User Guide
Page 4
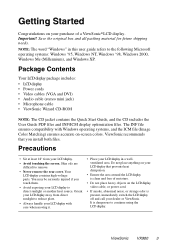
... care when moving it. • Place your LCD display. • Avoid touching the screen. Orient your LCD display away from your LCD display in this user guide refers to the following Microsoft operating systems: Windows '95, Windows NT, Windows '98, Windows 2000, Windows Me (Millennium), and Windows XP. ViewSonic VX900 3 Skin oils are difficult to remove. •...
... care when moving it. • Place your LCD display. • Avoid touching the screen. Orient your LCD display away from your LCD display in this user guide refers to the following Microsoft operating systems: Windows '95, Windows NT, Windows '98, Windows 2000, Windows Me (Millennium), and Windows XP. ViewSonic VX900 3 Skin oils are difficult to remove. •...
User Guide
Page 5
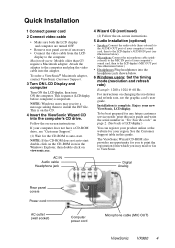
... the INF file. This is on changing the resolution and refresh rate, see the graphic card's user guide. See the Customer Support table in the Windows Explorer, then double-click on viewsonic.exe. 4 Wizard CD (continued) (2) Follow the on -screen instructions. For instructions on the ...cable (MIC OUT) ViewSonic VX900 4 This sequence (LCDdisplay before computer) is complete. Follow the on -screen instructions. 5 Audio Installation (optional) • Speakers Connect the audio cable (lime-colored) to the AUDIO OUT port of your computer's sound card, then to the LCD display's AUDIO IN...
... the INF file. This is on changing the resolution and refresh rate, see the graphic card's user guide. See the Customer Support table in the Windows Explorer, then double-click on viewsonic.exe. 4 Wizard CD (continued) (2) Follow the on -screen instructions. For instructions on the ...cable (MIC OUT) ViewSonic VX900 4 This sequence (LCDdisplay before computer) is complete. Follow the on -screen instructions. 5 Audio Installation (optional) • Speakers Connect the audio cable (lime-colored) to the AUDIO OUT port of your computer's sound card, then to the LCD display's AUDIO IN...
User Guide
Page 7
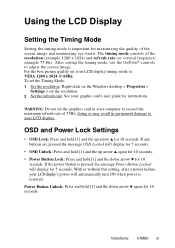
After setting the timing mode, use the OnView® controls to your graphic card's user guide for 5 seconds. With or without this setting, after a power failure, your LCD display's power will display for instructions. ViewSonic VX900 6 For the best picture quality set your computer to : VESA 1280 x 1024 @ 60Hz. WARNING: Do not set the resolution. 2 Set...
After setting the timing mode, use the OnView® controls to your graphic card's user guide for 5 seconds. With or without this setting, after a power failure, your LCD display's power will display for instructions. ViewSonic VX900 6 For the best picture quality set your computer to : VESA 1280 x 1024 @ 60Hz. WARNING: Do not set the resolution. 2 Set...
User Guide
Page 9
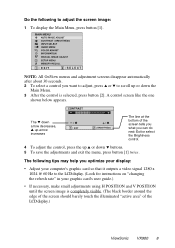
The ▼ down arrow decreases, ▲ up arrow increases The line at the bottom of the LCD display.) ViewSonic VX900 8 A control screen like the one shown below appears. The following to adjust the screen image: 1 To display the Main Menu, press button [1]....8226; Adjust your computer's graphic card so that it outputs a video signal 1280 x 1024 @ 60 Hz to the LCD display. (Look for instructions on "changing the refresh rate" in your graphic card's user guide.) • If necessary, make small adjustments using H POSITION and V POSITION until the screen image is selected, press ...
The ▼ down arrow decreases, ▲ up arrow increases The line at the bottom of the LCD display.) ViewSonic VX900 8 A control screen like the one shown below appears. The following to adjust the screen image: 1 To display the Main Menu, press button [1]....8226; Adjust your computer's graphic card so that it outputs a video signal 1280 x 1024 @ 60 Hz to the LCD display. (Look for instructions on "changing the refresh rate" in your graphic card's user guide.) • If necessary, make small adjustments using H POSITION and V POSITION until the screen image is selected, press ...
User Guide
Page 12
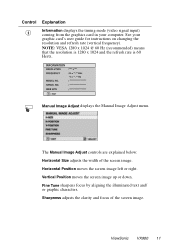
... menu. Horizontal Position moves the screen image left or right. ViewSonic VX900 11 Vertical Position moves the screen image up or down. Control Explanation Information displays the timing mode (video signal input) coming from the graphics card in your graphic card's user guide for instructions on changing the resolution and refresh rate (vertical frequency...
... menu. Horizontal Position moves the screen image left or right. ViewSonic VX900 11 Vertical Position moves the screen image up or down. Control Explanation Information displays the timing mode (video signal input) coming from the graphics card in your graphic card's user guide for instructions on changing the resolution and refresh rate (vertical frequency...
User Guide
Page 13
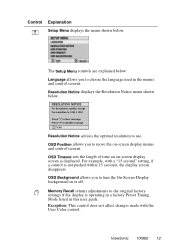
... is operating in a factory Preset Timing Mode listed in the menus and control screens. ViewSonic VX900 12 The Setup Menu controls are explained below: Language allows you to move the on or off. For example, with the User Color control. OSD Position allows you to the original factory settings if the display is... background on -screen display menus and control screens. OSD Background allows you to use. Memory Recall returns adjustments to choose the language used in this user guide. Resolution Notice displays the Resolution Notice menu shown below .
... is operating in a factory Preset Timing Mode listed in the menus and control screens. ViewSonic VX900 12 The Setup Menu controls are explained below: Language allows you to move the on or off. For example, with the User Color control. OSD Position allows you to the original factory settings if the display is... background on -screen display menus and control screens. OSD Background allows you to use. Memory Recall returns adjustments to choose the language used in this user guide. Resolution Notice displays the Resolution Notice menu shown below .
Quick Start Guide
Page 1
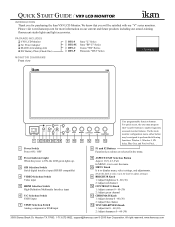
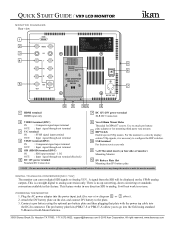
... 2: Adjust sharpness 0 - 60 (30) 3903 Stoney Brook Dr. Houston TX 77063. 1-713-272-8822. All right reserved. QUICK START GUIDE / VX9 LCD MONITOR INTRODUCTION Thank you will be assigned to perform the following functions: Window 1, Window 2, HV delay, Blue Gun, and Pixel to Pixel, . ... to select, turn the knob to enable frequently accessed monitor features. [email protected] © 2010 ikan Corporation. For quick access, the user may be satisfied with our "V" series monitors. PACKAGE INCLUDES VX9 LCD Monitor AC Power Adapter MA206 Articulating Arm...
... 2: Adjust sharpness 0 - 60 (30) 3903 Stoney Brook Dr. Houston TX 77063. 1-713-272-8822. All right reserved. QUICK START GUIDE / VX9 LCD MONITOR INTRODUCTION Thank you will be assigned to perform the following functions: Window 1, Window 2, HV delay, Blue Gun, and Pixel to Pixel, . ... to select, turn the knob to enable frequently accessed monitor features. [email protected] © 2010 ikan Corporation. For quick access, the user may be satisfied with our "V" series monitors. PACKAGE INCLUDES VX9 LCD Monitor AC Power Adapter MA206 Articulating Arm...
Quick Start Guide
Page 2
... battery plate and then plugging that plate with the power tap cable into the power input jack (See rear view diagram 6 or 7 above). 2. QUICK START GUIDE / VX9 LCD MONITOR MONITOR DIAGRAMS Rear view HDMI 1 2 VIDEO 3 Y/C Switch On 4 1 50p Y 720p 2 3 30p 25p 4 24p 1080p 5 24psf ON OFF Pb 1 2 3 4 5 Pr... correctly display certain 720p signals, it is no up converting, down converting or standards conversion available in reverse. The user must turn the monitor off before making changes to configure the DIP switches. 10 USB terminal For factory service use only 11 ¼-20...
... battery plate and then plugging that plate with the power tap cable into the power input jack (See rear view diagram 6 or 7 above). 2. QUICK START GUIDE / VX9 LCD MONITOR MONITOR DIAGRAMS Rear view HDMI 1 2 VIDEO 3 Y/C Switch On 4 1 50p Y 720p 2 3 30p 25p 4 24p 1080p 5 24psf ON OFF Pb 1 2 3 4 5 Pr... correctly display certain 720p signals, it is no up converting, down converting or standards conversion available in reverse. The user must turn the monitor off before making changes to configure the DIP switches. 10 USB terminal For factory service use only 11 ¼-20...
Quick Start Guide
Page 3
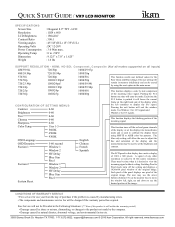
...the left , right, up and down to display the live signal. The blue only setting will exit the window mode. The user may use the arrow buttons (buttons 5-8) on the right hand side of the display or set the brightness and Fuction 1 Window...this native resolution. www.ikancorp.com CONDITIONS OF WARRANTY SERVICE • Free service for 4:3 signals. QUICK START GUIDE / VX9 LCD MONITOR S P E C I F I C AT I O N S Screen Size Resolution LCD Brightness Contrast Ratio Viewing angles Operating Volts Power Consumption Operating Temp. Free Service will enter the mode. support@ikancorp...
...the left , right, up and down to display the live signal. The blue only setting will exit the window mode. The user may use the arrow buttons (buttons 5-8) on the right hand side of the display or set the brightness and Fuction 1 Window...this native resolution. www.ikancorp.com CONDITIONS OF WARRANTY SERVICE • Free service for 4:3 signals. QUICK START GUIDE / VX9 LCD MONITOR S P E C I F I C AT I O N S Screen Size Resolution LCD Brightness Contrast Ratio Viewing angles Operating Volts Power Consumption Operating Temp. Free Service will enter the mode. support@ikancorp...


