

Brochure
Page 1
... style and high-performance power, choose the ViewSonic VX700. • Integrated Power Supply Eliminates those bulky external A/C adapters. ViewSonic® VX700 LCD Display ® • technology SuperClearMVA technology delivers high contrast, brilliant color, improved viewing angles and superior clarity for moving images. • technology This multi-mode input technology supports both digital (DVI) and analog (VGA) signals. • Full 17.0" viewable screen • 1280x1024 optimum resolution • 250 nits of the best display specifications in the industry...
... style and high-performance power, choose the ViewSonic VX700. • Integrated Power Supply Eliminates those bulky external A/C adapters. ViewSonic® VX700 LCD Display ® • technology SuperClearMVA technology delivers high contrast, brilliant color, improved viewing angles and superior clarity for moving images. • technology This multi-mode input technology supports both digital (DVI) and analog (VGA) signals. • Full 17.0" viewable screen • 1280x1024 optimum resolution • 250 nits of the best display specifications in the industry...

Brochure
Page 2
...), ViewSonic® VX700 LCD Display • OnView® controls including ViewMatch® feature Customize image adjustments and color temperature via an on -green COMPATIBILITY PC Mac®* IBM compatible from VGA up 1280x1024 non-interlaced Power Mac™ G3/G4 up to 1280x1024 CONNECTOR Analog 15-pin mini D-sub Digital Digital DVI-D Power 12V DC In, DC to monitor settings, maintaining an optimized image. • AutoTune® function Automatically monitors video input and optimizes display settings without requiring user adjustments. • VESA® wall-mount compliant...
...), ViewSonic® VX700 LCD Display • OnView® controls including ViewMatch® feature Customize image adjustments and color temperature via an on -green COMPATIBILITY PC Mac®* IBM compatible from VGA up 1280x1024 non-interlaced Power Mac™ G3/G4 up to 1280x1024 CONNECTOR Analog 15-pin mini D-sub Digital Digital DVI-D Power 12V DC In, DC to monitor settings, maintaining an optimized image. • AutoTune® function Automatically monitors video input and optimizes display settings without requiring user adjustments. • VESA® wall-mount compliant...
User Manual
Page 3
..., ViewSonic Corporation has determined that this product properly at end of our environment. For Your Records Product Name: Model Number: Document Number: Serial Number: Purchase Date: ViewSonic VX700 VLCDS26104-3W A-CD-VX700-3 Product disposal at the end of VESA. Microsoft, Windows, Windows NT, and the Windows logo are trademarks of its useful life. The ViewSonic® Wizard CDROM also provides an opportunity for you to change...
..., ViewSonic Corporation has determined that this product properly at end of our environment. For Your Records Product Name: Model Number: Document Number: Serial Number: Purchase Date: ViewSonic VX700 VLCDS26104-3W A-CD-VX700-3 Product disposal at the end of VESA. Microsoft, Windows, Windows NT, and the Windows logo are trademarks of its useful life. The ViewSonic® Wizard CDROM also provides an opportunity for you to change...

User Manual
Page 4
... future shipping needs. Package Contents Your LCD display package includes: • LCD display • Power cords • Video cables (VGA and DVI) • Audio cable (stereo mini jack) • Microphone cable • ViewSonic Wizard CD-ROM NOTE: The CD jacket contains the Quick Start Guide, and the CD includes the User Guide PDF files and INF/ICM display optimization files. Orient your LCD display away from your LCD display with Windows operating systems, and the ICM file (Image Color Matching...
... future shipping needs. Package Contents Your LCD display package includes: • LCD display • Power cords • Video cables (VGA and DVI) • Audio cable (stereo mini jack) • Microphone cable • ViewSonic Wizard CD-ROM NOTE: The CD jacket contains the Quick Start Guide, and the CD includes the User Guide PDF files and INF/ICM display optimization files. Orient your LCD display away from your LCD display with Windows operating systems, and the ICM file (Image Color Matching...
User Manual
Page 5
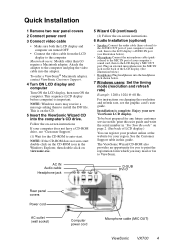
... any future customer service needs: print this guide. NOTE: Windows users may mail or fax to the computer Macintosh users: Models older than G3 require a Macintosh adapter. Quick Installation 1 Remove two rear panel covers 2 Connect power cord 3 Connect video cable • Make sure both the LCD display and computer are turned OFF • Connect the video cable from the LCD display to ViewSonic. Follow the on changing the resolution and refresh rate, see "Customer Support." (1) Wait for your computer's sound card, then to install the INF file...
... any future customer service needs: print this guide. NOTE: Windows users may mail or fax to the computer Macintosh users: Models older than G3 require a Macintosh adapter. Quick Installation 1 Remove two rear panel covers 2 Connect power cord 3 Connect video cable • Make sure both the LCD display and computer are turned OFF • Connect the video cable from the LCD display to ViewSonic. Follow the on changing the resolution and refresh rate, see "Customer Support." (1) Wait for your computer's sound card, then to install the INF file...
User Manual
Page 6
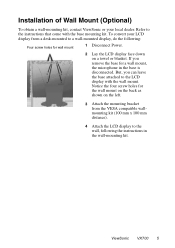
... left. 3 Attach the mounting bracket from a desk-mounted to a wall-mounted display, do the following the instructions in the base is disconnected. Refer to the instructions that come with the wall mount. Notice the four screw holes for the wall mount on the back as shown on a towel or blanket. Installation of Wall Mount (Optional) To obtain a wall-mounting kit, contact ViewSonic or your LCD display from the VESA compatible wallmounting kit (100...
... left. 3 Attach the mounting bracket from a desk-mounted to a wall-mounted display, do the following the instructions in the base is disconnected. Refer to the instructions that come with the wall mount. Notice the four screw holes for the wall mount on the back as shown on a towel or blanket. Installation of Wall Mount (Optional) To obtain a wall-mounting kit, contact ViewSonic or your LCD display from the VESA compatible wallmounting kit (100...
User Manual
Page 7
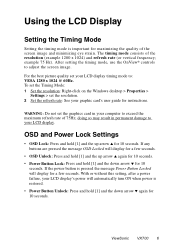
... Power Button Locked will display for a few seconds. With or without this setting, after a power failure, your graphic card's user guide for 10 seconds. ViewSonic VX700 6 After setting the timing mode, use the OnView® controls to : VESA 1280 x 1024 @ 60Hz. For the best picture quality set the graphics card in permanent damage to exceed the maximum refresh rate of 75Hz; The timing mode consists of the screen image and minimizing eye strain. OSD and Power Lock Settings • OSD Lock...
... Power Button Locked will display for a few seconds. With or without this setting, after a power failure, your graphic card's user guide for 10 seconds. ViewSonic VX700 6 After setting the timing mode, use the OnView® controls to : VESA 1280 x 1024 @ 60Hz. For the best picture quality set the graphics card in permanent damage to exceed the maximum refresh rate of 75Hz; The timing mode consists of the screen image and minimizing eye strain. OSD and Power Lock Settings • OSD Lock...
User Manual
Page 8
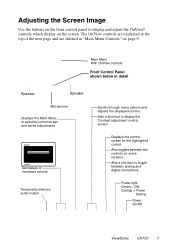
... "Main Menu Controls" on some screens. Power light Green = ON Orange = Power Saving Power On/Off ViewSonic VX700 7 Also a shortcut to display and adjust the OnView® controls which display on the screen. Also toggles between analog and digital connections. The OnView controls are explained at the top of the next page and are defined in detail Speaker Speaker Microphone Displays the Main Menu or exits the control screen and saves adjustments Decreases or increases volume Temporarily silences audio output...
... "Main Menu Controls" on some screens. Power light Green = ON Orange = Power Saving Power On/Off ViewSonic VX700 7 Also a shortcut to display and adjust the OnView® controls which display on the screen. Also toggles between analog and digital connections. The OnView controls are explained at the top of the next page and are defined in detail Speaker Speaker Microphone Displays the Main Menu or exits the control screen and saves adjustments Decreases or increases volume Temporarily silences audio output...
User Manual
Page 9
... the Main Menu. 3 After the control is completely visible. (The black border around the edge of the screen should barely touch the illuminated "active area" of the LCD display.) The following to the LCD display. (Look for instructions on "changing the refresh rate" in your computer's graphic card so that it outputs a video signal 1280 x 1024 @ 60 Hz to adjust the screen image: 1 To display the Main Menu, press button [1]. A control screen like the...
... the Main Menu. 3 After the control is completely visible. (The black border around the edge of the screen should barely touch the illuminated "active area" of the LCD display.) The following to the LCD display. (Look for instructions on "changing the refresh rate" in your computer's graphic card so that it outputs a video signal 1280 x 1024 @ 60 Hz to adjust the screen image: 1 To display the Main Menu, press button [1]. A control screen like the...
User Manual
Page 10
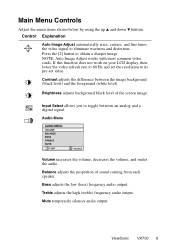
... audio output. ViewSonic VX700 9 Contrast adjusts the difference between an analog and a digital signal. Balance adjusts the proportion of the screen image. Audio Menu Volume increases the volume, decreases the volume, and mutes the audio. Mute temporarily silences audio output. Control Explanation Auto Image Adjust automatically sizes, centers, and fine tunes the video signal to obtain a sharper image. If this function does not work on your LCD display, then lower the video refresh rate to 60 Hz and set value. Brightness adjusts background black level of sound...
... audio output. ViewSonic VX700 9 Contrast adjusts the difference between an analog and a digital signal. Balance adjusts the proportion of the screen image. Audio Menu Volume increases the volume, decreases the volume, and mutes the audio. Mute temporarily silences audio output. Control Explanation Auto Image Adjust automatically sizes, centers, and fine tunes the video signal to obtain a sharper image. If this function does not work on your LCD display, then lower the video refresh rate to 60 Hz and set value. Brightness adjusts background black level of sound...
User Manual
Page 11
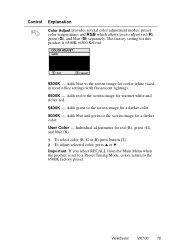
... button [2]. 2 To adjust selected color, press ▲ or ▼. Individual adjustments for warmer white and richer red. 5400K - The factory setting for a darker color. 5000K - Adds green to the screen image for this product is set to a Preset Timing Mode, colors return to adjust red (R), green (G), and blue (B) separately. Important: If you to the 6500K factory preset. ViewSonic VX700 10 Adds blue and green to the screen image for a darker color. User Color - Adds blue to the screen image for cooler white (used in...
... button [2]. 2 To adjust selected color, press ▲ or ▼. Individual adjustments for warmer white and richer red. 5400K - The factory setting for a darker color. 5000K - Adds green to the screen image for this product is set to a Preset Timing Mode, colors return to adjust red (R), green (G), and blue (B) separately. Important: If you to the 6500K factory preset. ViewSonic VX700 10 Adds blue and green to the screen image for a darker color. User Color - Adds blue to the screen image for cooler white (used in...
User Manual
Page 12
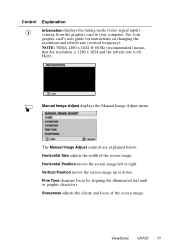
... graphic card's user guide for instructions on changing the resolution and refresh rate (vertical frequency). See your computer. The Manual Image Adjust controls are explained below: Horizontal Size adjusts the width of the screen image. Fine Tune sharpens focus by aligning the illuminated text and/ or graphic characters. NOTE: VESA 1280 x 1024 @ 60 Hz (recommended) means that the resolution is 1280 x 1024 and the refresh rate is 60 Hertz. Manual Image Adjust displays the Manual Image Adjust menu. ViewSonic VX700 11 Sharpness adjusts the...
... graphic card's user guide for instructions on changing the resolution and refresh rate (vertical frequency). See your computer. The Manual Image Adjust controls are explained below: Horizontal Size adjusts the width of the screen image. Fine Tune sharpens focus by aligning the illuminated text and/ or graphic characters. NOTE: VESA 1280 x 1024 @ 60 Hz (recommended) means that the resolution is 1280 x 1024 and the refresh rate is 60 Hertz. Manual Image Adjust displays the Manual Image Adjust menu. ViewSonic VX700 11 Sharpness adjusts the...

User Manual
Page 13
... control screens. OSD Background allows you to turn the On-Screen-Display background on -screen display screen is not pushed within 15 seconds, the display screen disappears. OSD Timeout sets the length of time an on or off. Resolution Notice displays the Resolution Notice menu shown below . Memory Recall returns adjustments to use. ViewSonic VX700 12 Exception: This control does not affect changes made with a "15 second" setting, if a control is displayed. For example, with the User Color control...
... control screens. OSD Background allows you to turn the On-Screen-Display background on -screen display screen is not pushed within 15 seconds, the display screen disappears. OSD Timeout sets the length of time an on or off. Resolution Notice displays the Resolution Notice menu shown below . Memory Recall returns adjustments to use. ViewSonic VX700 12 Exception: This control does not affect changes made with a "15 second" setting, if a control is displayed. For example, with the User Color control...
User Manual
Page 14
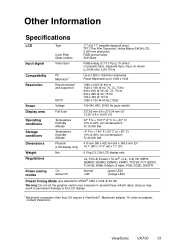
... Information Specifications LCD Type Color Filter Glass surface 17" (full 17" viewable diagonal area), TFT (Thin Film Transistor), Active Matrix SXGA LCD, 0.264 mm pixel pitch RGB vertical stripe Anti-Glare Input signal Video Sync RGB analog (0.7/1.0 Vp-p, 75 ohms) Composite Sync, Separate Sync, Sync on Green fh:30-82 kHz, fv:50-75 Hz Compatibility PC Macintosh1 Up to 1280 x 1024 Non-interlaced Power Macintosh up to 1280 x 1024 Resolution...
... Information Specifications LCD Type Color Filter Glass surface 17" (full 17" viewable diagonal area), TFT (Thin Film Transistor), Active Matrix SXGA LCD, 0.264 mm pixel pitch RGB vertical stripe Anti-Glare Input signal Video Sync RGB analog (0.7/1.0 Vp-p, 75 ohms) Composite Sync, Separate Sync, Sync on Green fh:30-82 kHz, fv:50-75 Hz Compatibility PC Macintosh1 Up to 1280 x 1024 Non-interlaced Power Macintosh up to 1280 x 1024 Resolution...

User Manual
Page 15
Troubleshooting No power • Make sure power button (or switch) is ON. • Make sure A/C p
Troubleshooting No power • Make sure power button (or switch) is ON. • Make sure A/C p

User Manual
Page 16
... 2 9929 8393 viewsonic.com Singapore/India and Southeast Asia viewsonic.com.sg T: 65 273 4018 F: 65 273 1566 service.sg@ viewsonic.com Other Asia/Pacific viewsonic.com.tw countries T: 886 2 2246 3456 service.ap@ F: 886 2 8242 3668 viewsonic.com South Africa viewsonic.com/asia T: 886 2 2246 3456 service.ap@ F: 886 2 8242 3668 viewsonic.com ViewSonic VX700 15 NOTE: You will need the product serial number.
... 2 9929 8393 viewsonic.com Singapore/India and Southeast Asia viewsonic.com.sg T: 65 273 4018 F: 65 273 1566 service.sg@ viewsonic.com Other Asia/Pacific viewsonic.com.tw countries T: 886 2 2246 3456 service.ap@ F: 886 2 8242 3668 viewsonic.com South Africa viewsonic.com/asia T: 886 2 2246 3456 service.ap@ F: 886 2 8242 3668 viewsonic.com ViewSonic VX700 15 NOTE: You will need the product serial number.
User Manual
Page 17
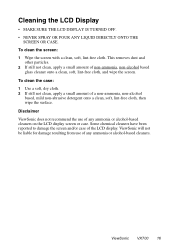
..., non-alcohol based, mild non-abrasive detergent onto a clean, soft, lint-free cloth, then wipe the surface. ViewSonic VX700 16 Cleaning the LCD Display • MAKE SURE THE LCD DISPLAY IS TURNED OFF. • NEVER SPRAY OR POUR ANY LIQUID DIRECTLY ONTO THE SCREEN OR CASE. This removes dust and other particles. 2 If still not clean, apply a small amount of the LCD display. To clean the case: 1 Use a soft...
..., non-alcohol based, mild non-abrasive detergent onto a clean, soft, lint-free cloth, then wipe the surface. ViewSonic VX700 16 Cleaning the LCD Display • MAKE SURE THE LCD DISPLAY IS TURNED OFF. • NEVER SPRAY OR POUR ANY LIQUID DIRECTLY ONTO THE SCREEN OR CASE. This removes dust and other particles. 2 If still not clean, apply a small amount of the LCD display. To clean the case: 1 Use a soft...

User Manual
Page 18
Limited Warranty VIEWSONIC LCD DISPLAY What the warranty covers: ViewSonic warrants its products to be free from defects in material or workmanship during the warranty period. If a product proves to be defective in material and workmanship during the warranty
Limited Warranty VIEWSONIC LCD DISPLAY What the warranty covers: ViewSonic warrants its products to be free from defects in material or workmanship during the warranty period. If a product proves to be defective in material and workmanship during the warranty
User Manual
Page 19
... must be connected to the terminal in the plug which are coloured in your country. ViewSonic VX700 18 The female receptacle of the cord set is certified for this unit has been enclosed and has been selected according to prevent electric shock. For units which is to be selected according to the current rating for power cords used to the...
... must be connected to the terminal in the plug which are coloured in your country. ViewSonic VX700 18 The female receptacle of the cord set is certified for this unit has been enclosed and has been selected according to prevent electric shock. For units which is to be selected according to the current rating for power cords used to the...
User Manual
Page 20
... compliance, the user must use grounded power supply cord and the provided shielded video interface cable with regard to radio or television reception, which the receiver is no guarantee that interference will not occur in a residential installation. Also, any unauthorized changes or modifications not expressly approved by 93/68/EEC Art.13 with bonded ferrite cores. ViewSonic VX700 19 These limits...
... compliance, the user must use grounded power supply cord and the provided shielded video interface cable with regard to radio or television reception, which the receiver is no guarantee that interference will not occur in a residential installation. Also, any unauthorized changes or modifications not expressly approved by 93/68/EEC Art.13 with bonded ferrite cores. ViewSonic VX700 19 These limits...


