
User Guide
Page 2
Contents Compliance Information 1 Important Safety Instructions 2 Declaration of RoHS Compliance 3 Copyright Information 4 Product Registration 4 Getting Started Package Contents 5 Precautions 5 Quick Installation 6 Wall Mounting (Optional 7 Using the LCD Display Setting the Timing Mode 8 OSD and Power Lock Settings 8 Adjusting the Screen Image 9 Main Menu Controls 11 Other Information Specifications 15 Troubleshooting 16 Customer Support 17 Cleaning the LCD Display 18 Limited Warranty 19 ViewSonic VX1932wm
Contents Compliance Information 1 Important Safety Instructions 2 Declaration of RoHS Compliance 3 Copyright Information 4 Product Registration 4 Getting Started Package Contents 5 Precautions 5 Quick Installation 6 Wall Mounting (Optional 7 Using the LCD Display Setting the Timing Mode 8 OSD and Power Lock Settings 8 Adjusting the Screen Image 9 Main Menu Controls 11 Other Information Specifications 15 Troubleshooting 16 Customer Support 17 Cleaning the LCD Display 18 Limited Warranty 19 ViewSonic VX1932wm
User Guide
Page 3
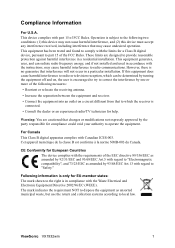
...can radiate radio frequency energy, and if not installed and used in a particular installation. These limits are cautioned that interference will not occur in accordance with the limits for help. CE Conformity...digital apparatus complies with part 15 of the FCC Rules. The mark indicates the requirement NOT to dispose the equipment as amended by the party responsible for compliance could void your authority to comply with the instructions... and receiver. • Connect the equipment into an outlet on , the user is in a residential installation. ViewSonic VX1932wm 1
...can radiate radio frequency energy, and if not installed and used in a particular installation. These limits are cautioned that interference will not occur in accordance with the limits for help. CE Conformity...digital apparatus complies with part 15 of the FCC Rules. The mark indicates the requirement NOT to dispose the equipment as amended by the party responsible for compliance could void your authority to comply with the instructions... and receiver. • Connect the equipment into an outlet on , the user is in a residential installation. ViewSonic VX1932wm 1
User Guide
Page 4
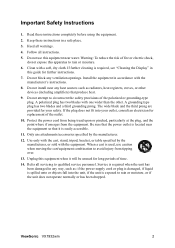
Keep these instructions completely before using the equipment. 2. Follow all warnings. 4. Do not block any heat sources such as : if the power-supply cord or plug is damaged, if liquid is spilled onto or objects fall into your safety. The wide blade and the third prong are provided for your outlet, consult an electrician for replacement of the outlet. 10. Service is...
Keep these instructions completely before using the equipment. 2. Follow all warnings. 4. Do not block any heat sources such as : if the power-supply cord or plug is damaged, if liquid is spilled onto or objects fall into your safety. The wide blade and the third prong are provided for your outlet, consult an electrician for replacement of the outlet. 10. Service is...
User Guide
Page 5
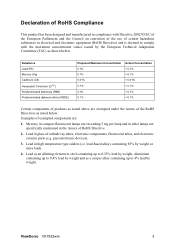
lead-based alloys containing 85% by the European Technical Adaptation Committee (TAC) as shown below: Substance Lead (Pb) Mercury (Hg) Cadmium (Cd) Hexavalent Chromium (Cr6+) Polybrominated biphenyls (PBB) Polybrominated diphenyl ...or more lead). 4. ViewSonic VX1932wm 3 Lead in the Annex of RoHS Directive. 2. piezoelectronic devices). 3. Mercury in compact fluorescent lamps not exceeding 5 mg per lamp and in other lamps not specifically mentioned in glass of cathode ray tubes, electronic components, fluorescent tubes, and electronic ceramic parts (e.g. Declaration of RoHS Compliance...
lead-based alloys containing 85% by the European Technical Adaptation Committee (TAC) as shown below: Substance Lead (Pb) Mercury (Hg) Cadmium (Cd) Hexavalent Chromium (Cr6+) Polybrominated biphenyls (PBB) Polybrominated diphenyl ...or more lead). 4. ViewSonic VX1932wm 3 Lead in the Annex of RoHS Directive. 2. piezoelectronic devices). 3. Mercury in compact fluorescent lamps not exceeding 5 mg per lamp and in other lamps not specifically mentioned in glass of cathode ray tubes, electronic components, fluorescent tubes, and electronic ceramic parts (e.g. Declaration of RoHS Compliance...
User Guide
Page 6
....tw ViewSonic VX1932wm 4 Macintosh and Power Macintosh are trademarks of ViewSonic Corporation. Microsoft, Windows, Windows NT, and the Windows logo are registered trademarks of VESA. ViewSonic, the three birds logo, OnView, ViewMatch, and ViewMeter are registered trademarks of product life The lamp in accordance with local, state or federal laws. For Your Records Product Name: Model Number: Document Number: Serial Number: Purchase Date: VX1932wm ViewSonic 19" LCD Display VS11444 VX1932wm...
....tw ViewSonic VX1932wm 4 Macintosh and Power Macintosh are trademarks of ViewSonic Corporation. Microsoft, Windows, Windows NT, and the Windows logo are registered trademarks of VESA. ViewSonic, the three birds logo, OnView, ViewMatch, and ViewMeter are registered trademarks of product life The lamp in accordance with local, state or federal laws. For Your Records Product Name: Model Number: Document Number: Serial Number: Purchase Date: VX1932wm ViewSonic 19" LCD Display VS11444 VX1932wm...
User Guide
Page 7
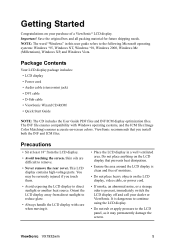
... -screen colors. Package Contents Your LCD display package includes: • LCD display • Power cord • Audio cable (stereo mini jack) • DVI cable • D-Sub cable • ViewSonic Wizard CD-ROM • Quick Start Guide NOTE: The CD includes the User Guide PDF files and INF/ICM display optimization files. Precautions • Sit at least 18" from direct sunlight to direct sunlight or another heat source. ViewSonic VX1932wm 5 Important! It is present, immediately switch the LCD display...
... -screen colors. Package Contents Your LCD display package includes: • LCD display • Power cord • Audio cable (stereo mini jack) • DVI cable • D-Sub cable • ViewSonic Wizard CD-ROM • Quick Start Guide NOTE: The CD includes the User Guide PDF files and INF/ICM display optimization files. Precautions • Sit at least 18" from direct sunlight to direct sunlight or another heat source. ViewSonic VX1932wm 5 Important! It is present, immediately switch the LCD display...
User Guide
Page 8
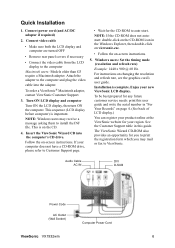
... resolution and refresh rate, see the graphics card's user guide. For instructions on -screen instructions. Insert the ViewSonic Wizard CD into the adapter. Enjoy your region. See the Customer Support table in the Windows Explorer, then double-click on viewsonic.exe. • Follow the on the CD. 4. Audio Cable AC IN DVI D-SUB Power Code AC Outlet (Wall Socket) Computer Power Cord ViewSonic VX1932wm 6 Connect video cable • Make sure both the LCD display and computer are turned OFF • Remove rear panel covers...
... resolution and refresh rate, see the graphics card's user guide. For instructions on -screen instructions. Insert the ViewSonic Wizard CD into the adapter. Enjoy your region. See the Customer Support table in the Windows Explorer, then double-click on viewsonic.exe. • Follow the on the CD. 4. Audio Cable AC IN DVI D-SUB Power Code AC Outlet (Wall Socket) Computer Power Cord ViewSonic VX1932wm 6 Connect video cable • Make sure both the LCD display and computer are turned OFF • Remove rear panel covers...
User Guide
Page 9
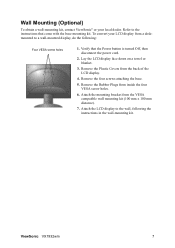
...). 7. ViewSonic VX1932wm 7 To convert your local dealer. Wall Mounting (Optional) To obtain a wall-mounting kit, contact ViewSonic® or your LCD display from a deskmounted to the wall, following : Four VESA screw holes 1. Verify that come with the base mounting kit. Attach the LCD display to a wall-mounted display, do the following the instructions in the wall-mounting kit. Remove the four screws attaching the base. 5. Refer to the instructions that the Power button is turned Off, then disconnect the power cord. 2. Remove...
...). 7. ViewSonic VX1932wm 7 To convert your local dealer. Wall Mounting (Optional) To obtain a wall-mounting kit, contact ViewSonic® or your LCD display from a deskmounted to the wall, following : Four VESA screw holes 1. Verify that come with the base mounting kit. Attach the LCD display to a wall-mounted display, do the following the instructions in the wall-mounting kit. Remove the four screws attaching the base. 5. Refer to the instructions that the Power button is turned Off, then disconnect the power cord. 2. Remove...

User Guide
Page 10
... 5 seconds. ViewSonic VX1932wm 8 After setting the timing mode, use the OSD (On-screen Display) controls to exceed the maximum refresh rate of the resolution (example 1440 x 900) and refresh rate (or vertical frequency; doing so may result in your computer to adjust the screen image. If the power button is pressed the message Power Button Locked will display for 10 seconds. If any buttons are pressed the message OSD Locked will automatically turn ON when power is restored. • Power Button Unlock: Press...
... 5 seconds. ViewSonic VX1932wm 8 After setting the timing mode, use the OSD (On-screen Display) controls to exceed the maximum refresh rate of the resolution (example 1440 x 900) and refresh rate (or vertical frequency; doing so may result in your computer to adjust the screen image. If the power button is pressed the message Power Button Locked will display for 10 seconds. If any buttons are pressed the message OSD Locked will automatically turn ON when power is restored. • Power Button Unlock: Press...
User Guide
Page 11
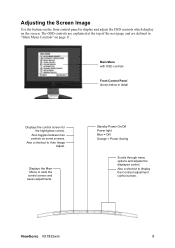
Adjusting the Screen Image Use the buttons on the front control panel to Auto Image Adjust. Standby Power On/Off Power light Blue = ON Orange = Power Saving Scrolls through menu options and adjusts the displayed control. Main Menu with OSD controls Front Control Panel shown below in "Main Menu Controls" on page 11. Displays the Main Menu or exits the control screen and saves adjustments. Also a shortcut to display and adjust the OSD controls which display on some screens. Also a shortcut to display the Contrast adjustment control screen. The OSD controls are explained at ...
Adjusting the Screen Image Use the buttons on the front control panel to Auto Image Adjust. Standby Power On/Off Power light Blue = ON Orange = Power Saving Scrolls through menu options and adjusts the displayed control. Main Menu with OSD controls Front Control Panel shown below in "Main Menu Controls" on page 11. Displays the Main Menu or exits the control screen and saves adjustments. Also a shortcut to display and adjust the OSD controls which display on some screens. Also a shortcut to display the Contrast adjustment control screen. The OSD controls are explained at ...

User Guide
Page 12
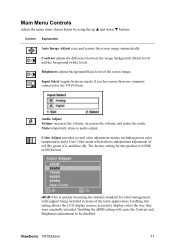
.... To display the Main Menu, press button [1]. A control screen like the one shown below appears. After the desired control is selected, press button [2]. Do the following tips may help you optimize your display: • Adjust the computer's graphics card so that it outputs a 1440 x 900 @ 60Hz video signal to the LCD display. (Look for instructions on "changing the refresh rate" in the graphics card's user guide.) • If necessary, make small adjustments using H. To adjust the setting, press...
.... To display the Main Menu, press button [1]. A control screen like the one shown below appears. After the desired control is selected, press button [2]. Do the following tips may help you optimize your display: • Adjust the computer's graphics card so that it outputs a 1440 x 900 @ 60Hz video signal to the LCD display. (Look for instructions on "changing the refresh rate" in the graphics card's user guide.) • If necessary, make small adjustments using H. To adjust the setting, press...
User Guide
Page 13
... of red (R), green (G), and blue (B). ViewSonic VX1932wm 11 Mute temporarily silences audio output. Enabling the sRGB setting will cause the Contrast and Brightness adjustments to the VX1932wm. Input Select toggles between the image background (black level) and the foreground (white level). Main Menu Controls Adjust the menu items shown below by using the up S and down T buttons. Color Adjust provides several color adjustment modes, including preset color temperatures and a User Color mode which allows independent adjustment of the screen image. The factory setting...
... of red (R), green (G), and blue (B). ViewSonic VX1932wm 11 Mute temporarily silences audio output. Enabling the sRGB setting will cause the Contrast and Brightness adjustments to the VX1932wm. Input Select toggles between the image background (black level) and the foreground (white level). Main Menu Controls Adjust the menu items shown below by using the up S and down T buttons. Color Adjust provides several color adjustment modes, including preset color temperatures and a User Color mode which allows independent adjustment of the screen image. The factory setting...
User Guide
Page 14
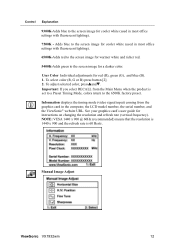
... mode (video signal input) coming from the Main Menu when the product is 60 Hertz. See your graphics card's user guide for red (R), green (G), and blue (B). 1. NOTE: VESA 1440 x 900 @ 60Hz (recommended) means that the resolution is 1440 x 900 and the refresh rate is set to a Preset Timing Mode, colors return to the 6500K factory preset. User Color Individual adjustments for instructions on changing the resolution and refresh rate (vertical frequency). Manual Image Adjust ViewSonic VX1932wm 12 Control Explanation 9300K-Adds blue to the screen image for cooler white (used...
... mode (video signal input) coming from the Main Menu when the product is 60 Hertz. See your graphics card's user guide for red (R), green (G), and blue (B). 1. NOTE: VESA 1440 x 900 @ 60Hz (recommended) means that the resolution is 1440 x 900 and the refresh rate is set to a Preset Timing Mode, colors return to the 6500K factory preset. User Color Individual adjustments for instructions on changing the resolution and refresh rate (vertical frequency). Manual Image Adjust ViewSonic VX1932wm 12 Control Explanation 9300K-Adds blue to the screen image for cooler white (used...
User Guide
Page 15
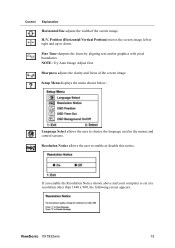
... the screen image. H./V. Sharpness adjusts the clarity and focus of the screen image. Position (Horizontal/Vertical Position) moves the screen image left or right and up or down. If you enable the Resolution Notice shown above and your computer is set at a resolution other than 1440 x 900, the following screen appears. NOTE: Try Auto Image Adjust first. Setup Menu displays the menu shown below: Language Select allows the user to enable or disable this notice. ViewSonic VX1932wm...
... the screen image. H./V. Sharpness adjusts the clarity and focus of the screen image. Position (Horizontal/Vertical Position) moves the screen image left or right and up or down. If you enable the Resolution Notice shown above and your computer is set at a resolution other than 1440 x 900, the following screen appears. NOTE: Try Auto Image Adjust first. Setup Menu displays the menu shown below: Language Select allows the user to enable or disable this notice. ViewSonic VX1932wm...
User Guide
Page 16
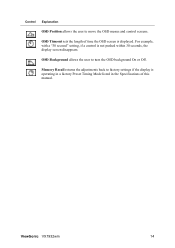
OSD Background allows the user to factory settings if the display is operating in a factory Preset Timing Mode listed in the Specifications of time the OSD screen is not pushed within 30 seconds, the display screen disappears. Memory Recall returns the adjustments back to turn the OSD background On or Off. ViewSonic VX1932wm 14 OSD Timeout sets the length of this manual. For example, with a "30 second" setting, if a control is displayed. Control Explanation OSD Position allows the user to move the OSD menus and control screens.
OSD Background allows the user to factory settings if the display is operating in a factory Preset Timing Mode listed in the Specifications of time the OSD screen is not pushed within 30 seconds, the display screen disappears. Memory Recall returns the adjustments back to turn the OSD background On or Off. ViewSonic VX1932wm 14 OSD Timeout sets the length of this manual. For example, with a "30 second" setting, if a control is displayed. Control Explanation OSD Position allows the user to move the OSD menus and control screens.
User Guide
Page 17
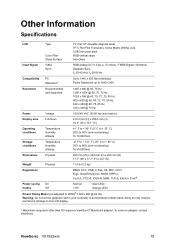
Other Information Specifications LCD Type Color Filter Glass Surface 19" (full 19" viewable diagonal area), TFT (Thin Film Transistor), Active Matrix WXGA LCD, 0.285 mm pixel pitch RGB vertical stripe Anti-Glare Input Signal Video Sync RGB analog (0.7/1.0 Vp-p, 75 ohms) / TMDS Digital (100ohms) Separate Sync, fh:30-82 kHz, fv:50-85 Hz Compatibility PC Macintosh1 Up to 1440 x 900 Non-interlaced Power Macintosh up to 1440 x 900 Resolution Recommended and...
Other Information Specifications LCD Type Color Filter Glass Surface 19" (full 19" viewable diagonal area), TFT (Thin Film Transistor), Active Matrix WXGA LCD, 0.285 mm pixel pitch RGB vertical stripe Anti-Glare Input Signal Video Sync RGB analog (0.7/1.0 Vp-p, 75 ohms) / TMDS Digital (100ohms) Separate Sync, fh:30-82 kHz, fv:50-85 Hz Compatibility PC Macintosh1 Up to 1440 x 900 Non-interlaced Power Macintosh up to 1440 x 900 Resolution Recommended and...
User Guide
Page 18
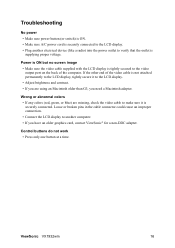
... any colors (red, green, or blue) are using an Macintosh older than G3, you need a Macintosh adapter. If the other end of the computer. Troubleshooting No power • Make sure power button (or switch) is ON. • Make sure A/C power cord is securely connected to the LCD display. • Plug another electrical device (like a radio) into the power outlet to another computer. • If you have an older graphics card, contact ViewSonic®...
... any colors (red, green, or blue) are using an Macintosh older than G3, you need a Macintosh adapter. If the other end of the computer. Troubleshooting No power • Make sure power button (or switch) is ON. • Make sure A/C power cord is securely connected to the LCD display. • Plug another electrical device (like a radio) into the power outlet to another computer. • If you have an older graphics card, contact ViewSonic®...
User Guide
Page 19
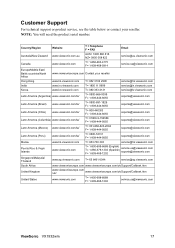
.../Region Website T = Telephone F = FAX Email Australia/New Zealand www.viewsonic.com.au AUS= 1800 880 818 NZ= 0800 008 822 service@au.viewsonic.com Canada www.viewsonic.com T= 1-866-463-4775 F= 1-909-468-5814 service.ca@viewsonic.com Europe/Middle East/ Baltic countries/North Africa www.viewsoniceurope.com Contact your reseller. NOTE: You will need the product serial number.
.../Region Website T = Telephone F = FAX Email Australia/New Zealand www.viewsonic.com.au AUS= 1800 880 818 NZ= 0800 008 822 service@au.viewsonic.com Canada www.viewsonic.com T= 1-866-463-4775 F= 1-909-468-5814 service.ca@viewsonic.com Europe/Middle East/ Baltic countries/North Africa www.viewsoniceurope.com Contact your reseller. NOTE: You will need the product serial number.
User Guide
Page 20
... LCD display screen or case. Use a soft, dry cloth. 2. This removes dust and other particles. 2. If the case still not clean, apply a small amount of non-ammonia, non-alcohol based glass cleaner onto a clean, soft, lint-free cloth, and wipe the screen. Disclaimer • ViewSonic® does not recommend the use of any ammonia or alcoholbased cleaners. Cleaning the LCD Display • MAKE SURE THE LCD DISPLAY IS TURNED...
... LCD display screen or case. Use a soft, dry cloth. 2. This removes dust and other particles. 2. If the case still not clean, apply a small amount of non-ammonia, non-alcohol based glass cleaner onto a clean, soft, lint-free cloth, and wipe the screen. Disclaimer • ViewSonic® does not recommend the use of any ammonia or alcoholbased cleaners. Cleaning the LCD Display • MAKE SURE THE LCD DISPLAY IS TURNED...
User Guide
Page 21
... components. The warranty period for this product in mainland China (Hong Kong, Macao and Taiwan Excluded) is valid only for a particular purpose. g. Removal, installation, and set-up service charges. Limited Warranty VIEWSONIC® LCD DISPLAY What the warranty covers: ViewSonic warrants its sole option, repair or replace the product with business relationships, or other party. Any damage of supplies or parts not meeting ViewSonic's specifications.
... components. The warranty period for this product in mainland China (Hong Kong, Macao and Taiwan Excluded) is valid only for a particular purpose. g. Removal, installation, and set-up service charges. Limited Warranty VIEWSONIC® LCD DISPLAY What the warranty covers: ViewSonic warrants its sole option, repair or replace the product with business relationships, or other party. Any damage of supplies or parts not meeting ViewSonic's specifications.


