

User Guide
Page 1
... found on installing and using the Regional selection box in a safe manner, as well as registering your product in the upper right corner of our website. VS18575 P/N: VG3456 Warranty information contained in this User Guide to obtain important information on our web site at http://www.viewsonic.com in English, or in specific languages using your product for future service. "Antes...
... found on installing and using the Regional selection box in a safe manner, as well as registering your product in the upper right corner of our website. VS18575 P/N: VG3456 Warranty information contained in this User Guide to obtain important information on our web site at http://www.viewsonic.com in English, or in specific languages using your product for future service. "Antes...

User Guide
Page 4
...connecting to a power outlet, Do not remove the grounding prong. Service will be required when the unit has been damaged in the building. A grounding-type plug has two blades and a third grounding prong. The system should provide a circuit breaker rated at 120/240V, 20A. • Only use attachments/accessories, such as toys and remote controls...8226; Please confirm the distribution system installed in any way, such as: ͫ if the power-supply cord or plug is damaged. ͫ if liquid is spilled onto or objects fall into your safety. The wide blade and the third prong are ...
...connecting to a power outlet, Do not remove the grounding prong. Service will be required when the unit has been damaged in the building. A grounding-type plug has two blades and a third grounding prong. The system should provide a circuit breaker rated at 120/240V, 20A. • Only use attachments/accessories, such as toys and remote controls...8226; Please confirm the distribution system installed in any way, such as: ͫ if the power-supply cord or plug is damaged. ͫ if liquid is spilled onto or objects fall into your safety. The wide blade and the third prong are ...
User Guide
Page 6
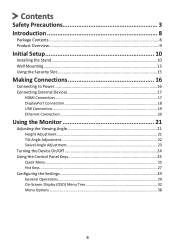
......9 Initial Setup 10 Installing the Stand 10 Wall Mounting...13 Using the Security Slot 15 Making Connections 16 Connecting to Power 16 Connecting External Devices 17 HDMI Connection 17 DisplayPort Connection 18 USB Connection...19 Ethernet Connection 20 Using the Monitor 21 Adjusting the Viewing Angle 21 Height Adjustment 21 Tilt Angle Adjustment 22 Swivel Angle Adjustment 23 Turning the Device On/Off 24 Using the Control Panel Keys 25 Quick Menu...25 Hot Keys...27 Configuring the Settings 29 General Operations 29 On-Screen Display (OSD) Menu Tree 32 Menu Options...
......9 Initial Setup 10 Installing the Stand 10 Wall Mounting...13 Using the Security Slot 15 Making Connections 16 Connecting to Power 16 Connecting External Devices 17 HDMI Connection 17 DisplayPort Connection 18 USB Connection...19 Ethernet Connection 20 Using the Monitor 21 Adjusting the Viewing Angle 21 Height Adjustment 21 Tilt Angle Adjustment 22 Swivel Angle Adjustment 23 Turning the Device On/Off 24 Using the Control Panel Keys 25 Quick Menu...25 Hot Keys...27 Configuring the Settings 29 General Operations 29 On-Screen Display (OSD) Menu Tree 32 Menu Options...

User Guide
Page 10
Use the captured screw in a user friendly box to the monitor stand's neck. 1 2 10 Remove the top tray. 2. NOTE: The monitor comes packaged in the monitor stand's base and secure it to make installation easy. Align and connect the three (3) points on a flat, stable surface and open the front flap of the box to reveal the contents. Place the box on the monitor stand's base with the monitor stand's neck. 3. Initial Setup This section provides detailed instructions for setting up your monitor. Installing the Stand 1. Remove the monitor stand's base and neck.
Use the captured screw in a user friendly box to the monitor stand's neck. 1 2 10 Remove the top tray. 2. NOTE: The monitor comes packaged in the monitor stand's base and secure it to make installation easy. Align and connect the three (3) points on a flat, stable surface and open the front flap of the box to reveal the contents. Place the box on the monitor stand's base with the monitor stand's neck. 3. Initial Setup This section provides detailed instructions for setting up your monitor. Installing the Stand 1. Remove the monitor stand's base and neck.

User Guide
Page 19
... the monitor. When making the connection(s), observe the following guidelines: • Two (2) USB Type-A ports: Connection for your Type-A peripheral device (s) (e.g., storage device). ͫ NOTE: To activate the USB Type-A port, ensure your computer is set to On in the OSD menu. 19 Type-C Type-C NOTE: To save power consumption, the USB Hub is also connected to the monitor's USB Type-B port. • One (1) USB Type-B port: Connect the USB Type-B male cable...
... the monitor. When making the connection(s), observe the following guidelines: • Two (2) USB Type-A ports: Connection for your Type-A peripheral device (s) (e.g., storage device). ͫ NOTE: To activate the USB Type-A port, ensure your computer is set to On in the OSD menu. 19 Type-C Type-C NOTE: To save power consumption, the USB Hub is also connected to the monitor's USB Type-B port. • One (1) USB Type-B port: Connect the USB Type-B male cable...

User Guide
Page 26
mode ast/Brightness Select Menu Contrast 70 Brightness 100 Input Select Select the input source. HDMI 1 HDMI 2 DisplayPort s Type C Main Menu Enter the On-Screen Display (OSD) Menu. VG3456 Input Select Audio Adjust ViewMode Color Adjust Manual Image Setup Menu Adjust HDMI 1 HDMI 2 DisplayPort Type C Exit Exit the Quick Menu. 3440 X 1440 @ 60Hz 26 Main Menu Exit Contrast/Brightness Adjust the contrast or brightness level.
mode ast/Brightness Select Menu Contrast 70 Brightness 100 Input Select Select the input source. HDMI 1 HDMI 2 DisplayPort s Type C Main Menu Enter the On-Screen Display (OSD) Menu. VG3456 Input Select Audio Adjust ViewMode Color Adjust Manual Image Setup Menu Adjust HDMI 1 HDMI 2 DisplayPort Type C Exit Exit the Quick Menu. 3440 X 1440 @ 60Hz 26 Main Menu Exit Contrast/Brightness Adjust the contrast or brightness level.

User Guide
Page 29
VG3456 Input Select Audio Adjust ViewMode Color Adjust Manual Image Setup Menu Adjust Volume 50 Mute 29 3440 X 1440 @ 60Hz Configuring the Settings General Operations 3440 X 1440 @ 60Hz 3440 X 1440 @ 60Hz Key Guide 1. Then press the 4 key to enter the selected menu. VG3456 Input Select Audio Adjust ViewMode Color Adjust Manual Image Setup Menu Adjust HDMI 1 HDMI 2 DisplayPort Type C 3440 X 1440 @ 60Hz 2. Then press the 3 key to display the OSD Menu. Press the 1 (ViewMode) or 2 key to activate the Quick Menu. Press the 2/3/4/5 key to select the main menu.
VG3456 Input Select Audio Adjust ViewMode Color Adjust Manual Image Setup Menu Adjust Volume 50 Mute 29 3440 X 1440 @ 60Hz Configuring the Settings General Operations 3440 X 1440 @ 60Hz 3440 X 1440 @ 60Hz Key Guide 1. Then press the 4 key to enter the selected menu. VG3456 Input Select Audio Adjust ViewMode Color Adjust Manual Image Setup Menu Adjust HDMI 1 HDMI 2 DisplayPort Type C 3440 X 1440 @ 60Hz 2. Then press the 3 key to display the OSD Menu. Press the 1 (ViewMode) or 2 key to activate the Quick Menu. Press the 2/3/4/5 key to select the main menu.

User Guide
Page 30
VG3456 Input Select Audio Adjust ViewMode Color Adjust Manual Image Setup Menu Adjust Volume On Mute Off 3440 X 1440 @ 60Hz 4. Then press the 3 key to adjust/select the setting. Press the 1 (ViewMode) or 2 key to confirm. 3. Then press the 3 key to select the desired menu option. VG3456 Input Select Audio Adjust ViewMode Color Adjust Manual Image Setup Menu Adjust Volume On Mute Off 3440 X 1440 @ 60Hz 30 Press the 1 (ViewMode) or 2 key to enter the sub-menu.
VG3456 Input Select Audio Adjust ViewMode Color Adjust Manual Image Setup Menu Adjust Volume On Mute Off 3440 X 1440 @ 60Hz 4. Then press the 3 key to adjust/select the setting. Press the 1 (ViewMode) or 2 key to confirm. 3. Then press the 3 key to select the desired menu option. VG3456 Input Select Audio Adjust ViewMode Color Adjust Manual Image Setup Menu Adjust Volume On Mute Off 3440 X 1440 @ 60Hz 30 Press the 1 (ViewMode) or 2 key to enter the sub-menu.
User Guide
Page 39
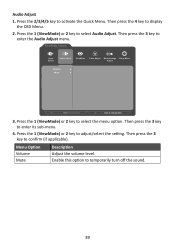
... enter the Audio Adjust menu. Menu Option Volume Mute Description Adjust the volume level. Then press the 3 key to temporarily turn off the sound. 39 VG3456 Input Select Audio Adjust ViewMode Color Adjust Manual Image Setup Menu Adjust Volume Mute 3440 X 1440 @ 60Hz 3. Then press the 3 key to display the OSD Menu. 2. Audio Adjust 1. Then press the 4 key to enter its sub-menu. 4. Press the 1 (ViewMode) or 2 key to activate the Quick Menu. Press the 2/3/4/5 key to select Audio Adjust. Press...
... enter the Audio Adjust menu. Menu Option Volume Mute Description Adjust the volume level. Then press the 3 key to temporarily turn off the sound. 39 VG3456 Input Select Audio Adjust ViewMode Color Adjust Manual Image Setup Menu Adjust Volume Mute 3440 X 1440 @ 60Hz 3. Then press the 3 key to display the OSD Menu. 2. Audio Adjust 1. Then press the 4 key to enter its sub-menu. 4. Press the 1 (ViewMode) or 2 key to activate the Quick Menu. Press the 2/3/4/5 key to select Audio Adjust. Press...

User Guide
Page 40
... ViewMode. VG3456 Input Select Audio Adjust ViewMode Color Adjust Manual Image Setup Menu Adjust Off Office Movie MAC Mono Game 3440 X 1440 @ 60Hz 3. To enter the respective sub-menu, press the 3 key. Select this option for watching movies. Then press the 3 key to select the setting. Select this option for monochrome. Press the 1 (ViewMode) or 2 key to confirm the selection. Follow the key guide that...
... ViewMode. VG3456 Input Select Audio Adjust ViewMode Color Adjust Manual Image Setup Menu Adjust Off Office Movie MAC Mono Game 3440 X 1440 @ 60Hz 3. To enter the respective sub-menu, press the 3 key. Select this option for watching movies. Then press the 3 key to select the setting. Select this option for monochrome. Press the 1 (ViewMode) or 2 key to confirm the selection. Follow the key guide that...
User Guide
Page 41
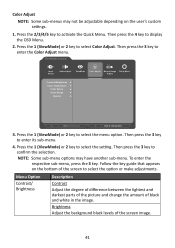
... to enter the Color Adjust menu. Follow the key guide that appears on the user's custom settings. 1. Brightness Adjust the background black levels of black and white in the image. Color Adjust NOTE: Some sub-menus may have another sub-menu. NOTE: Some sub-menu options may not be adjustable depending on the bottom of the screen to select the option or make adjustments. VG3456 Input Select Audio Adjust ViewMode Color Adjust Manual Image Setup Menu Adjust Contrast/Brightness Color Temperature Color Space Color Range Gamma 3440...
... to enter the Color Adjust menu. Follow the key guide that appears on the user's custom settings. 1. Brightness Adjust the background black levels of black and white in the image. Color Adjust NOTE: Some sub-menus may have another sub-menu. NOTE: Some sub-menu options may not be adjustable depending on the bottom of the screen to select the option or make adjustments. VG3456 Input Select Audio Adjust ViewMode Color Adjust Manual Image Setup Menu Adjust Contrast/Brightness Color Temperature Color Space Color Range Gamma 3440...
User Guide
Page 43
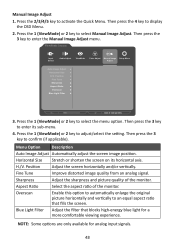
... screen image position. Horizontal Size Stretch or shorten the screen on its sub-menu. 4. Then press the 3 key to select Manual Image Adjust. Then press the 3 key to adjust/select the setting. Fine Tune Improve distorted image quality from an analog signal. NOTE: Some options are only available for a more comfortable viewing experience. Positian Fine Tune Sharpness Aspect Ratio Overscan Blue Light Filter 3440 X 1440 @ 60Hz 3. VG3456 Input Select Audio Adjust ViewMode Color Adjust Manual Image Setup Menu Adjust Auto Image Adjust Horizontal Size...
... screen image position. Horizontal Size Stretch or shorten the screen on its sub-menu. 4. Then press the 3 key to select Manual Image Adjust. Then press the 3 key to adjust/select the setting. Fine Tune Improve distorted image quality from an analog signal. NOTE: Some options are only available for a more comfortable viewing experience. Positian Fine Tune Sharpness Aspect Ratio Overscan Blue Light Filter 3440 X 1440 @ 60Hz 3. VG3456 Input Select Audio Adjust ViewMode Color Adjust Manual Image Setup Menu Adjust Auto Image Adjust Horizontal Size...

User Guide
Page 44
... select the setting. VG3456 Input Select Audio Adjust ViewMode Color Adjust Manual Image Setup Menu Adjust Language Select Resolution Notice Information OSD Timeout OSD Background Power Indicator Auto Power Off Sleep ECO Mode DisplayPort 1.2 DDC/CI 3440 X 1440 @ 60Hz 3. Setup Menu 1. Press the 1 (ViewMode) or 2 key to enter its sub-menu. 4. Then press the 4 key to select the option or make adjustments. 44 Follow the key guide that appears on the bottom of the screen to display the OSD Menu. 2. To...
... select the setting. VG3456 Input Select Audio Adjust ViewMode Color Adjust Manual Image Setup Menu Adjust Language Select Resolution Notice Information OSD Timeout OSD Background Power Indicator Auto Power Off Sleep ECO Mode DisplayPort 1.2 DDC/CI 3440 X 1440 @ 60Hz 3. Setup Menu 1. Press the 1 (ViewMode) or 2 key to enter its sub-menu. 4. Then press the 4 key to select the option or make adjustments. 44 Follow the key guide that appears on the bottom of the screen to display the OSD Menu. 2. To...

User Guide
Page 49
... the "Language Select" or "Power Lock setting". This function on the ability to the next input option. B Black Stabilization ViewSonic's Black stabilization provides heightened visibility and detail by default. Blue Light Filter Adjusts the filter that blocks high-energy blue light for an ideal viewing experience. All terms are listed in all LCD display models. A Advanced DCR Advanced DCR technology automatically detects the image signal and intelligently controls the backlight brightness and color, to...
... the "Language Select" or "Power Lock setting". This function on the ability to the next input option. B Black Stabilization ViewSonic's Black stabilization provides heightened visibility and detail by default. Blue Light Filter Adjusts the filter that blocks high-energy blue light for an ideal viewing experience. All terms are listed in all LCD display models. A Advanced DCR Advanced DCR technology automatically detects the image signal and intelligently controls the backlight brightness and color, to...

User Guide
Page 51
... available for the best blend of color and technology. Position Manually adjust the screen image horizontally and/or vertically. NOTE: VESA 1024 x 768 @ 60Hz (example) means that are six selections: 1.8, 2.0, 2.2, 2.4, 2.6 and 2.8. I Information Displays the timing mode (video signal input) coming from the two options. 51 G Game Mode Integrates a gaming-oriented On-Screen Display (OSD) design, including: precalibrated FPS, RTS, and MOBA gaming settings. Horizontal Size Manually stretch or shorten the screen image on changing the resolution and refresh rate (vertical frequency).
... available for the best blend of color and technology. Position Manually adjust the screen image horizontally and/or vertically. NOTE: VESA 1024 x 768 @ 60Hz (example) means that are six selections: 1.8, 2.0, 2.2, 2.4, 2.6 and 2.8. I Information Displays the timing mode (video signal input) coming from the two options. 51 G Game Mode Integrates a gaming-oriented On-Screen Display (OSD) design, including: precalibrated FPS, RTS, and MOBA gaming settings. Horizontal Size Manually stretch or shorten the screen image on changing the resolution and refresh rate (vertical frequency).

User Guide
Page 52
...; is the default as applicable. ENERGY STAR® is operating in a factory preset timing mode listed in the "Language Select" or "Power Lock" setting. • Memory Recall is a set a variety of this manual. You can manually set of Energy helping us all save money and protect the environment through energy efficient products and practices. O OSD Pivot Sets the monitor's On-Screen Display (OSD) Menu display direction. Department of power-saving guidelines issued by...
...; is the default as applicable. ENERGY STAR® is operating in a factory preset timing mode listed in the "Language Select" or "Power Lock" setting. • Memory Recall is a set a variety of this manual. You can manually set of Energy helping us all save money and protect the environment through energy efficient products and practices. O OSD Pivot Sets the monitor's On-Screen Display (OSD) Menu display direction. Department of power-saving guidelines issued by...

User Guide
Page 53
... of the human eye that the current viewing resolution is not the correct native resolution. S Saturation Adjusts the color depth of the monitor. Y YUV Color Space YUV color space is perfect for color image and video processing; Setup Menu Adjusts On-Screen Display (OSD) settings. Sharpness Adjusts the picture quality of each color (red, green, blue, cyan, magenta, and yellow). These presets are added together to reopen the menu. V ViewMode ViewSonic®'s unique ViewMode feature offers "Game...
... of the human eye that the current viewing resolution is not the correct native resolution. S Saturation Adjusts the color depth of the monitor. Y YUV Color Space YUV color space is perfect for color image and video processing; Setup Menu Adjusts On-Screen Display (OSD) settings. Sharpness Adjusts the picture quality of each color (red, green, blue, cyan, magenta, and yellow). These presets are added together to reopen the menu. V ViewMode ViewSonic®'s unique ViewMode feature offers "Game...

User Guide
Page 54
... is supplying power. Screen image is too light or dark Screen image cuts in the video cable connector. • Make sure the video cable connecting the monitor to make sure it is Off. 54 Screen image is blurred The screen isn't centered correctly The screen appears yellow • Adjust the resolution to the correct Aspect Ratio. • Reset the monitor to factory settings. • Adjust the horizontal and vertical controls via the OSD Menu. • Reset the monitor to factory settings. • Make sure the correct input source is...
... is supplying power. Screen image is too light or dark Screen image cuts in the video cable connector. • Make sure the video cable connecting the monitor to make sure it is Off. 54 Screen image is blurred The screen isn't centered correctly The screen appears yellow • Adjust the resolution to the correct Aspect Ratio. • Reset the monitor to factory settings. • Adjust the horizontal and vertical controls via the OSD Menu. • Reset the monitor to factory settings. • Make sure the correct input source is...

User Guide
Page 55
... or on the screen • Make sure the Power is On • Adjust brightness and contrast via the OSD Menu. • Check the connecting cable and make sure it back in the cable connector could cause an improper connection. 55 Control panel keys do not work • Restart the computer. Some menus aren't • Adjust the ViewMode or the input source. connect the device directly to factory settings. No audio output • If using ear-/headphones...
... or on the screen • Make sure the Power is On • Adjust brightness and contrast via the OSD Menu. • Check the connecting cable and make sure it back in the cable connector could cause an improper connection. 55 Control panel keys do not work • Restart the computer. Some menus aren't • Adjust the ViewMode or the input source. connect the device directly to factory settings. No audio output • If using ear-/headphones...
User Guide
Page 64
...; Hardware/Accessories/Parts/Components - • Software or data loss occurring during repair or replacement. • Any damage of the product due to shipment. • Causes external to the product, such as electric power fluctuations or failure. • Use of supplies or parts not meeting ViewSonic's specifications. • Failure of owner to perform periodic product maintenance as stated in the User Guide. • Any...
...; Hardware/Accessories/Parts/Components - • Software or data loss occurring during repair or replacement. • Any damage of the product due to shipment. • Causes external to the product, such as electric power fluctuations or failure. • Use of supplies or parts not meeting ViewSonic's specifications. • Failure of owner to perform periodic product maintenance as stated in the User Guide. • Any...


