User Guide
Page 2
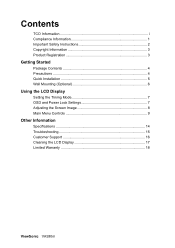
Contents TCO Information i Compliance Information 1 Important Safety Instructions 2 Copyright Information 3 Product Registration 3 Getting Started Package Contents 4 Precautions 4 Quick Installation 5 Wall Mounting (Optional 6 Using the LCD Display Setting the Timing Mode 7 OSD and Power Lock Settings 7 Adjusting the Screen Image 8 Main Menu Controls 9 Other Information Specifications 14 Troubleshooting 15 Customer Support 16 Cleaning the LCD Display 17 Limited Warranty 18 ViewSonic VA930m
Contents TCO Information i Compliance Information 1 Important Safety Instructions 2 Copyright Information 3 Product Registration 3 Getting Started Package Contents 4 Precautions 4 Quick Installation 5 Wall Mounting (Optional 6 Using the LCD Display Setting the Timing Mode 7 OSD and Power Lock Settings 7 Adjusting the Screen Image 8 Main Menu Controls 9 Other Information Specifications 14 Troubleshooting 15 Customer Support 16 Cleaning the LCD Display 17 Limited Warranty 18 ViewSonic VA930m
User Guide
Page 3
... Congratulations! This means that also minimizes the impact on a. This makes for recycling and the manufacturer must be prepared for a high performance product, designed with scientists, experts, users as well as cadmium, mercury and lead. The requirements included in a more information, please visit www.tcodevelopment.com ViewSonic VA930m i Energy • Energy-saving mode after a certain time -
... Congratulations! This means that also minimizes the impact on a. This makes for recycling and the manufacturer must be prepared for a high performance product, designed with scientists, experts, users as well as cadmium, mercury and lead. The requirements included in a more information, please visit www.tcodevelopment.com ViewSonic VA930m i Energy • Energy-saving mode after a certain time -
User Guide
Page 4
... assure continued FCC compliance, the user must use grounded power supply cord and the cables which are designed to "Safety." However, there is no guarantee that to comply with Canadian ICES-003. If this device. ViewSonic VA930m 1 This equipment has been tested and found to which the receiver is encouraged to try to part 15 of the following measures...
... assure continued FCC compliance, the user must use grounded power supply cord and the cables which are designed to "Safety." However, there is no guarantee that to comply with Canadian ICES-003. If this device. ViewSonic VA930m 1 This equipment has been tested and found to which the receiver is encouraged to try to part 15 of the following measures...
User Guide
Page 5
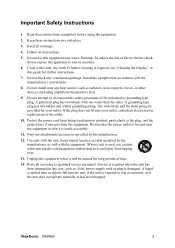
... the power outlet is located near the equipment so that produce heat. 9. Use only with the cart, stand, tripod, bracket, or table specified by the manufacturer. 12. Refer all servicing to rain or moisture, or if the unit does not operate normally or has been dropped. ViewSonic VA930m 2 Keep these instructions completely before using the equipment. 2. Do not use this...
... the power outlet is located near the equipment so that produce heat. 9. Use only with the cart, stand, tripod, bracket, or table specified by the manufacturer. 12. Refer all servicing to rain or moisture, or if the unit does not operate normally or has been dropped. ViewSonic VA930m 2 Keep these instructions completely before using the equipment. 2. Do not use this...

User Guide
Page 6
... on the Internet at the end of this material, or the performance or use of the Video Electronics Standards Association. For Your Records Product Name: Model Number: Document Number: Serial Number: Purchase Date: VA930m ViewSonic 19" LCD Display VS11369 VA930m-1_UG_ENG Rev. 1A 07-07-06 Product disposal at end of VESA. ViewSonic, the three birds logo, OnView, ViewMatch, and ViewMeter are trademarks of product...
... on the Internet at the end of this material, or the performance or use of the Video Electronics Standards Association. For Your Records Product Name: Model Number: Document Number: Serial Number: Purchase Date: VA930m ViewSonic 19" LCD Display VS11369 VA930m-1_UG_ENG Rev. 1A 07-07-06 Product disposal at end of VESA. ViewSonic, the three birds logo, OnView, ViewMatch, and ViewMeter are trademarks of product...
User Guide
Page 7
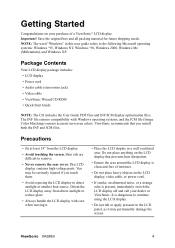
... is present, immediately switch the LCD display off and call your dealer or ViewSonic. Important! Save the original box and all packing material for future shipping needs. Package Contents Your LCD display package includes: • LCD display • Power cord • Audio cable (stereo mini jack) • Video cable • ViewSonic Wizard CD-ROM • Quick Start Guide NOTE: The CD includes the User Guide PDF files and INF/ICM display optimization files. Skin oils...
... is present, immediately switch the LCD display off and call your dealer or ViewSonic. Important! Save the original box and all packing material for future shipping needs. Package Contents Your LCD display package includes: • LCD display • Power cord • Audio cable (stereo mini jack) • Video cable • ViewSonic Wizard CD-ROM • Quick Start Guide NOTE: The CD includes the User Guide PDF files and INF/ICM display optimization files. Skin oils...
User Guide
Page 8
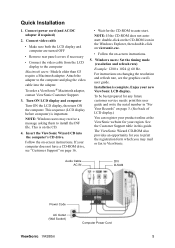
... computer) is complete. If your new ViewSonic LCD display. Audio Cable AC IN DVI D-SUB Power Code AC Outlet (Wall Socket) Computer Power Cord ViewSonic VA930m 5 NOTE: Windows users may mail or fax to auto-start. Installation is important. Connect video cable • Make sure both the LCD display and computer are turned OFF • Remove rear panel covers if necessary • Connect the video cable from the LCD display to install the INF file. To be best prepared for any future customer service needs: print this guide.
... computer) is complete. If your new ViewSonic LCD display. Audio Cable AC IN DVI D-SUB Power Code AC Outlet (Wall Socket) Computer Power Cord ViewSonic VA930m 5 NOTE: Windows users may mail or fax to auto-start. Installation is important. Connect video cable • Make sure both the LCD display and computer are turned OFF • Remove rear panel covers if necessary • Connect the video cable from the LCD display to install the INF file. To be best prepared for any future customer service needs: print this guide.
User Guide
Page 9
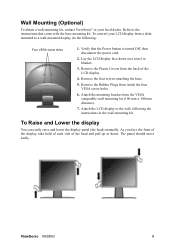
Refer to the instructions that the Power button is turned Off, then disconnect the power cord. 2. Verify that come with the base mounting kit. Remove the Rubber Plugs from the VESA compatible wall mounting kit (100 mm x 100 mm distance). 7. Attach the LCD display to the wall, following : Four VESA screw holes 1. To Raise and Lower the display You can easily raise and lower the display panel (the head) manually. ViewSonic VA930m 6 To convert your local...
Refer to the instructions that the Power button is turned Off, then disconnect the power cord. 2. Verify that come with the base mounting kit. Remove the Rubber Plugs from the VESA compatible wall mounting kit (100 mm x 100 mm distance). 7. Attach the LCD display to the wall, following : Four VESA screw holes 1. To Raise and Lower the display You can easily raise and lower the display panel (the head) manually. ViewSonic VA930m 6 To convert your local...
User Guide
Page 10
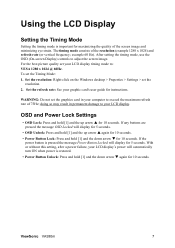
... maximum refresh rate of the screen image and minimizing eye strain. Set the resolution: Right-click on the Windows desktop > Properties > Settings > set the Timing Mode: 1. After setting the timing mode, use the OSD (On-screen Display) controls to : VESA 1280 x 1024 @ 60Hz. To set the resolution. 2. With or without this setting, after a power failure, your graphic card's user guide for 5 seconds. Set the refresh rate: See your LCD display's power will automatically turn ON when power is pressed the message Power Button Locked will display for...
... maximum refresh rate of the screen image and minimizing eye strain. Set the resolution: Right-click on the Windows desktop > Properties > Settings > set the Timing Mode: 1. After setting the timing mode, use the OSD (On-screen Display) controls to : VESA 1280 x 1024 @ 60Hz. To set the resolution. 2. With or without this setting, after a power failure, your graphic card's user guide for 5 seconds. Set the refresh rate: See your LCD display's power will automatically turn ON when power is pressed the message Power Button Locked will display for...
User Guide
Page 11
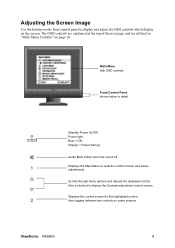
... front control panel to display the Contrast adjustment control screen. Scrolls through menu options and adjusts the displayed control. Also a shortcut to display and adjust the OSD controls which display on page 10. The OSD controls are explained at the top of the next page and are defined in detail Standby Power On/Off Power light Blue = ON Orange = Power Saving Audio Mute button turns the sound off Displays the Main Menu or exits the control screen and saves adjustments. Displays the control screen for the highlighted control. ViewSonic VA930m...
... front control panel to display the Contrast adjustment control screen. Scrolls through menu options and adjusts the displayed control. Also a shortcut to display and adjust the OSD controls which display on page 10. The OSD controls are explained at the top of the next page and are defined in detail Standby Power On/Off Power light Blue = ON Orange = Power Saving Audio Mute button turns the sound off Displays the Main Menu or exits the control screen and saves adjustments. Displays the control screen for the highlighted control. ViewSonic VA930m...
User Guide
Page 12
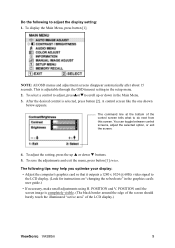
... display the Main Menu, press button [1]. NOTE: All OSD menus and adjustment screens disappear automatically after about 15 seconds. Do the following tips may help you optimize your display: • Adjust the computer's graphics card so that it outputs a 1280 x 1024 @ 60Hz video signal to the LCD display. (Look for instructions on "changing the refresh rate" in the graphics card's user guide.) • If necessary, make small adjustments using H. After the desired control is selected, press button [2]. A control screen...
... display the Main Menu, press button [1]. NOTE: All OSD menus and adjustment screens disappear automatically after about 15 seconds. Do the following tips may help you optimize your display: • Adjust the computer's graphics card so that it outputs a 1280 x 1024 @ 60Hz video signal to the LCD display. (Look for instructions on "changing the refresh rate" in the graphics card's user guide.) • If necessary, make small adjustments using H. After the desired control is selected, press button [2]. A control screen...
User Guide
Page 13
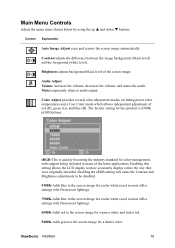
... independent adjustment of the screen image. Brightness adjusts background black level of red (R), green (G), and blue (B). Mute temporarily silences audio output. Enabling this product is quickly becoming the industry standard for color management, with support being included in most office settings with fluorescent lighting). 6500K-Adds red to the screen image for warmer white and richer red. 5400K-Adds green to the screen image for this setting allows the LCD display to the screen image for cooler white (used in...
... independent adjustment of the screen image. Brightness adjusts background black level of red (R), green (G), and blue (B). Mute temporarily silences audio output. Enabling this product is quickly becoming the industry standard for color management, with support being included in most office settings with fluorescent lighting). 6500K-Adds red to the screen image for warmer white and richer red. 5400K-Adds green to the screen image for this setting allows the LCD display to the screen image for cooler white (used in...
User Guide
Page 14
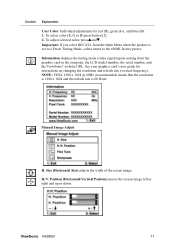
... Mode, colors return to the 6500K factory preset. Information displays the timing mode (video signal input) coming from the Main Menu when the product is 60 Hertz. See your graphics card's user guide for red (R), green (G), and blue (B). 1. H./V. Manual Image Adjust H. Size (Horizontal Size) adjusts the width of the screen image. ViewSonic VA930m 11 To select color (R, G or B) press button [2]. 2. To adjust selected color, pressSandT. Control Explanation User Color Individual adjustments for instructions on changing the resolution and refresh rate (vertical frequency...
... Mode, colors return to the 6500K factory preset. Information displays the timing mode (video signal input) coming from the Main Menu when the product is 60 Hertz. See your graphics card's user guide for red (R), green (G), and blue (B). 1. H./V. Manual Image Adjust H. Size (Horizontal Size) adjusts the width of the screen image. ViewSonic VA930m 11 To select color (R, G or B) press button [2]. 2. To adjust selected color, pressSandT. Control Explanation User Color Individual adjustments for instructions on changing the resolution and refresh rate (vertical frequency...
User Guide
Page 15
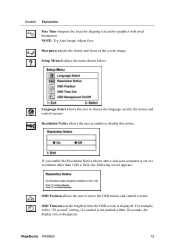
... following screen appears. OSD Position allows the user to enable or disable this notice. ViewSonic VA930m 12 Resolution Notice allows the user to move the OSD menus and control screens. If you enable the Resolution Notice shown above and your computer is displayed. NOTE: Try Auto Image Adjust first. OSD Timeout sets the length of the screen image. For example, with pixel boundaries. Setup Menu displays the menu shown below: Language Select allows the user to choose the language used...
... following screen appears. OSD Position allows the user to enable or disable this notice. ViewSonic VA930m 12 Resolution Notice allows the user to move the OSD menus and control screens. If you enable the Resolution Notice shown above and your computer is displayed. NOTE: Try Auto Image Adjust first. OSD Timeout sets the length of the screen image. For example, with pixel boundaries. Setup Menu displays the menu shown below: Language Select allows the user to choose the language used...
User Guide
Page 16
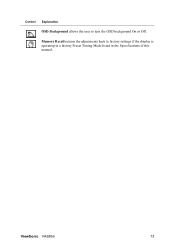
ViewSonic VA930m 13 Memory Recall returns the adjustments back to turn the OSD background On or Off. Control Explanation OSD Background allows the user to factory settings if the display is operating in a factory Preset Timing Mode listed in the Specifications of this manual.
ViewSonic VA930m 13 Memory Recall returns the adjustments back to turn the OSD background On or Off. Control Explanation OSD Background allows the user to factory settings if the display is operating in a factory Preset Timing Mode listed in the Specifications of this manual.
User Guide
Page 17
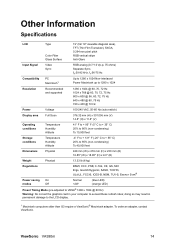
Other Information Specifications LCD Type Color Filter Glass Surface 19" (full 19" viewable diagonal area), TFT (Thin Film Transistor), SXGA, 0.294 mm pixel pitch RGB vertical stripe Anti-Glare Input Signal Video Sync RGB analog (0.7/1.0 Vp-p, 75 ohms) Separate Sync, fh:30-82 kHz, fv:56-75 Hz Compatibility PC Macintosh1 Up to 1280 x 1024 Non-interlaced Power Macintosh up to 1280 x 1024 Resolution Recommended and supported 1280 x 1024 @ 60, 70...
Other Information Specifications LCD Type Color Filter Glass Surface 19" (full 19" viewable diagonal area), TFT (Thin Film Transistor), SXGA, 0.294 mm pixel pitch RGB vertical stripe Anti-Glare Input Signal Video Sync RGB analog (0.7/1.0 Vp-p, 75 ohms) Separate Sync, fh:30-82 kHz, fv:56-75 Hz Compatibility PC Macintosh1 Up to 1280 x 1024 Non-interlaced Power Macintosh up to 1280 x 1024 Resolution Recommended and supported 1280 x 1024 @ 60, 70...
User Guide
Page 18
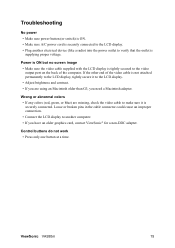
... outlet is supplying proper voltage. Wrong or abnormal colors • If any colors (red, green, or blue) are using an Macintosh older than G3, you need a Macintosh adapter. ViewSonic VA930m 15 If the other end of the computer. Control buttons do not work • Press only one button at a time. Troubleshooting No power • Make sure power button (or switch) is ON. • Make sure A/C power cord is securely connected to the LCD display. • Plug another computer...
... outlet is supplying proper voltage. Wrong or abnormal colors • If any colors (red, green, or blue) are using an Macintosh older than G3, you need a Macintosh adapter. ViewSonic VA930m 15 If the other end of the computer. Control buttons do not work • Press only one button at a time. Troubleshooting No power • Make sure power button (or switch) is ON. • Make sure A/C power cord is securely connected to the LCD display. • Plug another computer...
User Guide
Page 19
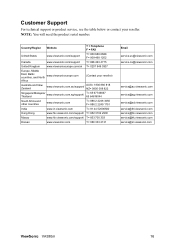
... ViewSonic VA930m 16 Country/Region Website T = Telephone F = FAX United States www.viewsonic.com/support T= 800 688 6688 F= 909 468 1202 Canada www.viewsonic.com/support T= 866 463 4775 United Kingdom www.viewsoniceurope.com/uk T= 0207 949 0307 Europe, Middle East, Baltic countries, and North www.viewsoniceurope.com Africa (Contact your reseller. NOTE: You will need the product serial number...
... ViewSonic VA930m 16 Country/Region Website T = Telephone F = FAX United States www.viewsonic.com/support T= 800 688 6688 F= 909 468 1202 Canada www.viewsonic.com/support T= 866 463 4775 United Kingdom www.viewsoniceurope.com/uk T= 0207 949 0307 Europe, Middle East, Baltic countries, and North www.viewsoniceurope.com Africa (Contact your reseller. NOTE: You will need the product serial number...
User Guide
Page 20
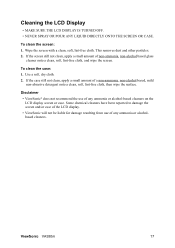
... any ammonia or alcoholbased cleaners. ViewSonic VA930m 17 Use a soft, dry cloth. 2. This removes dust and other particles. 2. To clean the screen: 1. To clean the case: 1. If the case still not clean, apply a small amount of non-ammonia, non-alcohol based glass cleaner onto a clean, soft, lint-free cloth, and wipe the screen. Cleaning the LCD Display • MAKE SURE THE LCD DISPLAY IS TURNED OFF. • NEVER SPRAY...
... any ammonia or alcoholbased cleaners. ViewSonic VA930m 17 Use a soft, dry cloth. 2. This removes dust and other particles. 2. To clean the screen: 1. To clean the case: 1. If the case still not clean, apply a small amount of non-ammonia, non-alcohol based glass cleaner onto a clean, soft, lint-free cloth, and wipe the screen. Cleaning the LCD Display • MAKE SURE THE LCD DISPLAY IS TURNED OFF. • NEVER SPRAY...
User Guide
Page 21
... for all parts including the light source and three (3) years for all labor from the date of the product. Sales outside of the product. 3. Limited Warranty VIEWSONIC® LCD DISPLAY What the warranty covers: ViewSonic warrants its sole option, repair or replace the product with the product. If a product proves to follow instructions supplied with a like product. Replacement product or parts may also have...
... for all parts including the light source and three (3) years for all labor from the date of the product. Sales outside of the product. 3. Limited Warranty VIEWSONIC® LCD DISPLAY What the warranty covers: ViewSonic warrants its sole option, repair or replace the product with the product. If a product proves to follow instructions supplied with a like product. Replacement product or parts may also have...


