User Guide
Page 7
... screen . . .21 Phenomena that may be easy Using the menu function 22 to Advanced Menu... Fastening the lens cover 3 PICTURE menu 26 Part names 4 BRIGHTNESS, CONTRAST, GAMMA, COLOR TEMP, Projector 4 COLOR, TINT, SHARPNESS, MY MEMORY Control panel 5 Rear panel 5 Remote control 6 IMAGE menu 29 ASPECT, OVER SCAN, V POSITION, H POSITION, H PHASE, H SIZE, AUTO ADJUST EXECUTE Setting up 7 Arrangement 7 Connecting your devices 10 Connecting power supply 12 Using the security bar and slot . . . .12 INPUT menu PROGRESSIVE, VIDEO NR, COLOR SPACE, COMPONENT, VIDEO FORMAT, FRAME LOCK...
... screen . . .21 Phenomena that may be easy Using the menu function 22 to Advanced Menu... Fastening the lens cover 3 PICTURE menu 26 Part names 4 BRIGHTNESS, CONTRAST, GAMMA, COLOR TEMP, Projector 4 COLOR, TINT, SHARPNESS, MY MEMORY Control panel 5 Rear panel 5 Remote control 6 IMAGE menu 29 ASPECT, OVER SCAN, V POSITION, H POSITION, H PHASE, H SIZE, AUTO ADJUST EXECUTE Setting up 7 Arrangement 7 Connecting your devices 10 Connecting power supply 12 Using the security bar and slot . . . .12 INPUT menu PROGRESSIVE, VIDEO NR, COLOR SPACE, COMPONENT, VIDEO FORMAT, FRAME LOCK...
User Guide
Page 16
... screws on Windows. Before connecting to input this projector. - Some PCs have multiple screen display modes that is VESA DDC (display data channel) compatible. • Take advantage of the cable's connector fits the port to connect with resolution up Connecting your pc as this projector is a Plug-and-Play monitor. An input signal of the corresponding laptop PC. • When the picture resolution is changed on a pc depending on an input, automatic adjustment...
... screws on Windows. Before connecting to input this projector. - Some PCs have multiple screen display modes that is VESA DDC (display data channel) compatible. • Take advantage of the cable's connector fits the port to connect with resolution up Connecting your pc as this projector is a Plug-and-Play monitor. An input signal of the corresponding laptop PC. • When the picture resolution is changed on a pc depending on an input, automatic adjustment...

User Guide
Page 17
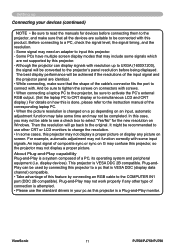
... inlet Power cord WARNING ►Please use the security bar and slot to be used as incorrect or faulty connections may become too hot. It is intended to prevent the projector from falling down, since it is not designed for use the power cord that the power switch of the security tool. ViewSonic 12 PJ758/PJ759/PJ760 WARNING ►Do not use extra caution when connecting the power cord...
... inlet Power cord WARNING ►Please use the security bar and slot to be used as incorrect or faulty connections may become too hot. It is intended to prevent the projector from falling down, since it is not designed for use the power cord that the power switch of the security tool. ViewSonic 12 PJ758/PJ759/PJ760 WARNING ►Do not use extra caution when connecting the power cord...
User Guide
Page 18
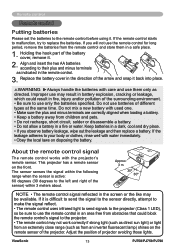
... time. Adjust the position of the battery cover, remove it . WARNING ►Always handle the batteries with the projector's remote sensor. Do not use them in battery explosion, cracking or leakage, which could block the remote control's signal to the projector (Class 1 LED), so be available. Remote control Remote control Putting batteries Please set the batteries to replace the batteries. If the remote control starts to malfunction, try to the remote control before using it . 2. Keep...
... time. Adjust the position of the battery cover, remove it . WARNING ►Always handle the batteries with the projector's remote sensor. Do not use them in battery explosion, cracking or leakage, which could block the remote control's signal to the projector (Class 1 LED), so be available. Remote control Remote control Putting batteries Please set the batteries to replace the batteries. If the remote control starts to malfunction, try to the remote control before using it . 2. Keep...
User Guide
Page 19
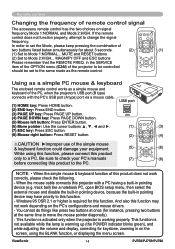
... mouse drivers. - When the mouse cable connects this function. Windows 95 OSR 2.1 or higher is warming up (the POWER indicator blinks green), and while adjusting the volume and display, correcting for keystone, zooming in pointing device (e.g. This function is not available while the lamp is required for this projector with the PC's USB port (A type) port via a mouse cable. In order to set to the same mode as the remote control. (2) VIDEO COMPUTER...
... mouse drivers. - When the mouse cable connects this function. Windows 95 OSR 2.1 or higher is warming up (the POWER indicator blinks green), and while adjusting the volume and display, correcting for keystone, zooming in pointing device (e.g. This function is not available while the lamp is required for this projector with the PC's USB port (A type) port via a mouse cable. In order to set to the same mode as the remote control. (2) VIDEO COMPUTER...

User Guide
Page 20
... MENU ESC ENTER RESET To display the picture, select an input signal according to the projector and the outlet. 2. The message "Power off the power 1. Do not turn on. Remove the lens cover, and set the power switch to OFF position (marked "O"). will stop blinking and light in orange. NOTE • Turn the power on/off . Please power on the projector prior to ON position (marked " I "). Power on/off Power on/off by normal procedure. Press STANDBY...
... MENU ESC ENTER RESET To display the picture, select an input signal according to the projector and the outlet. 2. The message "Power off the power 1. Do not turn on. Remove the lens cover, and set the power switch to OFF position (marked "O"). will stop blinking and light in orange. NOTE • Turn the power on/off . Please power on the projector prior to ON position (marked " I "). Power on/off Power on/off by normal procedure. Press STANDBY...

User Guide
Page 22
... an input signal 1. ViewSonic 17 PJ758/PJ759/PJ760 Press VIDEO button on the remote control. Press ASPECT button on the remote control. Press SEARCH button on the remote control. When an input is found , the projector will check the other port in order to switch from a signal from FREEZE MY BUTTON KEYSTONE 1 2 COMPUTER IN1 or 2 port, when TURN ON is inputted. ● NORMAL mode keeps the original aspect ratio setting. If no proper signal is selected for AUTO POSITION MENU SEARCH...
... an input signal 1. ViewSonic 17 PJ758/PJ759/PJ760 Press VIDEO button on the remote control. Press ASPECT button on the remote control. Press SEARCH button on the remote control. When an input is found , the projector will check the other port in order to switch from a signal from FREEZE MY BUTTON KEYSTONE 1 2 COMPUTER IN1 or 2 port, when TURN ON is inputted. ● NORMAL mode keeps the original aspect ratio setting. If no proper signal is selected for AUTO POSITION MENU SEARCH...

User Guide
Page 26
... the blank screen function. ViewSonic 21 PJ758/PJ759/PJ760 Press FREEZE button on the remote control. The "FREEZE" indication will appear on the screen (however, the indication will not appear when TURN OFF is selected for a long time, the LCD panel might possibly be burned in SCREEN menu ( 39)), and the projector will be displayed instead of the screen of STANDBY/ON, SEARCH, COMPUTER, VIDEO, BLANK, AUTO, VOLUME, MUTE, KEYSTONE, MENU, MAGNIFY and...
... the blank screen function. ViewSonic 21 PJ758/PJ759/PJ760 Press FREEZE button on the remote control. The "FREEZE" indication will appear on the screen (however, the indication will not appear when TURN OFF is selected for a long time, the LCD panel might possibly be burned in SCREEN menu ( 39)), and the projector will be displayed instead of the screen of STANDBY/ON, SEARCH, COMPUTER, VIDEO, BLANK, AUTO, VOLUME, MUTE, KEYSTONE, MENU, MAGNIFY and...

User Guide
Page 37
... for a video signal from VIDEO port or S-VIDEO port. • The AUTO mode automatically selects the optimum mode. • The AUTO operation may cause a certain degradation of color), please select the mode according to the input signal. INPUT Menu INPUT Menu (continued) Item Description VIDEO FORMAT The video format for S-VIDEO port and VIDEO port can be set . (1) Use the ◄/► buttons to select the input port. (2) Using the ▲/▼ buttons switches the mode for video format. an irregular picture, lack of the picture. AUTO Ù...
... for a video signal from VIDEO port or S-VIDEO port. • The AUTO mode automatically selects the optimum mode. • The AUTO operation may cause a certain degradation of color), please select the mode according to the input signal. INPUT Menu INPUT Menu (continued) Item Description VIDEO FORMAT The video format for S-VIDEO port and VIDEO port can be set . (1) Use the ◄/► buttons to select the input port. (2) Using the ▲/▼ buttons switches the mode for video format. an irregular picture, lack of the picture. AUTO Ù...

User Guide
Page 39
... button to the (forward/backward) setup angle by itself. Projector automatically corrects vertical keystone distortion due to execute the item. For some input, this function may be excessive. This function will be executed only once when selected in the SETUP menu, if the projector screen is inclined or angled downward, this function may not work correctly. • When the zoom adjustment is changed...
... button to the (forward/backward) setup angle by itself. Projector automatically corrects vertical keystone distortion due to execute the item. For some input, this function may be excessive. This function will be executed only once when selected in the SETUP menu, if the projector screen is inclined or angled downward, this function may not work correctly. • When the zoom adjustment is changed...

User Guide
Page 46
... indication about the lamp. • For the lamp replacement, see the section "Air filter" ( 53). (continued on next page) ViewSonic 41 PJ758/PJ759/PJ760 OPTION Menu OPTION Menu (continued) Item Description Using the ▲/▼ buttons adjusts the time to count down to automatically turn the projector off the power" ( 15). Long (max. 99 minutes) Ù Short (min. 0 minute = DISABLE) AUTO OFF When the time is set time, the projector lamp...
... indication about the lamp. • For the lamp replacement, see the section "Air filter" ( 53). (continued on next page) ViewSonic 41 PJ758/PJ759/PJ760 OPTION Menu OPTION Menu (continued) Item Description Using the ▲/▼ buttons adjusts the time to count down to automatically turn the projector off the power" ( 15). Long (max. 99 minutes) Ù Short (min. 0 minute = DISABLE) AUTO OFF When the time is set time, the projector lamp...

User Guide
Page 47
...; VIDEO: Sets port to VIDEO. • INFORMATION: Displays a dialog of INPUT INFORMATION ( 44). • AUTO KEYSTONE EXECUTE: Performs automatic keystone distortion correction ( 34). • MY MEMORY: Loads one of the following functions to MY BUTTON 1 and 2 on the remote control ( 6). Choose 1 or 2 on next page) ViewSonic 42 PJ758/PJ759/PJ760 FAN SPEED Ù AUTO ADJUST Ù GHOST Ù FILTER MESSAGE Ù KEY LOCK SERVICE FACTORY RESET Ù I NFORMATION Ù REMOTE FREQ. The HIGH is displayed. FAN SPEED Using...
...; VIDEO: Sets port to VIDEO. • INFORMATION: Displays a dialog of INPUT INFORMATION ( 44). • AUTO KEYSTONE EXECUTE: Performs automatic keystone distortion correction ( 34). • MY MEMORY: Loads one of the following functions to MY BUTTON 1 and 2 on the remote control ( 6). Choose 1 or 2 on next page) ViewSonic 42 PJ758/PJ759/PJ760 FAN SPEED Ù AUTO ADJUST Ù GHOST Ù FILTER MESSAGE Ù KEY LOCK SERVICE FACTORY RESET Ù I NFORMATION Ù REMOTE FREQ. The HIGH is displayed. FAN SPEED Using...

User Guide
Page 49
... the items LAMP TIME, FILTER TIME, LANGUAGE and SECURITY are locked. The factory default setting is for no signal and sync out. It shows the information about the current input. • The "FRAME LOCK" message on the dialog means the frame lock function is selected, the buttons on . FACTORY RESET Selecting RESET using the button ▲ performs this item displays a dialog titled "INPUT INFORMATION". If the remote control does not function correctly set this function...
... the items LAMP TIME, FILTER TIME, LANGUAGE and SECURITY are locked. The factory default setting is for no signal and sync out. It shows the information about the current input. • The "FRAME LOCK" message on the dialog means the frame lock function is selected, the buttons on . FACTORY RESET Selecting RESET using the button ▲ performs this item displays a dialog titled "INPUT INFORMATION". If the remote control does not function correctly set this function...

User Guide
Page 52
... ► button or the ENTER button to display the PIN LOCK on/off menu. (continued on /off menu. Enter the registered PASSWORD and the screen will be locked on /off menu. If necessary repeat the process from being used unless a registered Code is a function which prevents the projector from 2.3-1. 2.4 If you have forgotten your dealer with the 10-digit Inquiring Code. Your PASSWORD will be displayed inside...
... ► button or the ENTER button to display the PIN LOCK on/off menu. (continued on /off menu. Enter the registered PASSWORD and the screen will be locked on /off menu. If necessary repeat the process from being used unless a registered Code is a function which prevents the projector from 2.3-1. 2.4 If you have forgotten your dealer with the 10-digit Inquiring Code. Your PASSWORD will be displayed inside...

User Guide
Page 55
... with the 10-digit Inquiring Code. ViewSonic 50 PJ758/PJ759/PJ760 Enter the registered PASSWORD and the screen will close. The 10-digit Inquiring Code will be sent after your Transition Detector PASSWORD. 4.3 Setting the Transition Detector off 4.3-1 Follow the procedure in 4.1-1 to display the TRANSITION DETECTOR on /off menu. • Please do not forget your user registration information is input the menu will return...
... with the 10-digit Inquiring Code. ViewSonic 50 PJ758/PJ759/PJ760 Enter the registered PASSWORD and the screen will close. The 10-digit Inquiring Code will be sent after your Transition Detector PASSWORD. 4.3 Setting the Transition Detector off 4.3-1 Follow the procedure in 4.1-1 to display the TRANSITION DETECTOR on /off menu. • Please do not forget your user registration information is input the menu will return...
User Guide
Page 60
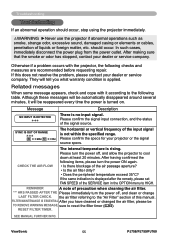
..., stop using the projector immediately. Otherwise if a problem occurs with it will be reappeared every time the power is displayed after the remedy, please set FAN SPEED of the SERVICE item in the OPTION menu to the "Air Filter" section of this does not resolve the problem, please contact your dealer or service company. Although these messages will tell you have cleaned or changed the air filter...
..., stop using the projector immediately. Otherwise if a problem occurs with it will be reappeared every time the power is displayed after the remedy, please set FAN SPEED of the SERVICE item in the OPTION menu to the "Air Filter" section of this does not resolve the problem, please contact your dealer or service company. Although these messages will tell you have cleaned or changed the air filter...

User Guide
Page 61
... least 20 minutes. In Orange off off The lamp cover has not been properly fixed. Blinking In Red or Lighting In Red Lighting In Red Turned off Ordinary operations may be performed. If the same indication is displayed after the remedy, please contact your dealer or service company. After performing any needed maintenance, turn the power on next page) ViewSonic The cooling fan is a possibility that no...
... least 20 minutes. In Orange off off The lamp cover has not been properly fixed. Blinking In Red or Lighting In Red Lighting In Red Turned off Ordinary operations may be performed. If the same indication is displayed after the remedy, please contact your dealer or service company. After performing any needed maintenance, turn the power on next page) ViewSonic The cooling fan is a possibility that no...

User Guide
Page 62
... interior portion has become overheated, for safety purposes, the projector is displayed after the remedy, please set FAN SPEED of the lamp and lamp cover, and then turn the power off . After the projector has sufficiently cooled down at least 10 minutes to the factory default. Lighting In Green Alternative blinking in OPTION menu to the section "Air Filter". After the remedy, reset the power to ON. In such...
... interior portion has become overheated, for safety purposes, the projector is displayed after the remedy, please set FAN SPEED of the lamp and lamp cover, and then turn the power off . After the projector has sufficiently cooled down at least 10 minutes to the factory default. Lighting In Green Alternative blinking in OPTION menu to the section "Air Filter". After the remedy, reset the power to ON. In such...

User Guide
Page 63
... set up the signal source device by a power outage (blackout), etc. Remove the lens cover. The main power source has been interrupted during operation such as by referring to a higher level using the menu function or the remote control. The AUDIO/SPEAKER setting is no lamp and/or lamp cover, or either of the source device. The signal cables are not correctly connected. Phenomenon Power does not come out. Select the input signal, and correct the settings...
... set up the signal source device by a power outage (blackout), etc. Remove the lens cover. The main power source has been interrupted during operation such as by referring to a higher level using the menu function or the remote control. The AUDIO/SPEAKER setting is no lamp and/or lamp cover, or either of the source device. The signal cables are not correctly connected. Phenomenon Power does not come out. Select the input signal, and correct the settings...
User Guide
Page 68
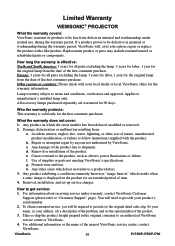
... provide your address, (d) a description of the problem, and (e) the serial number of time. 4. f. h. Any product exhibiting a condition commonly known as electric power fluctuations or failure. You will need to shipment. To obtain warranted service, you will , at its products to be required to "Customer Support" page). Limited Warranty VIEWSONIC® PROJECTOR What the warranty covers: ViewSonic warrants its sole option, repair or replace the...
... provide your address, (d) a description of the problem, and (e) the serial number of time. 4. f. h. Any product exhibiting a condition commonly known as electric power fluctuations or failure. You will need to shipment. To obtain warranted service, you will , at its products to be required to "Customer Support" page). Limited Warranty VIEWSONIC® PROJECTOR What the warranty covers: ViewSonic warrants its sole option, repair or replace the...


