User Guide
Page 2
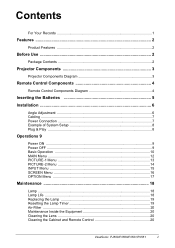
...Components 3 Projector Components Diagram 3 Remote Control Components 4 Remote Control Components Diagram 4 Inserting the Batteries 5 Installation 6 Angle Adjustment 6 Cabling ...7 Power Connection 7 Example of System Setup 8 Plug & Play ...8 Operations 9 Power ON ...9 Power OFF ...9 Basic Operation 10 MAIN Menu ...12 PICTURE-1 Menu 13 PICTURE-2 Menu 14 INPUT Menu ...15 SCREEN Menu 16 OPTION Menu 17 Maintenance 18 Lamp ...18 Lamp Life ...18 Replacing the Lamp 19 Resetting the Lamp Timer 19 Air-Filter ...20 Maintenance Inside the Equipment 20 Cleaning the Lens 20 Cleaning the...
...Components 3 Projector Components Diagram 3 Remote Control Components 4 Remote Control Components Diagram 4 Inserting the Batteries 5 Installation 6 Angle Adjustment 6 Cabling ...7 Power Connection 7 Example of System Setup 8 Plug & Play ...8 Operations 9 Power ON ...9 Power OFF ...9 Basic Operation 10 MAIN Menu ...12 PICTURE-1 Menu 13 PICTURE-2 Menu 14 INPUT Menu ...15 SCREEN Menu 16 OPTION Menu 17 Maintenance 18 Lamp ...18 Lamp Life ...18 Replacing the Lamp 19 Resetting the Lamp Timer 19 Air-Filter ...20 Maintenance Inside the Equipment 20 Cleaning the Lens 20 Cleaning the...

User Guide
Page 4
... Warranty Registration To meet your projector's warranty on the Internet at: http://www.viewsonic.com For Your Records Product Name: PJ500 Model Number: VPROJ23544-2W Document Number Serial Number: B0Y___________ Purchase Date: PJ550 PJ501 VPROJ23545-2W VPROJ25048-1W A-CD-PJ001 B0W__________ B12___________ PJ551 VPROJ25049-1W B13 1 ViewSonic PJ500/PJ550/PJ501/PJ551 All rights reserved. PS/2, VGA and XGA are trademarks of the...
... Warranty Registration To meet your projector's warranty on the Internet at: http://www.viewsonic.com For Your Records Product Name: PJ500 Model Number: VPROJ23544-2W Document Number Serial Number: B0Y___________ Purchase Date: PJ550 PJ501 VPROJ23545-2W VPROJ25048-1W A-CD-PJ001 B0W__________ B12___________ PJ551 VPROJ25049-1W B13 1 ViewSonic PJ500/PJ550/PJ501/PJ551 All rights reserved. PS/2, VGA and XGA are trademarks of the...

User Guide
Page 5
...) Quick Start Guide ViewSonic Wizard CD RGB Cable (computer) Yellow Red White RCA Video/ AUdio cable Red Blue Green Component Video Cable S-Video Cable Figure 1: Package Contents NOTE: Keep the original packing material for viewing high resolution computer images • Short focal length • Whisper-mode • Digital keystone correction • Component video maximizes video image quality Before Use Package Contents Make sure all of the following items are included in the package. Projector Carrying Case Remote Con- ViewSonic PJ500/PJ550/PJ501/PJ551...
...) Quick Start Guide ViewSonic Wizard CD RGB Cable (computer) Yellow Red White RCA Video/ AUdio cable Red Blue Green Component Video Cable S-Video Cable Figure 1: Package Contents NOTE: Keep the original packing material for viewing high resolution computer images • Short focal length • Whisper-mode • Digital keystone correction • Component video maximizes video image quality Before Use Package Contents Make sure all of the following items are included in the package. Projector Carrying Case Remote Con- ViewSonic PJ500/PJ550/PJ501/PJ551...

User Guide
Page 6
... Components Projector Components Diagram Slot for Kensington Lock Power switch AC power Intake ventilation Control panel Reset Keystone Input Standby/ON Front foot adjuster Air intake (for the cooling fan) Speaker Rear foot adjuster Remote control sensor Component Video Y (In) CB/PB (In) CR/PR (In) S-Video (In) Zoom knob Focus ring Remote control sensor Lens (with lens cap) Lamp indicator Temp indicator Power indicator Menu Exhaust ventilation Interface panel RGB (In) Control (RS232) Audio (In, 3.5 mm) R Audio (In) L Audio (In) Video (In) Figure 2: Projector Components 3 ViewSonic PJ500...
... Components Projector Components Diagram Slot for Kensington Lock Power switch AC power Intake ventilation Control panel Reset Keystone Input Standby/ON Front foot adjuster Air intake (for the cooling fan) Speaker Rear foot adjuster Remote control sensor Component Video Y (In) CB/PB (In) CR/PR (In) S-Video (In) Zoom knob Focus ring Remote control sensor Lens (with lens cap) Lamp indicator Temp indicator Power indicator Menu Exhaust ventilation Interface panel RGB (In) Control (RS232) Audio (In, 3.5 mm) R Audio (In) L Audio (In) Video (In) Figure 2: Projector Components 3 ViewSonic PJ500...

User Guide
Page 9
... foot adjuster button, and adjust the projection angle. 2 Release the adjuster button to lock at the desired angle. 3 Rotate the foot pad to adjust the projection angle. LCD panel, lens assembly, etc.) Angle Adjustment Use the foot adjusters on critical parts (i.e. b Distance from the projector to the projector. • Make sure the heat ventilation holes are for full size (PJ500/PJ501:800x600pixels, PJ501/PJ550:1024 x 768 pixels). ViewSonic PJ500/PJ550/PJ501/PJ551 6 Foot Adjuster...
... foot adjuster button, and adjust the projection angle. 2 Release the adjuster button to lock at the desired angle. 3 Rotate the foot pad to adjust the projection angle. LCD panel, lens assembly, etc.) Angle Adjustment Use the foot adjusters on critical parts (i.e. b Distance from the projector to the projector. • Make sure the heat ventilation holes are for full size (PJ500/PJ501:800x600pixels, PJ501/PJ550:1024 x 768 pixels). ViewSonic PJ500/PJ550/PJ501/PJ551 6 Foot Adjuster...
User Guide
Page 10
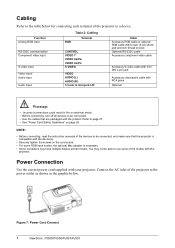
.../PJ551 Power Connection Use the correct power cord supplied with RCA jacks Optional Warnings • Incorrect connections could result in the graphic below for connecting each terminal of the devices to be able to use some RGB input modes, the optional Mac adapter is compatible with the device(s). • Securely tighten the screws on page 28. Function Analog RGB input RS-232C communication Component video input S-video input Video input/ Audio input Audio Input RGB Table 2: Cabling Terminal CONTROL VIDEO Y VIDEO...
.../PJ551 Power Connection Use the correct power cord supplied with RCA jacks Optional Warnings • Incorrect connections could result in the graphic below for connecting each terminal of the devices to be able to use some RGB input modes, the optional Mac adapter is compatible with the device(s). • Securely tighten the screws on page 28. Function Analog RGB input RS-232C communication Component video input S-video input Video input/ Audio input Audio Input RGB Table 2: Cabling Terminal CONTROL VIDEO Y VIDEO...
User Guide
Page 11
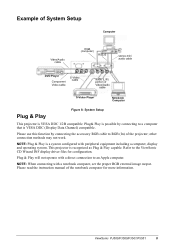
... image output. Please read the instruction manual of the notebook computer for configuration. Refer to a computer that is possible by connecting the accessory RGB cable to an Apple computer. ViewSonic PJ500/PJ550/PJ501/PJ551 8 Plug& Play is VESA DDC (Display Data Channel) compatible. NOTE: When connecting with peripheral equipment including a computer, display and operating system. This projector is VESA DDC 1/2B compatible. Please use...
... image output. Please read the instruction manual of the notebook computer for configuration. Refer to a computer that is possible by connecting the accessory RGB cable to an Apple computer. ViewSonic PJ500/PJ550/PJ501/PJ551 8 Plug& Play is VESA DDC (Display Data Channel) compatible. NOTE: When connecting with peripheral equipment including a computer, display and operating system. This projector is VESA DDC 1/2B compatible. Please use...

User Guide
Page 12
... the lamp will turn to continuous green, indicating that the indicator is connected correctly and lens cap has been removed. Warm-up begins and the power indicator blinks in Standby mode and the POWER indicator LED turns a steady orange. 2 Press the STANDBY/ON button on page 8. 1 Make sure the power cord is orange and set the POWER switch to [O]. will display on the control panel or the remote control. Remember to replace the lens cap after use . 4 Adjust the size of the projected image with the Zoom knob. 5 Adjust focus using the Focus...
... the lamp will turn to continuous green, indicating that the indicator is connected correctly and lens cap has been removed. Warm-up begins and the power indicator blinks in Standby mode and the POWER indicator LED turns a steady orange. 2 Press the STANDBY/ON button on page 8. 1 Make sure the power cord is orange and set the POWER switch to [O]. will display on the control panel or the remote control. Remember to replace the lens cap after use . 4 Adjust the size of the projected image with the Zoom knob. 5 Adjust focus using the Focus...

User Guide
Page 13
..., INPUT SELECT, or VIDEO, or changing the input signal. "POSITION" is displayed in this mode. (remote control) ViewSonic PJ500/PJ550/PJ501/PJ551 10 Initialize Each item: Select an item and press the RESET button. MAGNIFY magnifies the image. of the top Set/Clear VOLUME Mode: Press the VOLUME button to display the Volume menu, then press / sound. The sound is silenced in the POSITION mode. Basic Operation Table 3 below refers to buttons on the projector control panel...
..., INPUT SELECT, or VIDEO, or changing the input signal. "POSITION" is displayed in this mode. (remote control) ViewSonic PJ500/PJ550/PJ501/PJ551 10 Initialize Each item: Select an item and press the RESET button. MAGNIFY magnifies the image. of the top Set/Clear VOLUME Mode: Press the VOLUME button to display the Volume menu, then press / sound. The sound is silenced in the POSITION mode. Basic Operation Table 3 below refers to buttons on the projector control panel...

User Guide
Page 14
...) MENU (*) (projector control panel and remote control) SEARCH (remote control) ASPECT (Aspect Ratio) (remote control) ESC (Escape) (remote control) ENTER (remote control) Table 3: Basic Operation (Continued) Description Automatic Adjustment (for adjustment with numerical value): After fixing the item, press the button or ENTER button (on the remote control) to turn to the single type menu. A signal type appropriate for VIDEO on . PHASE), and Horizontal Size (H. Set/ Clear Blank Mode: press the BLANK button. Example : If S-VIDEO was the last input used before powering off...
...) MENU (*) (projector control panel and remote control) SEARCH (remote control) ASPECT (Aspect Ratio) (remote control) ESC (Escape) (remote control) ENTER (remote control) Table 3: Basic Operation (Continued) Description Automatic Adjustment (for adjustment with numerical value): After fixing the item, press the button or ENTER button (on the remote control) to turn to the single type menu. A signal type appropriate for VIDEO on . PHASE), and Horizontal Size (H. Set/ Clear Blank Mode: press the BLANK button. Example : If S-VIDEO was the last input used before powering off...
User Guide
Page 19
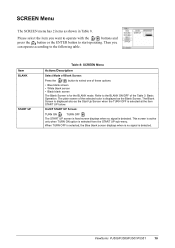
... TURN OFF The START UP screen is fixed screen displays when no signal is for the BLANK mode. ViewSonic PJ500/PJ550/PJ501/PJ551 16 Refer to the following table. When TURN OFF is selected, the Blue blank screen displays when is no signal is displayed as the Blank Screen. Then you want to operate with the / buttons and press the button or the ENTER button to select one of the selected color...
... TURN OFF The START UP screen is fixed screen displays when no signal is for the BLANK mode. ViewSonic PJ500/PJ550/PJ501/PJ551 16 Refer to the following table. When TURN OFF is selected, the Blue blank screen displays when is no signal is displayed as the Blank Screen. Then you want to operate with the / buttons and press the button or the ENTER button to select one of the selected color...

User Guide
Page 20
... 20. 17 ViewSonic PJ500/PJ550/PJ501/PJ551 Then the menu for reset will not operate properly if the lamp time is replaced!] : Keep pressing the RESET button for 3 seconds or more during the display of the filter time. Reset Lamp Time [Use this function only when the lamp is not reset correctly. • Before replacing the lamp, carefully read the descriptions of this item displays the time that the air-filter has been used . Refer to start operating. When...
... 20. 17 ViewSonic PJ500/PJ550/PJ501/PJ551 Then the menu for reset will not operate properly if the lamp time is replaced!] : Keep pressing the RESET button for 3 seconds or more during the display of the filter time. Reset Lamp Time [Use this function only when the lamp is not reset correctly. • Before replacing the lamp, carefully read the descriptions of this item displays the time that the air-filter has been used . Refer to start operating. When...
User Guide
Page 21
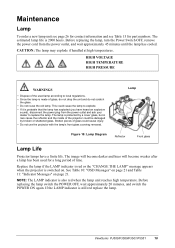
.../PJ551 18 Before replacing the lamp, turn the Power Switch OFF, remove the power cord from the power outlet and ask your dealer to local regulations. • Since the lamp is also red when the lamp unit reaches high temperature. This could be damaged by broken or shattered glass. Broken pieces of glass could cause injury. • Do not use the projector with the lamp's front glass covering removed. The image...
.../PJ551 18 Before replacing the lamp, turn the Power Switch OFF, remove the power cord from the power outlet and ask your dealer to local regulations. • Since the lamp is also red when the lamp unit reaches high temperature. This could be damaged by broken or shattered glass. Broken pieces of glass could cause injury. • Do not use the projector with the lamp's front glass covering removed. The image...
User Guide
Page 22
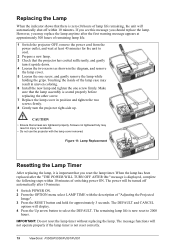
... OPTION menu select LAMP TIME with the lamp cover removed. The power will be turned off within 10 minutes of remaining lamp life. 1 Switch the projector OFF, remove the power cord from the power outlet, and wait at approximately 300 hours of switching power ON. IMPORTANT: Do not reset the lamp timer without replacing the lamp. message is not reset correctly. 19 ViewSonic PJ500/PJ550/PJ501/PJ551 Make sure that the lamp assembly is now reset to select the DEFAULT. CAUTION...
... OPTION menu select LAMP TIME with the lamp cover removed. The power will be turned off within 10 minutes of remaining lamp life. 1 Switch the projector OFF, remove the power cord from the power outlet, and wait at approximately 300 hours of switching power ON. IMPORTANT: Do not reset the lamp timer without replacing the lamp. message is not reset correctly. 19 ViewSonic PJ500/PJ550/PJ501/PJ551 Make sure that the lamp assembly is now reset to select the DEFAULT. CAUTION...

User Guide
Page 23
...; Switch POWER OFF and remove the power cord from the power outlet. 2 Remove the filter cover and the filter. 3 Replace the new air-filter and the filter cover. 4 Reset the Filter Timer using the function of the "FILTER TIME" on Table 9: MAIN Menu. To order a new air filter see page 26 for approximately 100 hours, the message "CLEAN THE AIR FILTER" appears when the projector is damaged. • Do not use chemical sprays. • Use a soft cloth or lens paper only. Cleaning the Cabinet and Remote Control Gently...
...; Switch POWER OFF and remove the power cord from the power outlet. 2 Remove the filter cover and the filter. 3 Replace the new air-filter and the filter cover. 4 Reset the Filter Timer using the function of the "FILTER TIME" on Table 9: MAIN Menu. To order a new air filter see page 26 for approximately 100 hours, the message "CLEAN THE AIR FILTER" appears when the projector is damaged. • Do not use chemical sprays. • Use a soft cloth or lens paper only. Cleaning the Cabinet and Remote Control Gently...
User Guide
Page 24
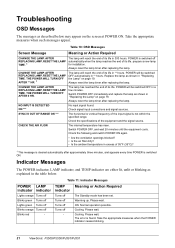
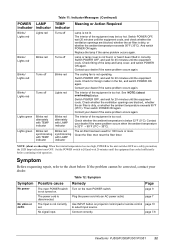
...the lamp. Check the specifications of its life. Indicator Messages The POWER indicator, LAMP indicator, and TEMP indicator are either lit, unlit or blinking as explained in "Replacing the Lamp" on the screen at POWER ON. POWER LAMP indicator indicator Lights orange Turns off Blinks green Turns off Lights green Turns off Blinks orange Turns off automatically when the lamp reaches the end of the equipment and the signal source. AFTER REPLACING LAMP, RESET THE LAMP TIME. 1 CHANGE THE LAMP. Always reset the lamp timer after replacing the lamp. Table 11: Indicator Messages TEMP...
...the lamp. Check the specifications of its life. Indicator Messages The POWER indicator, LAMP indicator, and TEMP indicator are either lit, unlit or blinking as explained in "Replacing the Lamp" on the screen at POWER ON. POWER LAMP indicator indicator Lights orange Turns off Blinks green Turns off Lights green Turns off Blinks orange Turns off automatically when the lamp reaches the end of the equipment and the signal source. AFTER REPLACING LAMP, RESET THE LAMP TIME. 1 CHANGE THE LAMP. Always reset the lamp timer after replacing the lamp. Table 11: Indicator Messages TEMP...
User Guide
Page 25
.../PJ501/PJ551 22 Check whether the ventilation openings are blocked, whether the air filter is 32°F ~ 95°F (0°C ~ 35°C). Check whether the ambient temperature is not correctly set. Page page 9 Plug the power cord into an AC power outlet. Clean the filter, then reset the filter timer. Table 11: Indicator Messages (Continued) POWER LAMP TEMP Meaning or Action Required indicator indicator indicator Blinks/ Lights red Blinks/ Lights red Blinks/ Lights red Blinks/ Lights red Lights green Lights green Lights red Turns off Blinks red Turns off Turns off...
.../PJ501/PJ551 22 Check whether the ventilation openings are blocked, whether the air filter is 32°F ~ 95°F (0°C ~ 35°C). Check whether the ambient temperature is not correctly set. Page page 9 Plug the power cord into an AC power outlet. Clean the filter, then reset the filter timer. Table 11: Indicator Messages (Continued) POWER LAMP TEMP Meaning or Action Required indicator indicator indicator Blinks/ Lights red Blinks/ Lights red Blinks/ Lights red Blinks/ Lights red Lights green Lights green Lights red Turns off Blinks red Turns off Turns off...
User Guide
Page 26
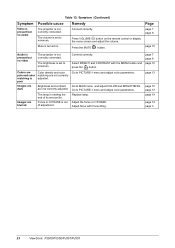
... poor Images are dark Color density and color matching are blurred The lamp is set to PICTURE-1 menu and adjust color parameters. Connect correctly. Symptom Video is present but no audio Table 12: Symptom (Continued) Possible cause Remedy The projector is turned on the remote control or display the menu screen and adjust the volume. Go to MAIN menu and adjust COLOR and BRIGHTNESS. Brightness and contrast are not correctly adjusted. Go to minimum. Replace lamp. Adjust focus...
... poor Images are dark Color density and color matching are blurred The lamp is set to PICTURE-1 menu and adjust color parameters. Connect correctly. Symptom Video is present but no audio Table 12: Symptom (Continued) Possible cause Remedy The projector is turned on the remote control or display the menu screen and adjust the volume. Go to MAIN menu and adjust COLOR and BRIGHTNESS. Brightness and contrast are not correctly adjusted. Go to minimum. Replace lamp. Adjust focus...

User Guide
Page 30
... follow instructions supplied with a like product. If a product proves to be free from the date of the first consumer purchase. e. Any other cause which the serial number has been defaced, modified or removed. 2. How to the product, such as electric power fluctuations or failure. To obtain warranted service, you may also have other acts of supplies or parts not meeting ViewSonic's specifications. For...
... follow instructions supplied with a like product. If a product proves to be free from the date of the first consumer purchase. e. Any other cause which the serial number has been defaced, modified or removed. 2. How to the product, such as electric power fluctuations or failure. To obtain warranted service, you may also have other acts of supplies or parts not meeting ViewSonic's specifications. For...

User Guide
Page 32
... limits are included with the instructions, may cause harmful interference to "Safety." If this device. FCC Warning To assure continued FCC compliance, the user must use only a shielded BNC(5) cable. This equipment generates, uses, and can be used in accordance with the projector or specified. 29 ViewSonic PJ500/PJ550/PJ501/PJ551 Use the cables which are designed to part 15 of the EEC...
... limits are included with the instructions, may cause harmful interference to "Safety." If this device. FCC Warning To assure continued FCC compliance, the user must use only a shielded BNC(5) cable. This equipment generates, uses, and can be used in accordance with the projector or specified. 29 ViewSonic PJ500/PJ550/PJ501/PJ551 Use the cables which are designed to part 15 of the EEC...


