
User Guide English
Page 1
Model No. Warranty information contained in this User Guide to obtain important information on installing and using your product in a safe manner, as well as registering your limited coverage from ViewSonic® Corporation, which is also found on our web site at http://www.viewsonic.com in English, or in specific languages using the Regional selection box in the upper right corner of our website. VS18859 P/N: ID2456 ID2456 Display User Guide IMPORTANT: Please read this User Guide will describe your product for future service.
Model No. Warranty information contained in this User Guide to obtain important information on installing and using your product in a safe manner, as well as registering your limited coverage from ViewSonic® Corporation, which is also found on our web site at http://www.viewsonic.com in English, or in specific languages using the Regional selection box in the upper right corner of our website. VS18859 P/N: ID2456 ID2456 Display User Guide IMPORTANT: Please read this User Guide will describe your product for future service.

User Guide English
Page 4
... connecting to appropriate levels, or hearing damage may result. 4 Service will be tripped over, pulled, or grabbed. • Protect the power cord from tipping over. • Refer all servicing to qualified service personnel. If the plug does not fit into the unit. ͫ if the unit is dangerous to continue using ear-/headphones, adjust the volume to a power outlet, Do not remove...
... connecting to appropriate levels, or hearing damage may result. 4 Service will be tripped over, pulled, or grabbed. • Protect the power cord from tipping over. • Refer all servicing to qualified service personnel. If the plug does not fit into the unit. ͫ if the unit is dangerous to continue using ear-/headphones, adjust the volume to a power outlet, Do not remove...
User Guide English
Page 13
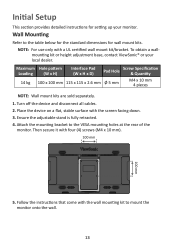
... or height adjustment base, contact ViewSonic® or your monitor. Then secure it with the screen facing down. 3. Follow the instructions that come with a UL certified wall mount kit/bracket. Initial Setup This section provides detailed instructions for wall mount kits. Place the device on a flat, stable surface with four (4) screws (M4 x 10 mm). 100 mm HDMI Type-C HDMI Out USB 3.0 5V/2A 100 mm 5. Wall Mounting Refer to mount the monitor...
... or height adjustment base, contact ViewSonic® or your monitor. Then secure it with the screen facing down. 3. Follow the instructions that come with a UL certified wall mount kit/bracket. Initial Setup This section provides detailed instructions for wall mount kits. Place the device on a flat, stable surface with four (4) screws (M4 x 10 mm). 100 mm HDMI Type-C HDMI Out USB 3.0 5V/2A 100 mm 5. Wall Mounting Refer to mount the monitor...

User Guide English
Page 17
... the cable to the USB down stream port of your computer. • One (1) USB Type C ports: One (1) up stream. Users can power their notebooks when connected. Make sure your Type C output device and cable support video signal transmission. ͫ NOTE: Power delivery capable, 5V/3A, 9V/3A, 12V/3A, 15V/3A, 20V/4.5A. USB Connection Connect one end of a USB cable to a USB port of USB ports. NOTE: The monitor supports three (3) types of the monitor.
... the cable to the USB down stream port of your computer. • One (1) USB Type C ports: One (1) up stream. Users can power their notebooks when connected. Make sure your Type C output device and cable support video signal transmission. ͫ NOTE: Power delivery capable, 5V/3A, 9V/3A, 12V/3A, 15V/3A, 20V/4.5A. USB Connection Connect one end of a USB cable to a USB port of USB ports. NOTE: The monitor supports three (3) types of the monitor.

User Guide English
Page 19
Connect the USB Type A to the VGA port on the monitor. 2. Open: Control Panel > Hardware and Sound >Tablet PC Settings 2. Select Touch Input. 4. HDMI Type-C HDMI Out USB 3.0 5V/2A VGA VGA When using the touch function, please note: • The touch function may need about five (5) seconds to resume if the USB cable is removed and plugged in again, or the computer resumes from Sleep Mode. • The touchscreen can only detect up to ten (10) fingers...
Connect the USB Type A to the VGA port on the monitor. 2. Open: Control Panel > Hardware and Sound >Tablet PC Settings 2. Select Touch Input. 4. HDMI Type-C HDMI Out USB 3.0 5V/2A VGA VGA When using the touch function, please note: • The touch function may need about five (5) seconds to resume if the USB cable is removed and plugged in again, or the computer resumes from Sleep Mode. • The touchscreen can only detect up to ten (10) fingers...

User Guide English
Page 24
Main Menu Exit Contrast/Brightness Adjust the contrast or brightness level. VGA s HDMI TYPE C Main Menu Enter the On-Screen Display (OSD) Menu. ID2456 Input Select Audio Adjust ViewMode Color Adjust Manual Image Setup Menu Adjust VGA HDMI TYPE C Exit Exit the Quick Menu. 1920 X 1080 @ 60Hz 24 mode ast/Brightness Select Menu Contrast 70 Brightness 100 Input Select Select the input source.
Main Menu Exit Contrast/Brightness Adjust the contrast or brightness level. VGA s HDMI TYPE C Main Menu Enter the On-Screen Display (OSD) Menu. ID2456 Input Select Audio Adjust ViewMode Color Adjust Manual Image Setup Menu Adjust VGA HDMI TYPE C Exit Exit the Quick Menu. 1920 X 1080 @ 60Hz 24 mode ast/Brightness Select Menu Contrast 70 Brightness 100 Input Select Select the input source.
User Guide English
Page 27
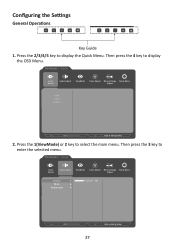
... selected menu. ID2456 Input Select Audio Adjust ViewMode Color Adjust Manual Image Setup Menu Adjust VGA HDMI TYPE C 1920 X 1080 @ 60Hz 2. Then press the 3 key to display the OSD Menu. Press the 2/3/4/5 key to select the main menu. ID2456 Input Select Audio Adjust ViewMode Color Adjust Manual Image Setup Menu Adjust Volume 50 Mute Audio Input 27 1920 x 1080 @ 60Hz Press the 1(ViewMode) or 2 key to display the Quick Menu. Mute Off Audio Input Configuring the Settings General Operations 1920 x 1080 @ 60Hz Mute Audio Input 1920 x 1080 @ 60Hz Key Guide 1.
... selected menu. ID2456 Input Select Audio Adjust ViewMode Color Adjust Manual Image Setup Menu Adjust VGA HDMI TYPE C 1920 X 1080 @ 60Hz 2. Then press the 3 key to display the OSD Menu. Press the 2/3/4/5 key to select the main menu. ID2456 Input Select Audio Adjust ViewMode Color Adjust Manual Image Setup Menu Adjust Volume 50 Mute Audio Input 27 1920 x 1080 @ 60Hz Press the 1(ViewMode) or 2 key to display the Quick Menu. Mute Off Audio Input Configuring the Settings General Operations 1920 x 1080 @ 60Hz Mute Audio Input 1920 x 1080 @ 60Hz Key Guide 1.
User Guide English
Page 28
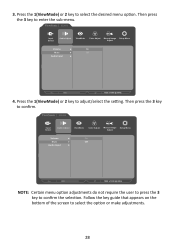
... option or make adjustments. 28 3. Follow the key guide that appears on the bottom of the screen to adjust/select the setting. ID2456 Input Select Audio Adjust ViewMode Color Adjust Manual Image Setup Menu Adjust Volume On Mute Off Audio Input 1920 x 1080 @ 60Hz 4. Press the 1(ViewMode) or 2 key to confirm the selection. ID2456 Input Select Audio Adjust ViewMode Color Adjust Manual Image Setup Menu Adjust Volume On Mute Off Audio Input 1920 x 1080 @ 60Hz NOTE: Certain menu option adjustments do not require the user to press...
... option or make adjustments. 28 3. Follow the key guide that appears on the bottom of the screen to adjust/select the setting. ID2456 Input Select Audio Adjust ViewMode Color Adjust Manual Image Setup Menu Adjust Volume On Mute Off Audio Input 1920 x 1080 @ 60Hz 4. Press the 1(ViewMode) or 2 key to confirm the selection. ID2456 Input Select Audio Adjust ViewMode Color Adjust Manual Image Setup Menu Adjust Volume On Mute Off Audio Input 1920 x 1080 @ 60Hz NOTE: Certain menu option adjustments do not require the user to press...
User Guide English
Page 29
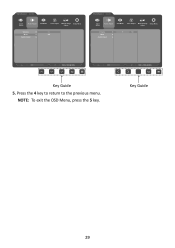
ID2456 Input Select Audio Adjust ViewMode Color Adjust Manual Image Setup Menu Adjust Volume On Mute Off Audio Input ID2456 Input Select Audio Adjust ViewMode Color Adjust Manual Image Setup Menu Adjust Volume 50 Mute Audio Input 1920 x 1080 @ 60Hz Key Guide 5. NOTE: To exit the OSD Menu, press the 5 key. 1920 x 1080 @ 60Hz Key Guide 29 Press the 4 key to return to the previous menu.
ID2456 Input Select Audio Adjust ViewMode Color Adjust Manual Image Setup Menu Adjust Volume On Mute Off Audio Input ID2456 Input Select Audio Adjust ViewMode Color Adjust Manual Image Setup Menu Adjust Volume 50 Mute Audio Input 1920 x 1080 @ 60Hz Key Guide 5. NOTE: To exit the OSD Menu, press the 5 key. 1920 x 1080 @ 60Hz Key Guide 29 Press the 4 key to return to the previous menu.
User Guide English
Page 35
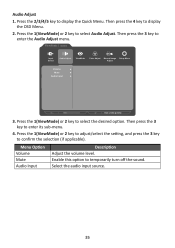
... (if applicable). ID2456 Input Select Audio Adjust ViewMode Color Adjust Manual Image Setup Menu Adjust Volume Mute Audio Input 1920 x 1080 @ 60Hz 3. Press the 1(ViewMode) or 2 key to adjust/select the setting, and press the 3 key to select Audio Adjust. Select the audio input source. 35 Then press the 3 key to display the OSD Menu. 2. Then press the 4 key to enter the Audio Adjust menu. Press the 1(ViewMode) or 2 key to temporarily turn off the sound. Enable this option...
... (if applicable). ID2456 Input Select Audio Adjust ViewMode Color Adjust Manual Image Setup Menu Adjust Volume Mute Audio Input 1920 x 1080 @ 60Hz 3. Press the 1(ViewMode) or 2 key to adjust/select the setting, and press the 3 key to select Audio Adjust. Select the audio input source. 35 Then press the 3 key to display the OSD Menu. 2. Then press the 4 key to enter the Audio Adjust menu. Press the 1(ViewMode) or 2 key to temporarily turn off the sound. Enable this option...
User Guide English
Page 36
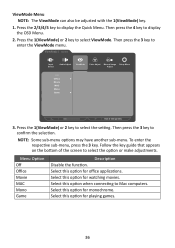
...ID2456 Input Select Audio Adjust ViewMode Color Adjust Manual Image Setup Menu Adjust Off Office Movie MAC Mono Game 1920 X 1080 @ 60Hz 3. Follow the key guide that appears on the bottom of the screen to display the OSD Menu. 2. Select this option for monochrome. To enter the respective sub-menu,... to select the setting. Menu Option Off Office Movie MAC Mono Game Description Disable the function. Press the 2/3/4/5 key to Mac computers. Select this option when connecting to display the Quick Menu. ViewMode Menu NOTE: The ViewMode can also be adjusted with the 1(ViewMode...
...ID2456 Input Select Audio Adjust ViewMode Color Adjust Manual Image Setup Menu Adjust Off Office Movie MAC Mono Game 1920 X 1080 @ 60Hz 3. Follow the key guide that appears on the bottom of the screen to display the OSD Menu. 2. Select this option for monochrome. To enter the respective sub-menu,... to select the setting. Menu Option Off Office Movie MAC Mono Game Description Disable the function. Press the 2/3/4/5 key to Mac computers. Select this option when connecting to display the Quick Menu. ViewMode Menu NOTE: The ViewMode can also be adjusted with the 1(ViewMode...
User Guide English
Page 37
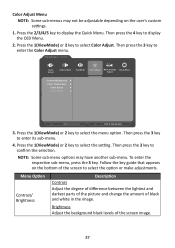
... 2 key to enter the Color Adjust menu. Follow the key guide that appears on the user's custom settings. 1. Then press the 3 key to select the setting. ID2456 Input Select Audio Adjust ViewMode Color Adjust Manual Image Setup Menu Adjust Contrast/Brightness Color Temperature Color Space Color Range 1920 X 1080 @ 60Hz 3. Press the 2/3/4/5 key to display the OSD Menu. 2. To enter the respective sub-menu, press the 3 key. Then press the 4 key to display the Quick Menu. Color Adjust Menu NOTE: Some sub-menus may...
... 2 key to enter the Color Adjust menu. Follow the key guide that appears on the user's custom settings. 1. Then press the 3 key to select the setting. ID2456 Input Select Audio Adjust ViewMode Color Adjust Manual Image Setup Menu Adjust Contrast/Brightness Color Temperature Color Space Color Range 1920 X 1080 @ 60Hz 3. Press the 2/3/4/5 key to display the OSD Menu. 2. To enter the respective sub-menu, press the 3 key. Then press the 4 key to display the Quick Menu. Color Adjust Menu NOTE: Some sub-menus may...
User Guide English
Page 39
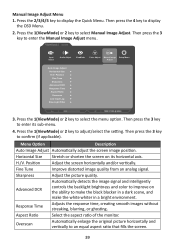
... the image signal and intelligently controls the backlight brightness and color to improve on its sub-menu. 4. Then press the 4 key to select the menu option. ID2456 Input Select Audio Adjust ViewMode Color Adjust Manual Image Setup Menu Adjust Auto Image Adjust Horizontal Size H./V. Press the 1(ViewMode) or 2 key to display the OSD Menu. 2. Horizontal Size Stretch or shorten the screen on the ability to enter its horizontal axis. Aspect Ratio Select the aspect ratio of the monitor. H./V. Position Adjust the screen horizontally and/or vertically. Press...
... the image signal and intelligently controls the backlight brightness and color to improve on its sub-menu. 4. Then press the 4 key to select the menu option. ID2456 Input Select Audio Adjust ViewMode Color Adjust Manual Image Setup Menu Adjust Auto Image Adjust Horizontal Size H./V. Press the 1(ViewMode) or 2 key to display the OSD Menu. 2. Horizontal Size Stretch or shorten the screen on the ability to enter its horizontal axis. Aspect Ratio Select the aspect ratio of the monitor. H./V. Position Adjust the screen horizontally and/or vertically. Press...
User Guide English
Page 41
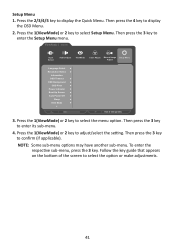
... sub-menu options may have another sub-menu. Follow the key guide that appears on the bottom of the screen to select the menu option. Then press the 3 key to confirm (if applicable). Then press the 3 key to enter its sub-menu. 4. ID2456 Input Select Audio Adjust ViewMode Color Adjust Manual Image Setup Menu Adjust Language Select Resolution Notice Information OSD Timeout OSD Background OSD Pivot Power Indicator Boot Up Screen Auto Power Off Sleep ECO Mode 1920...
... sub-menu options may have another sub-menu. Follow the key guide that appears on the bottom of the screen to select the menu option. Then press the 3 key to confirm (if applicable). Then press the 3 key to enter its sub-menu. 4. ID2456 Input Select Audio Adjust ViewMode Color Adjust Manual Image Setup Menu Adjust Language Select Resolution Notice Information OSD Timeout OSD Background OSD Pivot Power Indicator Boot Up Screen Auto Power Off Sleep ECO Mode 1920...
User Guide English
Page 45
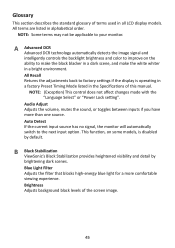
... all LCD display models. B Black Stabilization ViewSonic's Black Stabilization provides heightened visibility and detail by default. A Advanced DCR Advanced DCR technology automatically detects the image signal and intelligently controls the backlight brightness and color to make the black blacker in a dark scene, and make the white whiter in alphabetical order. All terms are listed in a bright environment. NOTE: (Exception) This control does not affect changes made with the "Language Select" or "Power Lock setting".
... all LCD display models. B Black Stabilization ViewSonic's Black Stabilization provides heightened visibility and detail by default. A Advanced DCR Advanced DCR technology automatically detects the image signal and intelligently controls the backlight brightness and color to make the black blacker in a dark scene, and make the white whiter in alphabetical order. All terms are listed in a bright environment. NOTE: (Exception) This control does not affect changes made with the "Language Select" or "Power Lock setting".

User Guide English
Page 46
... range if the colors are not displayed correctly. G Game Mode Integrating a gaming-oriented OSD design including pre-calibrated FPS, RTS, and MOBA gaming settings. Gamma Allows users to manually adjust the brightness level of color and technology. Color Temperature Allows users to select specific color temperature settings to 7500K. Panel Default Panel Original Status Panel Default Panel's default mode. Cool Set the color temperature to further customize their viewing experience. User Custom user settings. Contrast Adjusts the difference between the image background (black...
... range if the colors are not displayed correctly. G Game Mode Integrating a gaming-oriented OSD design including pre-calibrated FPS, RTS, and MOBA gaming settings. Gamma Allows users to manually adjust the brightness level of color and technology. Color Temperature Allows users to select specific color temperature settings to 7500K. Panel Default Panel Original Status Panel Default Panel's default mode. Cool Set the color temperature to further customize their viewing experience. User Custom user settings. Contrast Adjusts the difference between the image background (black...

User Guide English
Page 47
... instructions on HDR10 video content. L Low Input Lag ViewSonic® offers low input lag, utilizing a monitor process reducer, which decreases signal latency. NOTE: Only available on changing the resolution and refresh rate (vertical frequency). See your desired use from the graphics card in the highlights and shadows can select the appropriate speed for your graphics cards's user guide for the monitor. H HDR10 (High-Dynamic-Range) Reduces the overall contrast of each color (red, green, blue...
... instructions on HDR10 video content. L Low Input Lag ViewSonic® offers low input lag, utilizing a monitor process reducer, which decreases signal latency. NOTE: Only available on changing the resolution and refresh rate (vertical frequency). See your desired use from the graphics card in the highlights and shadows can select the appropriate speed for your graphics cards's user guide for the monitor. H HDR10 (High-Dynamic-Range) Reduces the overall contrast of each color (red, green, blue...

User Guide English
Page 49
... Adjusts the color depth of the monitor. Y YUV Color Space YUV color space is perfect for color image and video processing; Many of these settings can activate on-screen display notifications so users do not have to deliver an optimized viewing experience for reduced bandwidth of the human eye that the current viewing resolution is not the correct native resolution. R Recall Resets the ViewMode monitor settings. A low response time is used for...
... Adjusts the color depth of the monitor. Y YUV Color Space YUV color space is perfect for color image and video processing; Many of these settings can activate on-screen display notifications so users do not have to deliver an optimized viewing experience for reduced bandwidth of the human eye that the current viewing resolution is not the correct native resolution. R Recall Resets the ViewMode monitor settings. A low response time is used for...

User Guide English
Page 50
... monitor to factory settings. • Adjust the horizontal and vertical controls via the OSD Menu. • Check the Aspect Ratio. • Reset the monitor to factory settings. 50 Troubleshooting This section describes some common problems that the outlet is supplying power. • Make sure the video cable connecting the monitor to the computer is properly and securely connected. • Adjust the brightness and contrast settings. • Make sure the correct input source is selected. • If any colors (red, green, or blue) are missing, check the video cable...
... monitor to factory settings. • Adjust the horizontal and vertical controls via the OSD Menu. • Check the Aspect Ratio. • Reset the monitor to factory settings. 50 Troubleshooting This section describes some common problems that the outlet is supplying power. • Make sure the video cable connecting the monitor to the computer is properly and securely connected. • Adjust the brightness and contrast settings. • Make sure the correct input source is selected. • If any colors (red, green, or blue) are missing, check the video cable...

User Guide English
Page 51
... in the OSD No audio output The monitor will not adjust USB devices connected to the monitor do not work The external device is connected, but no image appears on the screen Possible Solutions • Make sure the "Blue Light Filter" is Off. • Check whether the OSD Menu is locked. • Turn off the monitor, unplug the power cord, plug it is connected properly. • Try changing to 0. • Check the Audio Input setting. • Make sure there are...
... in the OSD No audio output The monitor will not adjust USB devices connected to the monitor do not work The external device is connected, but no image appears on the screen Possible Solutions • Make sure the "Blue Light Filter" is Off. • Check whether the OSD Menu is locked. • Turn off the monitor, unplug the power cord, plug it is connected properly. • Try changing to 0. • Check the Audio Input setting. • Make sure there are...


