English Owner's Manual
Page 3
...audio recording legal requirements, please consult your Uniden UDS655 Firmware 52 Taking Care of these products to be in compliance with all local, state and federal law. Uniden expects consumer's use of Your Hardware 52 Receiver 52 Cameras 52 Solving Problems 53 Specifications 56 Date and...30 Multi Channel Idle Display 31 Default...32 Uniden surveillance products are hereby reserved. For further information on TV 45 Using your UDS655 14 Downloading and Using the Apps 47 UDS655 Screen Descriptions 16 UDS655 Main Menu Screen 16 Camera Setup Screen 18 Pair a New Device ...
...audio recording legal requirements, please consult your Uniden UDS655 Firmware 52 Taking Care of these products to be in compliance with all local, state and federal law. Uniden expects consumer's use of Your Hardware 52 Receiver 52 Cameras 52 Solving Problems 53 Specifications 56 Date and...30 Multi Channel Idle Display 31 Default...32 Uniden surveillance products are hereby reserved. For further information on TV 45 Using your UDS655 14 Downloading and Using the Apps 47 UDS655 Screen Descriptions 16 UDS655 Main Menu Screen 16 Camera Setup Screen 18 Pair a New Device ...
English Owner's Manual
Page 6
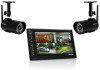
... viewed will turn to the rain, it can be submerged underwater. Setting Up the Equipment Set Up the Camera General Placement Guidelines The Uniden UDSC15 cameras included with your monitor are used for the UDSC15 camera. Water can create spots that , if they will cause a blurred image. •• Optimized motion detection range is...
... viewed will turn to the rain, it can be submerged underwater. Setting Up the Equipment Set Up the Camera General Placement Guidelines The Uniden UDSC15 cameras included with your monitor are used for the UDSC15 camera. Water can create spots that , if they will cause a blurred image. •• Optimized motion detection range is...
English Owner's Manual
Page 7
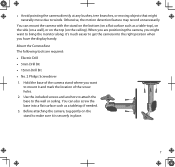
...5mm Drill Bit •• 15mm Drill Bit •• No. 2 Philips Screwdriver 1. Mount the Camera Base The following tools are positioning the camera, you have the display handy. •• Avoid pointing the camera directly at any bushes, tree branches, or moving objects that might want to mount it is securely... in place. 7 You can mount the camera with the stand on the bottom (on a flat surface such as a tabletop if needed. 3. You can also screw the base into the right ...
...5mm Drill Bit •• 15mm Drill Bit •• No. 2 Philips Screwdriver 1. Mount the Camera Base The following tools are positioning the camera, you have the display handy. •• Avoid pointing the camera directly at any bushes, tree branches, or moving objects that might want to mount it is securely... in place. 7 You can mount the camera with the stand on the bottom (on a flat surface such as a tabletop if needed. 3. You can also screw the base into the right ...
English Owner's Manual
Page 8
.... Connect one end of the monitor. 8 Set Up the Monitor 1. Remove the protective plastic from the monitor screen. 2. Tighten the camera brace up against the camera to secure it doesn't, try reconnecting the AC adapter, and make sure the power outlet isn't controlled by turning the wingnut to the... left a few turns, then turn the camera to 2 Tighten the brace against the camera to secure it to the desired direction. 4 Adjust the post to the correct angle, then tighten the wingnut to the mounting...
.... Connect one end of the monitor. 8 Set Up the Monitor 1. Remove the protective plastic from the monitor screen. 2. Tighten the camera brace up against the camera to secure it doesn't, try reconnecting the AC adapter, and make sure the power outlet isn't controlled by turning the wingnut to the... left a few turns, then turn the camera to 2 Tighten the brace against the camera to secure it to the desired direction. 4 Adjust the post to the correct angle, then tighten the wingnut to the mounting...
English Owner's Manual
Page 9
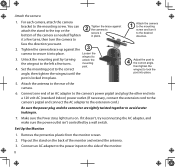
...up. Press M to the pairing option. 4. Place the camera on the top of the adapter to The Monitor The two cameras that reflects off surfaces such as glass, causing white light. Pairing Button 9 The monitor displays the Uniden title screen and then displays the LIVE view. 7. From ...scroll to pair the camera. 3. Scroll to the camera number you add cameras, install them and then pair the camera to improve the night vision, or place the camera in . Connect the other side of windows with your UDS655 are paired to your monitor at night The camera's infra-red LED shines...
...up. Press M to the pairing option. 4. Place the camera on the top of the adapter to The Monitor The two cameras that reflects off surfaces such as glass, causing white light. Pairing Button 9 The monitor displays the Uniden title screen and then displays the LIVE view. 7. From ...scroll to pair the camera. 3. Scroll to the camera number you add cameras, install them and then pair the camera to improve the night vision, or place the camera in . Connect the other side of windows with your UDS655 are paired to your monitor at night The camera's infra-red LED shines...

English Owner's Manual
Page 10
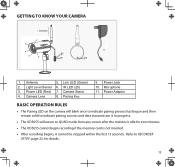
BASIC OPERATION Getting to Know Your Monitor 12 1 2 5 3 6 4 7 8 9 10 11 Your monitor operates in . The monitor's keys may operate differently based on what mode it is in three modes: M, Playback, and Record. Key M (MENU) Playback REC Mode Other 1 Link LED (Green) 2 Power/Charge LED (Red) 3 Channel Switch Cursor Left Change Camera (-) (CH-) 10
BASIC OPERATION Getting to Know Your Monitor 12 1 2 5 3 6 4 7 8 9 10 11 Your monitor operates in . The monitor's keys may operate differently based on what mode it is in three modes: M, Playback, and Record. Key M (MENU) Playback REC Mode Other 1 Link LED (Green) 2 Power/Charge LED (Red) 3 Channel Switch Cursor Left Change Camera (-) (CH-) 10
English Owner's Manual
Page 11
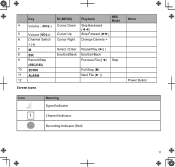
Key 4 Volume - (VOL-) 5 Volume (VOL+) 6 Channel Switch + (+) 7 M 8 ESC 9 Record/Stop (REC/DEL) 10 Zoom 11 Alarm 12 Screen icons M (MENU) Cursor Down Cursor Up Cursor Right Playback REC Mode Skip Backward (◄◄) Skip Forward (►►) Change Camera + Select / Enter Esc/Exit/Back Pause/Play (►|| ) Esc/Exit/Back Previous File (|◄) Stop Full Stop () Next File (► |) Other Power Button Icon 1 Meaning Signal Indicator Channel Indicator Recording Indicator (Red) 11
Key 4 Volume - (VOL-) 5 Volume (VOL+) 6 Channel Switch + (+) 7 M 8 ESC 9 Record/Stop (REC/DEL) 10 Zoom 11 Alarm 12 Screen icons M (MENU) Cursor Down Cursor Up Cursor Right Playback REC Mode Skip Backward (◄◄) Skip Forward (►►) Change Camera + Select / Enter Esc/Exit/Back Pause/Play (►|| ) Esc/Exit/Back Previous File (|◄) Stop Full Stop () Next File (► |) Other Power Button Icon 1 Meaning Signal Indicator Channel Indicator Recording Indicator (Red) 11

English Owner's Manual
Page 12
Second level of zoom in (X2 Zoom). 12 Zoom Level Indicator. X1 - Normal view. Icon Meaning Display Modes Quad Display Scan Display Camera Displayed There are seven audio levels. X2 - Monitor Power Indicator YYYY-MM-DD AMhh:mm:ss X1 Date and Time In ZOOM mode -
Second level of zoom in (X2 Zoom). 12 Zoom Level Indicator. X1 - Normal view. Icon Meaning Display Modes Quad Display Scan Display Camera Displayed There are seven audio levels. X2 - Monitor Power Indicator YYYY-MM-DD AMhh:mm:ss X1 Date and Time In ZOOM mode -
English Owner's Manual
Page 13
...Adaptor Basic Operation Rules •• The Pairing LED on the camera will blink once to indicate pairing process has begun and then remain solid to indicate pairing success and data transmission is in progress. •• The UDS655 will return to Recorder Setup, page 22, for two minutes.... •• The UDS655 cannot begin recording if the memory card is not inserted. •• After recording begins, it cannot be stopped within the first 15 seconds. Camera Stand 4. Pairing Key 9. Refer to QUAD mode from any screen ...
...Adaptor Basic Operation Rules •• The Pairing LED on the camera will blink once to indicate pairing process has begun and then remain solid to indicate pairing success and data transmission is in progress. •• The UDS655 will return to Recorder Setup, page 22, for two minutes.... •• The UDS655 cannot begin recording if the memory card is not inserted. •• After recording begins, it cannot be stopped within the first 15 seconds. Camera Stand 4. Pairing Key 9. Refer to QUAD mode from any screen ...
English Owner's Manual
Page 14
...Go to Recorder Setup/Record Schedule and press M. Press REC/DEL after the recording has been going for 2 seconds to turn on (Camera Setup), then the UDS655 records that recording block from quad view to single view (or back) Manually start recording Set up to record automatically Manually stop/cancel ... recording) Do This With the screen in quad view, press CH+ or CH- •• The UDS655 can record in QUAD mode (all cameras have displayed, the next press takes you must reset that camera in full screen (640 x 480). •• Press and hold power for 1 second to turn ...
...Go to Recorder Setup/Record Schedule and press M. Press REC/DEL after the recording has been going for 2 seconds to turn on (Camera Setup), then the UDS655 records that recording block from quad view to single view (or back) Manually start recording Set up to record automatically Manually stop/cancel ... recording) Do This With the screen in quad view, press CH+ or CH- •• The UDS655 can record in QUAD mode (all cameras have displayed, the next press takes you must reset that camera in full screen (640 x 480). •• Press and hold power for 1 second to turn ...
English Owner's Manual
Page 16
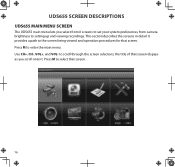
UDS655 Screen Descriptions UDS655 Main Menu Screen The UDS655 main menu lets you scroll onto it. Press M to scroll through the screen selectons; the title of that screen. This section describes the screens in detail. to enter the main menu. Use CH+, CH-, VOL+, and VOL- It provides a path to the screen being viewed and operation procedures for that screen dispays as you select from 8 screens to set your system preferences, from camera brightness to select that screen. 16 Press M to setting up and viewing recordings.
UDS655 Screen Descriptions UDS655 Main Menu Screen The UDS655 main menu lets you scroll onto it. Press M to scroll through the screen selectons; the title of that screen. This section describes the screens in detail. to enter the main menu. Use CH+, CH-, VOL+, and VOL- It provides a path to the screen being viewed and operation procedures for that screen dispays as you select from 8 screens to set your system preferences, from camera brightness to select that screen. 16 Press M to setting up and viewing recordings.
English Owner's Manual
Page 17
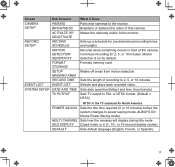
...AND TIME TV PUTPUT What it Does Pairs new cameras to the monitor. Continues recording for North America. MULTI CHANNEL Sets how the cameras will display during Idle mode IDLE DISPLAY (Quad mode or in front of that camera. Makes the cameras visible to the monitor. Records when something moves ...) Sets TV output to PAL or NTSC format. (Default = NTSC) NTSC is on by default. Brightens or darkens the video of the camera. Masks off areas from motion detection. Sets the length of recording to power saving mode. Selects and plays back recorded video. Formats memory card...
...AND TIME TV PUTPUT What it Does Pairs new cameras to the monitor. Continues recording for North America. MULTI CHANNEL Sets how the cameras will display during Idle mode IDLE DISPLAY (Quad mode or in front of that camera. Makes the cameras visible to the monitor. Records when something moves ...) Sets TV output to PAL or NTSC format. (Default = NTSC) NTSC is on by default. Brightens or darkens the video of the camera. Masks off areas from motion detection. Sets the length of recording to power saving mode. Selects and plays back recorded video. Formats memory card...
English Owner's Manual
Page 18
... Deactivate 18 Screen Sub Screens ALARM BUZZER NA PAN TILT ZOOM NA SCAN ACTIVA- The SD card must be deleted when you want to operate. Camera Setup Screen From this selection on the main menu - Set it Does You can set the alarm buzzer to ON or OFF. Zooms in and.... Allows the oldest files to be inserted and have sufficient space for the alarm buzzer to record but the memory card is full. NA TED CAMERA MEMORY CARD NA OVERWRITE What it to sound when movement triggers a motion sensitive recording.
... Deactivate 18 Screen Sub Screens ALARM BUZZER NA PAN TILT ZOOM NA SCAN ACTIVA- The SD card must be deleted when you want to operate. Camera Setup Screen From this selection on the main menu - Set it Does You can set the alarm buzzer to ON or OFF. Zooms in and.... Allows the oldest files to be inserted and have sufficient space for the alarm buzzer to record but the memory card is full. NA TED CAMERA MEMORY CARD NA OVERWRITE What it to sound when movement triggers a motion sensitive recording.

English Owner's Manual
Page 19
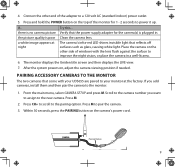
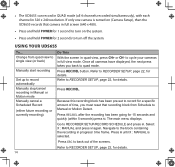
see our website at www.uniden.com for more cameras are paired to the monitor at a time! If two or more information on how to buy accessory cameras for this system. Some things to know about pairing cameras: •• If a camera is , you have to pair it detects. ...From the Setup Detail Optons screen, use VOL+ and VOL- Press M again to select the camera being added. Pair a New Device Your cameras are in pairing mode, you can't control which camera the monitor will detect first. 1. Press M. The PAIR A NEW DEVICE screen highlights the Pairing selection...
see our website at www.uniden.com for more cameras are paired to the monitor at a time! If two or more information on how to buy accessory cameras for this system. Some things to know about pairing cameras: •• If a camera is , you have to pair it detects. ...From the Setup Detail Optons screen, use VOL+ and VOL- Press M again to select the camera being added. Pair a New Device Your cameras are in pairing mode, you can't control which camera the monitor will detect first. 1. Press M. The PAIR A NEW DEVICE screen highlights the Pairing selection...

English Owner's Manual
Page 20
...press the Pairing key on the screen if pairing is successful or PAIRING FAIL if it isn't. PAIRED displays on the camera cable. If Pairing fails again, move the camera and monitor closer together and repeat. The default level is in progress. the five levels are OFF, 1 - 4. ...Press Esc to back out and return to adjust the camera's brightness; Image Brightness 1. Press M to accept the new setting and return to indicate that data transmission is 2. 3. 3. The green Pair LED on...
...press the Pairing key on the screen if pairing is successful or PAIRING FAIL if it isn't. PAIRED displays on the camera cable. If Pairing fails again, move the camera and monitor closer together and repeat. The default level is in progress. the five levels are OFF, 1 - 4. ...Press Esc to back out and return to adjust the camera's brightness; Image Brightness 1. Press M to accept the new setting and return to indicate that data transmission is 2. 3. 3. The green Pair LED on...

English Owner's Manual
Page 21
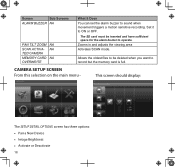
... Options screen displayed for viewing a single camera in full screen mode constantly and to record that camera in LIVE view and an SD card is in full screen (640 x 480) resolution. 1. to activate or deactivate a camera/ Cameras not paired to highlight the Camera Activation selection. 2. Press M to accept... monitor. Activate or Deactivate This feature "turns off" the camera so it won't be activated. 3. Press CH+or CH- The camera is still powered on the monitor. Select another camera if needed. This feature is useful for a camera, press CH+ to the system cannot be viewed on ,...
... Options screen displayed for viewing a single camera in full screen mode constantly and to record that camera in LIVE view and an SD card is in full screen (640 x 480) resolution. 1. to activate or deactivate a camera/ Cameras not paired to highlight the Camera Activation selection. 2. Press M to accept... monitor. Activate or Deactivate This feature "turns off" the camera so it won't be activated. 3. Press CH+or CH- The camera is still powered on the monitor. Select another camera if needed. This feature is useful for a camera, press CH+ to the system cannot be viewed on ,...
English Owner's Manual
Page 22
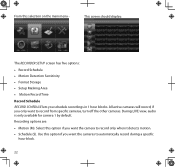
During LIVE view, audio is only available for camera 1 by default. Select this option if you only want to record from specific cameras, turn off the other cameras. From this option if you schedule recordings in 1 hour blocks. if you want the cameras to record only when it detects motion. ••... Schedule (S). Recording options are: •• Motion (M). All active cameras will record; Use this selection on the main menu - This screen should display: The Recorder setup screen has five options: •• ...
During LIVE view, audio is only available for camera 1 by default. Select this option if you only want to record from specific cameras, turn off the other cameras. From this option if you schedule recordings in 1 hour blocks. if you want the cameras to record only when it detects motion. ••... Schedule (S). Recording options are: •• Motion (M). All active cameras will record; Use this selection on the main menu - This screen should display: The Recorder setup screen has five options: •• ...
English Owner's Manual
Page 23
... record. Combine recording modes 1. The Record Schedule screen displays with the latest camera recording settings. 2. Select this option when you want to all cameras 1. From the main menu, select Recorder Setup. The Record Schedule screen displays with the latest camera recording settings. 2. to back out of the first hour block. Press ESC to...
... record. Combine recording modes 1. The Record Schedule screen displays with the latest camera recording settings. 2. Select this option when you want to all cameras 1. From the main menu, select Recorder Setup. The Record Schedule screen displays with the latest camera recording settings. 2. to back out of the first hour block. Press ESC to...
English Owner's Manual
Page 24
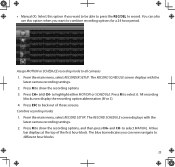
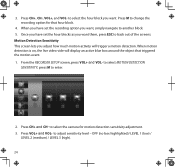
When you have set the recording option you want them, press ESC to select the camera for that triggered the motion event. 1. When motion detection is on, the live video vide will trigger a motion detection. From the Recorder Setup screen, press ...
When you have set the recording option you want them, press ESC to select the camera for that triggered the motion event. 1. When motion detection is on, the live video vide will trigger a motion detection. From the Recorder Setup screen, press ...
English Owner's Manual
Page 25
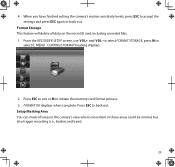
... and trees). 25 to select it. From the Recorder Setup screen, use VOL+ and VOL- Setup Masking Area You can mask off areas in the camera's view where movement in those areas could be normal, but also trigger recording (i. Format OK displays when complete. Press ESC to exit or M to ...back out. Press ESC to initiate the memory card format process. 3. 4. When you have finished setting the camera's motion sensitivity levels, press ESC to accept the settings and press Esc again to back out. Format Storage This feature will delete all data on...
... and trees). 25 to select it. From the Recorder Setup screen, use VOL+ and VOL- Setup Masking Area You can mask off areas in the camera's view where movement in those areas could be normal, but also trigger recording (i. Format OK displays when complete. Press ESC to exit or M to ...back out. Press ESC to initiate the memory card format process. 3. 4. When you have finished setting the camera's motion sensitivity levels, press ESC to accept the settings and press Esc again to back out. Format Storage This feature will delete all data on...


