User Guide
Page 2
... any sharp edges or lie across any electronic devices (except battery-powered ones) during an electrical storm. •• Use only the power cord indicated in the cord when placing your equipment, and always use the device if the adapter cords or plugs have been damaged, the monitor has been exposed to your owner's manual, included with the end user.
... any sharp edges or lie across any electronic devices (except battery-powered ones) during an electrical storm. •• Use only the power cord indicated in the cord when placing your equipment, and always use the device if the adapter cords or plugs have been damaged, the monitor has been exposed to your owner's manual, included with the end user.
User Guide
Page 3
... a blanket. Failure to follow the instructions in direct sunlight for use as a medical monitor, nor should this operating manual will void the warranty. Uniden assumes no user-serviceable parts inside. •• Do not expose the equipment to high temperatures, ...power adapter during long periods between the ages of the equipment or expose the equipment to your parent or guardian understand these terms, conditions and safety warnings with your parents or guardian to comply with any children under the age of each other. •• STRANGULATION HAZARD. Keep the adapter...
... a blanket. Failure to follow the instructions in direct sunlight for use as a medical monitor, nor should this operating manual will void the warranty. Uniden assumes no user-serviceable parts inside. •• Do not expose the equipment to high temperatures, ...power adapter during long periods between the ages of the equipment or expose the equipment to your parent or guardian understand these terms, conditions and safety warnings with your parents or guardian to comply with any children under the age of each other. •• STRANGULATION HAZARD. Keep the adapter...
User Guide
Page 4
... 8 MONITOR INSTALLATION 9 CAMERA INSTALLATION 9 Placement Considerations 9 Wall Mount 10 Suction Mount 10 Connect Power 11 BASIC OPERATION 12 WIRELESS CAMERA 12 WIRELESS MONITOR 14 LCD DISPLAY 17 USING THE UBR243 19 Viewing Modes 19 Common Operations 20 SYSTEM MENU DESCRIPTIONS 21 SYSTEM...21 Date/Time 22 Brightness 23 AV Out 23 Format Storage 24 Factory Reset 24 Language 25 Temperature Display Unit 25 Temperature Alert Range 26 ALERT...27 RECORD...28 Quality 28 Record Time 29 SPECIAL FEATURES 34 RECORDING VIDEO 34 Recording...
... 8 MONITOR INSTALLATION 9 CAMERA INSTALLATION 9 Placement Considerations 9 Wall Mount 10 Suction Mount 10 Connect Power 11 BASIC OPERATION 12 WIRELESS CAMERA 12 WIRELESS MONITOR 14 LCD DISPLAY 17 USING THE UBR243 19 Viewing Modes 19 Common Operations 20 SYSTEM MENU DESCRIPTIONS 21 SYSTEM...21 Date/Time 22 Brightness 23 AV Out 23 Format Storage 24 Factory Reset 24 Language 25 Temperature Display Unit 25 Temperature Alert Range 26 ALERT...27 RECORD...28 Quality 28 Record Time 29 SPECIAL FEATURES 34 RECORDING VIDEO 34 Recording...
User Guide
Page 5
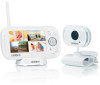
...;• Camera room temperature display on building materials and other obstructions in microphone •• Night light control •• Lullaby control 5 temperature range alert •• Recording to microSD card (supports up to 4 cameras (one camera included; not included) •• Play back recorded video •• Monitor live video from wired and wireless devices. Camera •• VGA resolution camera •• Built-in wireless signal path. •• Exceptional sound clarity...
...;• Camera room temperature display on building materials and other obstructions in microphone •• Night light control •• Lullaby control 5 temperature range alert •• Recording to microSD card (supports up to 4 cameras (one camera included; not included) •• Play back recorded video •• Monitor live video from wired and wireless devices. Camera •• VGA resolution camera •• Built-in wireless signal path. •• Exceptional sound clarity...
User Guide
Page 6
... true portability •• Audio level indicator •• Intercom •• Room temperature display •• Remote night light control •• Remote lullaby control •• Recorded video playback controls USING THE MANUAL This manual is used. •• Special Features. It also tells you should have in your equipment's function keys in the next section. •• Uniden UBR243 Screen Descriptions. Objects at or beyond...
... true portability •• Audio level indicator •• Intercom •• Room temperature display •• Remote night light control •• Remote lullaby control •• Recorded video playback controls USING THE MANUAL This manual is used. •• Special Features. It also tells you should have in your equipment's function keys in the next section. •• Uniden UBR243 Screen Descriptions. Objects at or beyond...
User Guide
Page 9
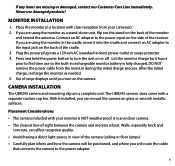
... monitor as needed. 5. Plug the power plug into the cradle and connect an AC adapter to the power input on or off. After the initial charge, recharge the monitor as a stand-alone unit, flip out the stand on the back of the receiver. CAMERA INSTALLATION The UBR243 camera and mounting clip are missing or damaged, contact our Customer Care Line immediately. The UBR243 camera does come with your camera(s). 2. Walls...
... monitor as needed. 5. Plug the power plug into the cradle and connect an AC adapter to the power input on or off. After the initial charge, recharge the monitor as a stand-alone unit, flip out the stand on the back of the receiver. CAMERA INSTALLATION The UBR243 camera and mounting clip are missing or damaged, contact our Customer Care Line immediately. The UBR243 camera does come with your camera(s). 2. Walls...
User Guide
Page 10
... screw heads. Adjust the camera as shown. 2. It also displays when the monitor is out of the screw holes on the wall. 1. Be sure to leave room for the mounting clip to mount the unit on the wall. 2. Drill holes and insert the anchors and screws provided. Suction Mount 1. Adjust the camera as needed . You can install additional cameras (maximum of range. Wall Mount The UBR243 camera mounting clip has...
... screw heads. Adjust the camera as shown. 2. It also displays when the monitor is out of the screw holes on the wall. 1. Be sure to leave room for the mounting clip to mount the unit on the wall. 2. Drill holes and insert the anchors and screws provided. Suction Mount 1. Adjust the camera as needed . You can install additional cameras (maximum of range. Wall Mount The UBR243 camera mounting clip has...
User Guide
Page 11
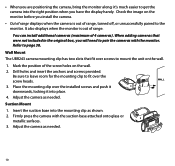
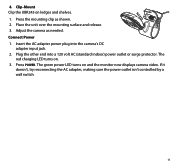
... end into the camera's DC adapter input jack. 2. Connect Power 1. Press POWER. Adjust the camera as shown. 2. The green power LED turns on . 3. The red charging LED turns on and the monitor now displays camera video. If it doesn't, try reconnecting the AC adapter, making sure the power outlet isn't controlled by a wall switch. 11 4. Place the unit over the mounting surface and release. 3. Press the mounting clip as needed. Clip-Mount Clip the UBR243 on ledges...
... end into the camera's DC adapter input jack. 2. Connect Power 1. Press POWER. Adjust the camera as shown. 2. The green power LED turns on . 3. The red charging LED turns on and the monitor now displays camera video. If it doesn't, try reconnecting the AC adapter, making sure the power outlet isn't controlled by a wall switch. 11 4. Place the unit over the mounting surface and release. 3. Press the mounting clip as needed. Clip-Mount Clip the UBR243 on ledges...
User Guide
Page 12
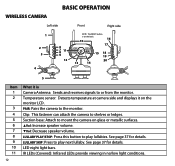
... play next lullaby. See page 37 for details. IR LEDs (Covered): Infrared LEDs provide viewing in no/low light conditions. LED night light bars. LULLABY PLAY/STOP: Press this button to mount the camera on the monitor LCD. WIRELESS CAMERA BASIC OPERATION Left side Front Right side 1 2 3 4 6 7 8 11 9 12 NOTE: The RESET button is Camera Antenna: Sends and receives signals to play lullabies. LULLABY SKIP: Press to or...
... play next lullaby. See page 37 for details. IR LEDs (Covered): Infrared LEDs provide viewing in no/low light conditions. LED night light bars. LULLABY PLAY/STOP: Press this button to mount the camera on the monitor LCD. WIRELESS CAMERA BASIC OPERATION Left side Front Right side 1 2 3 4 6 7 8 11 9 12 NOTE: The RESET button is Camera Antenna: Sends and receives signals to play lullabies. LULLABY SKIP: Press to or...
User Guide
Page 14
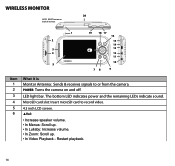
LED light bar. WIRELESS MONITOR 20 NOTE: RESET button on and off. The bottom LED indicates power and the remaining LEDs indicate sound. MicroSD card slot: Insert microSD card to or from the camera. Restart playback. 14 POWER: Turns the camera on back of monitor. 1 19 18 17 16 2 ZOOM 15 TALK 14 3 Vol 13 6 CH MENU CH OK 4 Vol 12 11 BACK MIC 10 5 78 9 Item 1 2 3 4 5 6 What it is...
LED light bar. WIRELESS MONITOR 20 NOTE: RESET button on and off. The bottom LED indicates power and the remaining LEDs indicate sound. MicroSD card slot: Insert microSD card to or from the camera. Restart playback. 14 POWER: Turns the camera on back of monitor. 1 19 18 17 16 2 ZOOM 15 TALK 14 3 Vol 13 6 CH MENU CH OK 4 Vol 12 11 BACK MIC 10 5 78 9 Item 1 2 3 4 5 6 What it is...
User Guide
Page 15
... Video Playback function one screen at a time. 10 DC 5V: Connects the DC 5V power adapter to the monitor. 11 Charge LED • Green = Battery is fully charged. • Orange = Battery is almost charged. • Red = Battery is CH◄ : • In Menus: Scroll left. • In Zoom: Scroll left. • In Live view: Switch between available cameras • In Video Playback - If the monitor...
... Video Playback function one screen at a time. 10 DC 5V: Connects the DC 5V power adapter to the monitor. 11 Charge LED • Green = Battery is fully charged. • Orange = Battery is almost charged. • Red = Battery is CH◄ : • In Menus: Scroll left. • In Zoom: Scroll left. • In Live view: Switch between available cameras • In Video Playback - If the monitor...
User Guide
Page 16
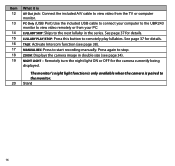
...). See page 37 for details. PC Only (USB Port):Use the included USB cable to connect your computer to the UBR243 monitor to stop. LULLABY PLAY/STOP: Press this button to start recording manually. Press again to view video remotely or from the TV or computer monitor. ZOOM: Displays the camera image in the series. See page 37 for details. Stand 16 Remotely turn the night light ON or OFF for the...
...). See page 37 for details. PC Only (USB Port):Use the included USB cable to connect your computer to the UBR243 monitor to stop. LULLABY PLAY/STOP: Press this button to start recording manually. Press again to view video remotely or from the TV or computer monitor. ZOOM: Displays the camera image in the series. See page 37 for details. Stand 16 Remotely turn the night light ON or OFF for the...
User Guide
Page 18
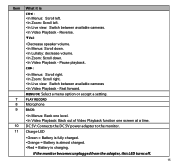
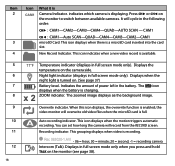
... camera side. Displays when the night light is displaying. You can set how long the camera will cycle in the following order: CH► : CAM1-CAM2-CAM3-CAM4-QUAD-AUTO SCAN - It will record from the RECORD screen. ZOOM indicator. Overwrite indicator. the video monitor will overwrite old video files when the microSD card is available. 5 6 7 8 9 10 11 12 18 77°F x 2 Temperature indicator (displays in full screen mode...
... camera side. Displays when the night light is displaying. You can set how long the camera will cycle in the following order: CH► : CAM1-CAM2-CAM3-CAM4-QUAD-AUTO SCAN - It will record from the RECORD screen. ZOOM indicator. Overwrite indicator. the video monitor will overwrite old video files when the microSD card is available. 5 6 7 8 9 10 11 12 18 77°F x 2 Temperature indicator (displays in full screen mode...
User Guide
Page 19
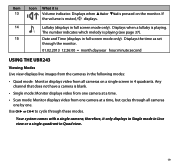
..., X displays. 14 Lullaby (displays in Quad view. 19 Displays the time as set through the monitor. 01.02.2013 12:26:00 = month.day.year hour:minute:second USING THE UBR243 Viewing Modes Live view displays live images from the cameras in the following modes: •• Quad mode: Monitor displays video from one . therefore, it is blank. •• Single mode: Monitor displays video from one camera at a time. •• Scan mode: Monitor displays video from all cameras one by one camera...
..., X displays. 14 Lullaby (displays in Quad view. 19 Displays the time as set through the monitor. 01.02.2013 12:26:00 = month.day.year hour:minute:second USING THE UBR243 Viewing Modes Live view displays live images from the cameras in the following modes: •• Quad mode: Monitor displays video from one . therefore, it is blank. •• Single mode: Monitor displays video from one camera at a time. •• Scan mode: Monitor displays video from all cameras one by one camera...
User Guide
Page 20
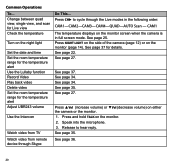
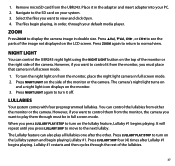
... temperature displays on the monitor screen when the camera is in the following order: CAM1-CAM2-CAM3-CAM4-QUAD-AUTO Scan - See page 37 for the temperature alert Adjust UBR243 volume Use the Intercom Watch video from TV Watch video from remote device through the Live modes in full screen mode. See page 37. See page 35. Speak into the microphone. 3. See page 25. Press NIGHT LIGHT on...
... temperature displays on the monitor screen when the camera is in the following order: CAM1-CAM2-CAM3-CAM4-QUAD-AUTO Scan - See page 37 for the temperature alert Adjust UBR243 volume Use the Intercom Watch video from TV Watch video from remote device through the Live modes in full screen mode. See page 37. See page 35. Speak into the microphone. 3. See page 25. Press NIGHT LIGHT on...
User Guide
Page 35
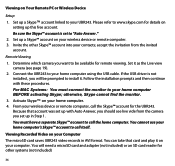
... also use Skype™ to view your system on a remote PC or wireless devices such as an iPhone®, iPad®, or AndroidTM smartphone or tablet. VIEWING LIVE VIDEO The UBR243 lets you will see that the folder or record has been deleted. The monitor screen goes blank and the TV screen displays the camera output. A confirmation screen displays. You can see a red "X" to your television. Connect the monitor to...
... also use Skype™ to view your system on a remote PC or wireless devices such as an iPhone®, iPad®, or AndroidTM smartphone or tablet. VIEWING LIVE VIDEO The UBR243 lets you will see that the folder or record has been deleted. The monitor screen goes blank and the TV screen displays the camera output. A confirmation screen displays. You can see a red "X" to your television. Connect the monitor to...
User Guide
Page 36
... "Auto Answer." 2. Remote Viewing 1. Determine which camera you set to install it. Because that card and play it as the Live view camera (see live vide from the invited account. Set up a Skype™ account on your computer. otherwise, Skype cannot find the monitor. 3. You cannot use your home computer's Skype™ account to your Computer The microSD card saves UBR243 video records in Step 1. Connect the UBR243 to call the home...
... "Auto Answer." 2. Remote Viewing 1. Determine which camera you set to install it. Because that card and play it as the Live view camera (see live vide from the invited account. Set up a Skype™ account on your computer. otherwise, Skype cannot find the monitor. 3. You cannot use your home computer's Skype™ account to your Computer The microSD card saves UBR243 video records in Step 1. Connect the UBR243 to call the home...
User Guide
Page 37
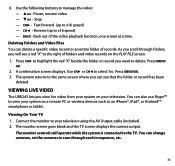
... UBR243 night light using the NIGHT LIGHT button on the top of the monitor or the right side of the monitor or the camera. Press NIGHT LIGHT on your default media player. Press NIGHT LIGHT again to turn the night light on from the monitor, you want to the SD card on the side of the camera. However, if you want to control them from the monitor, the camera you must be in full screen mode...
... UBR243 night light using the NIGHT LIGHT button on the top of the monitor or the right side of the monitor or the camera. Press NIGHT LIGHT on your default media player. Press NIGHT LIGHT again to turn the night light on from the monitor, you want to the SD card on the side of the camera. However, if you want to control them from the monitor, the camera you must be in full screen mode...

User Guide
Page 38
... Lullaby #2. Press LULLABY SKIP to skip to the monitor before mounting the cameras. 1. Press ▲Vol and ▼Vol on page 9. 38 CAMERA PAIRING The system comes with the monitor when it is powered on the monitor to play lullabies and make it the full screen live view camera. 2. Pair the cameras to Lullaby #4. USING THE INTERCOM The Intercom feature lets you want...
... Lullaby #2. Press LULLABY SKIP to skip to the monitor before mounting the cameras. 1. Press ▲Vol and ▼Vol on page 9. 38 CAMERA PAIRING The system comes with the monitor when it is powered on the monitor to play lullabies and make it the full screen live view camera. 2. Pair the cameras to Lullaby #4. USING THE INTERCOM The Intercom feature lets you want...
User Guide
Page 45
... Uniden, or (F) installed or programmed by anyone other than an authorized Uniden service center for a defect or malfunction covered by the owner's manual for this warranty, (E) used as detailed by this product. WARRANTY DURATION: This warranty to you without charge for warranty service. Warrantor, at least 20 cm (7.9") from state to the original retail owner, this warranty. THE LIMITED WARRANTY SET...
... Uniden, or (F) installed or programmed by anyone other than an authorized Uniden service center for a defect or malfunction covered by the owner's manual for this warranty, (E) used as detailed by this product. WARRANTY DURATION: This warranty to you without charge for warranty service. Warrantor, at least 20 cm (7.9") from state to the original retail owner, this warranty. THE LIMITED WARRANTY SET...


