User Manual
Page 3
... 5 AppCam Pan/Tilt Indoor Camera 5 Uniden's AppCam App 6 WHAT'S INCLUDED 6 PARTS OF THE CAMERA 7 NETWORK SETUP AND CAMERA INSTALLATION 8 OVERVIEW 8 PREREQUISITES 8 STEP 1 - INSTALL CAMERAS 11 OPERATION OVERVIEW 13 USING THE APP 14 ACCESSING YOUR CAMERAS 14 SNAPSHOT VS LIVE VIDEO SCREEN........... 14 SNAPSHOT SCREEN OVERVIEW 15 Add Another Camera 15 System Settings 15 Update 16 Information 16 System Information - Advanced Screen Details 17 Delete Camera Connection 19 Event List Details 19 LIVE VIDEO SCREEN OVERVIEW 19 View Recorded Files 21 TURN OFF THE APP 21...
... 5 AppCam Pan/Tilt Indoor Camera 5 Uniden's AppCam App 6 WHAT'S INCLUDED 6 PARTS OF THE CAMERA 7 NETWORK SETUP AND CAMERA INSTALLATION 8 OVERVIEW 8 PREREQUISITES 8 STEP 1 - INSTALL CAMERAS 11 OPERATION OVERVIEW 13 USING THE APP 14 ACCESSING YOUR CAMERAS 14 SNAPSHOT VS LIVE VIDEO SCREEN........... 14 SNAPSHOT SCREEN OVERVIEW 15 Add Another Camera 15 System Settings 15 Update 16 Information 16 System Information - Advanced Screen Details 17 Delete Camera Connection 19 Event List Details 19 LIVE VIDEO SCREEN OVERVIEW 19 View Recorded Files 21 TURN OFF THE APP 21...
User Manual
Page 5
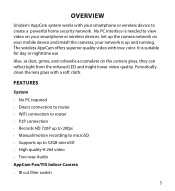
...; Direct connection to router •• WiFi connection to router •• P2P connection •• Records HD 720P up to 20fps •• Manual/motion recording to view video on your mobile device and install the cameras; It is needed to microSD •• Supports up the camera network on the camera glass, they can reflect light from the infrared LED and might lower video quality. Set up to create a powerful home security network. Also...
...; Direct connection to router •• WiFi connection to router •• P2P connection •• Records HD 720P up to 20fps •• Manual/motion recording to view video on your mobile device and install the cameras; It is needed to microSD •• Supports up the camera network on the camera glass, they can reflect light from the infrared LED and might lower video quality. Set up to create a powerful home security network. Also...

User Manual
Page 6
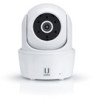
•• Night vision range - 25 feet •• Built-in microphone and speaker •• microSD card slot Uniden's AppCam App •• Multiple camera viewing and management from single app •• Remote access to recorded video •• Remote snapshot & recording control •• Event notification/email alert WHAT'S INCLUDED Camera Camera Mounting Bracket Ethernet cable 5V/1.5A Power Adapter Quick Start Guide Screws and Anchors If any items are missing or damaged, contact...
•• Night vision range - 25 feet •• Built-in microphone and speaker •• microSD card slot Uniden's AppCam App •• Multiple camera viewing and management from single app •• Remote access to recorded video •• Remote snapshot & recording control •• Event notification/email alert WHAT'S INCLUDED Camera Camera Mounting Bracket Ethernet cable 5V/1.5A Power Adapter Quick Start Guide Screws and Anchors If any items are missing or damaged, contact...
User Manual
Page 8
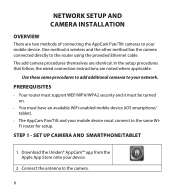
... must connect to the camera. 8 Download the Uniden® AppCam™ app from the Apple App Store onto your network. Connect the antenna to the same WiFi router for setup. In the setup procedures that follow, the wired connection instructions are identical. PREREQUISITES •• Your router must support WEP/WPA/WPA2 security and it must be turned on. •• You must have an available WiFi-enabled mobile...
... must connect to the camera. 8 Download the Uniden® AppCam™ app from the Apple App Store onto your network. Connect the antenna to the same WiFi router for setup. In the setup procedures that follow, the wired connection instructions are identical. PREREQUISITES •• Your router must support WEP/WPA/WPA2 security and it must be turned on. •• You must have an available WiFi-enabled mobile...
User Manual
Page 9
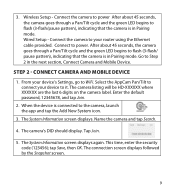
... section, Connect Camera and Mobile Device. Enter the default password, 12345678, and tap Join. 2. The camera's DID should display. From your router using the Ethernet cable provided. The System Information screen displays again. The connection screen displays followed by the Snapshot screen. 9 Wireless Setup - Wired Setup - Connect to WiFi. After about 45 seconds, the camera goes through a Pan/Tilt cycle and the green LED begins to the camera, launch the app and tap the Add New System...
... section, Connect Camera and Mobile Device. Enter the default password, 12345678, and tap Join. 2. The camera's DID should display. From your router using the Ethernet cable provided. The System Information screen displays again. The connection screen displays followed by the Snapshot screen. 9 Wireless Setup - Wired Setup - Connect to WiFi. After about 45 seconds, the camera goes through a Pan/Tilt cycle and the green LED begins to the camera, launch the app and tap the Add New System...
User Manual
Page 10
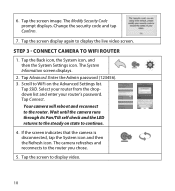
... Pan/Tilt self check and the LED returns to the steady on state to WiFi on the Advanced Settings list. STEP 3 - Tap SSID. Tap the screen image. Enter the Admin password (123456). 3. The camera refreshes and reconnects to the router. The Modify Security Code prompt displays. Your camera will reboot and reconnect to the router you chose. 5. Tap the screen to display the live video screen. Tap the screen display again to display video...
... Pan/Tilt self check and the LED returns to the steady on state to WiFi on the Advanced Settings list. STEP 3 - Tap SSID. Tap the screen image. Enter the Admin password (123456). 3. The camera refreshes and reconnects to the router. The Modify Security Code prompt displays. Your camera will reboot and reconnect to the router you chose. 5. Tap the screen to display the live video screen. Tap the screen display again to display video...
User Manual
Page 11
Access the Advanced Settings list (see Connect Camera to Time Zone. 3. Mountain Standard ͳͳ GMT-08:00 - Placement next to windows allows better transmission. •• Avoid having a direct light source in the driveway, etc. 11 Select your camera to 500 ft. -- Pacific Standard ͳͳ GMT-09:00 - INSTALL CAMERAS Consider the following when installing cameras: •• Clear line of...
Access the Advanced Settings list (see Connect Camera to Time Zone. 3. Mountain Standard ͳͳ GMT-08:00 - Placement next to windows allows better transmission. •• Avoid having a direct light source in the driveway, etc. 11 Select your camera to 500 ft. -- Pacific Standard ͳͳ GMT-09:00 - INSTALL CAMERAS Consider the following when installing cameras: •• Clear line of...

User Manual
Page 12
... screw the camera to the wall. 3. The night viewing range is 6 - 18 feet for 24-hour surveillance. the night vision LEDs will turn to the router, your camera wirelessly connected to black and white. If you want to do so, install the camera within reach of the screw holes. 2. Avoid pointing the camera lens directly at night and the picture viewed will cause a blurred image. •• Optimized motion detection range is...
... screw the camera to the wall. 3. The night viewing range is 6 - 18 feet for 24-hour surveillance. the night vision LEDs will turn to the router, your camera wirelessly connected to black and white. If you want to do so, install the camera within reach of the screw holes. 2. Avoid pointing the camera lens directly at night and the picture viewed will cause a blurred image. •• Optimized motion detection range is...

User Manual
Page 14
... follow these steps to use the Uniden AppCam app ("Uniden AppCam") to manage your AppCam operations and to take snapshots and start/stop recording live or recorded video on the network. page 15 for actions available from the Live Video screen. SNAPSHOT VS LIVE VIDEO SCREEN The Snapshot and Live Video screens control operations. The Live Video screen lets you take snapshots and remotely view live video. If you add more cameras, configure advanced settings, access and manage recorded files, update the camera connection status and check app version.
... follow these steps to use the Uniden AppCam app ("Uniden AppCam") to manage your AppCam operations and to take snapshots and start/stop recording live or recorded video on the network. page 15 for actions available from the Live Video screen. SNAPSHOT VS LIVE VIDEO SCREEN The Snapshot and Live Video screens control operations. The Live Video screen lets you take snapshots and remotely view live video. If you add more cameras, configure advanced settings, access and manage recorded files, update the camera connection status and check app version.
User Manual
Page 15
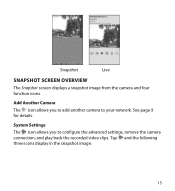
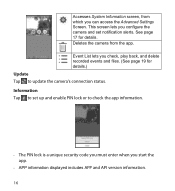
See page 9 for details. System Settings The icon allows you to add another camera to configure the advanced settings, remove the camera connection, and play back the recorded video clips. Tap and the following three icons display in the snapshot image: 15 Snapshot Live SNAPSHOT SCREEN OVERVIEW The Snapshot screen displays a snapshot image from the camera and four function icons. Add Another Camera The icon allows you to your network.
See page 9 for details. System Settings The icon allows you to add another camera to configure the advanced settings, remove the camera connection, and play back the recorded video clips. Tap and the following three icons display in the snapshot image: 15 Snapshot Live SNAPSHOT SCREEN OVERVIEW The Snapshot screen displays a snapshot image from the camera and four function icons. Add Another Camera The icon allows you to your network.
User Manual
Page 16
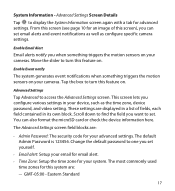
... is a unique security code you must enter when you configure the camera and set up and enable PIN lock or to update the camera's connection status. Information Tap to set notification alerts. Deletes the camera from which you can access the Advanced Settings Screen. This screen lets you start the app. •• APP information displayed includes APP and API version information. 16 Accesses System Information screen, from the app. Event List lets you...
... is a unique security code you must enter when you configure the camera and set up and enable PIN lock or to update the camera's connection status. Information Tap to set notification alerts. Deletes the camera from which you can access the Advanced Settings Screen. This screen lets you start the app. •• APP information displayed includes APP and API version information. 16 Accesses System Information screen, from the app. Event List lets you...
User Manual
Page 17
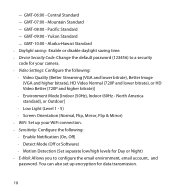
... settings. Advanced Settings Tap Advanced to display the System Information screen again with a tab for an image of fields, each field contained in your cameras. The default Admin Password is 123456. Change the default password to set. Enable Email Alert Email alerts notify you configure various settings in its own block. This screen lets you when something triggers the motion sensors on your device, such as configure specific camera settings. From this feature on . Enable Event...
... settings. Advanced Settings Tap Advanced to display the System Information screen again with a tab for an image of fields, each field contained in your cameras. The default Admin Password is 123456. Change the default password to set. Enable Email Alert Email alerts notify you configure various settings in its own block. This screen lets you when something triggers the motion sensors on your device, such as configure specific camera settings. From this feature on . Enable Event...
User Manual
Page 18
... your camera. •• Video Settings: Configure the following : ͳͳ Enable Notification (On, Off) ͳͳ Detect Mode (Off or Software) ͳͳ Motion Detection (Set separate low/high levels for Day or Night) •• E-Mail: Allows you to configure the email environment, email account, and password. Alaska-Hawaii Standard •• Daylight saving: Enable or disable daylight saving time. •• Device Security Code: Change the default password (123456) to a security code...
... your camera. •• Video Settings: Configure the following : ͳͳ Enable Notification (On, Off) ͳͳ Detect Mode (Off or Software) ͳͳ Motion Detection (Set separate low/high levels for Day or Night) •• E-Mail: Allows you to configure the email environment, email account, and password. Alaska-Hawaii Standard •• Daylight saving: Enable or disable daylight saving time. •• Device Security Code: Change the default password (123456) to a security code...
User Manual
Page 19
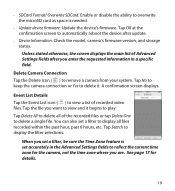
... page 17 for the camera, not the time zone where you want to view and it . Tap Search to delete it begins to overwrite the microSD card as space is set accurately in a specific field. Unless stated otherwise, the screen displays the main list of Advanced Settings fields after update. •• Device Information: Check the model, camera's firmware version, and storage status. ••...
... page 17 for the camera, not the time zone where you want to view and it . Tap Search to delete it begins to overwrite the microSD card as space is set accurately in a specific field. Unless stated otherwise, the screen displays the main list of Advanced Settings fields after update. •• Device Information: Check the model, camera's firmware version, and storage status. ••...
User Manual
Page 21
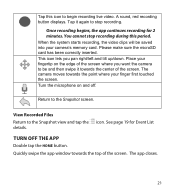
... recording begins, the app continues recording for Event List TURN OFF THE APP Double tap the HOME button. You cannot stop recording. Please make sure the microSD card has been correctly inserted. Place your fingertip on and off. icon. The camera moves towards the top of the screen. Quickly swipe the app window towards the point where your camera's memory card. This icon lets you want the camera...
... recording begins, the app continues recording for Event List TURN OFF THE APP Double tap the HOME button. You cannot stop recording. Please make sure the microSD card has been correctly inserted. Place your fingertip on and off. icon. The camera moves towards the top of the screen. Quickly swipe the app window towards the point where your camera's memory card. This icon lets you want the camera...
User Manual
Page 23
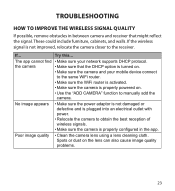
... lens can also cause image quality problems. 23 Poor image quality • Clean the camera lens using a lens cleaning cloth. Spots or dust on . • Make sure the camera and your network supports DHCP protocol. These could include furniture, cabinets, and walls. the camera • Make sure that might reflect the signal. TROUBLESHOOTING HOW TO IMPROVE THE WIRELESS SIGNAL QUALITY If possible, remove obstacles in the app...
... lens can also cause image quality problems. 23 Poor image quality • Clean the camera lens using a lens cleaning cloth. Spots or dust on . • Make sure the camera and your network supports DHCP protocol. These could include furniture, cabinets, and walls. the camera • Make sure that might reflect the signal. TROUBLESHOOTING HOW TO IMPROVE THE WIRELESS SIGNAL QUALITY If possible, remove obstacles in the app...
User Manual
Page 24
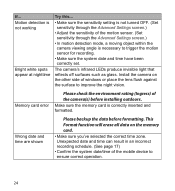
... motion sensor for recording. • Make sure the system date and time have been correctly set. If... Motion detection is not working Bright white spots appear at nighttime Try this... • Make sure the sensitivity setting is not turned OFF. (Set sensitivity through the Advanced Settings screen.) • In motion detection mode, a moving object within the camera viewing angle is correctly inserted and formatted. Install the camera on the memory card...
... motion sensor for recording. • Make sure the system date and time have been correctly set. If... Motion detection is not working Bright white spots appear at nighttime Try this... • Make sure the sensitivity setting is not turned OFF. (Set sensitivity through the Advanced Settings screen.) • In motion detection mode, a moving object within the camera viewing angle is correctly inserted and formatted. Install the camera on the memory card...
User Manual
Page 26
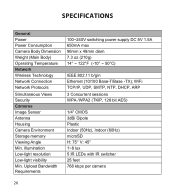
...switching power supply DC 5V 1.5A 650mA max 96mm x 48mm diam. 7.3 oz (210g) 14° ~ 122°F (-10° ~ 50°C) IEEE 802.11 b/g/n Ethernet (10/100 Base-T/Base -TX); WiFi TCP/IP, UDP, SMTP... LEDs with IR switcher 25 feet 768 kbps per camera 26 Illumination Low-light resolution Low-light visibility Min. SPECIFICATIONS General Power Power Consumption Camera Body Dimension Weight (Main Body) Operating Temperature Network Wireless Technology Network Connection Network Protocols Simultaneous Views Security Cameras Image Sensor Antenna Housing Camera Environment Storage memory Viewing ...
...switching power supply DC 5V 1.5A 650mA max 96mm x 48mm diam. 7.3 oz (210g) 14° ~ 122°F (-10° ~ 50°C) IEEE 802.11 b/g/n Ethernet (10/100 Base-T/Base -TX); WiFi TCP/IP, UDP, SMTP... LEDs with IR switcher 25 feet 768 kbps per camera 26 Illumination Low-light resolution Low-light visibility Min. SPECIFICATIONS General Power Power Consumption Camera Body Dimension Weight (Main Body) Operating Temperature Network Wireless Technology Network Connection Network Protocols Simultaneous Views Security Cameras Image Sensor Antenna Housing Camera Environment Storage memory Viewing ...

User Manual
Page 28
... outlet on , the user is encouraged to try to radio communications. This equipment generates, uses, and can be collocated or operating in accordance with any interference, including interference that Industry Canada technical specifications were met. CAUTION! RF Exposure Information The antenna used in conjunction with the instructions, may not be installed to which the monitor is no guarantee...
... outlet on , the user is encouraged to try to radio communications. This equipment generates, uses, and can be collocated or operating in accordance with any interference, including interference that Industry Canada technical specifications were met. CAUTION! RF Exposure Information The antenna used in conjunction with the instructions, may not be installed to which the monitor is no guarantee...

User Manual
Page 29
... used as part of any conversion kits, subassemblies, or any other than as detailed by the owner's manual for a defect or malfunction covered by warrantor or its option, may replace the unit with equipment or parts or as part of the European Community. WARRANTOR: Uniden America Corporation ("Uniden") ELEMENTS OF WARRANTY: Uniden warrants, for parts, service, or any configurations not sold by Uniden, (C) improperly installed, (D) serviced or repaired...
... used as part of any conversion kits, subassemblies, or any other than as detailed by the owner's manual for a defect or malfunction covered by warrantor or its option, may replace the unit with equipment or parts or as part of the European Community. WARRANTOR: Uniden America Corporation ("Uniden") ELEMENTS OF WARRANTY: Uniden warrants, for parts, service, or any configurations not sold by Uniden, (C) improperly installed, (D) serviced or repaired...


