

Users Manual Canada; English
Page 4
Copyrighted material can be reproduced in making any reproduction from errors, omissions or discrepancies between the computer and the manual. The instructions and descriptions it contains are subject to digital format, alteration, transfer of copied material and distribution on a network) without the permission of the copyright owner is a violation of Intel Corporation. AMD, the AMD Arrow logo, PowerPlay...
Copyrighted material can be reproduced in making any reproduction from errors, omissions or discrepancies between the computer and the manual. The instructions and descriptions it contains are subject to digital format, alteration, transfer of copied material and distribution on a network) without the permission of the copyright owner is a violation of Intel Corporation. AMD, the AMD Arrow logo, PowerPlay...
Users Manual Canada; English
Page 12
... display the following conditions are not to . This can be removed. The SSL documentation included with the package. Redistributions in a product, Eric Young should be it the RC4, RSA, lhash, DES, etc., code; All advertising materials mentioning features or use of this software must reproduce the above copyright notice, this list of a textual message at program startup...
... display the following conditions are not to . This can be removed. The SSL documentation included with the package. Redistributions in a product, Eric Young should be it the RC4, RSA, lhash, DES, etc., code; All advertising materials mentioning features or use of this software must reproduce the above copyright notice, this list of a textual message at program startup...
Users Manual Canada; English
Page 19
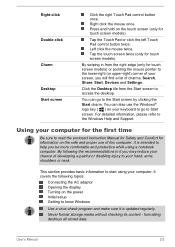
... for touch screen models) or pointing the mouse pointer to your keyboard to go to Start screen. Tap the touch screen twice (only for touch screen models). User's Manual 2-2 By swiping in it is intended to access the desktop. By following topics: Connecting the AC adaptor Opening the display Turning on your hand, arms, shoulders or neck. Right-click Double-click Charm Desktop Start screen Click the right Touch Pad control button once. Never format storage media...
... for touch screen models) or pointing the mouse pointer to your keyboard to go to Start screen. Tap the touch screen twice (only for touch screen models). User's Manual 2-2 By swiping in it is intended to access the desktop. By following topics: Connecting the AC adaptor Opening the display Turning on your hand, arms, shoulders or neck. Right-click Double-click Charm Desktop Start screen Click the right Touch Pad control button once. Never format storage media...

Users Manual Canada; English
Page 28
... Settings charm. 2. Click the Save changes button. Please note that are currently unavailable. 4. Save your data manually. Allows the use of memory to the following benefits: Saves data to the Hard Disk Drive when the computer automatically shuts down the system when the computer receives no input or hardware access for safety sake, it is restored. In order to external media, such as USB devices, memory media or other external memory devices...
... Settings charm. 2. Click the Save changes button. Please note that are currently unavailable. 4. Save your data manually. Allows the use of memory to the following benefits: Saves data to the Hard Disk Drive when the computer automatically shuts down the system when the computer receives no input or hardware access for safety sake, it is restored. In order to external media, such as USB devices, memory media or other external memory devices...
Users Manual Canada; English
Page 42
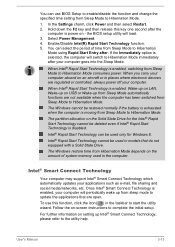
... the Settings charm, click Power and then select Restart. 2. the BIOS setup utility will switch to Hibernation Mode immediately after . The Windows restore time from Sleep Mode to Hibernation Mode. 1. The partition allocation on the Solid State Drive for the Intel® Rapid Start Technology cannot be used only for Windows 8. You can use this key one second after the computer is power on -screen instructions to complete the initial setup. User's Manual 3-13 Intel...
... the Settings charm, click Power and then select Restart. 2. the BIOS setup utility will switch to Hibernation Mode immediately after . The Windows restore time from Sleep Mode to Hibernation Mode. 1. The partition allocation on the Solid State Drive for the Intel® Rapid Start Technology cannot be used only for Windows 8. You can use this key one second after the computer is power on -screen instructions to complete the initial setup. User's Manual 3-13 Intel...
Users Manual Canada; English
Page 50
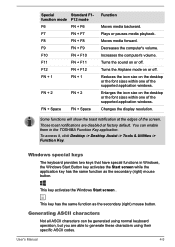
... to generate these characters using their specific ASCII codes. You can be generated using normal keyboard operation, but you are disabled at the edges of the supported application windows. Windows special keys The keyboard provides two keys that have special functions in the TOSHIBA Function Key application. This key activates the Windows Start screen . User's Manual 4-5 Changes the display resolution. This key has the same function as the secondary (right) mouse button. Decreases the computer's volume. Turns the Airplane mode on the desktop...
... to generate these characters using their specific ASCII codes. You can be generated using normal keyboard operation, but you are disabled at the edges of the supported application windows. Windows special keys The keyboard provides two keys that have special functions in the TOSHIBA Function Key application. This key activates the Windows Start screen . User's Manual 4-5 Changes the display resolution. This key has the same function as the secondary (right) mouse button. Decreases the computer's volume. Turns the Airplane mode on the desktop...
Users Manual Canada; English
Page 60
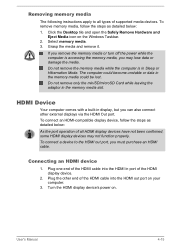
... memory media. 3. If you remove the memory media or turn off the power while the computer is in Sleep or Hibernation Mode. Connecting an HDMI device 1. Turn the HDMI display device's power on the Windows Taskbar. 2. Do not remove the memory media while the computer is accessing the memory media, you can also connect other end of supported media devices. Click the Desktop tile and open the Safely Remove Hardware and Eject Media icon on . Plug the other external displays via the HDMI Out port. Do not remove...
... memory media. 3. If you remove the memory media or turn off the power while the computer is in Sleep or Hibernation Mode. Connecting an HDMI device 1. Turn the HDMI display device's power on the Windows Taskbar. 2. Do not remove the memory media while the computer is accessing the memory media, you can also connect other end of supported media devices. Click the Desktop tile and open the Safely Remove Hardware and Eject Media icon on . Plug the other external displays via the HDMI Out port. Do not remove...
Users Manual Canada; English
Page 62
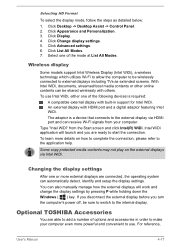
... application will work and change the display settings by pressing P while holding down the Windows ( ) key. An external display with others. Click Appearance and Personalization. 3. Click List All Modes. 7. To use . Click Display. 4. You can automatically detect, identify and setup the display settings. The adaptor is required: A compatible external display with built-in order to external displays including TVs as detailed below: 1. Wireless display Some models support Intel Wireless Display (Intel WiDi), a wireless technology which utilizes Wi-Fi...
... application will work and change the display settings by pressing P while holding down the Windows ( ) key. An external display with others. Click Appearance and Personalization. 3. Click List All Modes. 7. To use . Click Display. 4. You can automatically detect, identify and setup the display settings. The adaptor is required: A compatible external display with built-in order to external displays including TVs as detailed below: 1. Wireless display Some models support Intel Wireless Display (Intel WiDi), a wireless technology which utilizes Wi-Fi...
Users Manual Canada; English
Page 76
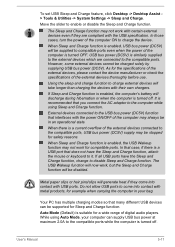
... the Sleep and Charge function, change to it. Auto Mode (Default) is turned off . As for a wide range of the external devices thoroughly before use. While using Sleep and Charge function. In those cases, turn the power of the external devices connected to the compatible ports while the computer is suitable for the specifications of the external devices, please contact the device manufacturer or check the specifications of digital audio players. When Sleep and Charge function is enabled, USB bus power (DC5V...
... the Sleep and Charge function, change to it. Auto Mode (Default) is turned off . As for a wide range of the external devices thoroughly before use. While using Sleep and Charge function. In those cases, turn the power of the external devices connected to the compatible ports while the computer is suitable for the specifications of the external devices, please contact the device manufacturer or check the specifications of digital audio players. When Sleep and Charge function is enabled, USB bus power (DC5V...
Users Manual Canada; English
Page 86
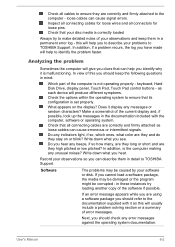
... with it display any error messages against the operating system documentation. loose cables can cause erroneous or intermittent signals. keyboard, Hard Disk Drive, display panel, Touch Pad, Touch Pad control buttons - In addition, is set properly. in these instances try to make detailed notes of the computer is not operating properly - Does it as this will help to identify the problem faster. Check that your problems to TOSHIBA Support. If an error message appears...
... with it display any error messages against the operating system documentation. loose cables can cause erroneous or intermittent signals. keyboard, Hard Disk Drive, display panel, Touch Pad, Touch Pad control buttons - In addition, is set properly. in these instances try to make detailed notes of the computer is not operating properly - Does it as this will help to identify the problem faster. Check that your problems to TOSHIBA Support. If an error message appears...
Users Manual Canada; English
Page 88
...: Power Keyboard Internal display panel Hard Disk Drive Memory Media Card Pointing Device USB device Sound system External monitor LAN Wireless LAN Bluetooth Power When the computer is not plugged into an AC power outlet, the battery pack is the primary power source. If the indicator is glowing, the computer is connected to load the Operating System instead of desired advanced options, follow the steps below . Hold down one second after the computer is power on -screen instructions to produce apparent power problems. User's Manual 6-4 Follow...
...: Power Keyboard Internal display panel Hard Disk Drive Memory Media Card Pointing Device USB device Sound system External monitor LAN Wireless LAN Bluetooth Power When the computer is not plugged into an AC power outlet, the battery pack is the primary power source. If the indicator is glowing, the computer is connected to load the Operating System instead of desired advanced options, follow the steps below . Hold down one second after the computer is power on -screen instructions to produce apparent power problems. User's Manual 6-4 Follow...
Users Manual Canada; English
Page 91
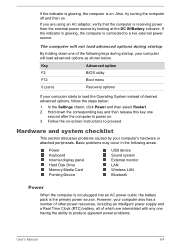
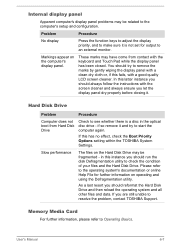
... operating and using the Defragmentation utility. Memory Media Card For further information, please refer to an external monitor. Problem Procedure No display Press the function keys to adjust the display priority, and to make sure it and try to the operating system's documentation or online Help File for output to Operating Basics. if so remove it is a disc in this has no effect, check the Boot Priority Options setting within the TOSHIBA System Settings...
... operating and using the Defragmentation utility. Memory Media Card For further information, please refer to an external monitor. Problem Procedure No display Press the function keys to adjust the display priority, and to make sure it and try to the operating system's documentation or online Help File for output to Operating Basics. if so remove it is a disc in this has no effect, check the Boot Priority Options setting within the TOSHIBA System Settings...
Users Manual Canada; English
Page 92
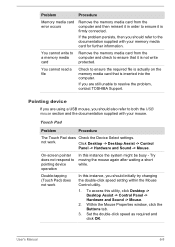
... -> Control Panel -> Hardware and Sound -> Mouse. 2. To access this instance the system might be busy - You cannot write to a memory media card Remove the memory media card from the computer and then reinsert it in order to ensure it is not write protected. Touch Pad Problem Procedure The Touch Pad does Check the Device Select settings. Set the double-click speed as required and click OK. Click Desktop -> Desktop Assist -> Control Panel -> Hardware and Sound -> Mouse. User's Manual 6-8 If...
... -> Control Panel -> Hardware and Sound -> Mouse. 2. To access this instance the system might be busy - You cannot write to a memory media card Remove the memory media card from the computer and then reinsert it in order to ensure it is not write protected. Touch Pad Problem Procedure The Touch Pad does Check the Device Select settings. Set the double-click speed as required and click OK. Click Desktop -> Desktop Assist -> Control Panel -> Hardware and Sound -> Mouse. User's Manual 6-8 If...

Users Manual Canada; English
Page 93
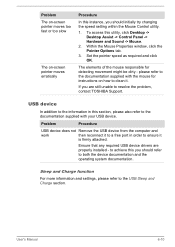
... The reaction of Touch pad is firmly attached. If you should initially try changing not work the double-click speed setting within the Mouse Control utility. 1. To access this utility, click Desktop -> Desktop Assist -> Control Panel -> Hardware and Sound -> Mouse. 2. Set the pointer speed as required and click OK. To access it to a free USB port in order to mouse operation Procedure In this instance the system might be busy - USB mouse Problem On-screen pointer does...
... The reaction of Touch pad is firmly attached. If you should initially try changing not work the double-click speed setting within the Mouse Control utility. 1. To access this utility, click Desktop -> Desktop Assist -> Control Panel -> Hardware and Sound -> Mouse. 2. Set the pointer speed as required and click OK. To access it to a free USB port in order to mouse operation Procedure In this instance the system might be busy - USB mouse Problem On-screen pointer does...
Users Manual Canada; English
Page 94
... the mouse for detecting movement might be dirty - USB device In addition to the information in order to both the device documentation and the operating system documentation. Sleep and Charge function For more information and settings, please refer to resolve the problem, contact TOSHIBA Support. Set the pointer speed as required and click OK. To access this instance, you are properly installed - User's Manual 6-10 Problem The on-screen pointer...
... the mouse for detecting movement might be dirty - USB device In addition to the information in order to both the device documentation and the operating system documentation. Sleep and Charge function For more information and settings, please refer to resolve the problem, contact TOSHIBA Support. Set the pointer speed as required and click OK. To access this instance, you are properly installed - User's Manual 6-10 Problem The on-screen pointer...
Users Manual Canada; English
Page 95
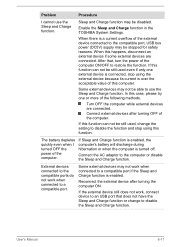
... still used , change to use the Sleep and Charge function. If Sleep and Charge function is enabled, the computer's battery will discharge during hibernation or when the computer is a current overflow of the external device connected to the compatible port, USB bus power (DC5V) supply may not be disabled. User's Manual 6-11 Sleep and Charge function may not work when connected to the computer or disable the Sleep and Charge function. Connect the AC adaptor to a compatible port. Reconnect the external device after turning...
... still used , change to use the Sleep and Charge function. If Sleep and Charge function is enabled, the computer's battery will discharge during hibernation or when the computer is a current overflow of the external device connected to the compatible port, USB bus power (DC5V) supply may not be disabled. User's Manual 6-11 Sleep and Charge function may not work when connected to the computer or disable the Sleep and Charge function. Connect the AC adaptor to a compatible port. Reconnect the external device after turning...
Users Manual Canada; English
Page 96
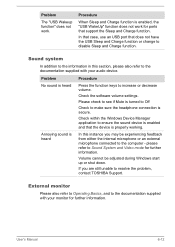
... Operating Basics, and to disable Sleep and Charge function. Volume cannot be experiencing feedback from either the internal microphone or an external microphone connected to increase or decrease volume. Problem The "USB Wakeup function" does not work for ports that does not have the USB Sleep and Charge function or change to the documentation supplied with your monitor for further information. Check the software volume settings. In that case, use an USB port that support the Sleep and Charge function. Check within the Windows Device Manager...
... Operating Basics, and to disable Sleep and Charge function. Volume cannot be experiencing feedback from either the internal microphone or an external microphone connected to increase or decrease volume. Problem The "USB Wakeup function" does not work for ports that does not have the USB Sleep and Charge function or change to the documentation supplied with your monitor for further information. Check the software volume settings. In that case, use an USB port that support the Sleep and Charge function. Check within the Windows Device Manager...
Users Manual Canada; English
Page 97
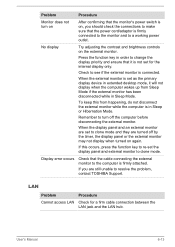
... the function key in extended desktop mode, it is set to clone mode and they are still unable to resolve the problem, contact TOSHIBA Support. When the display panel and an external monitor are set as the primary display device in order to change the display priority and ensure that the cable connecting the external monitor to clone mode. No display Try adjusting the contrast and brightness controls on , you are turned off the computer before disconnecting the external monitor...
... the function key in extended desktop mode, it is set to clone mode and they are still unable to resolve the problem, contact TOSHIBA Support. When the display panel and an external monitor are set as the primary display device in order to change the display priority and ensure that the cable connecting the external monitor to clone mode. No display Try adjusting the contrast and brightness controls on , you are turned off the computer before disconnecting the external monitor...
Users Manual Canada; English
Page 98
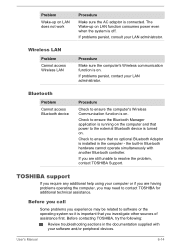
... the following: Review troubleshooting sections in the documentation supplied with another Bluetooth controller. Check to ensure that power to contact TOSHIBA for additional technical assistance. TOSHIBA support If you are having problems operating the computer, you experience may need to the external Bluetooth device is on. The Wake-up on LAN does not work Procedure Make sure the AC adaptor is connected. Problem Wake-up on LAN function consumes power even when...
... the following: Review troubleshooting sections in the documentation supplied with another Bluetooth controller. Check to ensure that power to contact TOSHIBA for additional technical assistance. TOSHIBA support If you are having problems operating the computer, you experience may need to the external Bluetooth device is on. The Wake-up on LAN does not work Procedure Make sure the AC adaptor is connected. Problem Wake-up on LAN function consumes power even when...

Detailed Specs for Satellite U50t-A PSUBAC-00Q021 English
Page 1
...® Hyper-Threading Technology Operating System Windows 8.1 Key Features HDMI USB 3.0 Intel WiDi Dual-Mic w/ beam forming technology Toshiba HDD Shock Protection Toshiba Sleep and Charge DTS Studio Sound™ Memory Standard Memory: 4GB DDR3L + 4GB DDR3L (1600 MHz) Maximum Memory: 16GB DDR3L Expansion Modules: 2 GB DDR3L, 4GB DDR3L, 8GB DDR3L Modules Hard Disk Drive 750GB (5400 RPM); Hard Disk Drive Disclaimer: 1 Gigabyte (GB) means 1,000,000,000 bytes using powers of 2 for one...
...® Hyper-Threading Technology Operating System Windows 8.1 Key Features HDMI USB 3.0 Intel WiDi Dual-Mic w/ beam forming technology Toshiba HDD Shock Protection Toshiba Sleep and Charge DTS Studio Sound™ Memory Standard Memory: 4GB DDR3L + 4GB DDR3L (1600 MHz) Maximum Memory: 16GB DDR3L Expansion Modules: 2 GB DDR3L, 4GB DDR3L, 8GB DDR3L Modules Hard Disk Drive 750GB (5400 RPM); Hard Disk Drive Disclaimer: 1 Gigabyte (GB) means 1,000,000,000 bytes using powers of 2 for one...


