
User Guide
Page 48
... slots on page 45. You may want to increase the computer's memory if you may want to run most of today's popular applications. The surrounding area may be hot. See "Setting up your software. NOTE Before adding external devices or memory, Toshiba recommends setting up your system or visit accessories.toshiba.com. Installing a memory module Memory modules...
... slots on page 45. You may want to increase the computer's memory if you may want to run most of today's popular applications. The surrounding area may be hot. See "Setting up your software. NOTE Before adding external devices or memory, Toshiba recommends setting up your system or visit accessories.toshiba.com. Installing a memory module Memory modules...
User Guide
Page 49
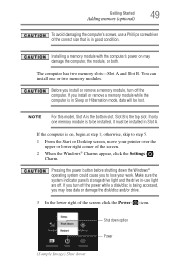
...size that is in good condition. Shut down option Power (Sample Image) Shut down the Windows® operating system could cause you install or remove a memory module, turn off the power while a disk/disc is in Sleep or Hibernation mode, data will be installed in -use a Phillips screwdriver of the ...lose data or damage the disk/disc and/or drive. 3 In the lower right of the screen click the Power ( ) icon. The computer has two memory slots-Slot A and Slot B. If you may damage the computer, the module, or both. Pressing the power button before shutting down NOTE For this model...
...size that is in good condition. Shut down option Power (Sample Image) Shut down the Windows® operating system could cause you install or remove a memory module, turn off the power while a disk/disc is in Sleep or Hibernation mode, data will be installed in -use a Phillips screwdriver of the ...lose data or damage the disk/disc and/or drive. 3 In the lower right of the screen click the Power ( ) icon. The computer has two memory slots-Slot A and Slot B. If you may damage the computer, the module, or both. Pressing the power button before shutting down NOTE For this model...
User Guide
Page 50
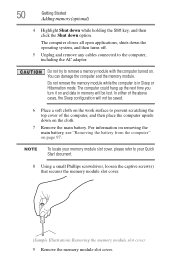
... cloth. 7 Remove the main battery. NOTE To locate your memory module slot cover, please refer to your Quick Start document. 8 Using a small Phillips screwdriver, loosen the captive screw(s) that secures the memory module slot cover. (Sample Illustration) Removing the memory module slot cover 9 Remove the memory module slot cover. In either of the computer, and then place the...
... cloth. 7 Remove the main battery. NOTE To locate your memory module slot cover, please refer to your Quick Start document. 8 Using a small Phillips screwdriver, loosen the captive screw(s) that secures the memory module slot cover. (Sample Illustration) Removing the memory module slot cover 9 Remove the memory module slot cover. In either of the computer, and then place the...

User Guide
Page 51
...the connector may have built up the memory module by performing steps 2-3 of the computer. NOTE If no memory slot is to discharge any contact with its connector. 12 Locate an empty memory module slot on the underside of "Removing a memory module" on the computer. NOTE If ...your system has the memory modules stacked on top of one memory module is available, you...
...the connector may have built up the memory module by performing steps 2-3 of the computer. NOTE If no memory slot is to discharge any contact with its connector. 12 Locate an empty memory module slot on the underside of "Removing a memory module" on the computer. NOTE If ...your system has the memory modules stacked on top of one memory module is available, you...
User Guide
Page 52
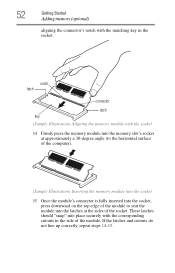
... connector latch key (Sample Illustration) Aligning the memory module with the socket 14 Firmly press the memory module into the memory slot's socket at approximately a 30-degree angle (to the horizontal surface of the computer). (Sample Illustration) Inserting the memory module into the socket 15 Once the module's...the module to seat the module into place securely with the matching key in the side of the socket. 52 Getting Started Adding memory (optional) aligning the connector's notch with the corresponding cutouts in the socket. These latches should "snap" into the latches at...
... connector latch key (Sample Illustration) Aligning the memory module with the socket 14 Firmly press the memory module into the memory slot's socket at approximately a 30-degree angle (to the horizontal surface of the computer). (Sample Illustration) Inserting the memory module into the socket 15 Once the module's...the module to seat the module into place securely with the matching key in the side of the socket. 52 Getting Started Adding memory (optional) aligning the connector's notch with the corresponding cutouts in the socket. These latches should "snap" into the latches at...

User Guide
Page 53
... on inserting the main battery, see "Inserting a charged battery" on the memory module Do not force the memory module into the slot NOTE For this model, Slot A is the bottom slot. Getting Started 53 Adding memory (optional) latch latch (Sample Illustration) Pressing down on page 99. 18 Turn... the computer right side up. If only one memory module is the top slot. The memory module should be installed in place. Back of computer Slot B Slot A (Sample Illustration) Inserting the memory module into position. Make sure to be installed, it must be completely ...
... on inserting the main battery, see "Inserting a charged battery" on the memory module Do not force the memory module into the slot NOTE For this model, Slot A is the bottom slot. Getting Started 53 Adding memory (optional) latch latch (Sample Illustration) Pressing down on page 99. 18 Turn... the computer right side up. If only one memory module is the top slot. The memory module should be installed in place. Back of computer Slot B Slot A (Sample Illustration) Inserting the memory module into position. Make sure to be installed, it must be completely ...

User Guide
Page 54
... possibly resulting in Sleep mode). You can now continue setting up the computer, verify that the computer has recognized the additional memory module. Removing a memory module If you are protected from overheating when the power is turned on page 56. TECHNICAL NOTE: You must have adequate ... on page 48 to work. 54 Getting Started Adding memory (optional) Always make sure your computer and AC adaptor have at least one memory module installed for the computer to shut down the computer and open the memory module slot cover. In this condition, observe the following: ❖...
... possibly resulting in Sleep mode). You can now continue setting up the computer, verify that the computer has recognized the additional memory module. Removing a memory module If you are protected from overheating when the power is turned on page 56. TECHNICAL NOTE: You must have adequate ... on page 48 to work. 54 Getting Started Adding memory (optional) Always make sure your computer and AC adaptor have at least one memory module installed for the computer to shut down the computer and open the memory module slot cover. In this condition, observe the following: ❖...
User Guide
Page 55
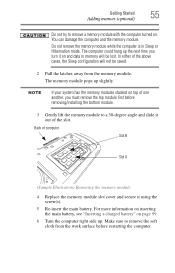
... not try to a 30-degree angle and slide it out of computer Slot B Slot A (Sample Illustration) Removing the memory module 4 Replace the memory module slot cover and secure it on and data in Sleep or Hibernation mode. Back of the slot. The computer could hang up the next time you must remove the top... module first before restarting the computer. The memory module pops up . You can damage the computer and the memory module. Make sure to remove the soft cloth ...
... not try to a 30-degree angle and slide it out of computer Slot B Slot A (Sample Illustration) Removing the memory module 4 Replace the memory module slot cover and secure it on and data in Sleep or Hibernation mode. Back of the slot. The computer could hang up the next time you must remove the top... module first before restarting the computer. The memory module pops up . You can damage the computer and the memory module. Make sure to remove the soft cloth ...
User Guide
Page 56
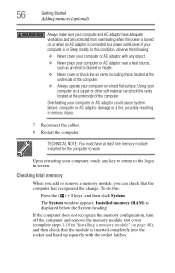
... socket and lined up squarely with any key to return to work. Checking total memory When you add or remove a memory module, you can block the vents located at least one memory module installed for the computer to the login in Sleep mode). To do this condition...failure, computer or AC adaptor damage or a fire, possibly resulting in "Installing a memory module" on a hard flat surface. If the computer does not recognize the memory configuration, turn off the computer and remove the memory module slot cover (complete steps 1-10 in serious injury. 7 Reconnect the cables. 8 Restart the...
... socket and lined up squarely with any key to return to work. Checking total memory When you add or remove a memory module, you can block the vents located at least one memory module installed for the computer to the login in Sleep mode). To do this condition...failure, computer or AC adaptor damage or a fire, possibly resulting in "Installing a memory module" on a hard flat surface. If the computer does not recognize the memory configuration, turn off the computer and remove the memory module slot cover (complete steps 1-10 in serious injury. 7 Reconnect the cables. 8 Restart the...
User Guide
Page 112
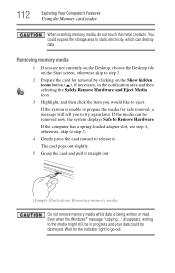
... Do not remove memory media while data is unable to prepare the media for safe removal, a message will tell you to try again later. If the media can destroy data. If the computer has a spring-loaded adapter slot, see step 4; If the system is being written or read. disappears, ... can be destroyed. The card pops out slightly. 5 Grasp the card and pull it . 112 Exploring Your Computer's Features Using the Memory card reader When inserting memory media, do not touch the metal contacts. Even when the Windows® message "copying..." Wait for removal by clicking on the Show ...
... Do not remove memory media while data is unable to prepare the media for safe removal, a message will tell you to try again later. If the media can destroy data. If the computer has a spring-loaded adapter slot, see step 4; If the system is being written or read. disappears, ... can be destroyed. The card pops out slightly. 5 Grasp the card and pull it . 112 Exploring Your Computer's Features Using the Memory card reader When inserting memory media, do not touch the metal contacts. Even when the Windows® message "copying..." Wait for removal by clicking on the Show ...

User Guide
Page 142
... power the computer nor recharge the batteries. The battery does not charge while the computer is the bottom slot. If you plug in Slot A. NOTE For this is working properly by the memory module. Power problems are firmly plugged into both the wall outlet and the computer. If the AC power... come on page 97. The battery may be inserted correctly in a lamp or other appliance. If the error recurs without the memory module installed, the error is the top slot. Try turning off the computer, remove the battery, clean the contacts with a soft dry cloth (if necessary) and replace the...
... power the computer nor recharge the batteries. The battery does not charge while the computer is the bottom slot. If you plug in Slot A. NOTE For this is working properly by the memory module. Power problems are firmly plugged into both the wall outlet and the computer. If the AC power... come on page 97. The battery may be inserted correctly in a lamp or other appliance. If the error recurs without the memory module installed, the error is the top slot. Try turning off the computer, remove the battery, clean the contacts with a soft dry cloth (if necessary) and replace the...
User Guide
Page 184
.../decrease buttons 84 memory adding (optional) 48 check total memory 56 removing memory module slot cover 50 Memory card reader inserting memory media 111 removing memory media 112 using 111 memory module installation 48 inserting... into socket 51 removing 54, 55 microphone using 109 monitor connecting 72 monitor problems troubleshooting 144 monitoring battery power 92 mouse properties 80 moving the computer 75 N network accessing 108 connecting your computer 108 networking wireless 108 notification area 106 notifications 107 O online resources Toshiba...
.../decrease buttons 84 memory adding (optional) 48 check total memory 56 removing memory module slot cover 50 Memory card reader inserting memory media 111 removing memory media 112 using 111 memory module installation 48 inserting... into socket 51 removing 54, 55 microphone using 109 monitor connecting 72 monitor problems troubleshooting 144 monitoring battery power 92 mouse properties 80 moving the computer 75 N network accessing 108 connecting your computer 108 networking wireless 108 notification area 106 notifications 107 O online resources Toshiba...
User Guide
Page 185
...optimum performance 90 power plans selecting power plan options 95 power saving options 95 precautions safety 38 printer troubleshooting 149 problem solving contacting Toshiba 159 Startup options 137 projector connecting 72 R real-time clock (RTC) battery 89 recording sounds 109 recovery creating recovery media ...45 removing an optical disc with computer on 86 and optical disc with computer off 86 battery from the computer 97 memory module 54 memory module slot cover 50 restart computer 46 restore points troubleshooting 154 running computer on battery power 88 S safety computer 102 disposing of...
...optimum performance 90 power plans selecting power plan options 95 power saving options 95 precautions safety 38 printer troubleshooting 149 problem solving contacting Toshiba 159 Startup options 137 projector connecting 72 R real-time clock (RTC) battery 89 recording sounds 109 recovery creating recovery media ...45 removing an optical disc with computer on 86 and optical disc with computer off 86 battery from the computer 97 memory module 54 memory module slot cover 50 restart computer 46 restore points troubleshooting 154 running computer on battery power 88 S safety computer 102 disposing of...


