User Guide
Page 2
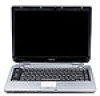
... TO ANY TROUBLE, FAILURE OR MALFUNCTION OF THE HARD DISK DRIVE OR OTHER STORAGE DEVICES AND THE DATA CANNOT BE RECOVERED, TOSHIBA SHALL NOT BE LIABLE FOR ANY DAMAGE OR LOSS OF DATA, OR ANY OTHER DAMAGE RESULTING THEREFROM. 2 Models: Satellite® M35 Series ReWritable CD/DVD Drives The computer ... may not function properly and you have purchased is not designed for any other storage devices as a precaution against possible failures, alteration, or loss of all set-up and usage instructions in the applicable user guides and/or manuals enclosed. YOU AGREE THAT TOSHIBA, ITS AFFILIATES...
... TO ANY TROUBLE, FAILURE OR MALFUNCTION OF THE HARD DISK DRIVE OR OTHER STORAGE DEVICES AND THE DATA CANNOT BE RECOVERED, TOSHIBA SHALL NOT BE LIABLE FOR ANY DAMAGE OR LOSS OF DATA, OR ANY OTHER DAMAGE RESULTING THEREFROM. 2 Models: Satellite® M35 Series ReWritable CD/DVD Drives The computer ... may not function properly and you have purchased is not designed for any other storage devices as a precaution against possible failures, alteration, or loss of all set-up and usage instructions in the applicable user guides and/or manuals enclosed. YOU AGREE THAT TOSHIBA, ITS AFFILIATES...
User Guide
Page 28
... Power management 105 Using additional batteries 106 Charging the batteries 106 Maximizing battery life 107 Charging the main battery 108 Charging the RTC battery 109 Monitoring battery power 110 Determining remaining battery power 111 Conserving battery power 113 Power profiles in Windows XP 114 Using a hot key to set the power profile..........114 Additional options for power 115 What to do when the battery runs low 115 What to do when the battery alarm sounds ....116 Changing the main battery 116 Removing the battery...
... Power management 105 Using additional batteries 106 Charging the batteries 106 Maximizing battery life 107 Charging the main battery 108 Charging the RTC battery 109 Monitoring battery power 110 Determining remaining battery power 111 Conserving battery power 113 Power profiles in Windows XP 114 Using a hot key to set the power profile..........114 Additional options for power 115 What to do when the battery runs low 115 What to do when the battery alarm sounds ....116 Changing the main battery 116 Removing the battery...

User Guide
Page 30
... Changing or removing existing key assignments 157 TOSHIBA Console 158 Customizing Your Computer 159 Network 159 Security 159 Power Management 159 Mouse utility 161 Hotkey utility 161 Toshiba Hardware Settings 162 Toshiba Picture Enhancement Utility 164 CD/DVD Drive Acoustic Silencer 164 Enabling Hibernation 165 Setting user passwords 165 Using an instant password 166 Setting a user password 167 Disabling a user password 167 Using a supervisor password 168 Setting a supervisor password 168 Deleting a supervisor password 169 Chapter 7: If Something Goes Wrong 170 Problems...
... Changing or removing existing key assignments 157 TOSHIBA Console 158 Customizing Your Computer 159 Network 159 Security 159 Power Management 159 Mouse utility 161 Hotkey utility 161 Toshiba Hardware Settings 162 Toshiba Picture Enhancement Utility 164 CD/DVD Drive Acoustic Silencer 164 Enabling Hibernation 165 Setting user passwords 165 Using an instant password 166 Setting a user password 167 Disabling a user password 167 Using a supervisor password 168 Setting a supervisor password 168 Deleting a supervisor password 169 Chapter 7: If Something Goes Wrong 170 Problems...
User Guide
Page 31
... Contents Keyboard problems 182 Display problems 182 Disk drive problems 184 DVD-ROM or multi-function drive problems...187 Sound system problems 187 PC Card problems 188 Printer problems 191 Modem problems 192 Develop good computing habits 192 If you need further assistance 194 Before you call 194 Contacting Toshiba 195 Other Toshiba Internet Web sites 196 Toshiba's worldwide offices 196 Appendix A: Hot Keys 200 Volume Mute 200 Instant password security 201 Power usage profile 201 Stand By mode...
... Contents Keyboard problems 182 Display problems 182 Disk drive problems 184 DVD-ROM or multi-function drive problems...187 Sound system problems 187 PC Card problems 188 Printer problems 191 Modem problems 192 Develop good computing habits 192 If you need further assistance 194 Before you call 194 Contacting Toshiba 195 Other Toshiba Internet Web sites 196 Toshiba's worldwide offices 196 Appendix A: Hot Keys 200 Volume Mute 200 Instant password security 201 Power usage profile 201 Stand By mode...
User Guide
Page 55
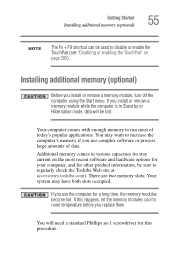
... on the most of data. Getting Started Installing additional memory (optional) 55 NOTE The Fn + F9 shortcut can be sure to regularly check the Toshiba Web site at accessories.toshiba.com). Additional memory comes in Stand by or Hibernation mode, data will need a standard Phillips no.1 screwdriver for a long time, the memory modules become hot. If you install or remove a memory module, turn off the computer using the Start menu.
... on the most of data. Getting Started Installing additional memory (optional) 55 NOTE The Fn + F9 shortcut can be sure to regularly check the Toshiba Web site at accessories.toshiba.com). Additional memory comes in Stand by or Hibernation mode, data will need a standard Phillips no.1 screwdriver for a long time, the memory modules become hot. If you install or remove a memory module, turn off the computer using the Start menu.

User Guide
Page 57
... module, touch a grounded metal surface to touch its edges so that secure the memory module slot cover, then remove the memory module slot cover. Getting Started Installing additional memory (optional) 57 6 Using a standard Phillips no. 1 screwdriver, unscrew the captive screws that the gold connector bar faces the slot, fit the memory module into the socket. 10 Gently press down on the memory module connector until the clips snap into the computer). 8 Remove the new memory module...
... module, touch a grounded metal surface to touch its edges so that secure the memory module slot cover, then remove the memory module slot cover. Getting Started Installing additional memory (optional) 57 6 Using a standard Phillips no. 1 screwdriver, unscrew the captive screws that the gold connector bar faces the slot, fit the memory module into the socket. 10 Gently press down on the memory module connector until the clips snap into the computer). 8 Remove the new memory module...
User Guide
Page 60
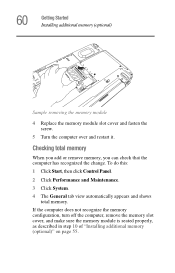
... not recognize the memory configuration, turn off the computer, remove the memory slot cover, and make sure the memory module is seated properly, as described in step 10 of "Installing additional memory (optional)" on page 55. Checking total memory When you add or remove memory, you can check that the computer has recognized the change. To do this: 1 Click Start, then click Control Panel. 2 Click Performance and Maintenance. 3 Click System. 4 The...
... not recognize the memory configuration, turn off the computer, remove the memory slot cover, and make sure the memory module is seated properly, as described in step 10 of "Installing additional memory (optional)" on page 55. Checking total memory When you add or remove memory, you can check that the computer has recognized the change. To do this: 1 Click Start, then click Control Panel. 2 Click Performance and Maintenance. 3 Click System. 4 The...
User Guide
Page 66
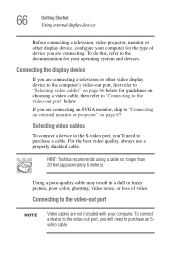
... display device, configure your operating system and devices. To do this, refer to the documentation for guidelines on choosing a video cable, then refer to 'Connecting to the video-out port' below for your computer for the type of video. Selecting video cables To connect a device to the S-video port, you will need to purchase a cable. 66 Getting Started Using external display devices Before connecting a television, video projector, monitor or other video display device to the computer's video-out port, first refer to "Selecting video cables...
... display device, configure your operating system and devices. To do this, refer to the documentation for guidelines on choosing a video cable, then refer to 'Connecting to the video-out port' below for your computer for the type of video. Selecting video cables To connect a device to the S-video port, you will need to purchase a cable. 66 Getting Started Using external display devices Before connecting a television, video projector, monitor or other video display device to the computer's video-out port, first refer to "Selecting video cables...
User Guide
Page 140
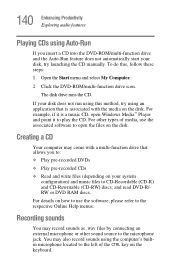
... disk does not run using this , follow these steps: 1 Open the Start menu and select My Computer. 2 Click the DVD-ROM/multi-function drive icon. and read DVD-R/RW or DVD RAM discs. If your disk, try using the computer's builtin microphone located to the microphone jack. For other sound source to the left of media, use the software, please refer to play the CD. To do this method, try launching the CD manually...
... disk does not run using this , follow these steps: 1 Open the Start menu and select My Computer. 2 Click the DVD-ROM/multi-function drive icon. and read DVD-R/RW or DVD RAM discs. If your disk, try using the computer's builtin microphone located to the microphone jack. For other sound source to the left of media, use the software, please refer to play the CD. To do this method, try launching the CD manually...

User Guide
Page 143
... headphone jack requires a 16-ohm stereo mini-jack. To adjust the volume: ❖ For external speakers, use the volume controls on the left side of using the internal speakers, you can connect up to produce sound from the headphones or external speakers into the headphone jack. This makes it ideal for devices that require an external power source. In addition to high speed, the i.LINK® port also supports isochronous...
... headphone jack requires a 16-ohm stereo mini-jack. To adjust the volume: ❖ For external speakers, use the volume controls on the left side of using the internal speakers, you can connect up to produce sound from the headphones or external speakers into the headphone jack. This makes it ideal for devices that require an external power source. In addition to high speed, the i.LINK® port also supports isochronous...
User Guide
Page 173
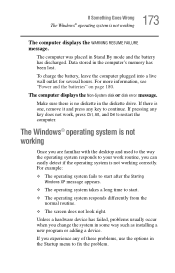
... some way such as installing a new program or adding a device. The Windows® operating system is not working The computer displays the WARNING RESUME FAILURE message. If pressing any of these problems, use the options in the Startup menu to start after the Starting Windows XP message appears. ❖ The operating system takes a long time to fix the problem. The computer displays the Non-System disk or disk error message. The computer...
... some way such as installing a new program or adding a device. The Windows® operating system is not working The computer displays the WARNING RESUME FAILURE message. If pressing any of these problems, use the options in the Startup menu to start after the Starting Windows XP message appears. ❖ The operating system takes a long time to fix the problem. The computer displays the Non-System disk or disk error message. The computer...

User Guide
Page 175
... and the syntax of Safe mode. A site you in . To access Windows® XP Help and Support: 1 Click Start, then click Help and Support. Many factors contribute to locate the site. Make sure you still have a problem using your browser to the speed with the forward slash (/). The Windows® XP operating system can help you If the operating system has started properly, but you...
... and the syntax of Safe mode. A site you in . To access Windows® XP Help and Support: 1 Click Start, then click Help and Support. Many factors contribute to locate the site. Make sure you still have a problem using your browser to the speed with the forward slash (/). The Windows® XP operating system can help you If the operating system has started properly, but you...
User Guide
Page 182
.... Press any of the keys. Was the battery fully charged to begin with your software using is not remapping the keyboard. Keyboard problems If, when you have a second keyboard, try it works, the first keyboard may be related to activate the screen. Is the display power set to turn off the numeric keypad light. If the numeric keypad or cursor control light is blank. If you type, strange things happen or...
.... Press any of the keys. Was the battery fully charged to begin with your software using is not remapping the keyboard. Keyboard problems If, when you have a second keyboard, try it works, the first keyboard may be related to activate the screen. Is the display power set to turn off the numeric keypad light. If the numeric keypad or cursor control light is blank. If you type, strange things happen or...

User Guide
Page 183
... not set for an external monitor. To do this dialog box allows you are using the built-in screen, make sure the display priority is a normal result of the desktop with the secondary control button, then clicking Properties. The screen does not look right. If you to continue working power outlet. ❖ Check that the monitor's power cable is firmly plugged into a working . This opens the Display Properties...
... not set for an external monitor. To do this dialog box allows you are using the built-in screen, make sure the display priority is a normal result of the desktop with the secondary control button, then clicking Properties. The screen does not look right. If you to continue working power outlet. ❖ Check that the monitor's power cable is firmly plugged into a working . This opens the Display Properties...
User Guide
Page 205
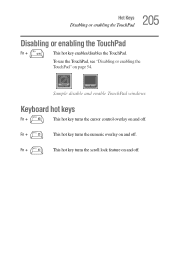
Fn + This hot key turns the numeric overlay on and off . 205 Hot Keys Disabling or enabling the TouchPad Disabling or enabling the TouchPad Fn + This hot key enables/disables the TouchPad. Sample disable and enable TouchPad windows Keyboard hot keys Fn + This hot key turns the cursor control overlay on and off . Fn + This hot key turns the scroll lock feature on page 54. To use the TouchPad, see "Disabling or enabling the TouchPad" on and off.
Fn + This hot key turns the numeric overlay on and off . 205 Hot Keys Disabling or enabling the TouchPad Disabling or enabling the TouchPad Fn + This hot key enables/disables the TouchPad. Sample disable and enable TouchPad windows Keyboard hot keys Fn + This hot key turns the cursor control overlay on and off . Fn + This hot key turns the scroll lock feature on page 54. To use the TouchPad, see "Disabling or enabling the TouchPad" on and off.

User Guide
Page 211
However, you can also use the Refresh button to the network. Detailed information about each device, such as the driver version number and the status, are connected to refresh the screen. Device Settings The Device Settings screen displays a list of all wired, wireless, and infrared (for systems with your Toshiba Computer ConfigFree Utilities Sample Connectivity Doctor screen The Connectivity Doctor screen automatically refreshes. 211 Using ConfigFree™ with infrared) devices that are also displayed.
However, you can also use the Refresh button to the network. Detailed information about each device, such as the driver version number and the status, are connected to refresh the screen. Device Settings The Device Settings screen displays a list of all wired, wireless, and infrared (for systems with your Toshiba Computer ConfigFree Utilities Sample Connectivity Doctor screen The Connectivity Doctor screen automatically refreshes. 211 Using ConfigFree™ with infrared) devices that are also displayed.

User Guide
Page 226
... the TouchPad. load-To move information from a computer while the computer is running and have the operating system automatically recognize the change. Internet-The decentralized, world-wide network of pixels is slower than L1 cache and faster than main memory. I icon-A small image displayed on the motherboard to help improve processing speed. Interlaced monitors take two passes to create a complete screen...
... the TouchPad. load-To move information from a computer while the computer is running and have the operating system automatically recognize the change. Internet-The decentralized, world-wide network of pixels is slower than L1 cache and faster than main memory. I icon-A small image displayed on the motherboard to help improve processing speed. Interlaced monitors take two passes to create a complete screen...
User Guide
Page 233
... 47 connection set up 133 conserving battery power 113 Contents CDs 88 DVDs 88 control buttons 53 critical applications 2 Ctrl keys 73 D desktop creating new icon 128 major features 128 desktop exploration 127 desktop icons 128 Device Manager 178 checking properties 179 disabling a device 178, 179 devices keyboard 61 mouse 61 dial-up connection 92 Dial-Up Networking Wizard 92 Disk Defragmenter 185 disk drive corrupted/damaged data files 186 missing files/trouble accessing a disk...
... 47 connection set up 133 conserving battery power 113 Contents CDs 88 DVDs 88 control buttons 53 critical applications 2 Ctrl keys 73 D desktop creating new icon 128 major features 128 desktop exploration 127 desktop icons 128 Device Manager 178 checking properties 179 disabling a device 178, 179 devices keyboard 61 mouse 61 dial-up connection 92 Dial-Up Networking Wizard 92 Disk Defragmenter 185 disk drive corrupted/damaged data files 186 missing files/trouble accessing a disk...
User Guide
Page 234
... normal/flickers 183 external monitor not working 184 latch 51 screen is blank 182 display device connecting 66 external 65 video 65 display modes hot key 204 display output settings 68 display panel closing 65 opening 51 display, external adjusting 69 disposal information 24 disposing of used batteries 119 DMA (Direct Memory Access) 177 double-click 53 DVD-ROM drive problems 187 removing a disc 88 troubleshooting 179 DVD-ROM or multi-function drive can't access disc 187 inserting discs 87 removing 88 DVD-ROM/multi-function drive drive tray will not open 187 problems 187 troubleshooting 179...
... normal/flickers 183 external monitor not working 184 latch 51 screen is blank 182 display device connecting 66 external 65 video 65 display modes hot key 204 display output settings 68 display panel closing 65 opening 51 display, external adjusting 69 disposal information 24 disposing of used batteries 119 DMA (Direct Memory Access) 177 double-click 53 DVD-ROM drive problems 187 removing a disc 88 troubleshooting 179 DVD-ROM or multi-function drive can't access disc 187 inserting discs 87 removing 88 DVD-ROM/multi-function drive drive tray will not open 187 problems 187 troubleshooting 179...
User Guide
Page 236
... problem solving 192 resetting port to default settings 131 upgrading 131 using 92 module memory 57 Wi-Fi Mini PC 152 monitor 65 connecting 66, 67 external connecting 122 not working 183 mouse installing 61 serial 61 using 122 N network 159 accessing 132 connecting to 92 dial-up connection 92 Dial-Up Networking Wizard 132 networking wireless 132 O office computing 121 optional devices 121 other documentation 36 overlay keys 74 P password deleting a supervisor 169 disabling a user 167 supervisor set up 168 passwords instant, using...
... problem solving 192 resetting port to default settings 131 upgrading 131 using 92 module memory 57 Wi-Fi Mini PC 152 monitor 65 connecting 66, 67 external connecting 122 not working 183 mouse installing 61 serial 61 using 122 N network 159 accessing 132 connecting to 92 dial-up connection 92 Dial-Up Networking Wizard 132 networking wireless 132 O office computing 121 optional devices 121 other documentation 36 overlay keys 74 P password deleting a supervisor 169 disabling a user 167 supervisor set up 168 passwords instant, using...


