User Guide
Page 31
... factory default software with user's data 66 Recovering without changing the internal storage drive partitions 69 Recovering to a custom size partition 72 Creating recovery DVDs/media 74 Restoring from recovery DVDs/media 76 Erasing the Internal Storage Drive 78 Checking the internal storage drive operating status 80 Installing drivers and applications 80 Using the touch pad 81 Adjusting touch pad settings 84 Disabling or enabling the touch pad 84 Using external display devices 85 Selecting video cables 85 Connecting an HDMI™-compatible television or external display device...
... factory default software with user's data 66 Recovering without changing the internal storage drive partitions 69 Recovering to a custom size partition 72 Creating recovery DVDs/media 74 Restoring from recovery DVDs/media 76 Erasing the Internal Storage Drive 78 Checking the internal storage drive operating status 80 Installing drivers and applications 80 Using the touch pad 81 Adjusting touch pad settings 84 Disabling or enabling the touch pad 84 Using external display devices 85 Selecting video cables 85 Connecting an HDMI™-compatible television or external display device...
User Guide
Page 34
... Memory card reader 144 Inserting memory media 144 Removing memory media 145 Chapter 5: Utilities 146 TOSHIBA Assist 147 Connect 148 Secure 149 Protect & Fix 150 Optimize 151 TOSHIBA Application Installer 152 Setting passwords 153 Using an instant password 153 Using a supervisor password 154 Using a user password 155 Deleting a user password 156 TOSHIBA Face Recognition Utility 157 TOSHIBA PC Diagnostic Tool Utility 158 Mouse Utility 159 TOSHIBA Hardware Setup 160 TOSHIBA Sleep Utility 162 Starting the TOSHIBA Sleep Utility 162 USB Sleep and Charge 162 Enabling/Disabling...
... Memory card reader 144 Inserting memory media 144 Removing memory media 145 Chapter 5: Utilities 146 TOSHIBA Assist 147 Connect 148 Secure 149 Protect & Fix 150 Optimize 151 TOSHIBA Application Installer 152 Setting passwords 153 Using an instant password 153 Using a supervisor password 154 Using a user password 155 Deleting a user password 156 TOSHIBA Face Recognition Utility 157 TOSHIBA PC Diagnostic Tool Utility 158 Mouse Utility 159 TOSHIBA Hardware Setup 160 TOSHIBA Sleep Utility 162 Starting the TOSHIBA Sleep Utility 162 USB Sleep and Charge 162 Enabling/Disabling...
User Guide
Page 53
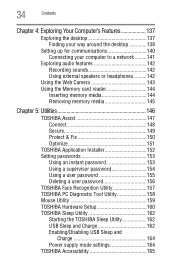
... cloth. Getting Started 53 Adding memory (optional) The computer has two memory slots-Slot A and Slot B. Before you install or remove a memory module while the computer is in Sleep or Hibernation mode, data will be installed in the lower-right corner of the computer, and then place the computer upside down the operating system, and then turns off the computer using the Start menu. NOTE For this model, Slot A is the...
... cloth. Getting Started 53 Adding memory (optional) The computer has two memory slots-Slot A and Slot B. Before you install or remove a memory module while the computer is in Sleep or Hibernation mode, data will be installed in the lower-right corner of the computer, and then place the computer upside down the operating system, and then turns off the computer using the Start menu. NOTE For this model, Slot A is the...
User Guide
Page 61
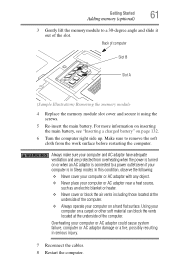
... main battery. Using your computer on a carpet or other soft material can block the vents located at the underside of the computer. ❖ Always operate your computer is in serious injury. 7 Reconnect the cables. 8 Restart the computer. Getting Started 61 Adding memory (optional) 3 Gently lift the memory module to a power outlet (even if your computer on a hard flat surface. Make sure to remove the...
... main battery. Using your computer on a carpet or other soft material can block the vents located at the underside of the computer. ❖ Always operate your computer is in serious injury. 7 Reconnect the cables. 8 Restart the computer. Getting Started 61 Adding memory (optional) 3 Gently lift the memory module to a power outlet (even if your computer on a hard flat surface. Make sure to remove the...
User Guide
Page 156
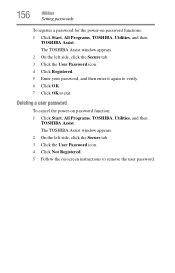
... OK. 7 Click OK to remove the user password. 156 Utilities Setting passwords To register a password for the power-on password function: 1 Click Start, All Programs, TOSHIBA, Utilities, and then TOSHIBA Assist. Deleting a user password To cancel the power-on password functions: 1 Click Start, All Programs, TOSHIBA, Utilities, and then TOSHIBA Assist. The TOSHIBA Assist window appears. 2 On the left side, click the Secure tab. 3 Click the User Password icon. 4 Click Not Registered. 5 Follow the on-screen instructions to exit.
... OK. 7 Click OK to remove the user password. 156 Utilities Setting passwords To register a password for the power-on password function: 1 Click Start, All Programs, TOSHIBA, Utilities, and then TOSHIBA Assist. Deleting a user password To cancel the power-on password functions: 1 Click Start, All Programs, TOSHIBA, Utilities, and then TOSHIBA Assist. The TOSHIBA Assist window appears. 2 On the left side, click the Secure tab. 3 Click the User Password icon. 4 Click Not Registered. 5 Follow the on-screen instructions to exit.
User Guide
Page 168
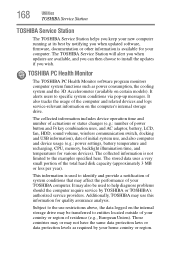
... to install the updates if you when updated software, firmware, documentation or other information is available for your computer. The collected information includes device operation time and number of actuations or status changes (e.g.: number of power button and Fn key combination uses, and AC adaptor, battery, LCD, fan, HDD, sound volume, wireless communication switch, docking and USB information), date of initial system use restrictions above, the data logged on the internal storage drive may be used to...
... to install the updates if you when updated software, firmware, documentation or other information is available for your computer. The collected information includes device operation time and number of actuations or status changes (e.g.: number of power button and Fn key combination uses, and AC adaptor, battery, LCD, fan, HDD, sound volume, wireless communication switch, docking and USB information), date of initial system use restrictions above, the data logged on the internal storage drive may be used to...
User Guide
Page 174
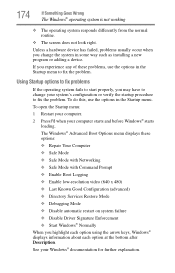
... these options: ❖ Repair Your Computer ❖ Safe Mode ❖ Safe Mode with Networking ❖ Safe Mode with Command Prompt ❖ Enable Boot Logging ❖ Enable low-resolution video (640 x 480) ❖ Last Known Good Configuration (advanced) ❖ Directory Services Restore Mode ❖ Debugging Mode ❖ Disable automatic restart on system failure ❖ Disable Driver Signature Enforcement ❖ Start Windows® Normally When you change your system's configuration or verify the startup procedure to fix the problem. Unless a hardware device...
... these options: ❖ Repair Your Computer ❖ Safe Mode ❖ Safe Mode with Networking ❖ Safe Mode with Command Prompt ❖ Enable Boot Logging ❖ Enable low-resolution video (640 x 480) ❖ Last Known Good Configuration (advanced) ❖ Directory Services Restore Mode ❖ Debugging Mode ❖ Disable automatic restart on system failure ❖ Disable Driver Signature Enforcement ❖ Start Windows® Normally When you change your system's configuration or verify the startup procedure to fix the problem. Unless a hardware device...
User Guide
Page 220
... speed. Hibernation-A feature of many Toshiba computers that you turn on the screen that provides electronic mail, the World Wide Web, and other line of using this function, if connected with the Fn key can set system options or control system parameters, such as a mouse. See also Sleep, Suspend. It is returned to create a complete screen image. See also cache, CPU cache, L1 cache. internal device-See device.
... speed. Hibernation-A feature of many Toshiba computers that you turn on the screen that provides electronic mail, the World Wide Web, and other line of using this function, if connected with the Fn key can set system options or control system parameters, such as a mouse. See also Sleep, Suspend. It is returned to create a complete screen image. See also cache, CPU cache, L1 cache. internal device-See device.
User Guide
Page 228
... to a network 141 HDMI™-compatible TV or external display device 85 monitor 86 power cord/cable 47 power source 47 connection set up 141 cooling fan adequate ventilation 45 customize computer settings 100 D data/entire system backup troubleshooting 191 desktop creating new icon 138 exploring the 137 icons 138 recycle bin 138 standard features 138 Windows® operating system 137 Device Manager fixing a problem 176 directing display output 86 disabling touch pad 84, 208 display troubleshooting 180 display devices external 85
... to a network 141 HDMI™-compatible TV or external display device 85 monitor 86 power cord/cable 47 power source 47 connection set up 141 cooling fan adequate ventilation 45 customize computer settings 100 D data/entire system backup troubleshooting 191 desktop creating new icon 138 exploring the 137 icons 138 recycle bin 138 standard features 138 Windows® operating system 137 Device Manager fixing a problem 176 directing display output 86 disabling touch pad 84, 208 display troubleshooting 180 display devices external 85
User Guide
Page 229
... down 95 starting again from 97 using 94 hot key disabling or enabling wireless devices 207 display brightness 206 Hibernation mode 204 keyboard overlays 210 Lock (Instant security) 201 Output (Display switch) 205 power plan 202 Sleep mode 203 using to set a power plan 129 volume mute 200 Zoom (Display resolution) 209 zooming in 210 zooming out 210 Hot Key Cards 198 Hot key functions 199 I icon desktop 138 moving to desktop 138 recycle bin 138 safety 40 installation memory module 52 installing
... down 95 starting again from 97 using 94 hot key disabling or enabling wireless devices 207 display brightness 206 Hibernation mode 204 keyboard overlays 210 Lock (Instant security) 201 Output (Display switch) 205 power plan 202 Sleep mode 203 using to set a power plan 129 volume mute 200 Zoom (Display resolution) 209 zooming in 210 zooming out 210 Hot Key Cards 198 Hot key functions 199 I icon desktop 138 moving to desktop 138 recycle bin 138 safety 40 installation memory module 52 installing
User Guide
Page 230
... light 50, 94, 97, 100 Web Camera light 143 Licenses 29 lock computer, using 101 M maintaining your battery 134 manual eject hole optical disc drive 115 memory adding (optional) 52 check total memory 62 removing memory module slot cover 55 Memory card reader inserting memory media 144 removing memory media 145 using 144 memory module installation 52 inserting into socket 56 removing 59, 61 microphone using 142 monitor connecting 86 monitor problems troubleshooting 180 monitoring battery power 124 mouse installing 87 mouse utility 159 moving the computer 101 N network accessing 141 connecting...
... light 50, 94, 97, 100 Web Camera light 143 Licenses 29 lock computer, using 101 M maintaining your battery 134 manual eject hole optical disc drive 115 memory adding (optional) 52 check total memory 62 removing memory module slot cover 55 Memory card reader inserting memory media 144 removing memory media 145 using 144 memory module installation 52 inserting into socket 56 removing 59, 61 microphone using 142 monitor connecting 86 monitor problems troubleshooting 180 monitoring battery power 124 mouse installing 87 mouse utility 159 moving the computer 101 N network accessing 141 connecting...
User Guide
Page 234
... Windows® operating system not working 173 wireless networking 186 turning off computer 89 computer more quickly 92 options 90 turning on power 50 U USB Sleep and Charge cannot use 193 USB Wakeup function does not work 194 USB-compatible printer 88 user password, deleting 156 user password, setting 155 using a microphone 142 computer lock 101 DVDs 113 external display devices 85 Hibernation mode 94 hot key to set a power plan 129 Memory card reader 144 optical disc drive 113 Shut down command 92 Sleep mode 97 touch pad 81 Web Camera 143 using the keyboard 103 using...
... Windows® operating system not working 173 wireless networking 186 turning off computer 89 computer more quickly 92 options 90 turning on power 50 U USB Sleep and Charge cannot use 193 USB Wakeup function does not work 194 USB-compatible printer 88 user password, deleting 156 user password, setting 155 using a microphone 142 computer lock 101 DVDs 113 external display devices 85 Hibernation mode 94 hot key to set a power plan 129 Memory card reader 144 optical disc drive 113 Shut down command 92 Sleep mode 97 touch pad 81 Web Camera 143 using the keyboard 103 using...
User Manual
Page 4
Satellite L750/L755/L750D/L755D/Satellite Pro L750/L750D Monitoring of power condition 6-2 Battery 6-3 Password Utility 6-10 Starting the computer by password 6-10 Power-up modes 6-11 Panel power on/off 6-11 System automatic Sleep/Hibernation 6-11 Chapter 7 HW Setup Accessing HW Setup 7-1 HW Setup window 7-1 Chapter 8 Troubleshooting Problem solving process 8-1 Hardware and system checklist 8-3 TOSHIBA support 8-19 Appendix A Specifications Physical Dimensions A-1 Environmental Requirements A-1 Appendix B Display Controller and Video mode Display controller B-1 Video mode...
Satellite L750/L755/L750D/L755D/Satellite Pro L750/L750D Monitoring of power condition 6-2 Battery 6-3 Password Utility 6-10 Starting the computer by password 6-10 Power-up modes 6-11 Panel power on/off 6-11 System automatic Sleep/Hibernation 6-11 Chapter 7 HW Setup Accessing HW Setup 7-1 HW Setup window 7-1 Chapter 8 Troubleshooting Problem solving process 8-1 Hardware and system checklist 8-3 TOSHIBA support 8-19 Appendix A Specifications Physical Dimensions A-1 Environmental Requirements A-1 Appendix B Display Controller and Video mode Display controller B-1 Video mode...

User Manual
Page 20
... 1, Getting Started for clarity, abbreviations are also defined in Chapter 3, Hardware, Utilities and Options to provide years of the Satellite L750/L755/L750D/L755D/Satellite Pro L750/L750D series computer. Acronyms are enclosed in parentheses following formats to set up your purchase of reliable, high-performance computing. Preface Congratulations on your computer. This powerful notebook computer provides excellent expansion capability, includes multimedia functionality, and is...
... 1, Getting Started for clarity, abbreviations are also defined in Chapter 3, Hardware, Utilities and Options to provide years of the Satellite L750/L755/L750D/L755D/Satellite Pro L750/L750D series computer. Acronyms are enclosed in parentheses following formats to set up your purchase of reliable, high-performance computing. Preface Congratulations on your computer. This powerful notebook computer provides excellent expansion capability, includes multimedia functionality, and is...
User Manual
Page 73
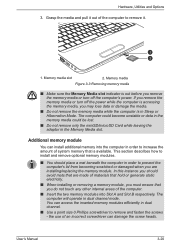
... channel. ■ Use a point size 0 Phillips screwdriver to install and remove optional memory modules. ■ You should avoid mats that are made of an incorrect screwdriver can access the inserted memory modules efficiently in order to remove it. 1 2 1. the use of materials that hold or generate static electricity. ■ When installing or removing a memory module, you are installing/replacing the memory module. You can damage the screw heads. Memory media slot 2. User's Manual 3-20 Hardware, Utilities and Options 3.
... channel. ■ Use a point size 0 Phillips screwdriver to install and remove optional memory modules. ■ You should avoid mats that are made of an incorrect screwdriver can access the inserted memory modules efficiently in order to remove it. 1 2 1. the use of materials that hold or generate static electricity. ■ When installing or removing a memory module, you are installing/replacing the memory module. You can damage the screw heads. Memory media slot 2. User's Manual 3-20 Hardware, Utilities and Options 3.

User Manual
Page 74
Hardware, Utilities and Options ■ Use only memory modules approved by static electricity. The computer is turned on LAN is off (refer to Replacing the battery pack section in Chapter 1, Getting Started if required). 2. d. make sure the Power indicator is enabled. Turn the computer upside down and remove the battery pack (refer to the Turning off the power section in Chapter 6, Power and Power-Up Modes, if required). 5. please note that this screw is...
Hardware, Utilities and Options ■ Use only memory modules approved by static electricity. The computer is turned on LAN is off (refer to Replacing the battery pack section in Chapter 1, Getting Started if required). 2. d. make sure the Power indicator is enabled. Turn the computer upside down and remove the battery pack (refer to the Turning off the power section in Chapter 6, Power and Power-Up Modes, if required). 5. please note that this screw is...
User Manual
Page 76
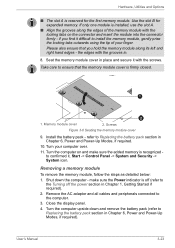
... the connector firmly - Remove the AC adaptor and all cables and peripherals connected to Replacing the battery pack section in Chapter 6, Power and Power-Up Modes, if required. 10. Memory module cover 2. Install the battery pack - If only one module is installed, use the slot A. ■ Align the grooves along its left and right hand edges - make sure the added memory is firmly closed. 1 2 1. Hardware, Utilities and Options ■ The slot A is off...
... the connector firmly - Remove the AC adaptor and all cables and peripherals connected to Replacing the battery pack section in Chapter 6, Power and Power-Up Modes, if required. 10. Memory module cover 2. Install the battery pack - If only one module is installed, use the slot A. ■ Align the grooves along its left and right hand edges - make sure the added memory is firmly closed. 1 2 1. Hardware, Utilities and Options ■ The slot A is off...
User Manual
Page 104
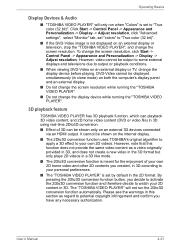
... "TOSHIBA VIDEO PLAYER", and change the display device before playing. User's Manual 4-21 Operating Basics Display Devices & Audio ■ "TOSHIBA VIDEO PLAYER" will not run when "Colors" is set "colors" to your 2D content in clone mode) on both the computer's display panel and an external display. ■ Do not change the screen resolution while running the "TOSHIBA VIDEO PLAYER". ■ Do not change the screen resolution, click Start -> Control Panel -> Appearance and Personalization -> Display -> Adjust resolution. To change the display device while...
... "TOSHIBA VIDEO PLAYER", and change the display device before playing. User's Manual 4-21 Operating Basics Display Devices & Audio ■ "TOSHIBA VIDEO PLAYER" will not run when "Colors" is set "colors" to your 2D content in clone mode) on both the computer's display panel and an external display. ■ Do not change the screen resolution while running the "TOSHIBA VIDEO PLAYER". ■ Do not change the screen resolution, click Start -> Control Panel -> Appearance and Personalization -> Display -> Adjust resolution. To change the display device while...

User Manual
Page 160
... up from Sleep Mode if the external monitor has been disconnected while in Sleep Mode. User's Manual 8-16 When the display panel and an external monitor are set the display panel and external monitor to clone mode and they are still unable to see if the external monitor is connected. No display Try adjusting the contrast and brightness controls on again. When the external monitor is set as the primary display device in extended desktop mode, it is not set for further...
... up from Sleep Mode if the external monitor has been disconnected while in Sleep Mode. User's Manual 8-16 When the display panel and an external monitor are set the display panel and external monitor to clone mode and they are still unable to see if the external monitor is connected. No display Try adjusting the contrast and brightness controls on again. When the external monitor is set as the primary display device in extended desktop mode, it is not set for further...
User Manual
Page 186
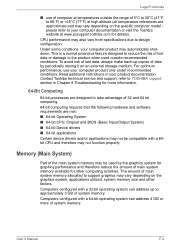
... system memory. Contact Toshiba technical service and support, refer to design configuration. The amount of system memory. Under some conditions, your product documentation. CPU performance may not function properly. For optimum performance, use of computer at high altitude (all temperature references are met: ■ 64-bit Operating System ■ 64-bit CPU, Chipset and BIOS (Basic Input/Output System) ■ 64-bit Device drivers...
... system memory. Contact Toshiba technical service and support, refer to design configuration. The amount of system memory. Under some conditions, your product documentation. CPU performance may not function properly. For optimum performance, use of computer at high altitude (all temperature references are met: ■ 64-bit Operating System ■ 64-bit CPU, Chipset and BIOS (Basic Input/Output System) ■ 64-bit Device drivers...


