User Guide
Page 72
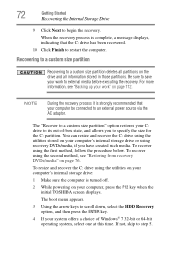
... your computer's internal storage drive or using the utilities stored on your work to its out-of Windows® 7 32-bit or 64-bit operating system, select one at this time. For more... such media. When the recovery process is strongly recommended that the C: drive has been recovered. 10 Click Finish to an external power source via the AC adaptor. You can resize and recover the...using the second method, see "Backing up your computer, press the F12 key when the initial TOSHIBA screen displays. If not, skip to begin the recovery. Recovering to a custom size partition Recovering...
... your computer's internal storage drive or using the utilities stored on your work to its out-of Windows® 7 32-bit or 64-bit operating system, select one at this time. For more... such media. When the recovery process is strongly recommended that the C: drive has been recovered. 10 Click Finish to an external power source via the AC adaptor. You can resize and recover the...using the second method, see "Backing up your computer, press the F12 key when the initial TOSHIBA screen displays. If not, skip to begin the recovery. Recovering to a custom size partition Recovering...
User Guide
Page 164
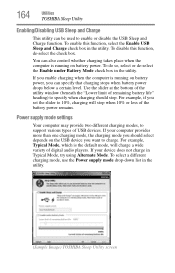
... power remains. If your computer provides more than one charging mode, the charging mode you should stop when 10% or less of digital audio players. 164 Utilities TOSHIBA Sleep Utility Enabling/Disabling USB Sleep and Charge This utility can specify that charging stops when battery power drops... below a certain level. Use the slider at the bottom of the utility window (beneath the "Lower limit of USB devices...
... power remains. If your computer provides more than one charging mode, the charging mode you should stop when 10% or less of digital audio players. 164 Utilities TOSHIBA Sleep Utility Enabling/Disabling USB Sleep and Charge This utility can specify that charging stops when battery power drops... below a certain level. Use the slider at the bottom of the utility window (beneath the "Lower limit of USB devices...
User Manual
Page 3
... Soft keys: FN key combinations 5-2 Hot keys 5-3 Windows special keys 5-5 Generating ASCII characters 5-5 Chapter 6 Power and Power-Up Modes Power conditions 6-1 User's Manual iii Satellite L750/L755/L750D/L755D/Satellite Pro L750/L750D System Recovery 1-13 Chapter 2 The Grand Tour Front ...10 Optional devices 3-15 Memory media slot 3-16 Optional accessories 3-29 Chapter 4 Operating Basics Using the Touch Pad 4-1 Web Camera 4-2 Using the TOSHIBA Face Recognition 4-3 Using optical disc drives 4-6 Writing CD/DVD/BDs 4-9 TOSHIBA VIDEO PLAYER 4-19 Using WinDVD BD for TOSHIBA...
... Soft keys: FN key combinations 5-2 Hot keys 5-3 Windows special keys 5-5 Generating ASCII characters 5-5 Chapter 6 Power and Power-Up Modes Power conditions 6-1 User's Manual iii Satellite L750/L755/L750D/L755D/Satellite Pro L750/L750D System Recovery 1-13 Chapter 2 The Grand Tour Front ...10 Optional devices 3-15 Memory media slot 3-16 Optional accessories 3-29 Chapter 4 Operating Basics Using the Touch Pad 4-1 Web Camera 4-2 Using the TOSHIBA Face Recognition 4-3 Using optical disc drives 4-6 Writing CD/DVD/BDs 4-9 TOSHIBA VIDEO PLAYER 4-19 Using WinDVD BD for TOSHIBA...
User Manual
Page 4
Satellite L750/L755/L750D/L755D/Satellite Pro L750/L750D Monitoring of power condition 6-2 Battery 6-3 Password Utility 6-10 Starting the computer by password 6-10 Power-up modes 6-11 Panel power on/off 6-11 System automatic Sleep/Hibernation 6-11 Chapter 7 HW Setup Accessing HW Setup 7-1 HW Setup window 7-1 Chapter 8 Troubleshooting Problem solving process 8-1 Hardware and system checklist 8-3 TOSHIBA...and Connectors Certification agencies D-1 Appendix E TOSHIBA PC Health Monitor Starting the TOSHIBA PC Health Monitor E-2 If a TOSHIBA PC Health Monitor message is displayed ...
Satellite L750/L755/L750D/L755D/Satellite Pro L750/L750D Monitoring of power condition 6-2 Battery 6-3 Password Utility 6-10 Starting the computer by password 6-10 Power-up modes 6-11 Panel power on/off 6-11 System automatic Sleep/Hibernation 6-11 Chapter 7 HW Setup Accessing HW Setup 7-1 HW Setup window 7-1 Chapter 8 Troubleshooting Problem solving process 8-1 Hardware and system checklist 8-3 TOSHIBA...and Connectors Certification agencies D-1 Appendix E TOSHIBA PC Health Monitor Starting the TOSHIBA PC Health Monitor E-2 If a TOSHIBA PC Health Monitor message is displayed ...
User Manual
Page 59
TOSHIBA Web Camera Application will depend on Direct Sequence Spread Spectrum/Orthogonal Frequency Division Multiplexing radio ... - You can use it is enabled, Bluetooth provides the wireless personal area network environment which eliminates the need for Ethernet LAN (10 megabits per second, 10BASE-T), Fast Ethernet LAN (100 megabits per second, 100BASE-TX) and Gigabit Ethernet LAN (1000 megabits per ...Manual 3-6 only the V.90 standard is supported in support for cables between electronic devices such as Windows Live Messenger. Some computers in Chapter 4, Operating Basics.
TOSHIBA Web Camera Application will depend on Direct Sequence Spread Spectrum/Orthogonal Frequency Division Multiplexing radio ... - You can use it is enabled, Bluetooth provides the wireless personal area network environment which eliminates the need for Ethernet LAN (10 megabits per second, 10BASE-T), Fast Ethernet LAN (100 megabits per second, 100BASE-TX) and Gigabit Ethernet LAN (1000 megabits per ...Manual 3-6 only the V.90 standard is supported in support for cables between electronic devices such as Windows Live Messenger. Some computers in Chapter 4, Operating Basics.

User Manual
Page 88
...10. Windows Logon via TOSHIBA Face Recognition This section explains how to login to Delete the Face Recognition Data Delete image data, account information, and personal record data created during registration. If verification is displayed. 2. The registered account name will be displayed. 3. How to Windows with TOSHIBA... 8. Register the account. Fill in the Management screen. 3. Clicking on this utility, click Start -> All Programs -> TOSHIBA -> Utilities -> Face Recognition. To launch this utility, please refer to be returned to start the authentication process. 1:N ...
...10. Windows Logon via TOSHIBA Face Recognition This section explains how to login to Delete the Face Recognition Data Delete image data, account information, and personal record data created during registration. If verification is displayed. 2. The registered account name will be displayed. 3. How to Windows with TOSHIBA... 8. Register the account. Fill in the Management screen. 3. Clicking on this utility, click Start -> All Programs -> TOSHIBA -> Utilities -> Face Recognition. To launch this utility, please refer to be returned to start the authentication process. 1:N ...
User Manual
Page 138
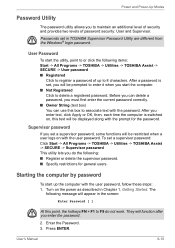
... power as described in TOSHIBA Supervisor Password Utility are different from the Windows® login password. The following message will appear in the screen: Enter Password [ ] At this text will be prompted to enter it when you enter the password. 2. User's Manual 6-10 After you enter text,... click Apply or OK, then, each time the computer is set, you will be restricted when a user logs on , this point, the hotkeys FN + F1 to F9 do the following items: Start -> All Programs -> TOSHIBA -> Utilities -> TOSHIBA Assist -> SECURE -> ...
... power as described in TOSHIBA Supervisor Password Utility are different from the Windows® login password. The following message will appear in the screen: Enter Password [ ] At this text will be prompted to enter it when you enter the password. 2. User's Manual 6-10 After you enter text,... click Apply or OK, then, each time the computer is set, you will be restricted when a user logs on , this point, the hotkeys FN + F1 to F9 do the following items: Start -> All Programs -> TOSHIBA -> Utilities -> TOSHIBA Assist -> SECURE -> ...

User Manual
Page 191
... adaptor 3-3 additional 3-29 connecting 1-4 DC IN 19V jack 2-5 ASCII characters 5-5 B Battery charging 6-5 extending life 6-7 indicator 2-10, 6-2 monitoring capacity 6-6 real time clock 3-3, 6-4 save mode 3-8 types 6-3 Battery pack 2-5, 3-2 replacing 6-8 BD drive problems 8-10 Bluetooth 3-6, 4-33 Bluetooth Stack for Windows by Toshiba 3-11 problems 8-18 Boot Priority 7-3 Bridge media slot 3-16 using 3-16 C CD/DVD/BD drive...
... adaptor 3-3 additional 3-29 connecting 1-4 DC IN 19V jack 2-5 ASCII characters 5-5 B Battery charging 6-5 extending life 6-7 indicator 2-10, 6-2 monitoring capacity 6-6 real time clock 3-3, 6-4 save mode 3-8 types 6-3 Battery pack 2-5, 3-2 replacing 6-8 BD drive problems 8-10 Bluetooth 3-6, 4-33 Bluetooth Stack for Windows by Toshiba 3-11 problems 8-18 Boot Priority 7-3 Bridge media slot 3-16 using 3-16 C CD/DVD/BD drive...
User Manual
Page 192
Satellite L750/L755/L750D/L755D/Satellite Pro L750/L750D FN + F7 (Brightness Up) 5-3 FN + F8 (Wireless) 5-4 FN + F9 (Touch Pad) 5-4 FN + space (Zoom) 5-4 Function keys 5-2 G Graphics controller 3-5 H Hard disk drive 3-3 automatic power off 3-7 Hard Disk Drive/Optical Disc Drive indicator 2-10 HDMI 3-25 Heat dispersal ...Manual K Keyboard 5-1 emulating enhanced keyboard 5-2 FN Sticky key 5-4 Function keys F1...F12 5-2 Hot keys 5-3 problems 8-7 typewriter keys 5-1 Windows special keys 5-5 L LAN 3-6, 4-35 cable types 4-35 connecting 4-36 disconnecting 4-36 jack 2-3 problems 8-18 M Media care 4-...
Satellite L750/L755/L750D/L755D/Satellite Pro L750/L750D FN + F7 (Brightness Up) 5-3 FN + F8 (Wireless) 5-4 FN + F9 (Touch Pad) 5-4 FN + space (Zoom) 5-4 Function keys 5-2 G Graphics controller 3-5 H Hard disk drive 3-3 automatic power off 3-7 Hard Disk Drive/Optical Disc Drive indicator 2-10 HDMI 3-25 Heat dispersal ...Manual K Keyboard 5-1 emulating enhanced keyboard 5-2 FN Sticky key 5-4 Function keys F1...F12 5-2 Hot keys 5-3 problems 8-7 typewriter keys 5-1 Windows special keys 5-5 L LAN 3-6, 4-35 cable types 4-35 connecting 4-36 disconnecting 4-36 jack 2-3 problems 8-18 M Media care 4-...


