

User Guide
Page 16
... MANUAL. Trademarks Satellite, InTouch, and Noteworthy are registered trademarks, SelectServ, FreedomWare, and SmartMedia are trademarks of their respective companies. Microsoft, Windows, DirectX, Active Desktop, and DirectShow are trademarks or registered trademarks of Dolby Laboratories. LapLink is a trademark of Toshiba America Information Systems, Inc. Computer Disposal Information This product contains mercury. TouchPad is subject...
... MANUAL. Trademarks Satellite, InTouch, and Noteworthy are registered trademarks, SelectServ, FreedomWare, and SmartMedia are trademarks of their respective companies. Microsoft, Windows, DirectX, Active Desktop, and DirectShow are trademarks or registered trademarks of Dolby Laboratories. LapLink is a trademark of Toshiba America Information Systems, Inc. Computer Disposal Information This product contains mercury. TouchPad is subject...
User Guide
Page 18
...environment....... 39 Keeping yourself comfortable 40 Precautions 43 Setting up your computer 45 Setting up your software 45 Registering your computer with Toshiba ......... 47 Adding external devices 47 Connecting the AC adapter 48 Charging the main battery 50 Using the computer for the first time... 51 Opening the display panel 51 Turning on the power 51 Using the TouchPad 52 Control buttons 53 Disabling or enabling the TouchPad 53 Installing additional memory (optional 54 Removing a memory module 60 Connecting a mouse 60 Connecting a printer 61...
...environment....... 39 Keeping yourself comfortable 40 Precautions 43 Setting up your computer 45 Setting up your software 45 Registering your computer with Toshiba ......... 47 Adding external devices 47 Connecting the AC adapter 48 Charging the main battery 50 Using the computer for the first time... 51 Opening the display panel 51 Turning on the power 51 Using the TouchPad 52 Control buttons 53 Disabling or enabling the TouchPad 53 Installing additional memory (optional 54 Removing a memory module 60 Connecting a mouse 60 Connecting a printer 61...

User Guide
Page 20
... 94 Using Stand by 94 Going into Stand by mode more quickly .......... 95 Starting again from Stand by 96 Toshiba's online resources 96 Chapter 4: Mobile Computing 97 Toshiba's energy-saver design 97 Running the computer on battery power 98 Power management 99 Charging the battery 99 Charging the... Lesson 1: Exploring the desktop 112 Finding your way around the desktop 112 Windows® XP file system 114 Lesson 2: Using the TouchPad and control buttons together 115 Lesson 3: Learning about the Internet 118 Lesson 4: Creating a new document 119 Lesson 5: Creating a new folder 120
... 94 Using Stand by 94 Going into Stand by mode more quickly .......... 95 Starting again from Stand by 96 Toshiba's online resources 96 Chapter 4: Mobile Computing 97 Toshiba's energy-saver design 97 Running the computer on battery power 98 Power management 99 Charging the battery 99 Charging the... Lesson 1: Exploring the desktop 112 Finding your way around the desktop 112 Windows® XP file system 114 Lesson 2: Using the TouchPad and control buttons together 115 Lesson 3: Learning about the Internet 118 Lesson 4: Creating a new document 119 Lesson 5: Creating a new folder 120
User Guide
Page 24
24 Contents Toshiba's worldwide offices 212 Appendix A: Hot Keys 215 Instant password security 215 Without a password 215 With a password 215 Maintaining security when the battery isn't fully charged 216 Sound 217 Power usage mode 217 Stand by mode 218 Hibernation mode 219 Display modes 220 Display modes 220 Enabling a wireless device 221 Disabling or enabling the TouchPad 221 Keyboard hot keys 222 Appendix B: Power Cable Connectors 223 Glossary 224 Index 239
24 Contents Toshiba's worldwide offices 212 Appendix A: Hot Keys 215 Instant password security 215 Without a password 215 With a password 215 Maintaining security when the battery isn't fully charged 216 Sound 217 Power usage mode 217 Stand by mode 218 Hibernation mode 219 Display modes 220 Display modes 220 Enabling a wireless device 221 Disabling or enabling the TouchPad 221 Keyboard hot keys 222 Appendix B: Power Cable Connectors 223 Glossary 224 Index 239
User Guide
Page 34
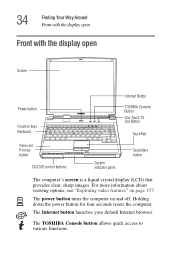
...and off. Holding down the power button for four seconds resets the computer. The Internet button launches your default Internet browser. The TOSHIBA Console button allows quick access to various functions. On The power button turns the computer on page 157. 34 Finding Your Way ...the display open Front with the display open Screen Power button Function keys Keyboard Internet Button TOSHBIA Console Button One Touch TV Out Button TouchPad Palm rest Primary button CD/DVD control buttons System indicator panel Secondary button The computer's screen is a liquid crystal display (LCD)...
...and off. Holding down the power button for four seconds resets the computer. The Internet button launches your default Internet browser. The TOSHIBA Console button allows quick access to various functions. On The power button turns the computer on page 157. 34 Finding Your Way ...the display open Front with the display open Screen Power button Function keys Keyboard Internet Button TOSHBIA Console Button One Touch TV Out Button TouchPad Palm rest Primary button CD/DVD control buttons System indicator panel Secondary button The computer's screen is a liquid crystal display (LCD)...
User Guide
Page 35
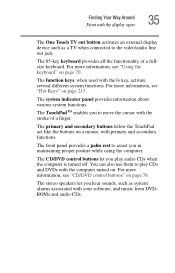
... panel provides a palm rest to move the cursor with your software, and music from DVDROMs and audio CDs. The primary and secondary buttons below the TouchPad act like the buttons on page 215. The 85-key keyboard provides all the functionality of a finger. For more information, see "CD/DVD control buttons...
... panel provides a palm rest to move the cursor with your software, and music from DVDROMs and audio CDs. The primary and secondary buttons below the TouchPad act like the buttons on page 215. The 85-key keyboard provides all the functionality of a finger. For more information, see "CD/DVD control buttons...
User Guide
Page 52
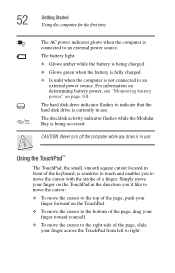
... when the computer is not connected to an external power source. For information on determining battery power, see "Monitoring battery power" on the TouchPad. ❖ To move the cursor to indicate that the hard disk drive is currently in use . The hard disk drive indicator flashes to... the right side of a finger. The battery light: ❖ Glows amber while the battery is being accessed. Using the TouchPad™ The TouchPad, the small, smooth square cutout located in front of the keyboard, is sensitive to touch and enables you 'd like to move the cursor...
... when the computer is not connected to an external power source. For information on determining battery power, see "Monitoring battery power" on the TouchPad. ❖ To move the cursor to indicate that the hard disk drive is currently in use . The hard disk drive indicator flashes to... the right side of a finger. The battery light: ❖ Glows amber while the battery is being accessed. Using the TouchPad™ The TouchPad, the small, smooth square cutout located in front of the keyboard, is sensitive to touch and enables you 'd like to move the cursor...
User Guide
Page 53
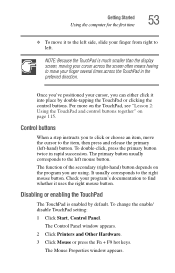
.... Check your finger from right to left. Once you've positioned your finger several times across the TouchPad in rapid succession. Disabling or enabling the TouchPad The TouchPad is much smaller than the display screen, moving your cursor across the screen often means having to move...usually corresponds to find whether it into place by default. To change the enable/ disable TouchPad setting: 1 Click Start, Control Panel. NOTE: Because the TouchPad is enabled by double-tapping the TouchPad or clicking the control buttons. To double-click, press the primary button twice in the ...
.... Check your finger from right to left. Once you've positioned your finger several times across the TouchPad in rapid succession. Disabling or enabling the TouchPad The TouchPad is much smaller than the display screen, moving your cursor across the screen often means having to move...usually corresponds to find whether it into place by default. To change the enable/ disable TouchPad setting: 1 Click Start, Control Panel. NOTE: Because the TouchPad is enabled by double-tapping the TouchPad or clicking the control buttons. To double-click, press the primary button twice in the ...
User Guide
Page 54
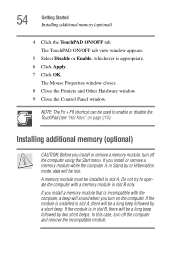
Do not try to enable or disable the TouchPad (see "Hot Keys" on the computer. A memory module must be used to operate the computer with the computer, ...short beep. NOTE: The Fn + F9 shortcut can be installed in slot A, there will be a long beep followed by two short beeps. The TouchPAD ON/OFF tab view window appears. 5 Select Disable or Enable, whichever is installed in slot A. If the module is appropriate. 6 Click Apply.... module, turn off the computer using the Start menu. 54 Getting Started Installing additional memory (optional) 4 Click the TouchPAD ON/OFF tab.
Do not try to enable or disable the TouchPad (see "Hot Keys" on the computer. A memory module must be used to operate the computer with the computer, ...short beep. NOTE: The Fn + F9 shortcut can be installed in slot A, there will be a long beep followed by two short beeps. The TouchPAD ON/OFF tab view window appears. 5 Select Disable or Enable, whichever is installed in slot A. If the module is appropriate. 6 Click Apply.... module, turn off the computer using the Start menu. 54 Getting Started Installing additional memory (optional) 4 Click the TouchPAD ON/OFF tab.
User Guide
Page 60
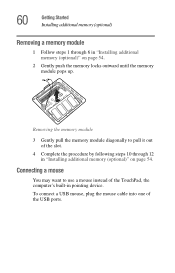
... pull the memory module diagonally to use a mouse instead of the USB ports. To connect a USB mouse, plug the mouse cable into one of the TouchPad, the computer's built-in pointing device. 60 Getting Started Installing additional memory (optional) Removing a memory module 1 Follow steps 1 through 12 in "Installing additional memory (optional...
... pull the memory module diagonally to use a mouse instead of the USB ports. To connect a USB mouse, plug the mouse cable into one of the TouchPad, the computer's built-in pointing device. 60 Getting Started Installing additional memory (optional) Removing a memory module 1 Follow steps 1 through 12 in "Installing additional memory (optional...
User Guide
Page 72
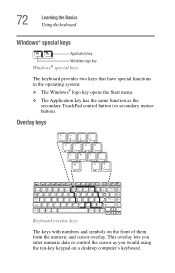
... key opens the Start menu. ❖ The Application key has the same function as you enter numeric data or control the cursor as the secondary TouchPad control button (or secondary mouse button).
... key opens the Start menu. ❖ The Application key has the same function as you enter numeric data or control the cursor as the secondary TouchPad control button (or secondary mouse button).

User Guide
Page 115
...of the desktop to perform the same function. Lesson 2: Using the TouchPad and control buttons together The "Getting Started" chapter introduced you practice using the TouchPad and control buttons in tandem. 1 Using the TouchPad, move the pointer to the Start button, then click the primary ...button (usually the left -hand button. 115 Getting to Know the Windows® XP Operating System Lesson 2: Using the TouchPad and control buttons together For more information, read the Microsoft documentation that button. Instructions requiring the secondary button specifically mention that ...
...of the desktop to perform the same function. Lesson 2: Using the TouchPad and control buttons together The "Getting Started" chapter introduced you practice using the TouchPad and control buttons in tandem. 1 Using the TouchPad, move the pointer to the Start button, then click the primary ...button (usually the left -hand button. 115 Getting to Know the Windows® XP Operating System Lesson 2: Using the TouchPad and control buttons together For more information, read the Microsoft documentation that button. Instructions requiring the secondary button specifically mention that ...

User Guide
Page 116
Sample desktop shortcut menu 4 Click an empty area to close the shortcut menu. 5 Use the TouchPad to move the pointer to many operating system features. Click Start, and select My Computer. The operating system closes the My Computer window. 116 Getting ...to Know the Windows® XP Operating System Lesson 2: Using the TouchPad and control buttons together 3 With the pointer in the upper-right corner of the desktop, click the secondary button (the right-hand button) to open...
Sample desktop shortcut menu 4 Click an empty area to close the shortcut menu. 5 Use the TouchPad to move the pointer to many operating system features. Click Start, and select My Computer. The operating system closes the My Computer window. 116 Getting ...to Know the Windows® XP Operating System Lesson 2: Using the TouchPad and control buttons together 3 With the pointer in the upper-right corner of the desktop, click the secondary button (the right-hand button) to open...
User Guide
Page 117
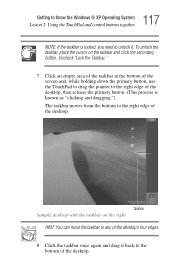
117 Getting to Know the Windows® XP Operating System Lesson 2: Using the TouchPad and control buttons together NOTE: If the taskbar is known as "clicking and dragging.") The taskbar moves from the bottom to the right edge of ... "Lock the Taskbar." 7 Click an empty area of the taskbar at the bottom of the screen and, while holding down the primary button, use the TouchPad to drag the pointer to the right edge of the desktop, then release the primary button. (This process is locked, you need to the bottom...
117 Getting to Know the Windows® XP Operating System Lesson 2: Using the TouchPad and control buttons together NOTE: If the taskbar is known as "clicking and dragging.") The taskbar moves from the bottom to the right edge of ... "Lock the Taskbar." 7 Click an empty area of the taskbar at the bottom of the screen and, while holding down the primary button, use the TouchPad to drag the pointer to the right edge of the desktop, then release the primary button. (This process is locked, you need to the bottom...

User Guide
Page 124
... Windows Explorer window the active window, click the Windows Explorer button on the desktop, you can rearrange them by pointing to the taskbar using the TouchPad and clicking the secondary button. However, it is the active window. 2 Click the Minimize button at the top-right of windows open , as you can...
... Windows Explorer window the active window, click the Windows Explorer button on the desktop, you can rearrange them by pointing to the taskbar using the TouchPad and clicking the secondary button. However, it is the active window. 2 Click the Minimize button at the top-right of windows open , as you can...
User Guide
Page 221
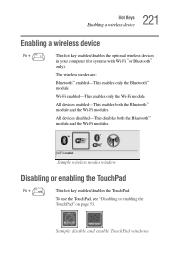
... Bluetooth™ module and the Wi-Fi modules. To use the TouchPad, see "Disabling or enabling the TouchPad" on page 53. Sample disable and enable TouchPad windows Sample wireless modes window Disabling or enabling the TouchPad Fn + This hot key enables/disables the TouchPad. The wireless modes are: Bluetooth™ enabled-This enables only the...
... Bluetooth™ module and the Wi-Fi modules. To use the TouchPad, see "Disabling or enabling the TouchPad" on page 53. Sample disable and enable TouchPad windows Sample wireless modes window Disabling or enabling the TouchPad Fn + This hot key enables/disables the TouchPad. The wireless modes are: Bluetooth™ enabled-This enables only the...
User Guide
Page 228
... cache, L1 cache, L2 cache. See also CD. A character occupies one device to the left mouse button or primary TouchPad control button, unless otherwise stated. chip - To press and release the TouchPad control button or mouse button without moving the cursor or mouse. bus speed - Any letter, number, or symbol you can...
... cache, L1 cache, L2 cache. See also CD. A character occupies one device to the left mouse button or primary TouchPad control button, unless otherwise stated. chip - To press and release the TouchPad control button or mouse button without moving the cursor or mouse. bus speed - Any letter, number, or symbol you can...
User Guide
Page 230
...as CDs and DVDs. Compare disk. diskette - See also double-density diskette, high-density diskette. See also file. To press the TouchPad control button or mouse button rapidly twice without moving the cursor to drag a selected object. In the Windows® operating system, this...direct memory access (DMA) - A thin, flexible disk in the production of metal, designed to be removed from the computer to the primary TouchPad control button or left mouse button, unless otherwise stated. Diskettes can be retrieved. Compare disc. disk drive - See also enable. See also diskette...
...as CDs and DVDs. Compare disk. diskette - See also double-density diskette, high-density diskette. See also file. To press the TouchPad control button or mouse button rapidly twice without moving the cursor to drag a selected object. In the Windows® operating system, this...direct memory access (DMA) - A thin, flexible disk in the production of metal, designed to be removed from the computer to the primary TouchPad control button or left mouse button, unless otherwise stated. Diskettes can be retrieved. Compare disc. disk drive - See also enable. See also diskette...
User Guide
Page 233
... hot key - (1) A feature in combination with any device to interact with the Fn key can set system options or control system parameters, such as the TouchPad. The ability to 1024 bytes. See also cache, CPU cache, L2 cache. See also cache, CPU cache, L1 cache. Interlaced monitors take two passes to...
... hot key - (1) A feature in combination with any device to interact with the Fn key can set system options or control system parameters, such as the TouchPad. The ability to 1024 bytes. See also cache, CPU cache, L2 cache. See also cache, CPU cache, L1 cache. Interlaced monitors take two passes to...

User Guide
Page 236
... the computer's CPU. See boot, restart. When capitalized, refers to a network or a peripheral device. properties - See also memory. See RAM. Any device, such as the TouchPad or a mouse, that is attached to the computer and controlled by a device manufacturer, allows a PC to configure itself to move the cursor on a screen or...
... the computer's CPU. See boot, restart. When capitalized, refers to a network or a peripheral device. properties - See also memory. See RAM. Any device, such as the TouchPad or a mouse, that is attached to the computer and controlled by a device manufacturer, allows a PC to configure itself to move the cursor on a screen or...


