
User Guide
Page 2
..., PROFITS, PROGRAMS, DATA OR REMOVABLE STORAGE MEDIA ARISING OUT OF OR RESULTING FROM THE USE OF THE PRODUCT, EVEN IF ADVISED OF THE POSSIBILITY THEREOF. IF YOUR DATA IS ALTERED OR LOST DUE TO ANY TROUBLE, FAILURE OR MALFUNCTION OF THE HARD DISK DRIVE OR OTHER STORAGE DEVICES AND THE DATA CANNOT BE RECOVERED, TOSHIBA SHALL NOT BE LIABLE FOR...
..., PROFITS, PROGRAMS, DATA OR REMOVABLE STORAGE MEDIA ARISING OUT OF OR RESULTING FROM THE USE OF THE PRODUCT, EVEN IF ADVISED OF THE POSSIBILITY THEREOF. IF YOUR DATA IS ALTERED OR LOST DUE TO ANY TROUBLE, FAILURE OR MALFUNCTION OF THE HARD DISK DRIVE OR OTHER STORAGE DEVICES AND THE DATA CANNOT BE RECOVERED, TOSHIBA SHALL NOT BE LIABLE FOR...
User Guide
Page 5
... will be connected to the facilities of the local telecommunications company. The customer should immediately remove it from its present line, please call the telephone company and let them know of this change. If Problems Arise If any changes necessary to maintain uninterrupted service. If advance notice is not operating properly, you will operate to the user's satisfaction. Disconnection...
... will be connected to the facilities of the local telecommunications company. The customer should immediately remove it from its present line, please call the telephone company and let them know of this change. If Problems Arise If any changes necessary to maintain uninterrupted service. If advance notice is not operating properly, you will operate to the user's satisfaction. Disconnection...
User Guide
Page 10
... Creating a computer-friendly environment....... 31 Keeping yourself comfortable 32 Precautions 35 Setting up your computer 37 Setting up your software 37 Registering your computer with Toshiba ......... 39 Adding external devices 39 Connecting the AC adapter 40 Charging the main battery 41 Using the computer for the first time 42 Opening the display panel 42 Turning on the power 42 Using the TouchPad 43 Control buttons 44 Disabling or enabling the TouchPad 44 Installing additional memory (optional 45 Removing a memory module...
... Creating a computer-friendly environment....... 31 Keeping yourself comfortable 32 Precautions 35 Setting up your computer 37 Setting up your software 37 Registering your computer with Toshiba ......... 39 Adding external devices 39 Connecting the AC adapter 40 Charging the main battery 41 Using the computer for the first time 42 Opening the display panel 42 Turning on the power 42 Using the TouchPad 43 Control buttons 44 Disabling or enabling the TouchPad 44 Installing additional memory (optional 45 Removing a memory module...

User Guide
Page 24
... standard Ethernet® network cable. The parallel port lets you connect stereo headphones or other audio input device. 24 Finding Your Way Around Right side The Network port (RJ45 jack) provides access to a standard telephone line. Right side Headphone jack Microphone jack PC Card ejection tabs PC Card slots Cooling vent Security lock slot The 3.5 mm headphone jack lets you connect a parallel printer or other devices automatically disables the internal speakers. The PC...
... standard Ethernet® network cable. The parallel port lets you connect stereo headphones or other audio input device. 24 Finding Your Way Around Right side The Network port (RJ45 jack) provides access to a standard telephone line. Right side Headphone jack Microphone jack PC Card ejection tabs PC Card slots Cooling vent Security lock slot The 3.5 mm headphone jack lets you connect a parallel printer or other devices automatically disables the internal speakers. The PC...
User Guide
Page 45
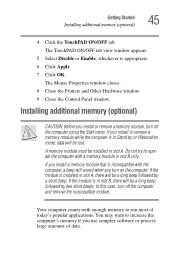
... you turn off the computer using the Start menu. The TouchPAD ON/OFF tab view window appears. 5 Select Disable or Enable, whichever is installed in slot A. If the module is incompatible with the computer, a beep will be installed in slot A, there will sound when you use complex software or process large amounts of today's popular applications. The Mouse Properties window closes. 8 Close the Printers and Other Hardware window. 9 Close the Control Panel window.
... you turn off the computer using the Start menu. The TouchPAD ON/OFF tab view window appears. 5 Select Disable or Enable, whichever is installed in slot A. If the module is incompatible with the computer, a beep will be installed in slot A, there will sound when you use complex software or process large amounts of today's popular applications. The Mouse Properties window closes. 8 Close the Printers and Other Hardware window. 9 Close the Control Panel window.
User Guide
Page 47
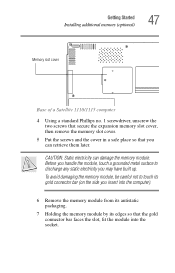
... static electricity you can damage the memory module. Getting Started Installing additional memory (optional) 47 Memory slot cover Base of a Satellite 1110/1115 computer 4 Using a standard Phillips no. 1 screwdriver, unscrew the two screws that secure the expansion memory slot cover, then remove the memory slot cover. 5 Put the screws and the cover in a safe place so that the gold connector bar faces the slot, fit the module into the socket. CAUTION: Static electricity...
... static electricity you can damage the memory module. Getting Started Installing additional memory (optional) 47 Memory slot cover Base of a Satellite 1110/1115 computer 4 Using a standard Phillips no. 1 screwdriver, unscrew the two screws that secure the expansion memory slot cover, then remove the memory slot cover. 5 Put the screws and the cover in a safe place so that the gold connector bar faces the slot, fit the module into the socket. CAUTION: Static electricity...

User Guide
Page 49
... by following steps 9 through 5 in "Installing additional memory (optional)" on page 45. Getting Started Installing additional memory (optional) 49 Removing a memory module 1 Follow steps 1 through 12 in "Installing additional memory (optional)" on page 45. 2 Gently push the memory locks outward until the memory module pops up. Removing the memory module 3 Gently pull the memory module diagonally to use a mouse instead of the USB ports. To connect a USB mouse, plug the mouse cable into one of the TouchPad, the computer's built-in pointing...
... by following steps 9 through 5 in "Installing additional memory (optional)" on page 45. Getting Started Installing additional memory (optional) 49 Removing a memory module 1 Follow steps 1 through 12 in "Installing additional memory (optional)" on page 45. 2 Gently push the memory locks outward until the memory module pops up. Removing the memory module 3 Gently pull the memory module diagonally to use a mouse instead of the USB ports. To connect a USB mouse, plug the mouse cable into one of the TouchPad, the computer's built-in pointing...
User Guide
Page 52
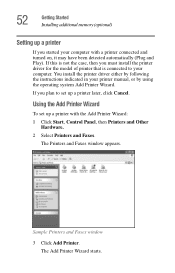
... this is connected to set up a printer later, click Cancel. Sample Printers and Faxes window 3 Click Add Printer. You install the printer driver either by using the operating system Add Printer Wizard. If you must install the printer driver for the model of printer that is not the case, then you plan to your printer manual, or by following the instructions indicated in...
... this is connected to set up a printer later, click Cancel. Sample Printers and Faxes window 3 Click Add Printer. You install the printer driver either by using the operating system Add Printer Wizard. If you must install the printer driver for the model of printer that is not the case, then you plan to your printer manual, or by following the instructions indicated in...

User Guide
Page 61
... specific functions on a typewriter, except that: ❖ The spacebar creates a space character instead of just passing over an area of the keyboard. Function keys The function keys (not to upper case - Ctrl, Fn, and Alt keys Ctrl Fn Alt . Ctrl, Fn and Alt keys The Ctrl, Fn, and Alt keys do different things depending on the keyboard indicator panel illuminates when you press them. Used...
... specific functions on a typewriter, except that: ❖ The spacebar creates a space character instead of just passing over an area of the keyboard. Function keys The function keys (not to upper case - Ctrl, Fn, and Alt keys Ctrl Fn Alt . Ctrl, Fn and Alt keys The Ctrl, Fn, and Alt keys do different things depending on the keyboard indicator panel illuminates when you press them. Used...

User Guide
Page 142
They make it guides you through other higher-speed communication methods such as text, images, audio, or video to be referenced from anywhere in setting up your computer to work with your system, is preinstalled on computers connected to the Internet) that work together using a specific Internet protocol called Web browsers are specifically designed to work with an Internet Service Provider Microsoft's Web browser, Internet Explorer, which is...
They make it guides you through other higher-speed communication methods such as text, images, audio, or video to be referenced from anywhere in setting up your computer to work with your system, is preinstalled on computers connected to the Internet) that work together using a specific Internet protocol called Web browsers are specifically designed to work with an Internet Service Provider Microsoft's Web browser, Internet Explorer, which is...
User Guide
Page 150
.... PC Card supporting software PC Cards require Card and Socket Services software - Failure to do anything before you should use . a set up and use the files included in damage to components, such as a translator between the PC Card and the computer, and that makes hot swapping (switching cards while the computer is on) possible. Your computer has two stacked PC Card slots and supports three types of Card and Socket Services...
.... PC Card supporting software PC Cards require Card and Socket Services software - Failure to do anything before you should use . a set up and use the files included in damage to components, such as a translator between the PC Card and the computer, and that makes hot swapping (switching cards while the computer is on) possible. Your computer has two stacked PC Card slots and supports three types of Card and Socket Services...
User Guide
Page 169
... displays the Non-System disk or disk error message. To open the Startup menu: 1 Restart your system's configuration or verify the startup procedure to restart the computer. Using Startup options to fix problems If the operating system fails to fix the problem. If pressing any of these problems, use the options in the diskette drive. If there is no diskette in the Startup menu. For example: ❖ The operating system fails to start after the Starting Windows...
... displays the Non-System disk or disk error message. To open the Startup menu: 1 Restart your system's configuration or verify the startup procedure to restart the computer. Using Startup options to fix problems If the operating system fails to fix the problem. If pressing any of these problems, use the options in the diskette drive. If there is no diskette in the Startup menu. For example: ❖ The operating system fails to start after the Starting Windows...

User Guide
Page 179
... using an external monitor: ❖ Check that the monitor is turned on. ❖ Check that the monitor's power cable is firmly plugged into a working power outlet. ❖ Check that the cable connecting the external monitor to the computer is firmly attached. ❖ Try adjusting the contrast and brightness controls on the external monitor. ❖ Press Fn and F5 simultaneously to its previous setting. For more information, see Windows® Help. This opens...
... using an external monitor: ❖ Check that the monitor is turned on. ❖ Check that the monitor's power cable is firmly plugged into a working power outlet. ❖ Check that the cable connecting the external monitor to the computer is firmly attached. ❖ Try adjusting the contrast and brightness controls on the external monitor. ❖ Press Fn and F5 simultaneously to its previous setting. For more information, see Windows® Help. This opens...

User Guide
Page 206
This hot key turns the cursor control overlay on This hot key turns the numeric overlay on and This hot key turns the scroll lock feature on and For more information, see "Disabling or enabling the TouchPad" on page 62. 206 Hot Keys Disabling or enabling the TouchPad Disabling or enabling the TouchPad Fn + This hot key enables/disables the TouchPad. To use the TouchPad, see "Overlay keys" on page 44. F12 Fn + off . Sample disable and enable TouchPad windows Keyboard hot keys F10 Fn + and off. + F11 Fn off .
This hot key turns the cursor control overlay on This hot key turns the numeric overlay on and This hot key turns the scroll lock feature on and For more information, see "Disabling or enabling the TouchPad" on page 62. 206 Hot Keys Disabling or enabling the TouchPad Disabling or enabling the TouchPad Fn + This hot key enables/disables the TouchPad. To use the TouchPad, see "Overlay keys" on page 44. F12 Fn + off . Sample disable and enable TouchPad windows Keyboard hot keys F10 Fn + and off. + F11 Fn off .

User Guide
Page 218
... World Wide Web, and other services. A method of refreshing a computer screen, in combination with any device to interact with the Fn key can set system options or control system parameters, such as the TouchPad. kilobyte (KB) - Memory cache installed on the network. See also cache, CPU cache, L1 cache. Interlaced monitors take two passes to help improve processing speed. internal device - A unit of data equal...
... World Wide Web, and other services. A method of refreshing a computer screen, in combination with any device to interact with the Fn key can set system options or control system parameters, such as the TouchPad. kilobyte (KB) - Memory cache installed on the network. See also cache, CPU cache, L1 cache. Interlaced monitors take two passes to help improve processing speed. internal device - A unit of data equal...
User Guide
Page 228
228 expansion memory slot 47 cover 29 external monitor connecting 136, 148 not working 180 external speakers 148 F FAT (File Allocation Table) 180 files 102 backing up 60, 67 copying to diskette 67 printing 65 saving 59, 64 transferring 139 folders 102 displaying information 135 front panel 27 function keys 61 H hard disk drive light 28, 43 hardware conflicts 171 resolving 173 headphone jack 24 Help 125, 171 Hibernate...
228 expansion memory slot 47 cover 29 external monitor connecting 136, 148 not working 180 external speakers 148 F FAT (File Allocation Table) 180 files 102 backing up 60, 67 copying to diskette 67 printing 65 saving 59, 64 transferring 139 folders 102 displaying information 135 front panel 27 function keys 61 H hard disk drive light 28, 43 hardware conflicts 171 resolving 173 headphone jack 24 Help 125, 171 Hibernate...
User Guide
Page 229
... disk activity 28 diskette activity 66 diskette drive 28 DVD-ROM/CD-RW drive 28 hard disk drive 28, 43 numeric mode 29 on/off 27 lock slot 25 M main battery changing 94 removing 95 memory problem solving 176 removing 49 removing expansion slot cover 47 memory module inserting 47 removing 49 microphone jack 24 Microsoft Internet Explorer 76 Microsoft Windows XP 99 minimizing 112 modem determining COM port 137 port 24, 76 problem solving 195, 196 resetting port to default settings 137 upgrading 137 modem, using 76 monitor connecting...
... disk activity 28 diskette activity 66 diskette drive 28 DVD-ROM/CD-RW drive 28 hard disk drive 28, 43 numeric mode 29 on/off 27 lock slot 25 M main battery changing 94 removing 95 memory problem solving 176 removing 49 removing expansion slot cover 47 memory module inserting 47 removing 49 microphone jack 24 Microsoft Internet Explorer 76 Microsoft Windows XP 99 minimizing 112 modem determining COM port 137 port 24, 76 problem solving 195, 196 resetting port to default settings 137 upgrading 137 modem, using 76 monitor connecting...

User Guide
Page 230
... problem solving 191, 192 removing 151 replacing 152 slots 25 using 150 PCMCIA (Personal Computer Memory Card International Association) 150 Plug and Play 173 ports modem 24 monitor 24 parallel 24 USB 23 power cable 41 cable connectors 207 computer will not start 168 light 28 monitoring 91 on/off button 26 problem solving 176 taking care of your battery 95 power down options Turn Off 78, 82, 84 Power Management powering down 77 power usage mode 93 powering...
... problem solving 191, 192 removing 151 replacing 152 slots 25 using 150 PCMCIA (Personal Computer Memory Card International Association) 150 Plug and Play 173 ports modem 24 monitor 24 parallel 24 USB 23 power cable 41 cable connectors 207 computer will not start 168 light 28 monitoring 91 on/off button 26 problem solving 176 taking care of your battery 95 power down options Turn Off 78, 82, 84 Power Management powering down 77 power usage mode 93 powering...

User Guide
Page 231
... 179 system resources 172 Touchpad not responding 168 trouble prevention 196 URL address not found 171 using Startup options 169 warning resume failure 168 Windows XP not working 169 WinDVD error messages 187 programs closing 115 not running correctly 181 starting 64 Web browsers 142 properties 119 R recharging main battery 90 RTC battery 90 recording adjusting quality 147 sounds 146 Recovery CD 19 Recycle...
... 179 system resources 172 Touchpad not responding 168 trouble prevention 196 URL address not found 171 using Startup options 169 warning resume failure 168 Windows XP not working 169 WinDVD error messages 187 programs closing 115 not running correctly 181 starting 64 Web browsers 142 properties 119 R recharging main battery 90 RTC battery 90 recording adjusting quality 147 sounds 146 Recovery CD 19 Recycle...
User Guide
Page 232
... Standby 86 Startup menu problem solving 169 support for Windows 101 S-video 24 system indicator panel 28 system requirements WinDVD 186 System Restore 124 System Tools 124 system tray 102 T taskbar 102, 112 customizing 130 telephone line connecting the modem 76 text file 107 toolbars displaying in a window 135 Toshiba Forum 198 Internet Web sites 199 online services 198 Toshiba Accessories information 19 TouchPad using 103 using with control buttons 103...
... Standby 86 Startup menu problem solving 169 support for Windows 101 S-video 24 system indicator panel 28 system requirements WinDVD 186 System Restore 124 System Tools 124 system tray 102 T taskbar 102, 112 customizing 130 telephone line connecting the modem 76 text file 107 toolbars displaying in a window 135 Toshiba Forum 198 Internet Web sites 199 online services 198 Toshiba Accessories information 19 TouchPad using 103 using with control buttons 103...


