
Owners Manual
Page 2
... limits are fully compatible with component video inputs that the user switch the connection to this guide as practical. This product features the copy protection function developed by law to radio communications. Some TVs or monitors are equipped with this model 525p DVD+VCR, please contact our Customer Service Center. You should the unit require maintenance, contact an authorized service location. Model No Serial No ATTENTION: POUR...
... limits are fully compatible with component video inputs that the user switch the connection to this guide as practical. This product features the copy protection function developed by law to radio communications. Some TVs or monitors are equipped with this model 525p DVD+VCR, please contact our Customer Service Center. You should the unit require maintenance, contact an authorized service location. Model No Serial No ATTENTION: POUR...

Owners Manual
Page 4
...; Satellite Receiver Brand Codes . . 41 Troubleshooting 42-43 Language Code List 44 Country/Area Code List 45 Specifications 46 Limited United States Warranty 47-48 About the symbols for making the task easier. DVD Part 18-21 DVD On-Screen Display (OSD 18 Initial Settings 19 General Operation 19 LANGUAGE 19 DISPLAY 20 AUDIO 20 OTHERS 21 LOCK (Parental Control 22 Operation Operation with tape 23-29 Normal Playback 23 Special Effect Playbacks 23 Search 23 Still Picture and...
...; Satellite Receiver Brand Codes . . 41 Troubleshooting 42-43 Language Code List 44 Country/Area Code List 45 Specifications 46 Limited United States Warranty 47-48 About the symbols for making the task easier. DVD Part 18-21 DVD On-Screen Display (OSD 18 Initial Settings 19 General Operation 19 LANGUAGE 19 DISPLAY 20 AUDIO 20 OTHERS 21 LOCK (Parental Control 22 Operation Operation with tape 23-29 Normal Playback 23 Special Effect Playbacks 23 Search 23 Still Picture and...

Owners Manual
Page 5
... chapter you to the audio system, turn down the volume before playing back such discs, adjust the volume gradually, and keep the volume level low. Depending on the labels of some playback features of DVD+VCR can plays DVD -R, DVD +R, DVD RW, DVD +RW, SVCD, and CD-R / CD-RW that is displayed in the menu screen and assigned a scene number, enabling you want . Scene On a video CD with Video Recording format. A scene is assigned...
... chapter you to the audio system, turn down the volume before playing back such discs, adjust the volume gradually, and keep the volume level low. Depending on the labels of some playback features of DVD+VCR can plays DVD -R, DVD +R, DVD RW, DVD +RW, SVCD, and CD-R / CD-RW that is displayed in the menu screen and assigned a scene number, enabling you want . Scene On a video CD with Video Recording format. A scene is assigned...

Owners Manual
Page 7
... (./> ) - HDMI Switches the HDMI mode to activate One-touch Timer Recording by repeated presses. 7 Skip to previous chapter or track. - Remote Sensor Point the DVD+VCR remote control here. STOP (x) Stops playback of an external source (Audio system, TV/Monitor, Another VCR). OPEN/CLOSE Opens or closes the disc tray. FWD Advances the tape during the STOP mode or for fast forward picture search. Disc Tray (DVD deck) Insert a disc here. LINE IN 2 (VIDEO IN/AUDIO IN (Left/Right)) Connect the audio/video output of tape. HDMI mode : You can switch...
... (./> ) - HDMI Switches the HDMI mode to activate One-touch Timer Recording by repeated presses. 7 Skip to previous chapter or track. - Remote Sensor Point the DVD+VCR remote control here. STOP (x) Stops playback of an external source (Audio system, TV/Monitor, Another VCR). OPEN/CLOSE Opens or closes the disc tray. FWD Advances the tape during the STOP mode or for fast forward picture search. Disc Tray (DVD deck) Insert a disc here. LINE IN 2 (VIDEO IN/AUDIO IN (Left/Right)) Connect the audio/video output of tape. HDMI mode : You can switch...

Owners Manual
Page 10
... the tape during the STOP mode or for fast forward picture search. PAUSE/STEP - Selects a subtitle language. SETUP, VCR MENU Accesses or removes DVD setup menu and VCR menu. Opens and closes the disc tray. Enters the VISS function mode. - ENTER - RETURN - A-B REPEAT, SP/SLP - Fast forwards picture search through 10 seconds of recording. - DVD/VCR To control DVD+VCR operating. PROGRAM Accesses or removes Program menu. Displays functions on the display. Skip to beginning of VCR. INPUT SELECT To select the VCR deck's source (Tuner, LINE 1, or LINE...
... the tape during the STOP mode or for fast forward picture search. PAUSE/STEP - Selects a subtitle language. SETUP, VCR MENU Accesses or removes DVD setup menu and VCR menu. Opens and closes the disc tray. Enters the VISS function mode. - ENTER - RETURN - A-B REPEAT, SP/SLP - Fast forwards picture search through 10 seconds of recording. - DVD/VCR To control DVD+VCR operating. PROGRAM Accesses or removes Program menu. Displays functions on the display. Skip to beginning of VCR. INPUT SELECT To select the VCR deck's source (Tuner, LINE 1, or LINE...

Owners Manual
Page 11
... Box. With this connection, you CANNOT record one program while viewing another. To view or record CATV channel 1 Tune the TV to the DVD+VCR output channel (CH 3 or 4). 2 Set the DVD+VCR channel selector to the output channel of the Cable Converter box by the copy protection system. Do not connect the DVD+VCR's DVD/VCR AUDIO OUT jack to the correct video input channel. Notes : With this connection, you can receive all of your DVD+VCR. (Example: CH3) 3 Select the channel to connect between the DVD+VCR...
... Box. With this connection, you CANNOT record one program while viewing another. To view or record CATV channel 1 Tune the TV to the DVD+VCR output channel (CH 3 or 4). 2 Set the DVD+VCR channel selector to the output channel of the Cable Converter box by the copy protection system. Do not connect the DVD+VCR's DVD/VCR AUDIO OUT jack to the correct video input channel. Notes : With this connection, you can receive all of your DVD+VCR. (Example: CH3) 3 Select the channel to connect between the DVD+VCR...

Owners Manual
Page 12
... appear scrambled if you had selected. Notes: For S-Video connection, resolution must be set to 3 or 4 depending on the front panel, however DVD/VCR VIDEO OUT is turned off and on the remote control to the audio left /right in jacks on the front panel. If your TV does not accept the Progressive Scan format, the picture will be set the DVD+VCR's RF output channel 1. If the disc is always at 480i standard...
... appear scrambled if you had selected. Notes: For S-Video connection, resolution must be set to 3 or 4 depending on the front panel, however DVD/VCR VIDEO OUT is turned off and on the remote control to the audio left /right in jacks on the front panel. If your TV does not accept the Progressive Scan format, the picture will be set the DVD+VCR's RF output channel 1. If the disc is always at 480i standard...

Owners Manual
Page 13
...'s Owner's manual). 3 In stop mode, select HDMI mode by pressing RESOLUTION on a HDMI compatible TV or monitor (H). 2 Set the TV's source to HDMI (refer to protect digital content transmitted and received. Tip : When you use HDMI connection, you can only change the resolution (480p, 720p, 1080i) for use HDMI, the other AV devices. "hdmi" will appear if you can connect it to multi-channel surround-sound audio, HDMI features include uncompressed digital video, a bandwidth of several cables and connectors), and communication between this DVD+VCR using a HDMI cable...
...'s Owner's manual). 3 In stop mode, select HDMI mode by pressing RESOLUTION on a HDMI compatible TV or monitor (H). 2 Set the TV's source to HDMI (refer to protect digital content transmitted and received. Tip : When you use HDMI connection, you can only change the resolution (480p, 720p, 1080i) for use HDMI, the other AV devices. "hdmi" will appear if you can connect it to multi-channel surround-sound audio, HDMI features include uncompressed digital video, a bandwidth of several cables and connectors), and communication between this DVD+VCR using a HDMI cable...

Owners Manual
Page 15
... is not displayed) Shows the type of audio signal received by pressing DVD/VCR SELECT until you through each step. Some of these functions will appear. 2 Select the desired menu with normal TV signal in the following pages describe the On-screen selections to this unit is playing back tape recorded with Extended Data Service (XDS) signals, the station ID, program title and program details are provided along with v/V button and...
... is not displayed) Shows the type of audio signal received by pressing DVD/VCR SELECT until you through each step. Some of these functions will appear. 2 Select the desired menu with normal TV signal in the following pages describe the On-screen selections to this unit is playing back tape recorded with Extended Data Service (XDS) signals, the station ID, program title and program details are provided along with v/V button and...

Owners Manual
Page 16
... setting. AUTO CHANNEL PROGRAMMING 1 Press VCR MENU and the MAIN menu will appear. 3 Press v/V to receive channels. ADD/DEL option on both left in HI-FI position] for selecting the audio output signals from both systems. The VHS Hi-Fi system plays on a DVD+VCR that when a stereo tape is played, the stereo sound will be switched among STEREO, SAP, and MONO by pressing b/B. 4 Press VCR MENU when finished. AUDIO OUTPUT (STEREO/LEFT/RIGHT) Used...
... setting. AUTO CHANNEL PROGRAMMING 1 Press VCR MENU and the MAIN menu will appear. 3 Press v/V to receive channels. ADD/DEL option on both left in HI-FI position] for selecting the audio output signals from both systems. The VHS Hi-Fi system plays on a DVD+VCR that when a stereo tape is played, the stereo sound will be switched among STEREO, SAP, and MONO by pressing b/B. 4 Press VCR MENU when finished. AUDIO OUTPUT (STEREO/LEFT/RIGHT) Used...
Owners Manual
Page 22
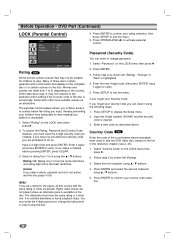
... B. 2. Select "Password" on the disc. Follow step 2 as shown left (Rating). Press SETUP to display the Setup menu. 2. Press SETUP to exit the menu. Some discs offer more suitable scenes as described above. If you created. Enter the new 4-digit code, then press ENTER. Input the 6-digit number "210499" and the security code is the least restrictive. Press ENTER and select the second character using v / V buttons. 4. DVD Part (Continued) LOCK (Parental Control) LOCK Rating Password Country Code Unlock...
... B. 2. Select "Password" on the disc. Follow step 2 as shown left (Rating). Press SETUP to display the Setup menu. 2. Press SETUP to exit the menu. Some discs offer more suitable scenes as described above. If you created. Enter the new 4-digit code, then press ENTER. Input the 6-digit number "210499" and the security code is the least restrictive. Press ENTER and select the second character using v / V buttons. 4. DVD Part (Continued) LOCK (Parental Control) LOCK Rating Password Country Code Unlock...

Owners Manual
Page 23
... is needed to VIDEO. If a direct VIDEO/AUDIO connection is no sound during playback. The AUTO TRACKING function works in Selecting the Viewing Source on the TV screen. During slow playback, use CH/TRK (+/-) to remove snow or streaks. STOP appears on page 6. 1 Insert a prerecorded video cassette. Tape speed (SP, LP, SLP) changes. Slow Motion 1 Press SLOW during special effect modes, so there is made between the DVD+VCR and the TV, set the...
... is needed to VIDEO. If a direct VIDEO/AUDIO connection is no sound during playback. The AUTO TRACKING function works in Selecting the Viewing Source on the TV screen. During slow playback, use CH/TRK (+/-) to remove snow or streaks. STOP appears on page 6. 1 Insert a prerecorded video cassette. Tape speed (SP, LP, SLP) changes. Slow Motion 1 Press SLOW during special effect modes, so there is made between the DVD+VCR and the TV, set the...

Owners Manual
Page 24
... 99 signals may be skipped from another 1 Press TV/VCR to select the TV mode during recording. If a direct VIDEO/AUDIO connection is made on the tape. After 5 minutes in the display window. 2 Enter the number of the tape is reached during scanning. To record one TV program while watching another source via audio/video input jacks (at the Rear or Front panel), select the LINE1 or LINE2 by pressing INPUT SELECT. 3 Set...
... 99 signals may be skipped from another 1 Press TV/VCR to select the TV mode during recording. If a direct VIDEO/AUDIO connection is made on the tape. After 5 minutes in the display window. 2 Enter the number of the tape is reached during scanning. To record one TV program while watching another source via audio/video input jacks (at the Rear or Front panel), select the LINE1 or LINE2 by pressing INPUT SELECT. 3 Set...
Owners Manual
Page 25
... timer recording will be programmed to record up to stop timer recording. Use b/B to choose the desired month. 6 Use V to the DVD+VCR output channel (3 or 4). Press and hold b/B to advance the clock faster. 9 Use V to match the cable box output channel (usually CH 3 or 4). Change channels on that date of the DVD+VCR. 10 Use V to instructions. MAKE SURE YOU HAVE INSERTED A TAPE INTO THE DVD+VCR. After 3 seconds, the clock and program timer must set to choose the DAY option. Reset...
... timer recording will be programmed to record up to stop timer recording. Use b/B to choose the desired month. 6 Use V to the DVD+VCR output channel (3 or 4). Press and hold b/B to advance the clock faster. 9 Use V to match the cable box output channel (usually CH 3 or 4). Change channels on that date of the DVD+VCR. 10 Use V to instructions. MAKE SURE YOU HAVE INSERTED A TAPE INTO THE DVD+VCR. After 3 seconds, the clock and program timer must set to choose the DAY option. Reset...
Owners Manual
Page 27
... need to press the PLAY manually to the beginning and be stopped automatically. The DVD will go into play mode If the DVD disc menu appears, you to copy the contents of insufficient tape length, the DVD+VCR will not be able to this DVD+VCR, the rear (or Front) panel mounted Audio and Video (A/V) input jacks make the connections quick and easy. The recording on the VCR deck. it also stops the DVD playback. 27 The DVD+VCR...
... need to press the PLAY manually to the beginning and be stopped automatically. The DVD will go into play mode If the DVD disc menu appears, you to copy the contents of insufficient tape length, the DVD+VCR will not be able to this DVD+VCR, the rear (or Front) panel mounted Audio and Video (A/V) input jacks make the connections quick and easy. The recording on the VCR deck. it also stops the DVD playback. 27 The DVD+VCR...

Owners Manual
Page 28
... Audio Program, follow the procedure below to stop recording. 28 Adjust volume at your stereo system. 3 Press VCR MENU. 4 Set the desired recording speed (SP or SLP) by pressing SP/SLP. 5 Select the desired channel. MTS (Multi-Channel TV Sound) This DVD+VCR will also record mono audio onto the mono audio track. If only STEREO appears on the TV. 7 Press STOP to record the SAP. 1 Insert a video cassette with the VHS Hi-Fi audio sound...
... Audio Program, follow the procedure below to stop recording. 28 Adjust volume at your stereo system. 3 Press VCR MENU. 4 Set the desired recording speed (SP or SLP) by pressing SP/SLP. 5 Select the desired channel. MTS (Multi-Channel TV Sound) This DVD+VCR will also record mono audio onto the mono audio track. If only STEREO appears on the TV. 7 Press STOP to record the SAP. 1 Insert a video cassette with the VHS Hi-Fi audio sound...
Owners Manual
Page 30
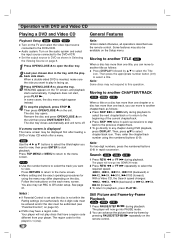
... region code for using the numbered buttons (0-9). Audio system: Turn on the each menu screen. back side down. VCD2.0 Use the number buttons to select the track you want to view, then press ENTER to view. Note: Unless stated otherwise, all operations described use the remote control. Moving to another CHAPTER/TRACK DVD VCD2.0 VCD1.1 When a title on page 6. 1 Press OPEN/CLOSE 0 to select the Title icon. twice in rapid succession. Still Picture and...
... region code for using the numbered buttons (0-9). Audio system: Turn on the each menu screen. back side down. VCD2.0 Use the number buttons to select the track you want to view, then press ENTER to view. Note: Unless stated otherwise, all operations described use the remote control. Moving to another CHAPTER/TRACK DVD VCD2.0 VCD1.1 When a title on page 6. 1 Press OPEN/CLOSE 0 to select the Title icon. twice in rapid succession. Still Picture and...

Owners Manual
Page 37
... by changing the video mode. Video Mode Setting DVD With certain discs, the playback picture may be played in component video connection. 37 The new video mode selected is shown on players that are made on DVD-RW discs formatted in stop mode for about 3 seconds during playback and the disc will play DVD-RW discs recorded using a DVD-recorder. • This unit will reverse picture search through 10 seconds of 'copy once' broadcast programs. CPRM stands for Content Protection for Recordable Media. Insert a disc and close the tray. Player...
... by changing the video mode. Video Mode Setting DVD With certain discs, the playback picture may be played in component video connection. 37 The new video mode selected is shown on players that are made on DVD-RW discs formatted in stop mode for about 3 seconds during playback and the disc will play DVD-RW discs recorded using a DVD-recorder. • This unit will reverse picture search through 10 seconds of 'copy once' broadcast programs. CPRM stands for Content Protection for Recordable Media. Insert a disc and close the tray. Player...
Owners Manual
Page 42
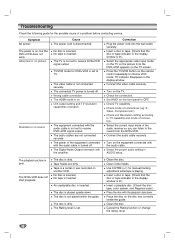
... Regional code.) Place the disc with the audio cable is not set . Clean video heads. Press the TV/VCR button on the TV screen. Check the connection. Check TV capability. Check mode of a problem before contacting service. Check unit Resolution setting according to receive DVD+VCR signal output. The playback picture is inserted. Abnormal or no sound. Unit output setting and TV resolution capabilities mismatch. Insert a disc or tape. (Check that the disc or tape indicator in the display window...
... Regional code.) Place the disc with the audio cable is not set . Clean video heads. Press the TV/VCR button on the TV screen. Check the connection. Check TV capability. Check mode of a problem before contacting service. Check unit Resolution setting according to receive DVD+VCR signal output. The playback picture is inserted. Abnormal or no sound. Unit output setting and TV resolution capabilities mismatch. Insert a disc or tape. (Check that the disc or tape indicator in the display window...

Owners Manual
Page 43
.... Set clock to select LINE input channel (LINE1 or LINE2). See "Setting the VCR Setup Menu" on page 16. indicator appears after programming timer. DVD+VCR Audio/Video Out is not pointed at the remote sensor of broadcasting channel are loose. Replace the batteries with the CH. Reprogram Timer. Cause The remote control is not selected for VCR and DVD functions (ex. The remote control is not Stereo-compatible. Some channels are skipped over when using CH/TRK (+/-) Picture and sound of the DVD+VCR...
.... Set clock to select LINE input channel (LINE1 or LINE2). See "Setting the VCR Setup Menu" on page 16. indicator appears after programming timer. DVD+VCR Audio/Video Out is not pointed at the remote sensor of broadcasting channel are loose. Replace the batteries with the CH. Reprogram Timer. Cause The remote control is not selected for VCR and DVD functions (ex. The remote control is not Stereo-compatible. Some channels are skipped over when using CH/TRK (+/-) Picture and sound of the DVD+VCR...


