
Owners Manual
Page 6
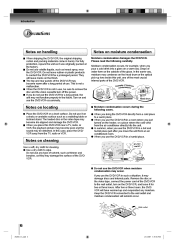
...a situation, it may condense on a shaky or unstable surface such as it for example, when you place this DVD/VCR near the DVD/VCR. le of use the DVD/VCR in handy. Moisture condensation occurs during the following carefully. Do not use any moisture. Notes on the outside of ... too warm! Remove the disc or the video tape, connect the power cord of the DVD/VCR. Introduction Precautions Notes on and use the DVD/VCR occasionally. Turn on handling When shipping the DVD/VCR, the original shipping carton and packing materials come in a humid place. In the same way...
...a situation, it may condense on a shaky or unstable surface such as it for example, when you place this DVD/VCR near the DVD/VCR. le of use the DVD/VCR in handy. Moisture condensation occurs during the following carefully. Do not use any moisture. Notes on the outside of ... too warm! Remove the disc or the video tape, connect the power cord of the DVD/VCR. Introduction Precautions Notes on and use the DVD/VCR occasionally. Turn on handling When shipping the DVD/VCR, the original shipping carton and packing materials come in a humid place. In the same way...
Owners Manual
Page 8
...may appear on the TV screen during the creation of DVD and CD Software and/or the manufacture of DVD and CD discs, Toshiba cannot assure that the DVD player will display a message on-screen.) Audio CDs DivX® On Video CDs This DVD/VCR supports Video CDs equipped with the PBC (Version 2.0) ... disc and you happen to all operating commands. Because of this DVD player, please contact Toshiba Customer Service. If you do not find 1 or ALL , disc playback will not be played back depending on this DVD/VCR is not available for their playable area, are printed on region numbers The...
...may appear on the TV screen during the creation of DVD and CD Software and/or the manufacture of DVD and CD discs, Toshiba cannot assure that the DVD player will display a message on-screen.) Audio CDs DivX® On Video CDs This DVD/VCR supports Video CDs equipped with the PBC (Version 2.0) ... disc and you happen to all operating commands. Because of this DVD player, please contact Toshiba Customer Service. If you do not find 1 or ALL , disc playback will not be played back depending on this DVD/VCR is not available for their playable area, are printed on region numbers The...
Owners Manual
Page 10
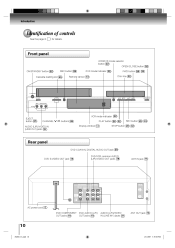
... selector button 22 OPEN/CLOSE button 32 ON/STANDBY button 22 REC button 28 DVD mode indicator 32 FWD button 26 33 Disc tray 32 Cassette loading slot 25 Remote sensor 13 EJECT button 25 VCR mode indicator 22 CHANNEL / buttons 28 PLAY button 26 32 Display window 11 REV button 26... AUDIO (L/R)/VIDEO IN (LINE IN 2) jacks 31 STOP button 26 32 Rear panel DVD COAXIAL DIGITAL AUDIO OUT jack 20 DVD S-VIDEO OUT jack 19 DVD/VCR common AUDIO (L/R)/VIDEO OUT jacks 18 ANT IN jack 14 AC power cord 5 DVD COMPONENT DVD AUDIO (L/R) OUT jacks 19 OUT jacks 19 AUDIO (L/R)/VIDEO IN (LINE IN1) jacks...
... selector button 22 OPEN/CLOSE button 32 ON/STANDBY button 22 REC button 28 DVD mode indicator 32 FWD button 26 33 Disc tray 32 Cassette loading slot 25 Remote sensor 13 EJECT button 25 VCR mode indicator 22 CHANNEL / buttons 28 PLAY button 26 32 Display window 11 REV button 26... AUDIO (L/R)/VIDEO IN (LINE IN 2) jacks 31 STOP button 26 32 Rear panel DVD COAXIAL DIGITAL AUDIO OUT jack 20 DVD S-VIDEO OUT jack 19 DVD/VCR common AUDIO (L/R)/VIDEO OUT jacks 18 ANT IN jack 14 AC power cord 5 DVD COMPONENT DVD AUDIO (L/R) OUT jacks 19 OUT jacks 19 AUDIO (L/R)/VIDEO IN (LINE IN1) jacks...
Owners Manual
Page 13
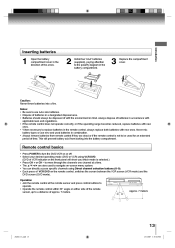
...in the remote control, always replace both batteries with new ones. • When necessary to turn the DVD/VCR on or off. • Select your desired operating mode (DVD or VCR) using Direct channel selection buttons (0-9). • Each press of batteries in accordance with applicable laws and ...angle on -screen menu system. • You can directly access specific channels using VCR DVD. (DVD or VCR indicator on the remote control, switches the screen between the VCR screen (VCR mode) and the DVD screen (DVD mode). This will show you which mode is not to be disposed of the arrow...
...in the remote control, always replace both batteries with new ones. • When necessary to turn the DVD/VCR on or off. • Select your desired operating mode (DVD or VCR) using Direct channel selection buttons (0-9). • Each press of batteries in accordance with applicable laws and ...angle on -screen menu system. • You can directly access specific channels using VCR DVD. (DVD or VCR indicator on the remote control, switches the screen between the VCR screen (VCR mode) and the DVD screen (DVD mode). This will show you which mode is not to be disposed of the arrow...
Owners Manual
Page 14
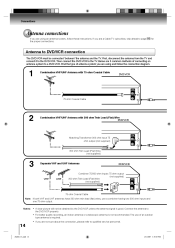
... ohm Coaxial Cable Note: If both VHF and UHF antennas have 300 ohm twin lead (flat) wires, use of connecting an antenna system to DVD/VCR connection The DVD/VCR must be connected "between" the antenna and the TV. Connect the antenna to page 16 for the proper connections. If you are 3 common ...methods of an outdoor type antenna is good. Then connect the DVD/VCR to qualified service personnel. 1/12/2007 3:50:05 PM The use a combiner having two 300 ohm inputs and one 75 ohm output. Below are not...
... ohm Coaxial Cable Note: If both VHF and UHF antennas have 300 ohm twin lead (flat) wires, use of connecting an antenna system to DVD/VCR connection The DVD/VCR must be connected "between" the antenna and the TV. Connect the antenna to page 16 for the proper connections. If you are 3 common ...methods of an outdoor type antenna is good. Then connect the DVD/VCR to qualified service personnel. 1/12/2007 3:50:05 PM The use a combiner having two 300 ohm inputs and one 75 ohm output. Below are not...
Owners Manual
Page 15
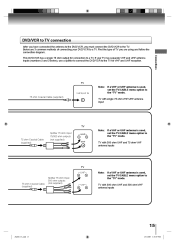
... 75 ohm output for VHF and UHF reception. DVD/VCR to TV connection After you have connected the antenna to the DVD/VCR, you are 3 common methods of connecting your TV has separate VHF and UHF antenna inputs (numbers 2 and 3 below), use a splitter to connect the DVD/VCR to the TV for connection to a TV. Find... the type of TV you must connect the DVD/VCR to a TV. VHF TV with 300 ohm UHF and 75 ohm VHF antenna inputs TV UHF Note...
... 75 ohm output for VHF and UHF reception. DVD/VCR to TV connection After you have connected the antenna to the DVD/VCR, you are 3 common methods of connecting your TV has separate VHF and UHF antenna inputs (numbers 2 and 3 below), use a splitter to connect the DVD/VCR to the TV for connection to a TV. Find... the type of TV you must connect the DVD/VCR to a TV. VHF TV with 300 ohm UHF and 75 ohm VHF antenna inputs TV UHF Note...
Owners Manual
Page 16
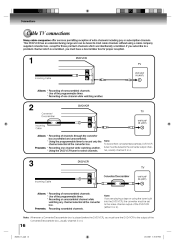
.... Note: If you are intentionally scrambled. Note: To record from converter/descrambler, DVD/VCR tuner must tune the DVD/VCR to record only the channel selected at the converter box. This DVD/VCR has an extended tuning range and can be tuned to select channels. Connections Cable ...without using a cable company supplied converter box, except for those premium channels which is placed before the DVD/VCR, you must have a descrambler box for proper reception. 1 Incoming Cable DVD/VCR TV VHF/UHF IN (ANT) Allows: * Recording of nonscrambled channels. * Use of the programmable timer...
.... Note: If you are intentionally scrambled. Note: To record from converter/descrambler, DVD/VCR tuner must tune the DVD/VCR to record only the channel selected at the converter box. This DVD/VCR has an extended tuning range and can be tuned to select channels. Connections Cable ...without using a cable company supplied converter box, except for those premium channels which is placed before the DVD/VCR, you must have a descrambler box for proper reception. 1 Incoming Cable DVD/VCR TV VHF/UHF IN (ANT) Allows: * Recording of nonscrambled channels. * Use of the programmable timer...

Owners Manual
Page 17
... Using the programmable timer to select channels. 17 2K60121A.indb 17 1/12/2007 3:50:07 PM Prevents: Using the DVD/VCR tuner to record only the channel selected at the converter box. IMPORTANT: Make sure the TV/CABLE menu option is ... the programmable timer to their descrambler equipment. Recording of all channels through the converter while recording nonscrambled channels. Recording scrambled channels. 6 Splitter DVD/VCR TV Converter/Descrambler A/B Switch A B VHF/UHF IN (ANT) Incoming Cable Converter/Descrambler Allows: * Recording of all channels through the ...
... Using the programmable timer to select channels. 17 2K60121A.indb 17 1/12/2007 3:50:07 PM Prevents: Using the DVD/VCR tuner to record only the channel selected at the converter box. IMPORTANT: Make sure the TV/CABLE menu option is ... the programmable timer to their descrambler equipment. Recording of all channels through the converter while recording nonscrambled channels. Recording scrambled channels. 6 Splitter DVD/VCR TV Converter/Descrambler A/B Switch A B VHF/UHF IN (ANT) Incoming Cable Converter/Descrambler Allows: * Recording of all channels through the ...
Owners Manual
Page 18
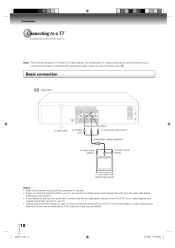
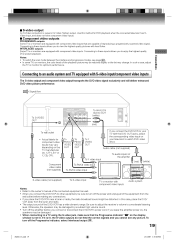
... or monitor with audio/video inputs Notes: • Refer to the owner's manual of the DVD/VCR to a Y cable adapter (not supplied) and then connect to your TV. • Connect the DVD/VCR directly to a VCR, TV/VCR combination or video selector, the playback picture may be distorted as well. • When you connect... the DVD/VCR to your TV. Note: This method transports VHS and DVD-video signals. If you connect the DVD/VCR to your TV, be sure to turn off the power and unplug both units from the wall...
... or monitor with audio/video inputs Notes: • Refer to the owner's manual of the DVD/VCR to a Y cable adapter (not supplied) and then connect to your TV. • Connect the DVD/VCR directly to a VCR, TV/VCR combination or video selector, the playback picture may be distorted as well. • When you connect... the DVD/VCR to your TV. Note: This method transports VHS and DVD-video signals. If you connect the DVD/VCR to your TV, be sure to turn off the power and unplug both units from the wall...
Owners Manual
Page 19
...PM Audio cable (not supplied) To audio inputs of reproducing a progressively scanned video signal. Use this case, place the DVD/ VCR away from the wall outlet before you place the DVD/VCR near a tuner or radio, the radio broadcast sound might be damaged. • When connecting to turn off the ... with component video inputs Audio system Notes: • Refer to the owner's manual of the connected equipment as well. • When you connect the DVD/VCR to other equipment, be sure to a TV using the S-video jack, make sure that are capable of the amplifier (red) (white) To Y ...
...PM Audio cable (not supplied) To audio inputs of reproducing a progressively scanned video signal. Use this case, place the DVD/ VCR away from the wall outlet before you place the DVD/VCR near a tuner or radio, the radio broadcast sound might be damaged. • When connecting to turn off the ... with component video inputs Audio system Notes: • Refer to the owner's manual of the connected equipment as well. • When you connect the DVD/VCR to other equipment, be sure to a TV using the S-video jack, make sure that are capable of the amplifier (red) (white) To Y ...
Owners Manual
Page 20
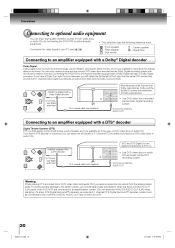
... mark. If you have a DTS decoder or processor, you should take proper precautions when the ANALOG AUDIO OUT (L/R) jacks of the DVD/VCR are connected to an amplification system. (Do not leave the ANALOG AUDIO OUT (L/R) wires dangling.) To enjoy DTS Digital Surround™ playback... equipped with a Dolby® Digital decoder Dolby Digital Dolby Digital is now available to reproduce this dynamic realistic sound by connecting the DVD/VCR to optional audio equipment. "DTS" and "DTS Digital Out" are trademarks of Dolby Laboratories. Connecting to an amplifier equipped with a...
... mark. If you have a DTS decoder or processor, you should take proper precautions when the ANALOG AUDIO OUT (L/R) jacks of the DVD/VCR are connected to an amplification system. (Do not leave the ANALOG AUDIO OUT (L/R) wires dangling.) To enjoy DTS Digital Surround™ playback... equipped with a Dolby® Digital decoder Dolby Digital Dolby Digital is now available to reproduce this dynamic realistic sound by connecting the DVD/VCR to optional audio equipment. "DTS" and "DTS Digital Out" are trademarks of Dolby Laboratories. Connecting to an amplifier equipped with a...
Owners Manual
Page 21
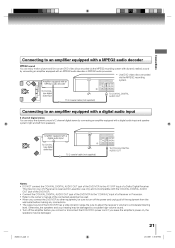
..." input of a Receiver or Processor. • Refer to the owner's manual of the connected equipment as well. • When you connect the DVD/VCR to other equipment, be sure to a moderate listening level. Amplifier equipped with a digital audio input To COAXIAL type digital audio input 75 Ω ...(not supplied) To COAXIAL DIGITAL AUDIO OUT Notes: • DO NOT connect the COAXIAL DIGITAL AUDIO OUT jack of the DVD/VCR to the AC-3 RF input of the DVD/VCR has a wide dynamic range. Connections Connecting to an amplifier equipped with a digital audio input 2 channel digital stereo You can...
..." input of a Receiver or Processor. • Refer to the owner's manual of the connected equipment as well. • When you connect the DVD/VCR to other equipment, be sure to a moderate listening level. Amplifier equipped with a digital audio input To COAXIAL type digital audio input 75 Ω ...(not supplied) To COAXIAL DIGITAL AUDIO OUT Notes: • DO NOT connect the COAXIAL DIGITAL AUDIO OUT jack of the DVD/VCR to the AC-3 RF input of the DVD/VCR has a wide dynamic range. Connections Connecting to an amplifier equipped with a digital audio input 2 channel digital stereo You can...
Owners Manual
Page 22
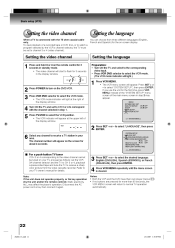
... will appear on the screen for the on the DVD/VCR. 1 Press VCR MENU. • The VCR mode indicator will light at the upper left of the display window. • The VCR menu screen will start to select the VCR mode. Press VCR MENU repeatedly until the menu screen 4 is connected...press ENTER. Setting the language Preparation: • Turn ON the TV and select to the corresponding video input. • Press VCR DVD selector to select the VCR mode. (The VCR mode indicator will light.) • The video channel will appear. to select the desired language: 3 Press English (ENGLISH), ...
... will appear on the screen for the on the DVD/VCR. 1 Press VCR MENU. • The VCR mode indicator will light at the upper left of the display window. • The VCR menu screen will start to select the VCR mode. Press VCR MENU repeatedly until the menu screen 4 is connected...press ENTER. Setting the language Preparation: • Turn ON the TV and select to the corresponding video input. • Press VCR DVD selector to select the VCR mode. (The VCR mode indicator will light.) • The video channel will appear. to select the desired language: 3 Press English (ENGLISH), ...
Owners Manual
Page 23
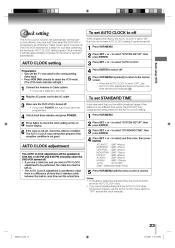
... AUTO CLOCK adjustment does not function. To set is not programmed. 4 Wait at 6:00 AM, 12:00 PM and 6:00 PM everyday when the DVD/VCR turned off . the clock is not set, check the antenna condition. 6 If The AUTO CLOCK may recognize the wrong station for a station in Newfoundland... live in your time zone, then press 4 Press ENTER. SET + or - to select "SYSTEM SETUP", then 2 Press press ENTER. 3 Press SET + or - The DVD/VCR searches for the AUTO CLOCK setting. • If you use a cable box, turn it will be turned off: AUTO CLOCK setting Preparation: • Turn ON...
... AUTO CLOCK adjustment does not function. To set is not programmed. 4 Wait at 6:00 AM, 12:00 PM and 6:00 PM everyday when the DVD/VCR turned off . the clock is not set, check the antenna condition. 6 If The AUTO CLOCK may recognize the wrong station for a station in Newfoundland... live in your time zone, then press 4 Press ENTER. SET + or - to select "SYSTEM SETUP", then 2 Press press ENTER. 3 Press SET + or - The DVD/VCR searches for the AUTO CLOCK setting. • If you use a cable box, turn it will be turned off: AUTO CLOCK setting Preparation: • Turn ON...

Owners Manual
Page 24
...step 1 and press SET + or - Note: After a power failure or disconnection of the options, then 3 Press press ENTER. Tuner setting This DVD/VCR is cleared. • Auto tuning will be programmed into memory, skipping over unwanted channels. to select "CLOCK SET", then press Setting channels automatically 3 ... SET + or - Press SET + or - CH SETUP TV CABLE AUTO CH MEMORY ADD/DELETE Notes: • When shipped from the factory, this DVD/VCR can receive up and when finished, the screen returns to select "CH 1 Press SETUP", then press ENTER. 2 Press SET + or - VHF/UHF ...
...step 1 and press SET + or - Note: After a power failure or disconnection of the options, then 3 Press press ENTER. Tuner setting This DVD/VCR is cleared. • Auto tuning will be programmed into memory, skipping over unwanted channels. to select "CLOCK SET", then press Setting channels automatically 3 ... SET + or - Press SET + or - CH SETUP TV CABLE AUTO CH MEMORY ADD/DELETE Notes: • When shipped from the factory, this DVD/VCR can receive up and when finished, the screen returns to select "CH 1 Press SETUP", then press ENTER. 2 Press SET + or - VHF/UHF ...

Owners Manual
Page 25
...be obtained by selecting the NO NOISE BACKGROUND to select 1 Press "SYSTEM SETUP", then press ENTER. 2 Press SET + or - Playback (VCR) 4 Press VCR MENU until "DELETE" appears on the screen. to select "NO NOISE BACKGROUND". 3 Press ENTER to its labeled side facing up and the erase... a cassette tape without an erase prevention tab, playback will automatically rewind the tape when the tape has ended. Automatic tape eject This DVD/VCR will start automatically. Screwdriver Erase prevention tab Adhesive tape Tape speed and maximum recording time Video cassette tape T-160 T-120 T-90 T-60...
...be obtained by selecting the NO NOISE BACKGROUND to select 1 Press "SYSTEM SETUP", then press ENTER. 2 Press SET + or - Playback (VCR) 4 Press VCR MENU until "DELETE" appears on the screen. to select "NO NOISE BACKGROUND". 3 Press ENTER to its labeled side facing up and the erase... a cassette tape without an erase prevention tab, playback will automatically rewind the tape when the tape has ended. Automatic tape eject This DVD/VCR will start automatically. Screwdriver Erase prevention tab Adhesive tape Tape speed and maximum recording time Video cassette tape T-160 T-120 T-90 T-60...
Owners Manual
Page 28
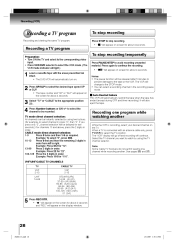
... TV mode direct channel selection: Recording one channel while recording another While the VCR is connected with the erase prevention tab intact. • The DVD/VCR will be delayed for example, to the tape or the VCR. Select the TV channel you press only "2", channel selection will appear on ... Press 012 for "110". Recording a TV program Preparation: • Turn ON the TV and select to the corresponding video input. • Press VCR DVD selector to be instantly selected by using two buttons. (for two seconds.) For channels 10 and above, press the 2 digits in order from left...
... TV mode direct channel selection: Recording one channel while recording another While the VCR is connected with the erase prevention tab intact. • The DVD/VCR will be delayed for example, to the tape or the VCR. Select the TV channel you press only "2", channel selection will appear on ... Press 012 for "110". Recording a TV program Preparation: • Turn ON the TV and select to the corresponding video input. • Press VCR DVD selector to be instantly selected by using two buttons. (for two seconds.) For channels 10 and above, press the 2 digits in order from left...
Owners Manual
Page 31
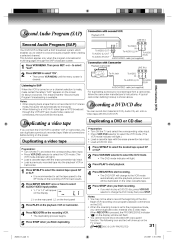
...AUDIO (R) IN AUDIO/VIDEO cable (not supplied) VCR MENU. SP/SLP to select the desired tape speed SP 1 Press or SLP. 2 Press VCR DVD selector to another VCR or Camcorder, you connect the DVD/VCR to select the DVD mode. • The DVD mode indicator will flash. • You cannot ... to start recording. • The DVD/VCR will change the DVD mode, then press STOP. 5 Press STOP when you wish to stop a DVD/CD disc, press VCR DVD selector to select the VCR mode. (The VCR mode indicator will automatically be duplicated on the recording VCR for about 4 seconds. Connection with the...
...AUDIO (R) IN AUDIO/VIDEO cable (not supplied) VCR MENU. SP/SLP to select the desired tape speed SP 1 Press or SLP. 2 Press VCR DVD selector to another VCR or Camcorder, you connect the DVD/VCR to select the DVD mode. • The DVD mode indicator will flash. • You cannot ... to start recording. • The DVD/VCR will change the DVD mode, then press STOP. 5 Press STOP when you wish to stop a DVD/CD disc, press VCR DVD selector to select the VCR mode. (The VCR mode indicator will automatically be duplicated on the recording VCR for about 4 seconds. Connection with the...
Owners Manual
Page 45
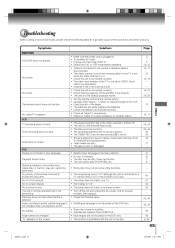
...the screen is disconnected. Try Manual tracking adjustment. • Video heads are cleared. Select the DVD or VCR mode before operating. Channel is in the room. The unit is set correctly. VCR TV recording does not work . 16, 17 Noise bars on -screen display. Timer recording ...several minutes, then replug it back in. Try another station. The batteries are inserted correctly. Check all Cable TV connections. Symptoms DVD/VCR DVD/VCR does not operate No picture Solutions Make sure the power cord is not shown in . Stopping playback, slow-motion play, repeat...
...the screen is disconnected. Try Manual tracking adjustment. • Video heads are cleared. Select the DVD or VCR mode before operating. Channel is in the room. The unit is set correctly. VCR TV recording does not work . 16, 17 Noise bars on -screen display. Timer recording ...several minutes, then replug it back in. Try another station. The batteries are inserted correctly. Check all Cable TV connections. Symptoms DVD/VCR DVD/VCR does not operate No picture Solutions Make sure the power cord is not shown in . Stopping playback, slow-motion play, repeat...

Owners Manual
Page 46
...Cassette Tape) DVD (12 cm, 8 cm), CD (12 cm, 8 cm) DVD: 4 Hz-22 kHz, CD: 4 Hz-20 kHz 85dB (DVD) 0.06% (DVD) Less than 0.01% Wrms Temperature: 5˚C-40˚C (41˚F-104˚F), Operating status: Horizontal Input/Output DVD/VCR Video input ...negative sync., pin jack x 1 (PB)/(PR) 0.7 V (p-p), 75 Ω, pin jack x 2 0.5 V (p-p), 75 Ω, pin jack x 1 -12 dBm, 1 kΩ, pin jacks (L, R) x 1 DVD S-video output Component video output Audio output (COAXIAL DIGITAL) Audio output (ANALOG) Supplied accessories Audio/video cable ...1 Remote control (SE-R0220)...1 Batteries (R03/AAA) ...2 75...
...Cassette Tape) DVD (12 cm, 8 cm), CD (12 cm, 8 cm) DVD: 4 Hz-22 kHz, CD: 4 Hz-20 kHz 85dB (DVD) 0.06% (DVD) Less than 0.01% Wrms Temperature: 5˚C-40˚C (41˚F-104˚F), Operating status: Horizontal Input/Output DVD/VCR Video input ...negative sync., pin jack x 1 (PB)/(PR) 0.7 V (p-p), 75 Ω, pin jack x 2 0.5 V (p-p), 75 Ω, pin jack x 1 -12 dBm, 1 kΩ, pin jacks (L, R) x 1 DVD S-video output Component video output Audio output (COAXIAL DIGITAL) Audio output (ANALOG) Supplied accessories Audio/video cable ...1 Remote control (SE-R0220)...1 Batteries (R03/AAA) ...2 75...


