
Owners Manual
Page 10
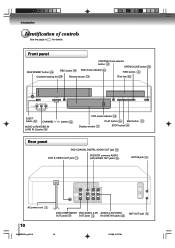
Introduction Identification of controls See the page in for details. Front panel ON/STANDBY button 22 REC button 34 VCR/DVD mode selector button 22 OPEN/CLOSE button 42 DVD mode indicator 42 FWD button 30 Cassette loading slot 29 Remote sensor 13 Disc tray 42 EJECT button 29 CHANNEL / buttons 34 AUDIO...
Introduction Identification of controls See the page in for details. Front panel ON/STANDBY button 22 REC button 34 VCR/DVD mode selector button 22 OPEN/CLOSE button 42 DVD mode indicator 42 FWD button 30 Cassette loading slot 29 Remote sensor 13 Disc tray 42 EJECT button 29 CHANNEL / buttons 34 AUDIO...

Owners Manual
Page 12
... button 51 DVD MENU button Use the DVD MENU button to display the menu included on the remote control. Introduction Identification of controls (Continued) The instructions in this manual describe the functions on many DVD video discs. Remote control VCR DVD button 22 EJECT button (VCR) 29 CLOCK/COUNTER button 33 VCR MENU button 23...
... button 51 DVD MENU button Use the DVD MENU button to display the menu included on the remote control. Introduction Identification of controls (Continued) The instructions in this manual describe the functions on many DVD video discs. Remote control VCR DVD button 22 EJECT button (VCR) 29 CLOCK/COUNTER button 33 VCR MENU button 23...
Owners Manual
Page 13
...at a time. • The / / / are dead or if the remote control is selected.) • Press CH + or CH - Operation • Aim the remote control at the remote sensor and press control buttons to operate. • Operate the remote control within 30° angle on or off. • Select your desired operating... in mind. Approx. 7 meters 2I30201B-En_p02-13 13 1/13/06, 2:47 PM 13 Always dispose of with the environment in the remote control, always replace both batteries with new ones. • When necessary to use new and used batteries in combination. • Always remove...
...at a time. • The / / / are dead or if the remote control is selected.) • Press CH + or CH - Operation • Aim the remote control at the remote sensor and press control buttons to operate. • Operate the remote control within 30° angle on or off. • Select your desired operating... in mind. Approx. 7 meters 2I30201B-En_p02-13 13 1/13/06, 2:47 PM 13 Always dispose of with the environment in the remote control, always replace both batteries with new ones. • When necessary to use new and used batteries in combination. • Always remove...

Owners Manual
Page 22
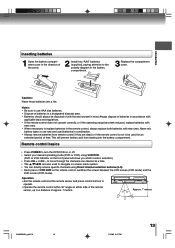
... channel 3 or 4 (video channel). The VCR mode indicator will OR start to flash for 3 seconds in the display window. 2 Press POWER to turn on the remote for 3 seconds in standby mode. The channel number will appear at the right of a recorded tape or DVD disc, or to correspond with the 75... view playback of the display window. 4 Turn ON the TV and set to CH 3 or 4 to watch a program selected by the unit and/or the remote control): Static electricity, etc., may affect the player's operation. Refer to your TV, proceed as follows: set to select the VCR mode.
... channel 3 or 4 (video channel). The VCR mode indicator will OR start to flash for 3 seconds in the display window. 2 Press POWER to turn on the remote for 3 seconds in standby mode. The channel number will appear at the right of a recorded tape or DVD disc, or to correspond with the 75... view playback of the display window. 4 Turn ON the TV and set to CH 3 or 4 to watch a program selected by the unit and/or the remote control): Static electricity, etc., may affect the player's operation. Refer to your TV, proceed as follows: set to select the VCR mode.

Owners Manual
Page 30
.... Rewind or forward the tape Stop the playback via CH3, 4 or video connection). 30 2I30201B-En_p26-31 30 1/13/06, 2:48 PM " " will appear on remote control. " " will appear on the screen (via STOP on the screen for about 4 seconds.
.... Rewind or forward the tape Stop the playback via CH3, 4 or video connection). 30 2I30201B-En_p26-31 30 1/13/06, 2:48 PM " " will appear on remote control. " " will appear on the screen (via STOP on the screen for about 4 seconds.
Owners Manual
Page 37
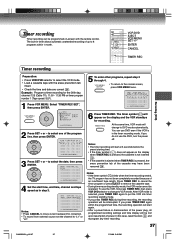
... 〉 6 Press TIMER REC. The built-in timer allows automatic unattended recording of up to select the VCR mode. • Load a cassette tape with the remote control. ENTER CANCEL TIMER REC Recording (VCR) Timer recording Preparation: • Press VCR DVD selector to 8 programs within the programmed time, the recording operation will start...
... 〉 6 Press TIMER REC. The built-in timer allows automatic unattended recording of up to select the VCR mode. • Load a cassette tape with the remote control. ENTER CANCEL TIMER REC Recording (VCR) Timer recording Preparation: • Press VCR DVD selector to 8 programs within the programmed time, the recording operation will start...

Owners Manual
Page 43
CD : You can use with this case, check your remote control once the movie is completed. • There may take a minute or so to the instructions supplied with the DVDs. • Do not move the unit ...
CD : You can use with this case, check your remote control once the movie is completed. • There may take a minute or so to the instructions supplied with the DVDs. • Do not move the unit ...

Owners Manual
Page 61
... JPEG Interval : 5 Seconds Screen Saver : On Function setup (DVD) DRC DRC (Dynamic Range Control) enables you input a wrong number, press CLEAR. Off: It plays back at the recording level on the remote control # . • This function works only when the disc recorded with a "QSound". On: ... "0000" using Number buttons (0-9). (Please note, this is required every time when you change the parental level. • If you to control the dynamic range so as explosion or similar is disengaged. Press Number buttons (0-9) to select "Password", then press ENTER. Be sure to achieve...
... JPEG Interval : 5 Seconds Screen Saver : On Function setup (DVD) DRC DRC (Dynamic Range Control) enables you input a wrong number, press CLEAR. Off: It plays back at the recording level on the remote control # . • This function works only when the disc recorded with a "QSound". On: ... "0000" using Number buttons (0-9). (Please note, this is required every time when you change the parental level. • If you to control the dynamic range so as explosion or similar is disengaged. Press Number buttons (0-9) to select "Password", then press ENTER. Be sure to achieve...

Owners Manual
Page 62
... correctly because of the DVD video player to the TV from "Interlace" or "Progressive". "No Disc" appears on the screen. 4) While holding 7 down on the remote control and then press STOP on the screen. Function setup (DVD) Customizing the function settings (Continued) Setting details If you forget the password... 1) Press OPEN/CLOSE...
... correctly because of the DVD video player to the TV from "Interlace" or "Progressive". "No Disc" appears on the screen. 4) While holding 7 down on the remote control and then press STOP on the screen. Function setup (DVD) Customizing the function settings (Continued) Setting details If you forget the password... 1) Press OPEN/CLOSE...
Owners Manual
Page 65
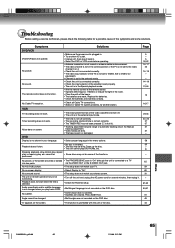
... Check the unit is connected correctly. • Check the input selector of the amplifier is in the Special playback mode. • Aim the remote control at the remote sensor. • Operate within Approx. 7 Meters or reduce the light in the menu options. No subtitle. • Some discs have no ...; The erase prevention tab of the video cassette is inserted. • The disc may not do some solutions. Angle cannot be dirty. The remote control does not function. Set to VIDEO (or equivalent). • Channel is set to "On". Stopping playback, slow-motion play, repeat play, ...
... Check the unit is connected correctly. • Check the input selector of the amplifier is in the Special playback mode. • Aim the remote control at the remote sensor. • Operate within Approx. 7 Meters or reduce the light in the menu options. No subtitle. • Some discs have no ...; The erase prevention tab of the video cassette is inserted. • The disc may not do some solutions. Angle cannot be dirty. The remote control does not function. Set to VIDEO (or equivalent). • Channel is set to "On". Stopping playback, slow-motion play, repeat play, ...

Owners Manual
Page 66
... Ω, negative sync., pin jack x 1 (PB)/(PR) 0.7 V (p-p), 75 Ω, pin jack x 2 0.5 V (p-p), 75 Ω, pin jack x 1 -12 dBm, 1 kΩ, pin jacks (L, R) x 1 Supplied accessories Audio/video cable 1 Remote control (SE-R0220 1 Batteries (R03/AAA 2 75 Ω coaxial cable 1 • This model complies with the above specifications. • Designs and specifications are subject to change...
... Ω, negative sync., pin jack x 1 (PB)/(PR) 0.7 V (p-p), 75 Ω, pin jack x 2 0.5 V (p-p), 75 Ω, pin jack x 1 -12 dBm, 1 kΩ, pin jacks (L, R) x 1 Supplied accessories Audio/video cable 1 Remote control (SE-R0220 1 Batteries (R03/AAA 2 75 Ω coaxial cable 1 • This model complies with the above specifications. • Designs and specifications are subject to change...


