
User Guide
Page 4
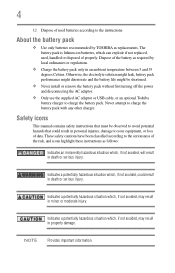
... these instructions as replacements. Safety icons This manual contains safety instructions that must be shortened. ❖ Never install or remove the battery pack without first turning off the power and disconnecting the AC adaptor. ❖ Only use the supplied AC adaptor or USB cable, or an optional Toshiba battery charger to avoid potential hazards that could result in death or serious injury. NOTE Provides important information...
... these instructions as replacements. Safety icons This manual contains safety instructions that must be shortened. ❖ Never install or remove the battery pack without first turning off the power and disconnecting the AC adaptor. ❖ Only use the supplied AC adaptor or USB cable, or an optional Toshiba battery charger to avoid potential hazards that could result in death or serious injury. NOTE Provides important information...

User Guide
Page 7
...25 Photo recording 26 Taking close up photos/videos 26 Using digital zoom 26 Menu options/operations 27 Video Setting options 28 Photo setting options 32 Photo Effects 36 Deleting files 39 Chapter 4: Playback Mode 41 Button functions 41 LCD touch screen information 42 Notification icons 42 Touch function icons 43 Playback mode operations 44 Video Playback 45 Photo Playback 45 Delete a file in Playback mode 46 Chapter 5: Camcorder Settings 47 Settings Menu 47 Sound 48 TV 48 Language 49 Time Setting 49 Format 50 Default Setting 50 Chapter 6: Viewing Photos and Videos on...
...25 Photo recording 26 Taking close up photos/videos 26 Using digital zoom 26 Menu options/operations 27 Video Setting options 28 Photo setting options 32 Photo Effects 36 Deleting files 39 Chapter 4: Playback Mode 41 Button functions 41 LCD touch screen information 42 Notification icons 42 Touch function icons 43 Playback mode operations 44 Video Playback 45 Photo Playback 45 Delete a file in Playback mode 46 Chapter 5: Camcorder Settings 47 Settings Menu 47 Sound 48 TV 48 Language 49 Time Setting 49 Format 50 Default Setting 50 Chapter 6: Viewing Photos and Videos on...
User Guide
Page 8
8 Contents Chapter 7: Viewing Photos and Videos on a Computer 54 Installing bundled software 54 Transferring photos or videos to a computer..........55 Chapter 8: Uploading Video Files to the Internet 56 CAMILEO UPLOADER 56 ArcSoft MediaImpression 60 Chapter 9: Specifications 63 Operating Environment Conditions 64 Chapter 10: Troubleshooting 65 Chapter 11: Other Information 67 Toshiba Support 67 Before you call 67 Contacting Toshiba 68 Toshiba's technical support Web site 68 Toshiba voice contact 68 Warranty 69 Online Warranty Information 69 Warranty Service 69
8 Contents Chapter 7: Viewing Photos and Videos on a Computer 54 Installing bundled software 54 Transferring photos or videos to a computer..........55 Chapter 8: Uploading Video Files to the Internet 56 CAMILEO UPLOADER 56 ArcSoft MediaImpression 60 Chapter 9: Specifications 63 Operating Environment Conditions 64 Chapter 10: Troubleshooting 65 Chapter 11: Other Information 67 Toshiba Support 67 Before you call 67 Contacting Toshiba 68 Toshiba's technical support Web site 68 Toshiba voice contact 68 Warranty 69 Online Warranty Information 69 Warranty Service 69

User Guide
Page 9
... or manually adjusted ❖ 16x digital zoom ❖ Various effect options, such as Time Lapse and Slow Motion 9 This format allows for easy viewing of photos and videos ❖ Video recording at an HD resolution of 1920 x1080 ❖ HDTV connectivity via an HDMI™ cable ❖ Easy playback of your CAMILEO™ S30 camcorder are: ❖ High quality images up to 16 mega-pixels ❖ Color LCD touch screen for extended video recording...
... or manually adjusted ❖ 16x digital zoom ❖ Various effect options, such as Time Lapse and Slow Motion 9 This format allows for easy viewing of photos and videos ❖ Video recording at an HD resolution of 1920 x1080 ❖ HDTV connectivity via an HDMI™ cable ❖ Easy playback of your CAMILEO™ S30 camcorder are: ❖ High quality images up to 16 mega-pixels ❖ Color LCD touch screen for extended video recording...

User Guide
Page 10
... memory allowing you to take photos and to record videos without a memory card NOTE A portion of the built-in memory is used for Firmware to operate the camcorder. ❖ Memory card slot allowing users to increase storage capacity Check the Components Unpack the box and make sure all listed items below are included: Camcorder USB cable AV cable Lithium-ion HDMI™ cable AC adaptor Rechargeable battery* CD-ROM Quick Start (Software, Cleaning cloth Hand Guide User's Manual...
... memory allowing you to take photos and to record videos without a memory card NOTE A portion of the built-in memory is used for Firmware to operate the camcorder. ❖ Memory card slot allowing users to increase storage capacity Check the Components Unpack the box and make sure all listed items below are included: Camcorder USB cable AV cable Lithium-ion HDMI™ cable AC adaptor Rechargeable battery* CD-ROM Quick Start (Software, Cleaning cloth Hand Guide User's Manual...

User Guide
Page 11
... Playback mode, press to select the file you wish to upload to launch the CAMILEO UPLOADER application automatically. Lens NOTE: Remove the protective film from the lens before use. Front/Side views SD™ Card cover Microphone Macro switch Switch between Video mode and Photo mode. These dots are a normal result of the manufacturing process, and do not affect the recording. LED light Speaker Power button Mode button Switch between Macro mode and Normal mode. When the camcorder...
... Playback mode, press to select the file you wish to upload to launch the CAMILEO UPLOADER application automatically. Lens NOTE: Remove the protective film from the lens before use. Front/Side views SD™ Card cover Microphone Macro switch Switch between Video mode and Photo mode. These dots are a normal result of the manufacturing process, and do not affect the recording. LED light Speaker Power button Mode button Switch between Macro mode and Normal mode. When the camcorder...
User Guide
Page 12
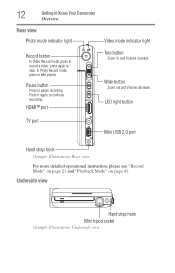
..., and Volume increase. Wide button Zoom out and Volume decrease. Pause button Press to take photos. In Photo Record mode, press to pause recording. LED light button TV port Mini USB 2.0 port Hand strap hook (Sample Illustration) Rear view For more detailed operational instruction, please see "Record Mode" on page 21 and "Playback Mode" on page 41. Press it again, to stop. 12 Getting to Know Your Camcorder Overview Rear view Photo mode indicator light Video mode indicator light Record button In Video Record mode, press to record a video...
..., and Volume increase. Wide button Zoom out and Volume decrease. Pause button Press to take photos. In Photo Record mode, press to pause recording. LED light button TV port Mini USB 2.0 port Hand strap hook (Sample Illustration) Rear view For more detailed operational instruction, please see "Record Mode" on page 21 and "Playback Mode" on page 41. Press it again, to stop. 12 Getting to Know Your Camcorder Overview Rear view Photo mode indicator light Video mode indicator light Record button In Video Record mode, press to record a video...
User Guide
Page 14
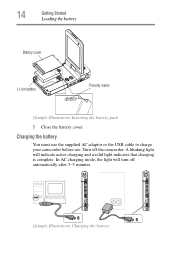
14 Getting Started Loading the battery Battery cover Li-ion battery Polarity marks (Sample Illustration) Inserting the battery pack 5 Close the battery cover. A blinking light will turn off the camcorder. Turn off automatically after 3~5 minutes. (Sample Illustration) Charging the battery In AC charging mode, the light will indicate active charging and a solid light indicates that charging is complete. Charging the battery You must use the supplied AC adaptor or the USB cable to charge your camcorder before use.
14 Getting Started Loading the battery Battery cover Li-ion battery Polarity marks (Sample Illustration) Inserting the battery pack 5 Close the battery cover. A blinking light will turn off the camcorder. Turn off automatically after 3~5 minutes. (Sample Illustration) Charging the battery In AC charging mode, the light will indicate active charging and a solid light indicates that charging is complete. Charging the battery You must use the supplied AC adaptor or the USB cable to charge your camcorder before use.
User Guide
Page 17
... clothes, promptly remove them to help prevent the electrolyte fluid from the battery pack to help prevent permanent eye damage. If caustic electrolyte fluid from the product. Battery pack warning indicators ❖ Always immediately turn on the product's power again until an authorized Toshiba service provider has checked it off and disconnect the power cable/cord plug from the plug socket and stop using the battery pack if...
... clothes, promptly remove them to help prevent the electrolyte fluid from the battery pack to help prevent permanent eye damage. If caustic electrolyte fluid from the product. Battery pack warning indicators ❖ Always immediately turn on the product's power again until an authorized Toshiba service provider has checked it off and disconnect the power cable/cord plug from the plug socket and stop using the battery pack if...

User Guide
Page 20
... recording photos and videos as shown below. Make sure the lock is locked (read only), however photos and videos can place the LCD touch screen back to turn on the camcorder automatically. ❖ Or press the Power button for one second to its original position. 20 Getting Started Turning the camcorder on and getting started Protecting data on an SD™ Card Photos or videos cannot be viewed...
... recording photos and videos as shown below. Make sure the lock is locked (read only), however photos and videos can place the LCD touch screen back to turn on the camcorder automatically. ❖ Or press the Power button for one second to its original position. 20 Getting Started Turning the camcorder on and getting started Protecting data on an SD™ Card Photos or videos cannot be viewed...

User Guide
Page 23
Record Mode 23 LCD touch screen information 00:03:12 Recording time 00:03:12 Pause Recording 3 The remaining amount of photos that can be taken at the 250 current resolution settings 321 Current number of photos taken 4 Motion Detection (Video Record mode only) Scene 5 Skin Night Backlight Manual white balance Daylight 6 Fluorescent Tungsten Zoom meter: 7 1x~16x (16x Digital zoom) Slow Motion (Video Record mode only) Note: Slow motion videos will be recorded in QVGA resolution. 8 Time Lapse (Video Record mode only) Pre-Record mode (Video Record mode only)
Record Mode 23 LCD touch screen information 00:03:12 Recording time 00:03:12 Pause Recording 3 The remaining amount of photos that can be taken at the 250 current resolution settings 321 Current number of photos taken 4 Motion Detection (Video Record mode only) Scene 5 Skin Night Backlight Manual white balance Daylight 6 Fluorescent Tungsten Zoom meter: 7 1x~16x (16x Digital zoom) Slow Motion (Video Record mode only) Note: Slow motion videos will be recorded in QVGA resolution. 8 Time Lapse (Video Record mode only) Pre-Record mode (Video Record mode only)

User Guide
Page 25
To stop recording, press the Record button again. Press the Play ( ) button to start recording (The Video Record LED indicator light glows after pressing the Record button). When a video is being recorded, a time indicator will display on the LCD touch screen. Record Mode 25 Video recording Video Record mode Stabilization ON/OFF 3 Photo Record mode Self-timer ON/OFF 4 Menu 5 Playback mode 6 Photo mode 7 Video mode 8 Delete mode Video recording In Video Record mode, press the Record ( ) button to view a recorded video. To pause recording, press the Pause ( ) button. The ...
To stop recording, press the Record button again. Press the Play ( ) button to start recording (The Video Record LED indicator light glows after pressing the Record button). When a video is being recorded, a time indicator will display on the LCD touch screen. Record Mode 25 Video recording Video Record mode Stabilization ON/OFF 3 Photo Record mode Self-timer ON/OFF 4 Menu 5 Playback mode 6 Photo mode 7 Video mode 8 Delete mode Video recording In Video Record mode, press the Record ( ) button to view a recorded video. To pause recording, press the Pause ( ) button. The ...
User Guide
Page 26
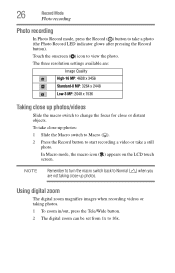
... ( ). 2 Press the Record button to start recording a video or take a photo (the Photo Record LED indicator glows after pressing the Record button). The three resolution settings available are not taking photos. 1 To zoom in/out, press the Tele/Wide button. 2 The digital zoom can be set from 1x to 16x. Using digital zoom The digital zoom magnifies images when recording videos or taking close or distant objects. 26 Record Mode Photo recording Photo recording In Photo Record mode, press the Record ( ) button to take a still...
... ( ). 2 Press the Record button to start recording a video or take a photo (the Photo Record LED indicator glows after pressing the Record button). The three resolution settings available are not taking photos. 1 To zoom in/out, press the Tele/Wide button. 2 The digital zoom can be set from 1x to 16x. Using digital zoom The digital zoom magnifies images when recording videos or taking close or distant objects. 26 Record Mode Photo recording Photo recording In Photo Record mode, press the Record ( ) button to take a still...
User Guide
Page 27
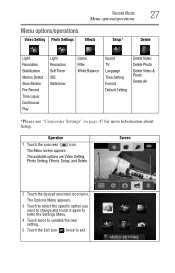
... Stabilization Motion Detect Slow Motion Pre-Record Time Lapse Continuous Play Light Resolution Self-Timer ISO Slideshow Scene Filter White Balance Sound TV Language Time Setting Format Default Setting Delete Video Delete Photo Delete Video & Photo Delete All *Please see "Camcorder Settings" on page 47 for more information about Setup. The available options are Video Setting, Photo Setting, Effects, Setup, and Delete. Screen 2 Touch the desired onscreen icon twice. The Menu screen appears. The Options Menu appears. 3 Touch to select the specific option you want to change and...
... Stabilization Motion Detect Slow Motion Pre-Record Time Lapse Continuous Play Light Resolution Self-Timer ISO Slideshow Scene Filter White Balance Sound TV Language Time Setting Format Default Setting Delete Video Delete Photo Delete Video & Photo Delete All *Please see "Camcorder Settings" on page 47 for more information about Setup. The available options are Video Setting, Photo Setting, Effects, Setup, and Delete. Screen 2 Touch the desired onscreen icon twice. The Menu screen appears. The Options Menu appears. 3 Touch to select the specific option you want to change and...
User Guide
Page 28
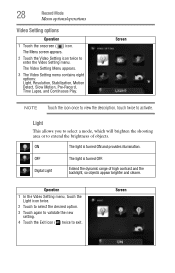
... clearer. ON The light is turned OFF. Screen Screen NOTE Touch the icon once to view the description, touch twice to exit. 28 Record Mode Menu options/operations Video Setting options Operation 1 Touch the onscreen ( ) icon. The Video Setting Menu appears. 3 The Video Setting menu contains eight options: Light, Resolution, Stabilization, Motion Detect, Slow Motion, Pre-Record, Time Lapse, and Continuous Play. OFF Digital Light The light is turned ON and provides illumination. Operation 1 In the Video Setting menu, touch the Light icon twice...
... clearer. ON The light is turned OFF. Screen Screen NOTE Touch the icon once to view the description, touch twice to exit. 28 Record Mode Menu options/operations Video Setting options Operation 1 Touch the onscreen ( ) icon. The Video Setting Menu appears. 3 The Video Setting menu contains eight options: Light, Resolution, Stabilization, Motion Detect, Slow Motion, Pre-Record, Time Lapse, and Continuous Play. OFF Digital Light The light is turned ON and provides illumination. Operation 1 In the Video Setting menu, touch the Light icon twice...

User Guide
Page 30
.... Screen Slow motion This setting records videos with a slow motion effect. Operation 1 In the Video Setting menu, touch the Motion Detect icon twice. 2 Touch to select the desired option. 3 Touch again to validate the new setting. 4 Touch the Exit icon ( ) twice to exit. The camcorder will begin recording automatically if movement is played, the playback time will be longer than the actual recording time. Screen When the video is detected. 30 Record Mode Menu options/operations Motion detection...
.... Screen Slow motion This setting records videos with a slow motion effect. Operation 1 In the Video Setting menu, touch the Motion Detect icon twice. 2 Touch to select the desired option. 3 Touch again to validate the new setting. 4 Touch the Exit icon ( ) twice to exit. The camcorder will begin recording automatically if movement is played, the playback time will be longer than the actual recording time. Screen When the video is detected. 30 Record Mode Menu options/operations Motion detection...
User Guide
Page 35
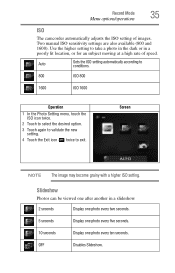
.... Screen NOTE The image may become grainy with a higher ISO setting. Two manual ISO sensitivity settings are also available (800 and 1600). Use the higher setting to exit. Slideshow Photos can be viewed one after another in a poorly lit location, or for an subject moving at a high rate of images. Record Mode 35 Menu options/operations ISO The camcorder automatically adjusts the ISO setting of speed. OFF Disables Slideshow...
.... Screen NOTE The image may become grainy with a higher ISO setting. Two manual ISO sensitivity settings are also available (800 and 1600). Use the higher setting to exit. Slideshow Photos can be viewed one after another in a poorly lit location, or for an subject moving at a high rate of images. Record Mode 35 Menu options/operations ISO The camcorder automatically adjusts the ISO setting of speed. OFF Disables Slideshow...
User Guide
Page 44
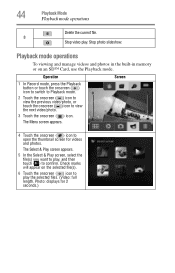
... Record mode, press the Playback button or touch the onscreen ( ) icon to switch to Playback mode. 2 Touch the onscreen ( ) icon to view the previous video/photo, or touch the onscreen ( ) icon to open the thumbnail screen for 2 seconds.) Playback mode operations To viewing and manage videos and photos in the built-in memory or on the selected file(s). 6 Touch the onscreen ( ) icon to play the selected files. (Video: full length. 44 Playback Mode Playback mode operations Delete the current file. 8 Stop video play...
... Record mode, press the Playback button or touch the onscreen ( ) icon to switch to Playback mode. 2 Touch the onscreen ( ) icon to view the previous video/photo, or touch the onscreen ( ) icon to open the thumbnail screen for 2 seconds.) Playback mode operations To viewing and manage videos and photos in the built-in memory or on the selected file(s). 6 Touch the onscreen ( ) icon to play the selected files. (Video: full length. 44 Playback Mode Playback mode operations Delete the current file. 8 Stop video play...

User Guide
Page 54
...-screen instructions to view the User's Manual. Many users will find they already have this software installed on their computer. NOTE Detailed information can be found in the online help of all the bundled software. 54 To install the bundled software: 1 Insert the CD-ROM into your media, burn videos onto DVD, and upload videos to the Internet easily. ❖ Adobe® Reader® is needed to complete the installation. Chapter 7 Viewing Photos...
...-screen instructions to view the User's Manual. Many users will find they already have this software installed on their computer. NOTE Detailed information can be found in the online help of all the bundled software. 54 To install the bundled software: 1 Insert the CD-ROM into your media, burn videos onto DVD, and upload videos to the Internet easily. ❖ Adobe® Reader® is needed to complete the installation. Chapter 7 Viewing Photos...

User Guide
Page 69
... in the fifty (50) United States and District of Columbia may obtain warranty service by visiting the Toshiba Acclaim Web site at www.acclaim.toshiba.com or by contacting the telephone support center at http://pcsupport.toshiba.com/accessories1yr. The One (1) Year Standard Limited Warranty for Toshiba Computer Accessories can be found online at 1-949-583-3305.
... in the fifty (50) United States and District of Columbia may obtain warranty service by visiting the Toshiba Acclaim Web site at www.acclaim.toshiba.com or by contacting the telephone support center at http://pcsupport.toshiba.com/accessories1yr. The One (1) Year Standard Limited Warranty for Toshiba Computer Accessories can be found online at 1-949-583-3305.


