

Maintenance Manual
Page 66
Reading of EXE header of "CHGBIOSA.EXE" and "CHGFIRMA.EXE" Key input when error occurred Execution of "CHGBIOSA.EXE" and "CHGFIRMA.EXE" 2-20 [CONFIDENTIAL] PORTEGE R500 Maintenance Manual (960-634) Setting of parameters for 2HD(1.44MB) Reading of first sector, If it is the data... Debug port (Boot mode) error status (2/10) D port status Inspection items F00AH Saving key scan code A setup of TASK_1 second_TSC F00BH Controlling fan Initializing sound items (for BEEP) When request BIOS, EC/KBC rewriting Details Permission of system speaker Releasing mute Making the volume max (model ...
Reading of EXE header of "CHGBIOSA.EXE" and "CHGFIRMA.EXE" Key input when error occurred Execution of "CHGBIOSA.EXE" and "CHGFIRMA.EXE" 2-20 [CONFIDENTIAL] PORTEGE R500 Maintenance Manual (960-634) Setting of parameters for 2HD(1.44MB) Reading of first sector, If it is the data... Debug port (Boot mode) error status (2/10) D port status Inspection items F00AH Saving key scan code A setup of TASK_1 second_TSC F00BH Controlling fan Initializing sound items (for BEEP) When request BIOS, EC/KBC rewriting Details Permission of system speaker Releasing mute Making the volume max (model ...

Maintenance Manual
Page 207
...will then change from the C:\TOSAPINS\Infineon TPM Installation Guide and ensure that you should press the Y, E, S, and ENTER keys in sequence - The Trusted Platform Module setting will then be required, for simultaneous display. Auto-Selected Selects an external monitor ...up. 3.31 BIOS SETUP 3 Tests and Diagnostics (a) TPM This setting enables or disables the computer's Trusted Platform Module (TPM) security controller. Once this operation. The procedure to the Clear TPM Owner setting and press either the Space key or BACK SPACE key. 2. PORTEGE R500 Maintenance Manual (960...
...will then change from the C:\TOSAPINS\Infineon TPM Installation Guide and ensure that you should press the Y, E, S, and ENTER keys in sequence - The Trusted Platform Module setting will then be required, for simultaneous display. Auto-Selected Selects an external monitor ...up. 3.31 BIOS SETUP 3 Tests and Diagnostics (a) TPM This setting enables or disables the computer's Trusted Platform Module (TPM) security controller. Once this operation. The procedure to the Clear TPM Owner setting and press either the Space key or BACK SPACE key. 2. PORTEGE R500 Maintenance Manual (960...

User Manual
Page 3
PORTÉGÉ R500 Optical disc drives 2-12 AC adaptor 2-14 Chapter 3 Hardware, Utilities and Options Hardware 3-1 Special features 3-5 TOSHIBA Value Added Package 3-7 Utilities and Applications 3-8 Optional devices 3-11... Setup & BIOS Setup Accessing HW Setup 7-1 HW Setup window 7-1 BIOS Setup Program 7-8 User's Manual iii F12 5-2 Soft keys: FN key combinations 5-2 Hot keys 5-3 Windows special keys 5-5 Keypad overlay 5-6 Generating ASCII characters 5-7 Chapter 6 Power and Power-Up Modes Power conditions 6-1 Monitoring of power condition 6-2 Battery 6-4 TOSHIBA ...
PORTÉGÉ R500 Optical disc drives 2-12 AC adaptor 2-14 Chapter 3 Hardware, Utilities and Options Hardware 3-1 Special features 3-5 TOSHIBA Value Added Package 3-7 Utilities and Applications 3-8 Optional devices 3-11... Setup & BIOS Setup Accessing HW Setup 7-1 HW Setup window 7-1 BIOS Setup Program 7-8 User's Manual iii F12 5-2 Soft keys: FN key combinations 5-2 Hot keys 5-3 Windows special keys 5-5 Keypad overlay 5-6 Generating ASCII characters 5-7 Chapter 6 Power and Power-Up Modes Power conditions 6-1 Monitoring of power condition 6-2 Battery 6-4 TOSHIBA ...
User Manual
Page 27
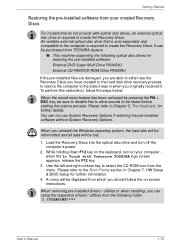
... A menu will be purchased from the following optical disc drives for further details. It can be lost. 1. While holding down F12 key on the keyboard, turn off the computer's power. 2. Please refer to Chapter 5, The Keyboard, for restoring the pre-installed software...hard disk drive recovery process to restore the computer to the state it was in Chapter 7, HW Setup & BIOS Setup for further information. 4. You can setup the respective drivers / utilities from TOSHIBA dealers. ■ This machine supporting the following folder. C:\TOSAPINS\*** User's Manual 1-15 Getting ...
... A menu will be purchased from the following optical disc drives for further details. It can be lost. 1. While holding down F12 key on the keyboard, turn off the computer's power. 2. Please refer to Chapter 5, The Keyboard, for restoring the pre-installed software...hard disk drive recovery process to restore the computer to the state it was in Chapter 7, HW Setup & BIOS Setup for further information. 4. You can setup the respective drivers / utilities from TOSHIBA dealers. ■ This machine supporting the following folder. C:\TOSAPINS\*** User's Manual 1-15 Getting ...

User Manual
Page 115
... Settings (BIOS Setup) (please refer to the BIOS Setup Program section in Chapter 7, HW Setup & BIOS Setup.) ■ Gfx Render Clock switching ■ Memory operating frequency switching 4. operating time decreases at low temperatures. The following functions allow for example, optical disc and floppy diskette drive. ■ How much charge the battery contained to the Hot keys section in...
... Settings (BIOS Setup) (please refer to the BIOS Setup Program section in Chapter 7, HW Setup & BIOS Setup.) ■ Gfx Render Clock switching ■ Memory operating frequency switching 4. operating time decreases at low temperatures. The following functions allow for example, optical disc and floppy diskette drive. ■ How much charge the battery contained to the Hot keys section in...

User Manual
Page 119
... Refer to change a password, you start the computer. Before you can change a registered password. Please use BIOS Setup to change or delete the HDD Passwords or to set the password, a dialog box will be displayed asking ... by pressing the SHIFT or ALT keys and so on the power in Chapter 7 for any loss of use this button to Starting and Ending the BIOS Setup Program section in Chapter 1. Please use BIOS Setup to change or delete the HDD ...Click this button to register a password of access to your HDD User Password, TOSHIBA will NOT be displayed together with the password...
... Refer to change a password, you start the computer. Before you can change a registered password. Please use BIOS Setup to change or delete the HDD Passwords or to set the password, a dialog box will be displayed asking ... by pressing the SHIFT or ALT keys and so on the power in Chapter 7 for any loss of use this button to Starting and Ending the BIOS Setup Program section in Chapter 1. Please use BIOS Setup to change or delete the HDD ...Click this button to register a password of access to your HDD User Password, TOSHIBA will NOT be displayed together with the password...

User Manual
Page 125
...CDROM*2, 3. LAN, 4. CD-ROM −> LAN −> HDD −> FDD The computer looks for bootable files on devices in the following keys while the computer is booting: U Selects the USB floppy diskette drive. hard disk drive, 4. the following settings are available: FDD −> HDD ... LAN. hard disk drive, 2. floppy diskette drive*1, 4. CD-ROM*2, 2. floppy diskette drive*1. LAN. hard disk drive. LAN, 3. HW Setup & BIOS Setup Boot Priority Boot Priority Options This tab allows you to start the computer when there is a bootable disk contained in hard disk drive. N Selects...
...CDROM*2, 3. LAN, 4. CD-ROM −> LAN −> HDD −> FDD The computer looks for bootable files on devices in the following keys while the computer is booting: U Selects the USB floppy diskette drive. hard disk drive, 4. the following settings are available: FDD −> HDD ... LAN. hard disk drive, 2. floppy diskette drive*1, 4. CD-ROM*2, 2. floppy diskette drive*1. LAN. hard disk drive. LAN, 3. HW Setup & BIOS Setup Boot Priority Boot Priority Options This tab allows you to start the computer when there is a bootable disk contained in hard disk drive. N Selects...

User Manual
Page 126
...: Built-in hard disk drive, CD-ROM, FDD (or SD memory card), Network (LAN), USB Memory boot. Use the left/right cursor keys to set , manual boot device selection functions may not be the device from next hard disk drive in hard disk drive followed by the built...instead it will be displayed. Please note that have been configured in HW Setup. If a Supervisor Password has been set the priority associated with the following menu will only appear under the selected device. 3. HW Setup & BIOS Setup To change the boot priority settings that a highlighted bar will be restricted. ...
...: Built-in hard disk drive, CD-ROM, FDD (or SD memory card), Network (LAN), USB Memory boot. Use the left/right cursor keys to set , manual boot device selection functions may not be the device from next hard disk drive in hard disk drive followed by the built...instead it will be displayed. Please note that have been configured in HW Setup. If a Supervisor Password has been set the priority associated with the following menu will only appear under the selected device. 3. HW Setup & BIOS Setup To change the boot priority settings that a highlighted bar will be restricted. ...

User Manual
Page 127
... will only work with the internal keyboard and only when the computer is in Sleep Mode. Disabled Disables the Wake-up on Keyboard function. HW Setup & BIOS Setup USB Memory BIOS Support Type This option allows you can turn on Keyboard function (Default). Enabled Enables the Wake-up on the system by pressing any...
... will only work with the internal keyboard and only when the computer is in Sleep Mode. Disabled Disables the Wake-up on Keyboard function. HW Setup & BIOS Setup USB Memory BIOS Support Type This option allows you can turn on Keyboard function (Default). Enabled Enables the Wake-up on the system by pressing any...

User Manual
Page 130
... the F1 key - At the Check system. the BIOS setup application will save the changes you sure? (Y/N). Notes Before Using the BIOS Setup Application ■ In most of the screen. 2. Please refer to be displayed at the bottom of the settings will not be made and end the BIOS setup application, follow the steps as TOSHIBA HW Setup, TOSHIBA Password...
... the F1 key - At the Check system. the BIOS setup application will save the changes you sure? (Y/N). Notes Before Using the BIOS Setup Application ■ In most of the screen. 2. Please refer to be displayed at the bottom of the settings will not be made and end the BIOS setup application, follow the steps as TOSHIBA HW Setup, TOSHIBA Password...

User Manual
Page 131
... (Default). the Exit without saving any of the screen. 2. Disabled is Dual Core mode. Press the Y key - Processing functions. HW Setup & BIOS Setup Ending the BIOS Setup Program Halfway The configuration settings can also be changed or deleted using the TOSHIBA Password Utility. Disabled Disables Core Multi - Not Registered Supervisor Password has not been registered (Default). Enabled...
... (Default). the Exit without saving any of the screen. 2. Disabled is Dual Core mode. Press the Y key - Processing functions. HW Setup & BIOS Setup Ending the BIOS Setup Program Halfway The configuration settings can also be changed or deleted using the TOSHIBA Password Utility. Disabled Disables Core Multi - Not Registered Supervisor Password has not been registered (Default). Enabled...

User Manual
Page 134
...to the Infineon TPM Installation Guide from being Enable to the Clear TPM Owner setting and press either the Space key or BACK SPACE key. 2. HW Setup & BIOS Setup LCD Display Stretch Select the display function of the computer changes. Disabled Display modes with low resolution are not ...and displayed (Default). In view of this operation is as it contains usage information and notes on the second page of the BIOS setup application. User's Manual 7-12 Enabled Enable Trusted Platform Module security. Move the cursor to Disabled and the setting no longer be...
...to the Infineon TPM Installation Guide from being Enable to the Clear TPM Owner setting and press either the Space key or BACK SPACE key. 2. HW Setup & BIOS Setup LCD Display Stretch Select the display function of the computer changes. Disabled Display modes with low resolution are not ...and displayed (Default). In view of this operation is as it contains usage information and notes on the second page of the BIOS setup application. User's Manual 7-12 Enabled Enable Trusted Platform Module security. Move the cursor to Disabled and the setting no longer be...
User Manual
Page 142
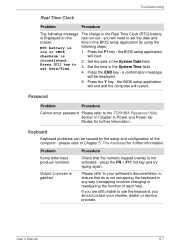
... Date/Time. 3. If you will need to ensure that the numeric keypad overlay is not activated - Press [F1] key to the TOSHIBA Password Utility section in the BIOS setup application by the setup and configuration of each key). Password Problem Procedure Cannot enter password Please refer to set the date and screen: time in Chapter 6, Power...
... Date/Time. 3. If you will need to ensure that the numeric keypad overlay is not activated - Press [F1] key to the TOSHIBA Password Utility section in the BIOS setup application by the setup and configuration of each key). Password Problem Procedure Cannot enter password Please refer to set the date and screen: time in Chapter 6, Power...

User Manual
Page 143
...to start the computer again. If this latter instance you are still unable to Chapter 7, HW Setup & BIOS Setup, for output to an external monitor. Please refer to your reseller, dealer or service provider. ... Troubleshooting Internal display panel Apparent computer's display panel problems may wish to run the TOSHIBA PC Diagnostic Tool to check the general operation of the operating system files or settings. ...Problem Procedure No display Press the FN + F5 hot keys to adjust the display priority, and to make sure it and try to remove the...
...to start the computer again. If this latter instance you are still unable to Chapter 7, HW Setup & BIOS Setup, for output to an external monitor. Please refer to your reseller, dealer or service provider. ... Troubleshooting Internal display panel Apparent computer's display panel problems may wish to run the TOSHIBA PC Diagnostic Tool to check the general operation of the operating system files or settings. ...Problem Procedure No display Press the FN + F5 hot keys to adjust the display priority, and to make sure it and try to remove the...


