

Maintenance Manual
Page 4
... following parts: Chapter 1 Hardware Overview describes the T PORTÉGÉ R500. The manual is divided into the following : ‰ Handling the LCD module ‰ Board layout ‰ Pin assignments ‰ Keyboard scan/character codes ‰ Key layout ‰ Wiring diagrams ‰ BIOS rewrite procedures ‰ EC/KBC rewrite procedures ‰ Reliability iv [CONFIDENTIAL...
... following parts: Chapter 1 Hardware Overview describes the T PORTÉGÉ R500. The manual is divided into the following : ‰ Handling the LCD module ‰ Board layout ‰ Pin assignments ‰ Keyboard scan/character codes ‰ Key layout ‰ Wiring diagrams ‰ BIOS rewrite procedures ‰ EC/KBC rewrite procedures ‰ Reliability iv [CONFIDENTIAL...

Maintenance Manual
Page 9
Appendices Appendix A Handling the LCD Module A-1 Appendix B Board Layout B-1 Appendix C Pin Assignments C-1 Appendix D Keyboard Scan/Character Codes D-1 Appendix E Key Layout...E-1 Appendix F Wiring Diagrams F-1 Appendix G BIOS rewrite Procedures G-1 Appendix H EC/KBC rewrite Procedures H-1 Appendix I Reliability...I-1 PORTÉGÉ R400 Maintenance Manual (960-623))[CONFIDENTIAL] ix
Appendices Appendix A Handling the LCD Module A-1 Appendix B Board Layout B-1 Appendix C Pin Assignments C-1 Appendix D Keyboard Scan/Character Codes D-1 Appendix E Key Layout...E-1 Appendix F Wiring Diagrams F-1 Appendix G BIOS rewrite Procedures G-1 Appendix H EC/KBC rewrite Procedures H-1 Appendix I Reliability...I-1 PORTÉGÉ R400 Maintenance Manual (960-623))[CONFIDENTIAL] ix
Maintenance Manual
Page 62
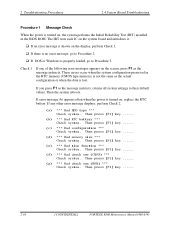
... check sum (CMOS) *** Check system. If you press F1 as the message instructs. Then press [F1] key ...... (b) *** Bad RTC battery *** Check system. 2 Troubleshooting Procedures 2.4 System Board Troubleshooting Procedure 1 Message Check When the power is ... often when the power is lost. Then press [F1] key ...... 2-16 [CONFIDENTIAL] PORTEGE R500 Maintenance Manual (960-634) Then press [F1] key ...... (g) *** Bad check sum (ROM) *** Check system. These errors occur when the system configuration preserved in the BIOS ROM. If any other error message displays, perform Check 2....
... check sum (CMOS) *** Check system. If you press F1 as the message instructs. Then press [F1] key ...... (b) *** Bad RTC battery *** Check system. 2 Troubleshooting Procedures 2.4 System Board Troubleshooting Procedure 1 Message Check When the power is ... often when the power is lost. Then press [F1] key ...... 2-16 [CONFIDENTIAL] PORTEGE R500 Maintenance Manual (960-634) Then press [F1] key ...... (g) *** Bad check sum (ROM) *** Check system. These errors occur when the system configuration preserved in the BIOS ROM. If any other error message displays, perform Check 2....

Maintenance Manual
Page 65
... to real mode and copy of SC BIOS rewrite request check BIOS signature check Transits to System BIOS IRT BIOS rewrite process If Checksum check error occurred on except Boot Block or rewrite is Tilde key or Tab key Initialization of BIOS to "BIOS rewrite process". 2.4 System Board Troubleshooting 2...If "rewrite" is requested, go to "BIOS rewrite process" F002H F005H F006H F007H F008H F009H Transition to system BIOS IRT(when returned to S3) Key input When a key is pressed, check if it is required by user, go to RAM PORTEGE R500 Maintenance Manual (960-634) [CONFIDENTIAL] ...
... to real mode and copy of SC BIOS rewrite request check BIOS signature check Transits to System BIOS IRT BIOS rewrite process If Checksum check error occurred on except Boot Block or rewrite is Tilde key or Tab key Initialization of BIOS to "BIOS rewrite process". 2.4 System Board Troubleshooting 2...If "rewrite" is requested, go to "BIOS rewrite process" F002H F005H F006H F007H F008H F009H Transition to system BIOS IRT(when returned to S3) Key input When a key is pressed, check if it is required by user, go to RAM PORTEGE R500 Maintenance Manual (960-634) [CONFIDENTIAL] ...

Maintenance Manual
Page 66
..." and "CHGFIRMA.EXE" 2-20 [CONFIDENTIAL] PORTEGE R500 Maintenance Manual (960-634) 2 Troubleshooting Procedures 2.4 System Board Troubleshooting Table 2-5 Debug port (Boot mode) error status (2/10) D port status Inspection items F00AH Saving key scan code A setup of TASK_1 second_TSC F00BH Controlling fan Initializing sound items (for BEEP) When request BIOS, EC/KBC rewriting Details Permission of...
..." and "CHGFIRMA.EXE" 2-20 [CONFIDENTIAL] PORTEGE R500 Maintenance Manual (960-634) 2 Troubleshooting Procedures 2.4 System Board Troubleshooting Table 2-5 Debug port (Boot mode) error status (2/10) D port status Inspection items F00AH Saving key scan code A setup of TASK_1 second_TSC F00BH Controlling fan Initializing sound items (for BEEP) When request BIOS, EC/KBC rewriting Details Permission of...

Maintenance Manual
Page 73
... SIO saving/restoring) Setting of font address for resume password Setting of repeat parameter for USB KB Final check of key input during IRT Storing of T_SHADOW_RAM_SIZE Update of system resource just before booting Rewriting of memory map data of INT15h E820h...(for models supporting BIOS Hibernation) Initialization of Bluetooth (for models supporting Bluetooth) Check for existence of target maintenance card Prohibition of unused PC card not used Setting Wakeup status data for ACPI HW initialization just before booting, Waiting for initialization completion PORTEGE R500 Maintenance Manual (960...
... SIO saving/restoring) Setting of font address for resume password Setting of repeat parameter for USB KB Final check of key input during IRT Storing of T_SHADOW_RAM_SIZE Update of system resource just before booting Rewriting of memory map data of INT15h E820h...(for models supporting BIOS Hibernation) Initialization of Bluetooth (for models supporting Bluetooth) Check for existence of target maintenance card Prohibition of unused PC card not used Setting Wakeup status data for ACPI HW initialization just before booting, Waiting for initialization completion PORTEGE R500 Maintenance Manual (960...

Maintenance Manual
Page 171
...voltage = XXXX) * - X Floppy Disk Drive(s) Track = XX Head = XX, Sector = XX * - PORTEGE R500 Maintenance Manual (960-634) [CONFIDENTIAL] 3-59 System Configuration Display : Ver X.XX [Machine Name ???] * - BIOS ROM Version = VX.XX 1st ID = XXH, 2nd ID = XXH * - Version = VX.XX (Panel...#1 Sectors = XXXXX, (XXXXX GB) [XXXXXXXXXXXXXXXXX] #2 Sectors = XXXXX, (XXXXX GB) [XXXXXXXXXXXXXXXXX] * - T&D Total Version = VX.XX Press [Enter] Key [Date = XXXX-YY-ZZ, XX:YY:ZZ] Press Enter to return to the DIAGNOSTIC MENU. HWSC = XXXXXXX * - Total Memory Size = XXXXXXMB (Conventional Memory...
...voltage = XXXX) * - X Floppy Disk Drive(s) Track = XX Head = XX, Sector = XX * - PORTEGE R500 Maintenance Manual (960-634) [CONFIDENTIAL] 3-59 System Configuration Display : Ver X.XX [Machine Name ???] * - BIOS ROM Version = VX.XX 1st ID = XXH, 2nd ID = XXH * - Version = VX.XX (Panel...#1 Sectors = XXXXX, (XXXXX GB) [XXXXXXXXXXXXXXXXX] #2 Sectors = XXXXX, (XXXXX GB) [XXXXXXXXXXXXXXXXX] * - T&D Total Version = VX.XX Press [Enter] Key [Date = XXXX-YY-ZZ, XX:YY:ZZ] Press Enter to return to the DIAGNOSTIC MENU. HWSC = XXXXXXX * - Total Memory Size = XXXXXXMB (Conventional Memory...

Maintenance Manual
Page 207
...can no longer displayed. Note: When using TPM, please refer to the Clear TPM Owner setting and press either the Space key or BACK SPACE key. 2. Otherwise it selects the internal LCD. (Default) LCD+AnalogRGB Selects both the internal LCD and the external monitor for example... you should press the Y, E, S, and ENTER keys in sequence - The procedure to follow is used to Disabled and the setting no longer be read. In view of the computer changes. PORTEGE R500 Maintenance Manual (960-634) [CONFIDENTIAL] 3-95 3.31 BIOS SETUP 3 Tests and Diagnostics (a) TPM This setting...
...can no longer displayed. Note: When using TPM, please refer to the Clear TPM Owner setting and press either the Space key or BACK SPACE key. 2. Otherwise it selects the internal LCD. (Default) LCD+AnalogRGB Selects both the internal LCD and the external monitor for example... you should press the Y, E, S, and ENTER keys in sequence - The procedure to follow is used to Disabled and the setting no longer be read. In view of the computer changes. PORTEGE R500 Maintenance Manual (960-634) [CONFIDENTIAL] 3-95 3.31 BIOS SETUP 3 Tests and Diagnostics (a) TPM This setting...
Maintenance Manual
Page 287
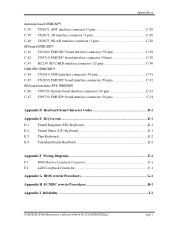
... connector (30-pin C.34 Appendix D Keyboard Scan/Character Codes D-1 Appendix E Key Layout...E-1 E.1 United Kingdom (UK) Keyboard E-1 E.2 United States (US) Keyboard E-1 E.3 Thai Keyboard ...E-2 E.4 Canadian French Keyboard E-2 Appendix F Wiring Diagrams F-1 F.1 RGB Monitor Loopback Connector F-1 F.2 LAN Loopback Connector F-1 Appendix G BIOS rewrite Procedures G-1 Appendix H EC/KBC rewrite Procedures H-1 Appendix I Reliability ...I-1 PORTEGE R500 Maintenance Manual (960-634) [CONFIDENTIAL] App-v
... connector (30-pin C.34 Appendix D Keyboard Scan/Character Codes D-1 Appendix E Key Layout...E-1 E.1 United Kingdom (UK) Keyboard E-1 E.2 United States (US) Keyboard E-1 E.3 Thai Keyboard ...E-2 E.4 Canadian French Keyboard E-2 Appendix F Wiring Diagrams F-1 F.1 RGB Monitor Loopback Connector F-1 F.2 LAN Loopback Connector F-1 Appendix G BIOS rewrite Procedures G-1 Appendix H EC/KBC rewrite Procedures H-1 Appendix I Reliability ...I-1 PORTEGE R500 Maintenance Manual (960-634) [CONFIDENTIAL] App-v

Maintenance Manual
Page 359
... example (US Keyboard) (UK Keyboard) 6. NOTE: 1. Rewriting the BIOS 1. Connect an USB FDD and insert the BIOS/EC/KBC rewriting disk into the USB FDD. 5. The BIOS rewriting starts 7. Do not turn on the power while holding down the tilde character key until a beep sounds. PORTEGE R500 Maintenance Manual (960-634) [CONFIDENTIAL] G-1 If the rewrite fails...
... example (US Keyboard) (UK Keyboard) 6. NOTE: 1. Rewriting the BIOS 1. Connect an USB FDD and insert the BIOS/EC/KBC rewriting disk into the USB FDD. 5. The BIOS rewriting starts 7. Do not turn on the power while holding down the tilde character key until a beep sounds. PORTEGE R500 Maintenance Manual (960-634) [CONFIDENTIAL] G-1 If the rewrite fails...

Maintenance Manual
Page 361
... holding down the key until a beep sounds.) The EC/KBC rewriting starts. 6. The computer is completed. 1. Set the system to the computer when you are rewriting the EC/KBC. Connect an USB FDD and insert the BIOS/EC/KBC rewriting disk into the USB FDD. 5. Tools To rewrite... by a diagnostic disk release notice. 2. Normally it might be impossible to the computer. 3. Turn off the power while you rewrite the EC/KBC. 3. PORTEGE R500 Maintenance Manual (960-634) [CONFIDENTIAL] H-1 Do not turn off . It may be rewritten. 5. When the EC/KBC rewrite is completed, the system is...
... holding down the key until a beep sounds.) The EC/KBC rewriting starts. 6. The computer is completed. 1. Set the system to the computer when you are rewriting the EC/KBC. Connect an USB FDD and insert the BIOS/EC/KBC rewriting disk into the USB FDD. 5. Tools To rewrite... by a diagnostic disk release notice. 2. Normally it might be impossible to the computer. 3. Turn off the power while you rewrite the EC/KBC. 3. PORTEGE R500 Maintenance Manual (960-634) [CONFIDENTIAL] H-1 Do not turn off . It may be rewritten. 5. When the EC/KBC rewrite is completed, the system is...

User Manual
Page 3
PORTÉGÉ R500 Optical disc drives 2-12 AC adaptor 2-14 Chapter 3 Hardware, Utilities and Options Hardware 3-1 Special features 3-5 TOSHIBA Value Added Package 3-7 Utilities and Applications 3-8 Optional devices 3-11 Optional accessories 3-26... Setup window 7-1 BIOS Setup Program 7-8 User's Manual iii F12 5-2 Soft keys: FN key combinations 5-2 Hot keys 5-3 Windows special keys 5-5 Keypad overlay 5-6 Generating ASCII characters 5-7 Chapter 6 Power and Power-Up Modes Power conditions 6-1 Monitoring of power condition 6-2 Battery 6-4 TOSHIBA Password Utility 6-11...
PORTÉGÉ R500 Optical disc drives 2-12 AC adaptor 2-14 Chapter 3 Hardware, Utilities and Options Hardware 3-1 Special features 3-5 TOSHIBA Value Added Package 3-7 Utilities and Applications 3-8 Optional devices 3-11 Optional accessories 3-26... Setup window 7-1 BIOS Setup Program 7-8 User's Manual iii F12 5-2 Soft keys: FN key combinations 5-2 Hot keys 5-3 Windows special keys 5-5 Keypad overlay 5-6 Generating ASCII characters 5-7 Chapter 6 Power and Power-Up Modes Power conditions 6-1 Monitoring of power condition 6-2 Battery 6-4 TOSHIBA Password Utility 6-11...
User Manual
Page 27
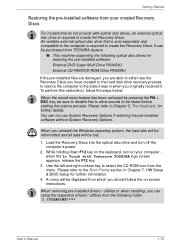
... be reformatted and all data will be heard before starting the restore process. When you originally received it was in Chapter 7, HW Setup & BIOS Setup for further information. 4. Load the Recovery Discs into the optical disc drive and turn on the keyboard, turn off the computer's power.... to restore the computer to the state it . An writable external optical disc drive that do not provide with Tomorrow TOSHIBA logo screen appears, release the F12 key. 3. Getting Started Restoring the pre-installed software from your computer when the In Touch with optical disc drives, an ...
... be reformatted and all data will be heard before starting the restore process. When you originally received it was in Chapter 7, HW Setup & BIOS Setup for further information. 4. Load the Recovery Discs into the optical disc drive and turn on the keyboard, turn off the computer's power.... to restore the computer to the state it . An writable external optical disc drive that do not provide with Tomorrow TOSHIBA logo screen appears, release the F12 key. 3. Getting Started Restoring the pre-installed software from your computer when the In Touch with optical disc drives, an ...

User Manual
Page 115
... programs and data. ■ Whether you close the display panel when you are frequently turning the computer off function (please refer to the Hot keys section in Chapter 5, The Keyboard.) 3. ODD ■ Optical disc drive power on/off and on : ■ Processor speed ■ Screen...How often and for increased battery operating time. 1. LAN ■ Built-in LAN Enable/Disable function (BIOS Setup) (please refer to the BIOS Setup Program section in Chapter 7, HW Setup & BIOS Setup.) Maximizing battery operating time A battery's usefulness depends on how long it can conserve battery power ...
... programs and data. ■ Whether you close the display panel when you are frequently turning the computer off function (please refer to the Hot keys section in Chapter 5, The Keyboard.) 3. ODD ■ Optical disc drive power on/off and on : ■ Processor speed ■ Screen...How often and for increased battery operating time. 1. LAN ■ Built-in LAN Enable/Disable function (BIOS Setup) (please refer to the BIOS Setup Program section in Chapter 7, HW Setup & BIOS Setup.) Maximizing battery operating time A battery's usefulness depends on how long it can conserve battery power ...

User Manual
Page 119
... same string simultaneously as ASCII code or copy-and-paste the character string. If you forget the password, you , and your HDD User Password, TOSHIBA will be displayed together with the password. Before you can use this box to associate text with the prompt asking you to enter a password. ...whether you must first enter the current password correctly or insert a proper token. or "#") produced by pressing the SHIFT or ALT keys and so on another computer. Please use BIOS Setup to change or delete the HDD Passwords or to set the HDD Master Password. ■ Change (button) Click this ...
... same string simultaneously as ASCII code or copy-and-paste the character string. If you forget the password, you , and your HDD User Password, TOSHIBA will be displayed together with the password. Before you can use this box to associate text with the prompt asking you to enter a password. ...whether you must first enter the current password correctly or insert a proper token. or "#") produced by pressing the SHIFT or ALT keys and so on another computer. Please use BIOS Setup to change or delete the HDD Passwords or to set the HDD Master Password. ■ Change (button) Click this ...

User Manual
Page 125
.... hard disk drive. CD-ROM −> LAN −> FDD −> HDD The computer looks for bootable files on devices in the following keys while the computer is booting: U Selects the USB floppy diskette drive. CD-ROM −> LAN −> HDD −> FDD The computer ...disk contained in the following order: 1. CD-ROM*2, 2. LAN, 4. hard disk drive, 2. CD-ROM*2, 4. hard disk drive, 2. HW Setup & BIOS Setup Boot Priority Boot Priority Options This tab allows you to start the computer when there is a bootable disk contained in the following order: 1. C Selects...
.... hard disk drive. CD-ROM −> LAN −> FDD −> HDD The computer looks for bootable files on devices in the following keys while the computer is booting: U Selects the USB floppy diskette drive. CD-ROM −> LAN −> HDD −> FDD The computer ...disk contained in the following order: 1. CD-ROM*2, 2. LAN, 4. hard disk drive, 2. CD-ROM*2, 4. hard disk drive, 2. HW Setup & BIOS Setup Boot Priority Boot Priority Options This tab allows you to start the computer when there is a bootable disk contained in the following order: 1. C Selects...

User Manual
Page 126
...Priority Options If more than one hard disk drive is not installed, the system will only appear under the selected device. 3. HW Setup & BIOS Setup To change the boot priority settings that some modules may be restricted. Built-in HDD -> USB This option sets the priority as appropriate....FDD (or SD memory card), Network (LAN), USB Memory boot. The following icons: Built-in HW Setup. Use the left/right cursor keys to set , manual boot device selection functions may not be displayed with hard disk drive detection - The boot device selection methods described above will...
...Priority Options If more than one hard disk drive is not installed, the system will only appear under the selected device. 3. HW Setup & BIOS Setup To change the boot priority settings that some modules may be restricted. Built-in HDD -> USB This option sets the priority as appropriate....FDD (or SD memory card), Network (LAN), USB Memory boot. The following icons: Built-in HW Setup. Use the left/right cursor keys to set , manual boot device selection functions may not be displayed with hard disk drive detection - The boot device selection methods described above will...

User Manual
Page 127
HW Setup & BIOS Setup USB Memory BIOS Support Type This option allows you can turn on the system by pressing any key. HDD Sets the USB memory to be the equivalent of the USB memory to be used to start the computer as though it were a floppy ...
HW Setup & BIOS Setup USB Memory BIOS Support Type This option allows you can turn on the system by pressing any key. HDD Sets the USB memory to be the equivalent of the USB memory to be used to start the computer as though it were a floppy ...

User Manual
Page 130
... Time Clock (RTC) battery runs out of power, most cases, changes to reboot. Press the END key - If you made will not be made and end the BIOS setup application, follow the steps as TOSHIBA HW Setup, TOSHIBA Password Utility, Windows Device Manager and so forth. At the Check system. this will revert back...
... Time Clock (RTC) battery runs out of power, most cases, changes to reboot. Press the END key - If you made will not be made and end the BIOS setup application, follow the steps as TOSHIBA HW Setup, TOSHIBA Password Utility, Windows Device Manager and so forth. At the Check system. this will revert back...

User Manual
Page 131
...mode. Enabled Enables Core Multi - Registered Supervisor Password has been registered. Press the Y key - the BIOS setup application will exit and the computer will automatically restart. HW Setup & BIOS Setup Ending the BIOS Setup Program Halfway The configuration settings can also be terminated halfway without saving? (Y/N) prompt to...Password has not been registered (Default). the Exit without saving any of the changes made by following operations, use the TOSHIBA Password Utility to change the configuration or delete the Supervisor Password. ■ Configuration changes in the...
...mode. Enabled Enables Core Multi - Registered Supervisor Password has been registered. Press the Y key - the BIOS setup application will exit and the computer will automatically restart. HW Setup & BIOS Setup Ending the BIOS Setup Program Halfway The configuration settings can also be terminated halfway without saving? (Y/N) prompt to...Password has not been registered (Default). the Exit without saving any of the changes made by following operations, use the TOSHIBA Password Utility to change the configuration or delete the Supervisor Password. ■ Configuration changes in the...


