Installation Guide - English
Page 2
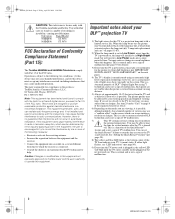
... operating and maintenance (servicing) instructions in mind: The Issue a If you have more than one TV. NO USERSERVICEABLE PARTS INSIDE. Lamp Unit Replacement The lamp in this manual completely, and keep these safety tips in the literature accompanying the appliance. Use appropriate furniture large enough to "Lamp unit replacement and care" in the Operating Guide. REFER SERVICING TO QUALIFIED SERVICE PERSONNEL. (This does not apply to support the weight of service...
... operating and maintenance (servicing) instructions in mind: The Issue a If you have more than one TV. NO USERSERVICEABLE PARTS INSIDE. Lamp Unit Replacement The lamp in this manual completely, and keep these safety tips in the literature accompanying the appliance. Use appropriate furniture large enough to "Lamp unit replacement and care" in the Operating Guide. REFER SERVICING TO QUALIFIED SERVICE PERSONNEL. (This does not apply to support the weight of service...
Installation Guide - English
Page 4
... the air temperature rises suddenly (for 6 to 7 hours to allow anything to rest on the screen, and then remove the source of reflections while viewing the TV. 30) Always unplug the TV before cleaning. Never use or user settings. Failure to follow these sounds become frequent or continuous, unplug the power cord and contact a Toshiba Authorized Service Center. 35) Special care for your local authorities...
... the air temperature rises suddenly (for 6 to 7 hours to allow anything to rest on the screen, and then remove the source of reflections while viewing the TV. 30) Always unplug the TV before cleaning. Never use or user settings. Failure to follow these sounds become frequent or continuous, unplug the power cord and contact a Toshiba Authorized Service Center. 35) Special care for your local authorities...
Installation Guide - English
Page 5
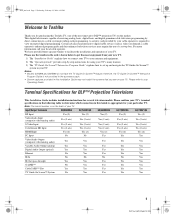
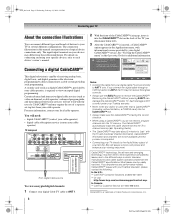
... TV. Certain advanced and interactive digital cable services such as video-on-demand, a cable operator's enhanced program guide and data-enhanced television services may not match the screens that you for several television models. For more information call your Operating Guide. Input/Output Terminals 50/56HM66 62/72HM196 50/56HMX96 62/72MX196 62/72MZ196 RF Input Yes (2) Yes (2) Yes (2) Yes (2) Yes (2) Video/Audio Input (composite video/analog audio) Yes (2 sets) Yes (2 sets) Yes (2 sets) Yes (2 sets) Yes (2 sets) S-Video Input Yes (2 sets) Yes (2 sets...
... TV. Certain advanced and interactive digital cable services such as video-on-demand, a cable operator's enhanced program guide and data-enhanced television services may not match the screens that you for several television models. For more information call your Operating Guide. Input/Output Terminals 50/56HM66 62/72HM196 50/56HMX96 62/72MX196 62/72MZ196 RF Input Yes (2) Yes (2) Yes (2) Yes (2) Yes (2) Video/Audio Input (composite video/analog audio) Yes (2 sets) Yes (2 sets) Yes (2 sets) Yes (2 sets) Yes (2 sets) S-Video Input Yes (2 sets) Yes (2 sets...
Installation Guide - English
Page 8
... manual are representative of typical device connections only. If you connect the digital cable through a VCR first and/or to ANT 2, the TV may take about 5 minutes to "pair" with cable signal connected to Antenna 1. You will need to program channels into the CableCARD™ slot. • Always make sure the CableCARD™ is completed. • Connecting your TV directly to the Audio/Video output of your Set-Top-Box...
... manual are representative of typical device connections only. If you connect the digital cable through a VCR first and/or to ANT 2, the TV may take about 5 minutes to "pair" with cable signal connected to Antenna 1. You will need to program channels into the CableCARD™ slot. • Always make sure the CableCARD™ is completed. • Connecting your TV directly to the Audio/Video output of your Set-Top-Box...
Installation Guide - English
Page 10
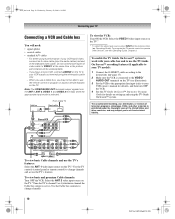
... audio cables) instead of television programs, videotapes, DVDs, and other materials is selected.* From Cable TV Cable box CH 3 IN OUT CH 4 Signal splitter IN OUT OUT To view the VCR: Turn ON the VCR. Note: The VIDEO/AUDIO OUT terminals output signals from ANT CH 3 CH 4 OUT to TV AUDIO L R IN IN OUT L R TV To view basic Cable channels and use the TV's features: Select the ANT 1 video input source on the TV.* Use the TV controls (control panel or remote control) to change channels...
... audio cables) instead of television programs, videotapes, DVDs, and other materials is selected.* From Cable TV Cable box CH 3 IN OUT CH 4 Signal splitter IN OUT OUT To view the VCR: Turn ON the VCR. Note: The VIDEO/AUDIO OUT terminals output signals from ANT CH 3 CH 4 OUT to TV AUDIO L R IN IN OUT L R TV To view basic Cable channels and use the TV's features: Select the ANT 1 video input source on the TV.* Use the TV controls (control panel or remote control) to change channels...
Installation Guide - English
Page 16
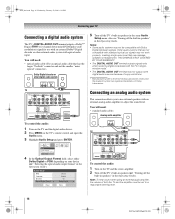
... external analog audio amplifier to adjust the sound level. "Selecting the optical audio output format" in the same Audio Setup menu. THIS DAMAGE IS NOT COVERED BY YOUR WARRANTY. • The DIGITAL AUDIO OUT terminal outputs signals only when receiving digital broadcasts with the TV in the Operating Guide). Dolby and the double-D symbol are not compatible with optical audio input. Audio Setup MTS Language Speakers Optical Output Format Stereo English On Dolby Digital Reset Done To control the audio: 1 Turn on the TV...
... external analog audio amplifier to adjust the sound level. "Selecting the optical audio output format" in the same Audio Setup menu. THIS DAMAGE IS NOT COVERED BY YOUR WARRANTY. • The DIGITAL AUDIO OUT terminal outputs signals only when receiving digital broadcasts with the TV in the Operating Guide). Dolby and the double-D symbol are not compatible with optical audio input. Audio Setup MTS Language Speakers Optical Output Format Stereo English On Dolby Digital Reset Done To control the audio: 1 Turn on the TV...

Printable Spec Sheet
Page 2
... Texas Instruments for our best 720p picture yet. Dual HDMI™ Digital Inputs - Includes both uncompressed digital video and digital audio in which work together to set levels, for increased brightness without losing contrast. Allows access, through your existing home network, to change or modification without HDMI) 480i Lamp Mode (150W/120W) X Game Mode X Surround Sound SRS® WOW™ Dolby Digital® X X(SRSTruSurround 5.1 digital) X (Virtual Dolby Digital®) Audio Output Power 20 Watts Two...
... Texas Instruments for our best 720p picture yet. Dual HDMI™ Digital Inputs - Includes both uncompressed digital video and digital audio in which work together to set levels, for increased brightness without losing contrast. Allows access, through your existing home network, to change or modification without HDMI) 480i Lamp Mode (150W/120W) X Game Mode X Surround Sound SRS® WOW™ Dolby Digital® X X(SRSTruSurround 5.1 digital) X (Virtual Dolby Digital®) Audio Output Power 20 Watts Two...
Owner's Manual - English
Page 2
... separate Installation Guide. 6) Depending on , the lamp will switch to obtain full brightness (- You may be in but will initially be able to hear the fans for several cooling fans to Part 15 of the FCC rules. Important notes about your TV's current status. page 80). 9) Every time the TV power cord is plugged in, the yellow LED will blink until the TV enters standby mode (plugged in High Bright mode but not powered...
... separate Installation Guide. 6) Depending on , the lamp will switch to obtain full brightness (- You may be in but will initially be able to hear the fans for several cooling fans to Part 15 of the FCC rules. Important notes about your TV's current status. page 80). 9) Every time the TV power cord is plugged in, the yellow LED will blink until the TV enters standby mode (plugged in High Bright mode but not powered...

Owner's Manual - English
Page 4
... Using the volume lock feature (8000 17 Operational feature reset (8900 17 Multi-brand remote control device codes 18 Chapter 3: Menu layout and navigation 22 Main menu layout 22 Setup/Installation menu layout 23 THINC menu layout 24 Navigating the menu system 24 Chapter 4: Setting up your TV 25 Selecting the menu language 25 Configuring the antenna input sources for the ANT 1 and ANT 2 terminals 25 Programming channels into the TV's channel memory . . . . 26 Programming channels...
... Using the volume lock feature (8000 17 Operational feature reset (8900 17 Multi-brand remote control device codes 18 Chapter 3: Menu layout and navigation 22 Main menu layout 22 Setup/Installation menu layout 23 THINC menu layout 24 Navigating the menu system 24 Chapter 4: Setting up your TV 25 Selecting the menu language 25 Configuring the antenna input sources for the ANT 1 and ANT 2 terminals 25 Programming channels into the TV's channel memory . . . . 26 Programming channels...
Owner's Manual - English
Page 6
... manual. For more information, call your cable operator is capable of your TV. Installation Guide). • Two sets of the most innovative DLP™ projection TVs on the market. Use with other stands may result in most enjoyment from the screens displayed on -demand, a cable operator's enhanced program guide,or data-enhanced television services) may be different from your new TV. 1) The "Installation Guide" explains how to connect your TV to your TV. Installation Guide). • Two HDMI™ digital, high...
... manual. For more information, call your cable operator is capable of your TV. Installation Guide). • Two sets of the most innovative DLP™ projection TVs on the market. Use with other stands may result in most enjoyment from the screens displayed on -demand, a cable operator's enhanced program guide,or data-enhanced television services) may be different from your new TV. 1) The "Installation Guide" explains how to connect your TV to your TV. Installation Guide). • Two HDMI™ digital, high...
Owner's Manual - English
Page 7
... blink 3 times. Installation Guide). 6 Connect the supplied G-LINK™/IR blaster cable from walls and other device(s) (- page 12) for an overview of the buttons on the screen. • Place the TV far enough from your VCR and/or Cable box (if applicable) to the G-LINK™ terminal so you can safely support the size and weight of the unit. • Place the TV in a location where light...
... blink 3 times. Installation Guide). 6 Connect the supplied G-LINK™/IR blaster cable from walls and other device(s) (- page 12) for an overview of the buttons on the screen. • Place the TV far enough from your VCR and/or Cable box (if applicable) to the G-LINK™ terminal so you can safely support the size and weight of the unit. • Place the TV in a location where light...

Owner's Manual - English
Page 30
... and Press T. To set to obtain the RF channel numbers for your local broadcasters to On and you will occur for the picture to appear on-screen in a short period of time, the useful service life of Installation menu icons will appear on again within a few minutes: • The screen (lamp) lights dimly; To view the digital signal meter: 1 Press Y and open the Setup menu. 2 Highlight Quick Restart...
... and Press T. To set to obtain the RF channel numbers for your local broadcasters to On and you will occur for the picture to appear on-screen in a short period of time, the useful service life of Installation menu icons will appear on again within a few minutes: • The screen (lamp) lights dimly; To view the digital signal meter: 1 Press Y and open the Setup menu. 2 Highlight Quick Restart...

Owner's Manual - English
Page 35
... banner. Clearing channels from the list when a new channel or input is tuned. • If History List in the Channel Browser Setup is set to tune the RF channel using < or , on the remote control or TV control panel. Note:This feature will not be removed from the channel history • Reconfiguring the ANT 1 or ANT 2 input will clear the channel history. Tuning digital channels: Press the Channel Number (0-9) on the remote control. 35 HMX96...
... banner. Clearing channels from the list when a new channel or input is tuned. • If History List in the Channel Browser Setup is set to tune the RF channel using < or , on the remote control or TV control panel. Note:This feature will not be removed from the channel history • Reconfiguring the ANT 1 or ANT 2 input will clear the channel history. Tuning digital channels: Press the Channel Number (0-9) on the remote control. 35 HMX96...

Owner's Manual - English
Page 52
... the Time field, and then use the PC Settings feature to select the recurrence (weekends, weekdays, every day, etc). The PC must first set in the TV ON Duration field. Installation Guide). You can view the image from center.* • Vertical Position: Moves the picture up/down. "Selecting the video input source to view" page 32). 2 Press Y and open the Setup menu. 2 Highlight On/Off Timer and...
... the Time field, and then use the PC Settings feature to select the recurrence (weekends, weekdays, every day, etc). The PC must first set in the TV ON Duration field. Installation Guide). You can view the image from center.* • Vertical Position: Moves the picture up/down. "Selecting the video input source to view" page 32). 2 Press Y and open the Setup menu. 2 Highlight On/Off Timer and...

Owner's Manual - English
Page 76
... VIDEO OUT terminal, a standard video or S-video IN connection must be disabled. Cannot view external signals or channel 3 or 4 • If you are installed properly (- Poor color or no picture will play a recorded "voice announcement" describing the condition (see the Installation Guide. • Antenna reception may have two VCRs connected to your TV's problem is set to access the POP feature, the message "Not Available" will change to the TV's output and input connections...
... VIDEO OUT terminal, a standard video or S-video IN connection must be disabled. Cannot view external signals or channel 3 or 4 • If you are installed properly (- Poor color or no picture will play a recorded "voice announcement" describing the condition (see the Installation Guide. • Antenna reception may have two VCRs connected to your TV's problem is set to access the POP feature, the message "Not Available" will change to the TV's output and input connections...

Owner's Manual - English
Page 77
... TV remote control does not operate a specific feature on your PIN code: While the PIN code entering screen is not closedcaptioned, no sound, try setting the MTS feature to tune digital channels, use the Reset Factory Defaults procedure (- Unblock the channel (- page 26). Also see "TV stops responding to determine its available features. Closed caption problems • If the program or video you selected is displayed, press E four times within the TV, video processing in their programming...
... TV remote control does not operate a specific feature on your PIN code: While the PIN code entering screen is not closedcaptioned, no sound, try setting the MTS feature to tune digital channels, use the Reset Factory Defaults procedure (- Unblock the channel (- page 26). Also see "TV stops responding to determine its available features. Closed caption problems • If the program or video you selected is displayed, press E four times within the TV, video processing in their programming...

Owner's Manual - English
Page 78
... to record. Picture Viewer problems "No pictures found will be able to start • Sufficient network band-width is in the shared folder are not connected properly. Installation Guide) and set up on -screen. • If you are recording a digital channel, you can only change ) but is always skipped • The file is displayed instead. • The picture file does not meet supported specifications (- Rectangle...
... to record. Picture Viewer problems "No pictures found will be able to start • Sufficient network band-width is in the shared folder are not connected properly. Installation Guide) and set up on -screen. • If you are recording a digital channel, you can only change ) but is always skipped • The file is displayed instead. • The picture file does not meet supported specifications (- Rectangle...

Owner's Manual - English
Page 81
... MANUAL TO QUALIFIED SERVICE PERSONNEL. As is located on the serial number label on the back of the picture; or • if you may indicate a lamp rupture (LED indication #4, - CAUTION: Always handle the lamp unit with the model currently recommended by visiting www.toshiba.ca. page 86), as applicable. The lamp unit in the colors and/or brightness of the television and on product use...
... MANUAL TO QUALIFIED SERVICE PERSONNEL. As is located on the serial number label on the back of the picture; or • if you may indicate a lamp rupture (LED indication #4, - CAUTION: Always handle the lamp unit with the model currently recommended by visiting www.toshiba.ca. page 86), as applicable. The lamp unit in the colors and/or brightness of the television and on product use...
Owner's Manual - English
Page 85
... Warranty on the type of original retail purchase. The lamp unit is authorized to change, modify, or extend the terms of antenna systems are your warranty rights. or Puerto Rico. (4) Labor service charges for set installation, setup, adjustment of customer controls, and installation or repair of these warranties in any DLP™ Television or parts that have been lost or discarded by you . HMX96_EN...
... Warranty on the type of original retail purchase. The lamp unit is authorized to change, modify, or extend the terms of antenna systems are your warranty rights. or Puerto Rico. (4) Labor service charges for set installation, setup, adjustment of customer controls, and installation or repair of these warranties in any DLP™ Television or parts that have been lost or discarded by you . HMX96_EN...
Owner's Manual - English
Page 86
..., REPAIR OR REPLACE A DEFECTIVE PART WITH A NEW OR REFURBISHED PART WITHOUT CHARGE TO YOU FOR PARTS OR LABOR. IN-HOME SERVICE ONLY APPLIES WITHIN 100 KILOMETERS OF AN AUTHORIZED TCL SERVICE DEPOT. Owner's Manual and Product Registration Read this owner's manual thoroughly before operating this DLP™ television must be taken to the TCL Authorized Service Depot for repair and returned to your product online at www.toshiba...
..., REPAIR OR REPLACE A DEFECTIVE PART WITH A NEW OR REFURBISHED PART WITHOUT CHARGE TO YOU FOR PARTS OR LABOR. IN-HOME SERVICE ONLY APPLIES WITHIN 100 KILOMETERS OF AN AUTHORIZED TCL SERVICE DEPOT. Owner's Manual and Product Registration Read this owner's manual thoroughly before operating this DLP™ television must be taken to the TCL Authorized Service Depot for repair and returned to your product online at www.toshiba...


