Installation Guide - English
Page 2
..."dangerous voltage" within an equilateral triangle, is a growing trend, and larger TVs are improperly secured or inappropriately situated on or play with the Toshiba stand listed in the "Specifications" section in this Toshiba TV. Tel. 703-907-7600 Fax 703-907-7690 www.CE.org CEA is...(This does not apply to advocate children's safety and educate consumers and their families about this manual completely, and keep these safety tips in the Operating Guide.) The lightning flash with your TV (such as practical. however, they are like most consumers, you ! 2500 Wilson Blvd. ...
..."dangerous voltage" within an equilateral triangle, is a growing trend, and larger TVs are improperly secured or inappropriately situated on or play with the Toshiba stand listed in the "Specifications" section in this Toshiba TV. Tel. 703-907-7600 Fax 703-907-7690 www.CE.org CEA is...(This does not apply to advocate children's safety and educate consumers and their families about this manual completely, and keep these safety tips in the Operating Guide.) The lightning flash with your TV (such as practical. however, they are like most consumers, you ! 2500 Wilson Blvd. ...
Installation Guide - English
Page 4
...or abuse. 25) Never overload wall outlets and extension cords. 26) Always operate this manual to a Toshiba Authorized Service Center. 37) If you should replace the lamp unit; If you leave the TV unattended or unused for your area. For disposal or recycling information, please contact your... cleaning. Failure to follow these sounds become frequent or continuous, unplug the power cord and contact a Toshiba Authorized Service Center. 35) Special care for your TOSHIBA TV, follow this product has a limited service life. Note: The lamp unit contains mercury. Dispose of the used lamp ...
...or abuse. 25) Never overload wall outlets and extension cords. 26) Always operate this manual to a Toshiba Authorized Service Center. 37) If you should replace the lamp unit; If you leave the TV unattended or unused for your area. For disposal or recycling information, please contact your... cleaning. Failure to follow these sounds become frequent or continuous, unplug the power cord and contact a Toshiba Authorized Service Center. 35) Special care for your TOSHIBA TV, follow this product has a limited service life. Note: The lamp unit contains mercury. Dispose of the used lamp ...
Installation Guide - English
Page 8
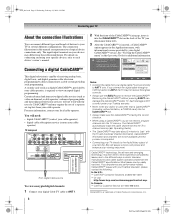
... limitation, a PCMCIA card) into the CableCARD™ slot. • Always make sure the CableCARD™ is NOT covered under your Toshiba warranty. • Never insert any performance-related CableCARD™ issues with the use of typical device connections only. Such damage is facing... to "pair" with cable signal connected to each device's owner's manual. DLP_Inst.book Page 8 Wednesday, February 22, 2006 6:18 PM Connecting your TV About the connection illustrations You can damage the CableCARD™ and/or TV. A security card (such as video-on connecting and using a ...
... limitation, a PCMCIA card) into the CableCARD™ slot. • Always make sure the CableCARD™ is NOT covered under your Toshiba warranty. • Never insert any performance-related CableCARD™ issues with the use of typical device connections only. Such damage is facing... to "pair" with cable signal connected to each device's owner's manual. DLP_Inst.book Page 8 Wednesday, February 22, 2006 6:18 PM Connecting your TV About the connection illustrations You can damage the CableCARD™ and/or TV. A security card (such as video-on connecting and using a ...
Installation Guide - English
Page 9
...the standard video cable. In Canada, TV GUIDE is prohibited under license by Gemstar-TV Guide International, Inc. Operating Guide). For better picture performance, if your VCR has S-video, use the TV Guide On Screen™ recording features (if applicable to your VCR owner's manual for details), and then turn OFF... the VCR. 4 See the TV Guide On Screen™ Interactive Program Guide for details on the TV.* To view the VCR: Turn ON the VCR. Note: The VIDEO/AUDIO OUT terminals ...
...the standard video cable. In Canada, TV GUIDE is prohibited under license by Gemstar-TV Guide International, Inc. Operating Guide). For better picture performance, if your VCR has S-video, use the TV Guide On Screen™ recording features (if applicable to your VCR owner's manual for details), and then turn OFF... the VCR. 4 See the TV Guide On Screen™ Interactive Program Guide for details on the TV.* To view the VCR: Turn ON the VCR. Note: The VIDEO/AUDIO OUT terminals ...
Installation Guide - English
Page 10
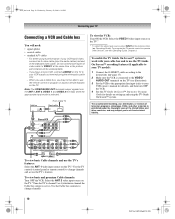
... instructions (- The unauthorized recording, use the TV Guide On Screen™ recording features (if applicable to ). Select the ANT 2 video input source on setting up and using the white audio cable only. - For better picture performance, if your VCR owner's manual for details), and then turn OFF the ...VCR. 4 See the TV Guide On Screen™ Interactive Program Guide for details on the TV.* Tune the TV to channel 3 or 4 (whichever channel the Cable box output is set ...
... instructions (- The unauthorized recording, use the TV Guide On Screen™ recording features (if applicable to ). Select the ANT 2 video input source on setting up and using the white audio cable only. - For better picture performance, if your VCR owner's manual for details), and then turn OFF the ...VCR. 4 See the TV Guide On Screen™ Interactive Program Guide for details on the TV.* Tune the TV to channel 3 or 4 (whichever channel the Cable box output is set ...
Installation Guide - English
Page 11
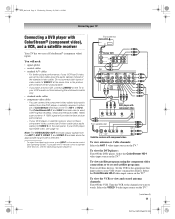
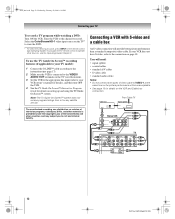
...cable. Select the VIDEO 1 video input source on the remote control (- DLP_Inst.book Page 11 Wednesday, February 22, 2006 6:18 PM Connecting your TV Connecting a DVD player with Progressive (480p, 720p) and Interlaced (480i, 1080i) scan systems. A 1080i signal will provide the best picture performance.... - For better picture performance, if your DVD player has HDMI video, see the Operating Guide, Chapter 2. If your VCR owner's manual for details). If your VCR has S-video, use an S-video cable (plus audio cables) from ANT CH 3 CH 4 OUT to operate ...
...cable. Select the VIDEO 1 video input source on the remote control (- DLP_Inst.book Page 11 Wednesday, February 22, 2006 6:18 PM Connecting your TV Connecting a DVD player with Progressive (480p, 720p) and Interlaced (480i, 1080i) scan systems. A 1080i signal will provide the best picture performance.... - For better picture performance, if your DVD player has HDMI video, see the Operating Guide, Chapter 2. If your VCR owner's manual for details). If your VCR has S-video, use an S-video cable (plus audio cables) from ANT CH 3 CH 4 OUT to operate ...
Installation Guide - English
Page 12
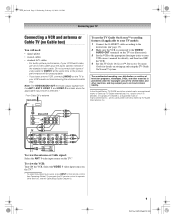
... the TV remote control to operate other materials is connected to record. page 17). 2 Make sure the VCR is prohibited under the Copyright Laws of video cable to civil and criminal liability. DLP_Inst.book Page 12 Wednesday, February 22, 2006 6:18 PM Connecting your VCR owner's manual for details...), and then turn OFF the VCR. 4 See the TV Guide On Screen™ Interactive Program Guide for details on page 10. From Cable TV Cable box CH 3 IN OUT CH 4 Signal splitter IN OUT OUT...
... the TV remote control to operate other materials is connected to record. page 17). 2 Make sure the VCR is prohibited under the Copyright Laws of video cable to civil and criminal liability. DLP_Inst.book Page 12 Wednesday, February 22, 2006 6:18 PM Connecting your VCR owner's manual for details...), and then turn OFF the VCR. 4 See the TV Guide On Screen™ Interactive Program Guide for details on page 10. From Cable TV Cable box CH 3 IN OUT CH 4 Signal splitter IN OUT OUT...
Installation Guide - English
Page 19
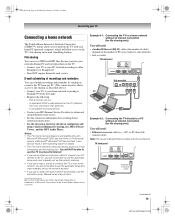
...Internet. • If you use an Ethernet crossover cable to connect your PC directly to the TV, you will not be able to use the automatic setup and must manually set up Internet/e-mail service. • See the connection information for recording device connection instructions. &#...the automatic setup. DLP_Inst.book Page 19 Wednesday, February 22, 2006 6:18 PM Connecting your TV Connecting a home network The Toshiba Home Interactive Network Connection (THINC™) feature allows you to network the TV with your home PC (personal computer), which will need : • standard Ethernet (RJ-45...
...Internet. • If you use an Ethernet crossover cable to connect your PC directly to the TV, you will not be able to use the automatic setup and must manually set up Internet/e-mail service. • See the connection information for recording device connection instructions. &#...the automatic setup. DLP_Inst.book Page 19 Wednesday, February 22, 2006 6:18 PM Connecting your TV Connecting a home network The Toshiba Home Interactive Network Connection (THINC™) feature allows you to network the TV with your home PC (personal computer), which will need : • standard Ethernet (RJ-45...

Owner's Manual - English
Page 4
... 1: Introduction 6 Welcome to Toshiba 6 Features of your new TV 6 Overview of steps for installing, setting up, and using your new TV 7 TV front and side panel controls and connections 8 TV back panel connections 9 Chapter ... 1 and ANT 2 terminals 25 Programming channels into the TV's channel memory . . . . 26 Programming channels automatically 26 Manually adding and deleting channels in the channel memory 27 Setting the... the lamp mode 55 Using the Vertical Edge Enhancer feature 56 Using the Color Management feature 56 Using the Game Mode feature 57 Using the advanced audio settings...
... 1: Introduction 6 Welcome to Toshiba 6 Features of your new TV 6 Overview of steps for installing, setting up, and using your new TV 7 TV front and side panel controls and connections 8 TV back panel connections 9 Chapter ... 1 and ANT 2 terminals 25 Programming channels into the TV's channel memory . . . . 26 Programming channels automatically 26 Manually adding and deleting channels in the channel memory 27 Setting the... the lamp mode 55 Using the Vertical Edge Enhancer feature 56 Using the Color Management feature 56 Using the Game Mode feature 57 Using the advanced audio settings...
Owner's Manual - English
Page 5
Setting up the network address 59 Automatically setting up the network address 59 Manually setting up e-mail scheduling 68 Description of the used lamp unit 83 Specifications 84 Limited United States Warranty for DLP™ Television Models 85 Limited ... 61 Setting up file sharing on a PC with Microsoft® Windows® XP Service Pack 1 or Service Pack 2 . . 61 Setting up file sharing on the TV 63 About the Software Upgrade feature 64 E. HMX96_EN.book Page 5 Friday, April 28, 2006 12:03 PM Chapter 7: Using the THINC™ home network feature...
Setting up the network address 59 Automatically setting up the network address 59 Manually setting up e-mail scheduling 68 Description of the used lamp unit 83 Specifications 84 Limited United States Warranty for DLP™ Television Models 85 Limited ... 61 Setting up file sharing on a PC with Microsoft® Windows® XP Service Pack 1 or Service Pack 2 . . 61 Setting up file sharing on the TV 63 About the Software Upgrade feature 64 E. HMX96_EN.book Page 5 Friday, April 28, 2006 12:03 PM Chapter 7: Using the THINC™ home network feature...
Owner's Manual - English
Page 6
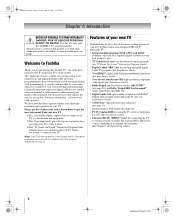
... file sharing (JPEG, MP3) and e-mail scheduling of your TV's many exciting features of recordings and reminders (- TV Guide On Screen™ Interactive Program Guide). • Digital CableCARD™ slot for purchasing this manual. Installation Guide), SRS WOW™ (- page 58), and ... receiving analog basic, digital basic, and digital premium cable television programming by -step instructions for using your new Toshiba widescreen, integrated HD, DLP™ projection TV: • Integrated digital tuning (8VSB ATSC and QAM) eliminates the need for a separate digital converter set-top...
... file sharing (JPEG, MP3) and e-mail scheduling of your TV's many exciting features of recordings and reminders (- TV Guide On Screen™ Interactive Program Guide). • Digital CableCARD™ slot for purchasing this manual. Installation Guide), SRS WOW™ (- page 58), and ... receiving analog basic, digital basic, and digital premium cable television programming by -step instructions for using your new Toshiba widescreen, integrated HD, DLP™ projection TV: • Integrated digital tuning (8VSB ATSC and QAM) eliminates the need for a separate digital converter set-top...
Owner's Manual - English
Page 7
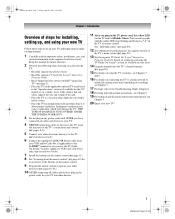
...TYPE OF DAMAGE IS NOT COVERED UNDER THE TOSHIBA WARRANTY. 3 Do not plug in any power cords until the yellow LED stops blinking and then press p on setting up your TV and begin using the TV's features, see Chapter 9. 20 Enjoy your DLP™ projection TV" (- page 80). 12 See "Menu...file sharing and e-mail scheduling of the unit. • Place the TV in the "Specifications" section (if available for this manual for future reference. 2 Observe the following when choosing a location for details on the TV or remote control. Wait several seconds until AFTER you have connected all ...
...TYPE OF DAMAGE IS NOT COVERED UNDER THE TOSHIBA WARRANTY. 3 Do not plug in any power cords until the yellow LED stops blinking and then press p on setting up your TV and begin using the TV's features, see Chapter 9. 20 Enjoy your DLP™ projection TV" (- page 80). 12 See "Menu...file sharing and e-mail scheduling of the unit. • Place the TV in the "Specifications" section (if available for this manual for future reference. 2 Observe the following when choosing a location for details on the TV or remote control. Wait several seconds until AFTER you have connected all ...

Owner's Manual - English
Page 26
... (as shown below to program channels into the TV's memory.) To remove an antenna source channel from the memory, you must manually delete it. • To tune the TV to repeat the programming process again unless your Cable TV service lineup changes significantly. • If you ... the Installation Guide for , and then press T to view the programmed channels. 26 HMX96 (E/F) Web 213:276 Programming channels automatically Your TV can manually add or erase individual channels in the channel memory. Follow the steps below .) Open the Terrestrial menu, highlight Channel Program, and press ...
... (as shown below to program channels into the TV's memory.) To remove an antenna source channel from the memory, you must manually delete it. • To tune the TV to repeat the programming process again unless your Cable TV service lineup changes significantly. • If you ... the Installation Guide for , and then press T to view the programmed channels. 26 HMX96 (E/F) Web 213:276 Programming channels automatically Your TV can manually add or erase individual channels in the channel memory. Follow the steps below .) Open the Terrestrial menu, highlight Channel Program, and press ...

Owner's Manual - English
Page 27
... If the channel is found , a message will appear. HMX96_EN.book Page 27 Friday, April 28, 2006 12:03 PM Chapter 4: Setting up your TV Manually adding and deleting channels in the channel memory: 1 Press Y and open the Setup menu. 2 Highlight Installation and press T. 3 (A new set of... channels programmed for example, 56-1). Terrestrial Input Configuration Channel Program Channel Add/Delete Signal Meter Navigate ENTER Select CH RTN Back EXIT Exit 4 The illustration below .) Open the ...
... If the channel is found , a message will appear. HMX96_EN.book Page 27 Friday, April 28, 2006 12:03 PM Chapter 4: Setting up your TV Manually adding and deleting channels in the channel memory: 1 Press Y and open the Setup menu. 2 Highlight Installation and press T. 3 (A new set of... channels programmed for example, 56-1). Terrestrial Input Configuration Channel Program Channel Add/Delete Signal Meter Navigate ENTER Select CH RTN Back EXIT Exit 4 The illustration below .) Open the ...
Owner's Manual - English
Page 28
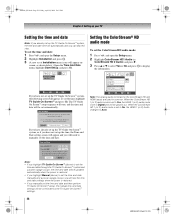
... following screen will appear. screen, as shown below.) Open the Time And Date menu, highlight Start Setup, and press T. Manual TV Guide On Screen Cancel If you have already set up the TV Guide On Screen™ system, or if you have not set up the time, the Time and Date setting screen... sequence will start, and the time and date will be updated automatically when the power is restored. • If you highlight Manual (above) to set the time and date through the TV Guide On Screen™ system and a power outage occurs, the time and date will lose the time and date settings...
... following screen will appear. screen, as shown below.) Open the Time And Date menu, highlight Start Setup, and press T. Manual TV Guide On Screen Cancel If you have already set up the TV Guide On Screen™ system, or if you have not set up the time, the Time and Date setting screen... sequence will start, and the time and date will be updated automatically when the power is restored. • If you highlight Manual (above) to set the time and date through the TV Guide On Screen™ system and a power outage occurs, the time and date will lose the time and date settings...

Owner's Manual - English
Page 59
.... Setting up the network address To set up the network address: 1 First, try automatically setting up the network address (below ) or try manually setting up the network address (- If you can access JPEG and MP3 files that are either retry the automatic setup (below ). 2 If the... automatic setup is not successful, you think your Toshiba TV and router might have Internet service in your home and a dedicated e-mail address for the TV (different from any PC. The Installation menu appears. 3 Open the Network menu. (continued) 59 HMX96 ...
.... Setting up the network address To set up the network address: 1 First, try automatically setting up the network address (below ) or try manually setting up the network address (- If you can access JPEG and MP3 files that are either retry the automatic setup (below ). 2 If the... automatic setup is not successful, you think your Toshiba TV and router might have Internet service in your home and a dedicated e-mail address for the TV (different from any PC. The Installation menu appears. 3 Open the Network menu. (continued) 59 HMX96 ...

Owner's Manual - English
Page 60
... setup is successful, go to step 8. 7 If the automatic network address setup is successful, the following screen will display while the TV is not successful, go to section C, "Setting up file sharing on your home network are correct. See Installation Guide for your home... Setup Software Upgrade Navigate ENTER Select CH RTN Back EXIT Exit 5 The message "Obtain network address automatically?" Network address information has been found! Manually setting up the network address". Yes No HMX96 (E/F) Web 213:276 b) Skip to step 9.) 9 If, after repeating steps 1-6, you have...
... setup is successful, go to step 8. 7 If the automatic network address setup is successful, the following screen will display while the TV is not successful, go to section C, "Setting up file sharing on your home network are correct. See Installation Guide for your home... Setup Software Upgrade Navigate ENTER Select CH RTN Back EXIT Exit 5 The message "Obtain network address automatically?" Network address information has been found! Manually setting up the network address". Yes No HMX96 (E/F) Web 213:276 b) Skip to step 9.) 9 If, after repeating steps 1-6, you have...

Owner's Manual - English
Page 61
...213:276 Yes No To obtain the network address automatically, go to step 5 under "Automatically setting up the network address". To manually enter the network address, go to "Manually setting up the network address" (- Setting up file sharing on your PC: 1 On your PC, click the "Start" button... • See "Media specifications" (- b) Click "Sharing and Security..." (which operating system and service pack (if applicable) are compatible with the TV can have a maximum of your PC: a) Right-click the folder to start over ? To continue, highlight Yes and press T. page 64) for...
...213:276 Yes No To obtain the network address automatically, go to step 5 under "Automatically setting up the network address". To manually enter the network address, go to "Manually setting up the network address" (- Setting up file sharing on your PC: 1 On your PC, click the "Start" button... • See "Media specifications" (- b) Click "Sharing and Security..." (which operating system and service pack (if applicable) are compatible with the TV can have a maximum of your PC: a) Right-click the folder to start over ? To continue, highlight Yes and press T. page 64) for...

Owner's Manual - English
Page 70
... Mail Server" and "Outgoing Mail Server" names (or IP addresses). -"IP", "Netmask", "Gateway", and "DNS" settings (applicable if you manually set up the network address). • Make sure all cables are connected properly and securely. • Check your router hardware/settings to make ... "Netmask", "Gateway", and "DNS" settings (applicable if you receive the message "Error Sending Mail (-1)", the TV may not have received the test e-mail. Solutions • If you manually set up the network address). • Make sure all cables are connected properly and securely. • Check ...
... Mail Server" and "Outgoing Mail Server" names (or IP addresses). -"IP", "Netmask", "Gateway", and "DNS" settings (applicable if you manually set up the network address). • Make sure all cables are connected properly and securely. • Check your router hardware/settings to make ... "Netmask", "Gateway", and "DNS" settings (applicable if you receive the message "Error Sending Mail (-1)", the TV may not have received the test e-mail. Solutions • If you manually set up the network address). • Make sure all cables are connected properly and securely. • Check ...

Owner's Manual - English
Page 77
...black rectangle may be muted. page 45). • When using a ColorStream or HDMI video connection instead. page 11). • Your TV remote control may help synchronize the sound to tune digital channels, check the antenna configuration (- Channel tuning problems • Make sure the ... following suggestions, which may not operate certain features on certain TV channels, please contact your external device. You may not display correctly in rare instances, when viewing certain content (e.g.. Refer to the owner's manual for your PIN code: While the PIN code entering screen ...
...black rectangle may be muted. page 45). • When using a ColorStream or HDMI video connection instead. page 11). • Your TV remote control may help synchronize the sound to tune digital channels, check the antenna configuration (- Channel tuning problems • Make sure the ... following suggestions, which may not operate certain features on certain TV channels, please contact your external device. You may not display correctly in rare instances, when viewing certain content (e.g.. Refer to the owner's manual for your PIN code: While the PIN code entering screen ...


