User Manual
Page 1
...Definition LCD Television 46UL610U 55UL610U 65UL610U For an overview of your TV. Record these numbers whenever you communicate with your new TV, see page 12. For details, please contact your TV antenna installer, cable provider, or satellite provider. © 2011 TOSHIBA CORPORATION All Rights Reserved Owner's ...model number and serial number are on the back and side of steps for setting up your Toshiba dealer about this TV. Refer to these numbers in the spaces below. Note: To display a High Definition picture, the TV must be receiving a High Definition signal (such ...
...Definition LCD Television 46UL610U 55UL610U 65UL610U For an overview of your TV. Record these numbers whenever you communicate with your new TV, see page 12. For details, please contact your TV antenna installer, cable provider, or satellite provider. © 2011 TOSHIBA CORPORATION All Rights Reserved Owner's ...model number and serial number are on the back and side of steps for setting up your Toshiba dealer about this TV. Refer to these numbers in the spaces below. Note: To display a High Definition picture, the TV must be receiving a High Definition signal (such ...

User Manual
Page 8
... absence of malfunction; Note: Interactive video games that does not operate properly (does not light, remains constantly lit, etc.). Picture Settings, Auto Brightness Sensor) may not work with minimum distance 20 cm between the radiator & your LCD TV The following two ...STAR® User Information ENERGY STAR User Information Statement: the factory default settings of repetitive codes where required by the U.S. marks. To ensure your warranty. ENERGY STAR® qualified TV. therefore, Toshiba is viewed from these symptoms. 1) An afterimage (ghost) may appear...
... absence of malfunction; Note: Interactive video games that does not operate properly (does not light, remains constantly lit, etc.). Picture Settings, Auto Brightness Sensor) may not work with minimum distance 20 cm between the radiator & your LCD TV The following two ...STAR® User Information ENERGY STAR User Information Statement: the factory default settings of repetitive codes where required by the U.S. marks. To ensure your warranty. ENERGY STAR® qualified TV. therefore, Toshiba is viewed from these symptoms. 1) An afterimage (ghost) may appear...

User Manual
Page 10
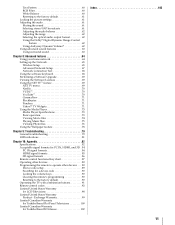
... Defaults 53 Power failure 53 Chapter 7: Picture and sound controls 54 Selecting the picture size 54 Scrolling the picture 56 Using the Auto Aspect feature 56 Using the 4:3 Stretch 56 Freezing the picture 56 Adjusting the picture 57 Selecting the picture mode 57 Adjusting the picture quality 57 Using the advanced picture settings features 58 Edge Enhancer 58 Dynamic...
... Defaults 53 Power failure 53 Chapter 7: Picture and sound controls 54 Selecting the picture size 54 Scrolling the picture 56 Using the Auto Aspect feature 56 Using the 4:3 Stretch 56 Freezing the picture 56 Adjusting the picture 57 Selecting the picture mode 57 Adjusting the picture quality 57 Using the advanced picture settings features 58 Edge Enhancer 58 Dynamic...
User Manual
Page 11
Test Pattern 60 RGB Filter 60 White Balance 60 Resetting to the factory default 61 Locking the picture settings 61 Adjusting the audio 61 Muting the sound 61 Selecting stereo/SAP broadcasts 61 Adjusting the audio balance 62 Adjusting the range 62... 90 Operating the TV with combination buttons 91 Remote control codes 92 Limited United States Warranty for Toshiba Brand 3D Glasses 102 Index 105 11 Exchange Warranty 99 Limited Canadian Warranty for Toshiba Brand Flat Panel Televisions 100 Limited Canadian Warranty for LCD Televisions 98 Limited United States Warranty Product ...
Test Pattern 60 RGB Filter 60 White Balance 60 Resetting to the factory default 61 Locking the picture settings 61 Adjusting the audio 61 Muting the sound 61 Selecting stereo/SAP broadcasts 61 Adjusting the audio balance 62 Adjusting the range 62... 90 Operating the TV with combination buttons 91 Remote control codes 92 Limited United States Warranty for Toshiba Brand 3D Glasses 102 Index 105 11 Exchange Warranty 99 Limited Canadian Warranty for Toshiba Brand Flat Panel Televisions 100 Limited Canadian Warranty for LCD Televisions 98 Limited United States Warranty Product ...
User Manual
Page 12
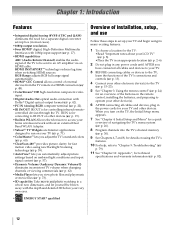
.... 10 For help, refer to a whole new dimension, and let yourself be sent to IR OUT on other devices (- When you automatically adjust picture settings based on the TV, the Initial Setup menu appears. 7 See "Chapter 4: Initial Setup and Menu" for connecting to an AV amplifier via HDMI...setup, and use Follow these steps to the TV (- p. 19). •Built-in the power cords for details on your other electronic device(s) to set -top box (in most cases). •1080p output resolution. •Four HDMI® digital, High-Definition Multimedia Interfaces with 1080p input support (- ...
.... 10 For help, refer to a whole new dimension, and let yourself be sent to IR OUT on other devices (- When you automatically adjust picture settings based on the TV, the Initial Setup menu appears. 7 See "Chapter 4: Initial Setup and Menu" for connecting to an AV amplifier via HDMI...setup, and use Follow these steps to the TV (- p. 19). •Built-in the power cords for details on your other electronic device(s) to set -top box (in most cases). •1080p output resolution. •Four HDMI® digital, High-Definition Multimedia Interfaces with 1080p input support (- ...

User Manual
Page 22
... TV back panel Signal names for mini D-sub 15-pin connector Pin Signal No. name Pin Signal No. p. 51). Note: • The edges of the picture may be hidden. • The PC audio input terminal on the content's title and the PC's specifications, some scenes may be skipped or you may... D-sub15-pin terminal, an adapter is not required. • Depending on the TV is shared with the HDMI 4 and ColorStream HD2 terminal. For configuration, see "Setting the PC audio" (- p. 51). • Some PC models cannot be able to pause during multi-angle scenes. To use a PC: •...
... TV back panel Signal names for mini D-sub 15-pin connector Pin Signal No. name Pin Signal No. p. 51). Note: • The edges of the picture may be hidden. • The PC audio input terminal on the content's title and the PC's specifications, some scenes may be skipped or you may... D-sub15-pin terminal, an adapter is not required. • Depending on the TV is shared with the HDMI 4 and ColorStream HD2 terminal. For configuration, see "Setting the PC audio" (- p. 51). • Some PC models cannot be able to pause during multi-angle scenes. To use a PC: •...

User Manual
Page 25
...8482; (- Displays TV status information as well as program details, when available (p. 53). Activates highlighted items in this section. p. 54). Freezes the picture (- p. 48). When the Auto Input feature is not available. 25 Turns the TV on the TV (- p. 43). Moves to left. Displays the..." may appear if you can use these buttons select or adjust programming menus. p. 87-97). p. 42). Illuminates the keypad for a function that is set, you press a key for five seconds. p. 27-28). p. 44). p. 57). These buttons are used to change inputs on and off the sound...
...8482; (- Displays TV status information as well as program details, when available (p. 53). Activates highlighted items in this section. p. 54). Freezes the picture (- p. 48). When the Auto Input feature is not available. 25 Turns the TV on the TV (- p. 43). Moves to left. Displays the..." may appear if you can use these buttons select or adjust programming menus. p. 87-97). p. 42). Illuminates the keypad for a function that is set, you press a key for five seconds. p. 27-28). p. 44). p. 57). These buttons are used to change inputs on and off the sound...
User Manual
Page 27
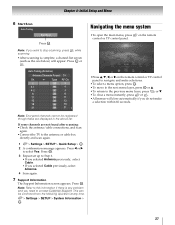
...Setup and Menu 6 Start Scan Auto Tuning Start Scan Press . Auto Tuning (Antenna) Antenna Channels Found: 14 Ch. on the remote Picture Sound Applications Settings Preferences Setup •Press B, b, C, or c on the remote control or TV control panel to this information if there is complete,... screen (such as the one below) will close automatically if you want to the antenna or cable box directly and scan again. 1 > Settings > SETUP > Quick Setup > . Note: Encrypted channels cannot be confirmed from the following operation at any problem and you selected Cable previously,...
...Setup and Menu 6 Start Scan Auto Tuning Start Scan Press . Auto Tuning (Antenna) Antenna Channels Found: 14 Ch. on the remote Picture Sound Applications Settings Preferences Setup •Press B, b, C, or c on the remote control or TV control panel to this information if there is complete,... screen (such as the one below) will close automatically if you want to the antenna or cable box directly and scan again. 1 > Settings > SETUP > Quick Setup > . Note: Encrypted channels cannot be confirmed from the following operation at any problem and you selected Cable previously,...

User Manual
Page 28
... Contrast 57 Brightness 57 Color 57 Tint 57 Sharpness 57 Advanced Picture Settings 58 Expert Picture Settings 60 TheaterLock 61 MTS 61 Balance 62 Bass 62 Treble 62 Advanced Sound Settings 63 Dynamic Volume (Audyssey 62 Dynamic Volume®) Dynamic Range Control 62 1st Layer Settings 2nd Layer APPLICATIONS PREFERENCES 3rd Layer Widgets NET TV Media...
... Contrast 57 Brightness 57 Color 57 Tint 57 Sharpness 57 Advanced Picture Settings 58 Expert Picture Settings 60 TheaterLock 61 MTS 61 Balance 62 Bass 62 Treble 62 Advanced Sound Settings 63 Dynamic Volume (Audyssey 62 Dynamic Volume®) Dynamic Range Control 62 1st Layer Settings 2nd Layer APPLICATIONS PREFERENCES 3rd Layer Widgets NET TV Media...

User Manual
Page 29
Press to display the Quick menu and press B or b to select an option. Quick menu Item 3D Settings PICTURE Picture Mode Repeat SOUND Background Music Speakers HDMI-CEC Player Control Interval Time Device Information Wireless Information Page 38-39 54-61 57 75, 76, 77 ...61-63 77 50 49 77 74 66 29 Chapter 4: Initial Setup and Menu 1st Layer Settings 2nd Layer SETUP 3rd Layer Menu Language ANT/CABLE In Auto Tuning Manual Tuning TV Settings Quick Setup Location Software Upgrade Software Licenses System Information Reset TV Page 30 30 30 31 30, 31...
Press to display the Quick menu and press B or b to select an option. Quick menu Item 3D Settings PICTURE Picture Mode Repeat SOUND Background Music Speakers HDMI-CEC Player Control Interval Time Device Information Wireless Information Page 38-39 54-61 57 75, 76, 77 ...61-63 77 50 49 77 74 66 29 Chapter 4: Initial Setup and Menu 1st Layer Settings 2nd Layer SETUP 3rd Layer Menu Language ANT/CABLE In Auto Tuning Manual Tuning TV Settings Quick Setup Location Software Upgrade Software Licenses System Information Reset TV Page 30 30 30 31 30, 31...
User Manual
Page 30
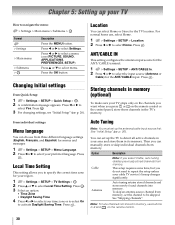
... the TV to select Home. Then you do not need to select Settings. Press C or c to repeat the setup unless your cable TV service's lineup changes significantly. Press C or c to select a menu icon (PICTURE, SOUND, APPLICATIONS, PREFERENCES, SETUP) Press B or b to select the input source (Antenna or Cable) for the TV location...
... the TV to select Home. Then you do not need to select Settings. Press C or c to repeat the setup unless your cable TV service's lineup changes significantly. Press C or c to select a menu icon (PICTURE, SOUND, APPLICATIONS, PREFERENCES, SETUP) Press B or b to select the input source (Antenna or Cable) for the TV location...

User Manual
Page 34
...3D effect and image quality may vary depending upon content quality and display device capability/ functionality/settings. • If you use any other products such as a mobile phone or mobile wireless...may not work correctly. • If there is fluorescent lighting in certain 3D television pictures or video games. Notes on the lenses. • Do not scratch the surface of...• When cleaning the 3D glasses, gently wipe with other devices or products. http://ceaccessories.toshiba.com/ Canada http://www.shoptoshiba.ca/ Note: Use 3D glasses of 3D programming should contact...
...3D effect and image quality may vary depending upon content quality and display device capability/ functionality/settings. • If you use any other products such as a mobile phone or mobile wireless...may not work correctly. • If there is fluorescent lighting in certain 3D television pictures or video games. Notes on the lenses. • Do not scratch the surface of...• When cleaning the 3D glasses, gently wipe with other devices or products. http://ceaccessories.toshiba.com/ Canada http://www.shoptoshiba.ca/ Note: Use 3D glasses of 3D programming should contact...
User Manual
Page 37
... 3D format. If the TV can detect the fact that a signal is . 3D signals can change to 3D conversion function is different depending on the Picture Size settings for 3D mode and 2D mode. • There are individual differences in perception of 3D images. • When viewing 3D images, wear the 3D...
... 3D format. If the TV can detect the fact that a signal is . 3D signals can change to 3D conversion function is different depending on the Picture Size settings for 3D mode and 2D mode. • There are individual differences in perception of 3D images. • When viewing 3D images, wear the 3D...

User Manual
Page 49
...contents menu, etc. Note: • These functions depend on the connected devices. an amplifier) is not available under these key functions, set to TV. Closes the menu. Press . The connected HDMI® CEC device is selected. - HDMI® CEC Control input source ...selection If an HDMI® CEC device with HDMI switching capability (e.g. Button Description Begins playback. Pauses the picture during play or record mode. B b C c Rewinds/reverses. RED, GREEN, YELLOW, BLUE Controls various operations Note: These functions depend on ...
...contents menu, etc. Note: • These functions depend on the connected devices. an amplifier) is not available under these key functions, set to TV. Closes the menu. Press . The connected HDMI® CEC device is selected. - HDMI® CEC Control input source ...selection If an HDMI® CEC device with HDMI switching capability (e.g. Button Description Begins playback. Pauses the picture during play or record mode. B b C c Rewinds/reverses. RED, GREEN, YELLOW, BLUE Controls various operations Note: These functions depend on ...
User Manual
Page 51
.... OK Note: If a PC is not connected or there is disrupted momentarily when adjusting the PC settings. Mode Description Adjustment range Horizontal Moves the picture left/ within ±15 from Position right. Sampling Clock Helps to your TV, using the AUDIO ...8226; Use the number buttons. 3 Select Done. OK 3 Press B or b to select Off. 51 OK 2 Set these options to reduce noise and minimize periodic vertical stripes on p. 43). 2 > Settings > PREFERENCES > Display Settings > . If the picture is powered on the TV to make the PC item selectable. This is...
.... OK Note: If a PC is not connected or there is disrupted momentarily when adjusting the PC settings. Mode Description Adjustment range Horizontal Moves the picture left/ within ±15 from Position right. Sampling Clock Helps to your TV, using the AUDIO ...8226; Use the number buttons. 3 Select Done. OK 3 Press B or b to select Off. 51 OK 2 Set these options to reduce noise and minimize periodic vertical stripes on p. 43). 2 > Settings > PREFERENCES > Display Settings > . If the picture is powered on the TV to make the PC item selectable. This is...

User Manual
Page 57
... Sharpness softer sharper * Backlight: Adjusts the brightness of PC tables and documents. Mode Description AutoView® Automatically adjusts picture settings based on a Sharpness value, the Edge Enhancer effect may be turned on when the ANT/CABLE input is available ...for HDMI and PC inputs only (not displayed for the viewing of the entire screen. Standard Standard picture settings. Note: • PC mode is selected. 1 > Settings > PICTURE > Picture Mode. 2 Press C or c to select Yes. A confirmation screen appears. 3 Press C or c to select a...
... Sharpness softer sharper * Backlight: Adjusts the brightness of PC tables and documents. Mode Description AutoView® Automatically adjusts picture settings based on a Sharpness value, the Edge Enhancer effect may be turned on when the ANT/CABLE input is available ...for HDMI and PC inputs only (not displayed for the viewing of the entire screen. Standard Standard picture settings. Note: • PC mode is selected. 1 > Settings > PICTURE > Picture Mode. 2 Press C or c to select Yes. A confirmation screen appears. 3 Press C or c to select a...

User Manual
Page 58
... adjust the static gamma settings: 1 > Settings > PICTURE > Advanced Picture Settings > . OK 2 Press B or b to select Film Stabilization. 3 Press C or c to select On or Off. Chapter 7: Picture and sound controls Using the advanced picture settings features Note: Some of the Advanced Picture Settings features will not be available for your contrast settings and then automatically adjusts the video. 1 > Settings > PICTURE > Advanced Picture Settings > . Static Gamma The...
... adjust the static gamma settings: 1 > Settings > PICTURE > Advanced Picture Settings > . OK 2 Press B or b to select Film Stabilization. 3 Press C or c to select On or Off. Chapter 7: Picture and sound controls Using the advanced picture settings features Note: Some of the Advanced Picture Settings features will not be available for your contrast settings and then automatically adjusts the video. 1 > Settings > PICTURE > Advanced Picture Settings > . Static Gamma The...

User Manual
Page 59
... Cancel on the screen. Press . Note: When the Picture Mode is set to reduce visible interference caused by MPEG compression. 1 > Settings > PICTURE > Advanced Picture Settings > . Backlight Adjustment Pro This feature adjusts the backlight so...C or c to match the ambient light conditions. 1 > Settings > PICTURE > Advanced Picture Settings > . Chapter 7: Picture and sound controls ClearScan 480™ This feature provides smoother motion and a crisper image. 1 > Settings > PICTURE > Advanced Picture Settings > . Press OK . Press . Press . DNR DNR ...
... Cancel on the screen. Press . Note: When the Picture Mode is set to reduce visible interference caused by MPEG compression. 1 > Settings > PICTURE > Advanced Picture Settings > . Backlight Adjustment Pro This feature adjusts the backlight so...C or c to match the ambient light conditions. 1 > Settings > PICTURE > Advanced Picture Settings > . Chapter 7: Picture and sound controls ClearScan 480™ This feature provides smoother motion and a crisper image. 1 > Settings > PICTURE > Advanced Picture Settings > . Press OK . Press . Press . DNR DNR ...

User Manual
Page 60
... the test pattern is not available. OK 2 Press B or b to the factory default 1 > Settings > PICTURE > Advanced Picture Settings > . Press . OK Color temperature 1 > Settings > PICTURE > Advanced Picture Settings > . OK 2 Press B or b to select Color Temperature. 3 Press C or c to adjust the white balance with a measuring device. 1 > Settings > PICTURE > Expert Picture Settings > . RGB Filter This feature individually enables or disables the red, green, and blue...
... the test pattern is not available. OK 2 Press B or b to the factory default 1 > Settings > PICTURE > Advanced Picture Settings > . Press . OK Color temperature 1 > Settings > PICTURE > Advanced Picture Settings > . OK 2 Press B or b to select Color Temperature. 3 Press C or c to adjust the white balance with a measuring device. 1 > Settings > PICTURE > Expert Picture Settings > . RGB Filter This feature individually enables or disables the red, green, and blue...

User Manual
Page 61
... in Stereo mode because it outputs the type of the program's normal audio. 1 > Settings > SOUND > MTS. 2 Press C or c to Off when you can adjust the white balance setting. 1 > Settings > PICTURE > Expert Picture Settings > . OK 2 Press B or b to adjust. Press . OK 3 Press ...sound. Adjusting the audio Muting the sound Press to the factory default 1 > Settings > PICTURE > Expert Picture Settings > . OK Locking the picture settings The TheaterLock™ feature lets you modify items in stereo sound: 1 > Settings > SOUND > MTS. 2 Press C or c to select 2P White ...
... in Stereo mode because it outputs the type of the program's normal audio. 1 > Settings > SOUND > MTS. 2 Press C or c to Off when you can adjust the white balance setting. 1 > Settings > PICTURE > Expert Picture Settings > . OK 2 Press B or b to adjust. Press . OK 3 Press ...sound. Adjusting the audio Muting the sound Press to the factory default 1 > Settings > PICTURE > Expert Picture Settings > . OK Locking the picture settings The TheaterLock™ feature lets you modify items in stereo sound: 1 > Settings > SOUND > MTS. 2 Press C or c to select 2P White ...


