Owner's Manual - English
Page 11
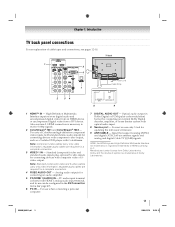
...personal computer. 7 DIGITAL AUDIO OUT - Manufactured under license from a DVI device. TV back 1 5 6 Power cord Cable Strap 7 2 34 8 9 1 HDMI™ IN - Also see pages 12-18. Optical audio output in the AV Connection menu (- HDMI, the HDMI logo and High-Definition Multimedia Interface are required ...of ColorStream high-definition component video inputs (with standard stereo audio inputs) for connecting devices with component video output, such as a Toshiba DVD player with HDMI 1 analog audio input terminal, and its use can be configured in Dolby Digital or PCM (pulse-code...
...personal computer. 7 DIGITAL AUDIO OUT - Manufactured under license from a DVI device. TV back 1 5 6 Power cord Cable Strap 7 2 34 8 9 1 HDMI™ IN - Also see pages 12-18. Optical audio output in the AV Connection menu (- HDMI, the HDMI logo and High-Definition Multimedia Interface are required ...of ColorStream high-definition component video inputs (with standard stereo audio inputs) for connecting devices with component video output, such as a Toshiba DVD player with HDMI 1 analog audio input terminal, and its use can be configured in Dolby Digital or PCM (pulse-code...

Owner's Manual - English
Page 17
... use with an external Dolby® Digital decoder or other digital audio system LINE IN LR Optical Audio IN TV upper back panel damage speakers or headphones. AV Connection PC/HDMI 1 Audio HDMI 1 Audio HDMI Settings Digital Audio Output PC Digital Auto Note: •...audio output format" on the remote control to open the SETUP menu. 3 Press B or b to select AV Connection and press T. Chapter 2: Connecting your TV Connecting a digital audio system The TV's DIGITAL AUDIO OUT terminal outputs a Dolby®* Digital or 2-channel down-mixed PCM (pulse-code modulation) ...
... use with an external Dolby® Digital decoder or other digital audio system LINE IN LR Optical Audio IN TV upper back panel damage speakers or headphones. AV Connection PC/HDMI 1 Audio HDMI 1 Audio HDMI Settings Digital Audio Output PC Digital Auto Note: •...audio output format" on the remote control to open the SETUP menu. 3 Press B or b to select AV Connection and press T. Chapter 2: Connecting your TV Connecting a digital audio system The TV's DIGITAL AUDIO OUT terminal outputs a Dolby®* Digital or 2-channel down-mixed PCM (pulse-code modulation) ...
Owner's Manual - English
Page 26
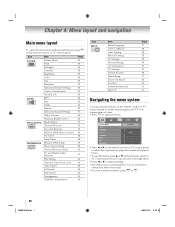
...43 Parental Control and Locks 44 Auto Aspect 38 4:3 Stretch 38 Blue Screen 30 Transparency 30 TOSHIBA Illumination 30 Icon SETUP Item Menu Language ANT/CABLE In Auto Tuning Manual Tuning TV Settings Manual Setting AV Connection PC Settings Picture Position Quick Setup Power-On Mode Location System Information Reset... TV Page 27 28 28 28 29 29 51 47 38 27 30 30 31 31 Navigating ...
...43 Parental Control and Locks 44 Auto Aspect 38 4:3 Stretch 38 Blue Screen 30 Transparency 30 TOSHIBA Illumination 30 Icon SETUP Item Menu Language ANT/CABLE In Auto Tuning Manual Tuning TV Settings Manual Setting AV Connection PC Settings Picture Position Quick Setup Power-On Mode Location System Information Reset... TV Page 27 28 28 28 29 29 51 47 38 27 30 30 31 31 Navigating ...
Owner's Manual - English
Page 43
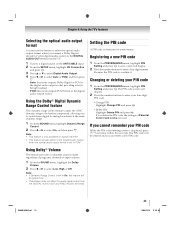
... you cannot remember your PIN code While the PIN code entering screen is only available on the ANT/CABLE input. 2 From the SETUP menu, highlight AV Connection and press T. 3 Press B or b to select Digital Audio Output. 4 Press C or c to the digital audio output socket. Registering a new.... Using Dolby® Volume This feature provides a consistent sound volume regardless of Parental Control and Locks are reset. Chapter 6: Using the TV's features Selecting the optical audio output format You can enter a new PIN code. PCM: this mode outputs Dolby Digital or PCM to confirm...
... you cannot remember your PIN code While the PIN code entering screen is only available on the ANT/CABLE input. 2 From the SETUP menu, highlight AV Connection and press T. 3 Press B or b to select Digital Audio Output. 4 Press C or c to the digital audio output socket. Registering a new.... Using Dolby® Volume This feature provides a consistent sound volume regardless of Parental Control and Locks are reset. Chapter 6: Using the TV's features Selecting the optical audio output format You can enter a new PIN code. PCM: this mode outputs Dolby Digital or PCM to confirm...
Owner's Manual - English
Page 47
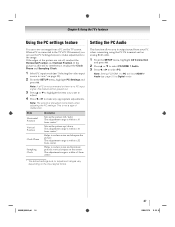
...the picture up/down. Note: The screen is within ±5 from center. * The default settings and /or adjustment ranges vary depending on the TV screen. The adjustment range is not a sign of the picture are cut off, readjust the Horizontal Position and Vertical Position. Setting the PC Audio .... This is within ±10 from your PC when connecting using the PC IN terminal and an analog RGB cable. 1 From the SETUP menu, highlight AV Connection and press T. 2 Press B or b to select PC/HDMI 1 Audio. 3 Press C or c to select PC. Mode Horizontal Position Vertical Position Clock Phase...
...the picture up/down. Note: The screen is within ±5 from center. * The default settings and /or adjustment ranges vary depending on the TV screen. The adjustment range is not a sign of the picture are cut off, readjust the Horizontal Position and Vertical Position. Setting the PC Audio .... This is within ±10 from your PC when connecting using the PC IN terminal and an analog RGB cable. 1 From the SETUP menu, highlight AV Connection and press T. 2 Press B or b to select PC/HDMI 1 Audio. 3 Press C or c to select PC. Mode Horizontal Position Vertical Position Clock Phase...

Owner's Manual - English
Page 51
... HDMI™ cable. If an HDMI source device does not support these features, the TV may not work properly with this mode. 1 Select the appropriate HDMI input mode (HDMI 1, HDMI 2, or HDMI 3). 2 From the SETUP menu, highlight AV Connection and press T. 3 Press B or b to select HDMI Settings. 4 Press B or b to highlight the...
... HDMI™ cable. If an HDMI source device does not support these features, the TV may not work properly with this mode. 1 Select the appropriate HDMI input mode (HDMI 1, HDMI 2, or HDMI 3). 2 From the SETUP menu, highlight AV Connection and press T. 3 Press B or b to select HDMI Settings. 4 Press B or b to highlight the...


