Owner's Manual - English
Page 3
...power-supply cord or plug is dropped and the cabinet or enclosure surface has been damaged or the TV does not operate normally, take the following precautions: • ALWAYS turn off the TV and unplug the power cord to avoid possible electric shock or fire. • NEVER allow your skin...provided to dripping or splashing and that no objects filled with any other place with water and consult your safety. The LCD panel inside the TV contains glass and a toxic liquid. Never place the TV: • on an unstable cart, stand, or table. Additional Safety Precautions 14a) CAUTION: If the...
...power-supply cord or plug is dropped and the cabinet or enclosure surface has been damaged or the TV does not operate normally, take the following precautions: • ALWAYS turn off the TV and unplug the power cord to avoid possible electric shock or fire. • NEVER allow your skin...provided to dripping or splashing and that no objects filled with any other place with water and consult your safety. The LCD panel inside the TV contains glass and a toxic liquid. Never place the TV: • on an unstable cart, stand, or table. Additional Safety Precautions 14a) CAUTION: If the...

Owner's Manual - English
Page 4
...or off. This is being turned on the LCD screen. If you leave the TV unattended or unused for long periods of time. 34) During normal use, the TV may make occasional snapping or popping sounds. Note: The lamp(s) inside this manual to a Toshiba Authorized Service Center. 38) If... Hz power source only. 27) Always make sure you are never in a position where your TOSHIBA TV, follow this product can accidentally touch overhead power lines. Gently wipe the display panel surface (the TV screen) using a dry, soft cloth only (cotton, flannel, etc.). Never strike the screen ...
...or off. This is being turned on the LCD screen. If you leave the TV unattended or unused for long periods of time. 34) During normal use, the TV may make occasional snapping or popping sounds. Note: The lamp(s) inside this manual to a Toshiba Authorized Service Center. 38) If... Hz power source only. 27) Always make sure you are never in a position where your TOSHIBA TV, follow this product can accidentally touch overhead power lines. Gently wipe the display panel surface (the TV screen) using a dry, soft cloth only (cotton, flannel, etc.). Never strike the screen ...

Owner's Manual - English
Page 10
...- Effective range: 16.4 ft (5m) 2 Green and Yellow LEDs Green = Power indicator Yellow = Power-On Mode indicator (- Chapter 1: Introduction TV front and side panel controls and connections Model 42RV530U is used in this remote sensor. The side panel A/V connections are viewing (ANT/CABLE, VIDEO ...HDMI connection is on-screen, these buttons change the source you are referred to the controls on the remote control or TV control panel and you cannot turn the TV on -screen, these buttons function as "VIDEO 2" and include standard A/V connections. 4 POWER - Press to receive ...
...- Effective range: 16.4 ft (5m) 2 Green and Yellow LEDs Green = Power indicator Yellow = Power-On Mode indicator (- Chapter 1: Introduction TV front and side panel controls and connections Model 42RV530U is used in this remote sensor. The side panel A/V connections are viewing (ANT/CABLE, VIDEO ...HDMI connection is on-screen, these buttons change the source you are referred to the controls on the remote control or TV control panel and you cannot turn the TV on -screen, these buttons function as "VIDEO 2" and include standard A/V connections. 4 POWER - Press to receive ...
Owner's Manual - English
Page 13
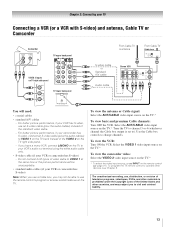
... standard video cable. - Chapter 2: Connecting your TV Connecting a VCR (or a VCR with S-video) and antenna, Cable TV or Camcorder Camcorder AUDIO OUT L R VIDEO TV upper back panel VIDEO 2 inputs on the TV.* To view basic and premium Cable channels: Turn OFF the VCR. Select the ANT/CABLE video ...input source on the remote control (- To program the TV remote control to operate ...
... standard video cable. - Chapter 2: Connecting your TV Connecting a VCR (or a VCR with S-video) and antenna, Cable TV or Camcorder Camcorder AUDIO OUT L R VIDEO TV upper back panel VIDEO 2 inputs on the TV.* To view basic and premium Cable channels: Turn OFF the VCR. Select the ANT/CABLE video ...input source on the remote control (- To program the TV remote control to operate ...
Owner's Manual - English
Page 14
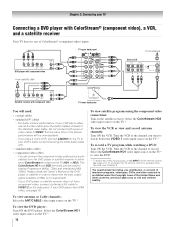
... Manual of video cable to your DVD player has HDMI video, see Chapter 3. Select the ColorStream HD2 video input source on the TV.* To view the DVD player: Turn ON the DVD player. You can be unacceptable. - To view antenna or Cable channels: Select the ANT/CABLE video input source ...you have component video, connect a standard A/V cable to view the DVD. * To select the video input source, press INPUT on the TV.* To record a TV program while watching a DVD: Turn ON the VCR. Do not connect both types of the DVD player or satellite in order to determine the best output signal...
... Manual of video cable to your DVD player has HDMI video, see Chapter 3. Select the ColorStream HD2 video input source on the TV.* To view the DVD player: Turn ON the DVD player. You can be unacceptable. - To view antenna or Cable channels: Select the ANT/CABLE video input source ...you have component video, connect a standard A/V cable to view the DVD. * To select the video input source, press INPUT on the TV.* To record a TV program while watching a DVD: Turn ON the VCR. Do not connect both types of the DVD player or satellite in order to determine the best output signal...
Owner's Manual - English
Page 15
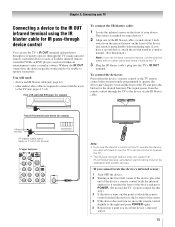
... control (with the infrared emitter) so it touches the front of the device and press POWER. (Do not use the TV's remote control for this step.) 3 If the device turns on, the point at which the remote control touched the device is marked on some devices.* 2 Align one of the IR...all IR-controlled devices; Without the IR OUT connection, the device typically would need to the TV (- You will need : • dual-wand IR blaster cable (- page 12) • other audio/video cables as Toshiba infrared remotecontrolled VCRs or DVD players) enclosed within an entertainment center or similar cabinet. If ...
... control (with the infrared emitter) so it touches the front of the device and press POWER. (Do not use the TV's remote control for this step.) 3 If the device turns on, the point at which the remote control touched the device is marked on some devices.* 2 Align one of the IR...all IR-controlled devices; Without the IR OUT connection, the device typically would need to the TV (- You will need : • dual-wand IR blaster cable (- page 12) • other audio/video cables as Toshiba infrared remotecontrolled VCRs or DVD players) enclosed within an entertainment center or similar cabinet. If ...

Owner's Manual - English
Page 16
...1080p (24Hz/60Hz) signal formats. For proper operation, it is recommended that you follow these procedures: • When turning on your electronic components, turn off your TV receives digital audio and uncompressed digital video from an HDMI source device, or uncompressed digital video from EIA/CEA-861-D-compliant...HDMI 4 video input source on the TV.* * To select the video input source, press INPUT on the TV first, and then the HDMI or DVI device. • When turning off the HDMI or DVI device first, and then the TV. To program the TV remote control to operate other devices, see...
...1080p (24Hz/60Hz) signal formats. For proper operation, it is recommended that you follow these procedures: • When turning on your electronic components, turn off your TV receives digital audio and uncompressed digital video from an HDMI source device, or uncompressed digital video from EIA/CEA-861-D-compliant...HDMI 4 video input source on the TV.* * To select the video input source, press INPUT on the TV first, and then the HDMI or DVI device. • When turning off the HDMI or DVI device first, and then the TV. To program the TV remote control to operate other devices, see...

Owner's Manual - English
Page 18
.... You will need : • standard audio cables Analog audio amplifier To control the audio: 1 Turn on the TV and the digital audio device. 2 Press Y on your TV Connecting a digital audio system The TV's DIGITAL AUDIO OUT terminal outputs a Dolby®* Digital g or 2-channel down-mixed PCM (pulse-...Dynamic Range Control Reset No Auto Stereo English Dolby Digital Compressed Done To control the audio: 1 Turn on page 46). Chapter 2: Connecting your device (- LINE IN LR TV upper back panel Audio Digital Audio Selector Audio Settings Advanced Audio Settings Audio Setup 4 In the Optical...
.... You will need : • standard audio cables Analog audio amplifier To control the audio: 1 Turn on the TV and the digital audio device. 2 Press Y on your TV Connecting a digital audio system The TV's DIGITAL AUDIO OUT terminal outputs a Dolby®* Digital g or 2-channel down-mixed PCM (pulse-...Dynamic Range Control Reset No Auto Stereo English Dolby Digital Compressed Done To control the audio: 1 Turn on page 46). Chapter 2: Connecting your device (- LINE IN LR TV upper back panel Audio Digital Audio Selector Audio Settings Advanced Audio Settings Audio Setup 4 In the Optical...

Owner's Manual - English
Page 21
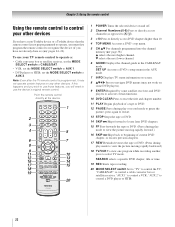
...Also see "Arrow buttons.") 15 Arrow buttons (BbC c) When a menu is not available. 21 page 22). page 23). 1 POWER turns the TV on -screen menus. 19 MODE SELECT switch switches between TV, CABLE/SAT, AUX 1, and AUX 2 modes (- page 38) or to the last viewed channel or source (- page 54). ...may appear if you press a key for operating the TV only are described here. When the TV is on the TV front will be illuminated. 2 FREEZE freezes the picture. page 39). 12 MUTE reduces or turns off . page 54). 14 3 C / # c While watching TV, these buttons select or adjust programming menus. (Also ...
...Also see "Arrow buttons.") 15 Arrow buttons (BbC c) When a menu is not available. 21 page 22). page 23). 1 POWER turns the TV on -screen menus. 19 MODE SELECT switch switches between TV, CABLE/SAT, AUX 1, and AUX 2 modes (- page 38) or to the last viewed channel or source (- page 54). ...may appear if you press a key for operating the TV only are described here. When the TV is on the TV front will be illuminated. 2 FREEZE freezes the picture. page 39). 12 MUTE reduces or turns off . page 54). 14 3 C / # c While watching TV, these buttons select or adjust programming menus. (Also ...
Owner's Manual - English
Page 22
... AUX 2. If this happens and you wish to use those features, you have a non-Toshiba device or a Toshiba device that the remote control is programmed, it may not work on and off. 2 Channel... b selects the next lower channel. 6 GUIDE Displays the channel guide in the AUX mode. 7 INFO Displays TV status information on-screen. 8 BbC c Press to directly access DVD chapters higher than 10. 4 TOP MENU... remote control. Point the remote control directly at the device. 16 17 18 19 1 POWER Turns the selected device on some DVD players). 9 ENTER Required by some satellite receivers and DVD players...
... AUX 2. If this happens and you wish to use those features, you have a non-Toshiba device or a Toshiba device that the remote control is programmed, it may not work on and off. 2 Channel... b selects the next lower channel. 6 GUIDE Displays the channel guide in the AUX mode. 7 INFO Displays TV status information on-screen. 8 BbC c Press to directly access DVD chapters higher than 10. 4 TOP MENU... remote control. Point the remote control directly at the device. 16 17 18 19 1 POWER Turns the selected device on some DVD players). 9 ENTER Required by some satellite receivers and DVD players...
Owner's Manual - English
Page 24
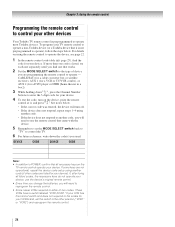
... TV. 6 For future reference, write down E, press the Channel Number buttons to operate), follow the steps below. See notes below. • If the correct code was entered, the device will turn on the device, point the remote control at it is preprogrammed to operate most Toshiba devices... device does not respond to another code (if other devices Your Toshiba TV remote control is not preprogrammed to enter the 3-digit code for your device. To program your TV remote control to operate a non-Toshiba device (or a Toshiba device that came with the device. 5 Remember to set the switch...
... TV. 6 For future reference, write down E, press the Channel Number buttons to operate), follow the steps below. See notes below. • If the correct code was entered, the device will turn on the device, point the remote control at it is preprogrammed to operate most Toshiba devices... device does not respond to another code (if other devices Your Toshiba TV remote control is not preprogrammed to enter the 3-digit code for your device. To program your TV remote control to operate a non-Toshiba device (or a Toshiba device that came with the device. 5 Remember to set the switch...
Owner's Manual - English
Page 34
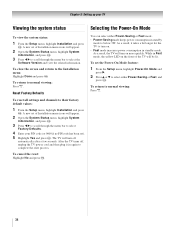
... the related information. As a result, it in standby mode. A new set of the TV will appear. 2 Open the System Status menu, highlight System Information, and press T. 3 Press C c to scroll through the menu bar to turn on more quickly. To return to their factory default values: 1 From the Setup menu, ...highlight Installation and press T. After the TV turns off automatically after a few seconds. You can select either Power-Saving or Fast, and press T. To set the Power-On Mode feature: 1 From...
... the related information. As a result, it in standby mode. A new set of the TV will appear. 2 Open the System Status menu, highlight System Information, and press T. 3 Press C c to scroll through the menu bar to turn on more quickly. To return to their factory default values: 1 From the Setup menu, ...highlight Installation and press T. After the TV turns off automatically after a few seconds. You can select either Power-Saving or Fast, and press T. To set the Power-On Mode feature: 1 From...
Owner's Manual - English
Page 35
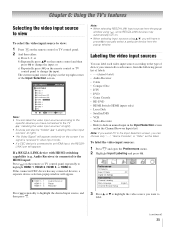
... using B b, you want to actually select a particular device from the popup window using +, some REGZA-LINK devices may automatically turn on the remote control or TV control panel. 2 And then either: a) Press 0-9; Note: • When selecting REGZA-LINK input sources from the popup window...8226; Video Recorder • Hide (to highlight HDMI 1, HDMI 2, HDMI 3, or HDMI 4. or b) Repeatedly press Bb on the remote control or TV control panel to change the input. If a REGZA-LINK device with HDMI switching capability (e.g. To label the video input sources: 1 Press Y and ...
... using B b, you want to actually select a particular device from the popup window using +, some REGZA-LINK devices may automatically turn on the remote control or TV control panel. 2 And then either: a) Press 0-9; Note: • When selecting REGZA-LINK input sources from the popup window...8226; Video Recorder • Hide (to highlight HDMI 1, HDMI 2, HDMI 3, or HDMI 4. or b) Repeatedly press Bb on the remote control or TV control panel to change the input. If a REGZA-LINK device with HDMI switching capability (e.g. To label the video input sources: 1 Press Y and ...

Owner's Manual - English
Page 37
...selected list in the Channel Browser™. Note: • The Channel Browser™ opens in the last selected list. • If all lists are turned off , n will have no effect. • Pressing n will not display the Channel Browser™. In Select mode, when you stop on an item... in the Channel Browser™, it will be cleared every time the TV is turned off , pressing 3 C, # c, or n will bring up the Channel Browser™: 1 From the Preferences menu, highlight Channel Browser Setup and press T. 2 Press B...
...selected list in the Channel Browser™. Note: • The Channel Browser™ opens in the last selected list. • If all lists are turned off , n will have no effect. • Pressing n will not display the Channel Browser™. In Select mode, when you stop on an item... in the Channel Browser™, it will be cleared every time the TV is turned off , pressing 3 C, # c, or n will bring up the Channel Browser™: 1 From the Preferences menu, highlight Channel Browser Setup and press T. 2 Press B...
Owner's Manual - English
Page 38
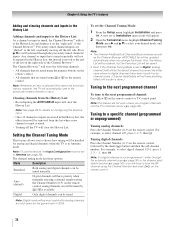
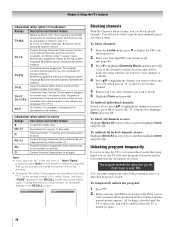
...Antenna (- Note: To use this feature, the Input Configuration must be cleared, but instead is tuned. • Turning off the left , eventually moving off the TV will be set of the Channel Browser™. Mode Description Standard Both analog and digital channels can be tuned normally ...feature will not work unless you will be the default channel to the next programmed channel: Press < or , on the remote control or TV control panel. Any channel or input that are "shifted" to a specific channel (programmed or unprogrammed) Tuning analog channels: Press the Channel ...
...Antenna (- Note: To use this feature, the Input Configuration must be cleared, but instead is tuned. • Turning off the left , eventually moving off the TV will be set of the Channel Browser™. Mode Description Standard Both analog and digital channels can be tuned normally ...feature will not work unless you will be the default channel to the next programmed channel: Press < or , on the remote control or TV control panel. Any channel or input that are "shifted" to a specific channel (programmed or unprogrammed) Tuning analog channels: Press the Channel ...
Owner's Manual - English
Page 41
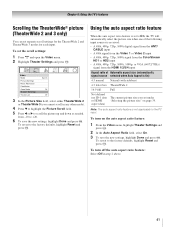
...Full Not defined (no ID-1 data or HDMI aspect data) The current picture size you cannot scroll in step 2 above. 41 Chapter 6: Using the TV's features Scrolling the TheaterWide® picture (TheaterWide 2 and 3 only) You can set separate scroll settings for the TheaterWide 2 and TheaterWide 3 modes for...: 1 Press Y and open the Video menu. 2 Highlight Theater Settings and press T. To revert to the factory defaults, highlight Reset and press T. To turn off the auto aspect ratio feature: Select Off in any other mode). 4 Press b to highlight the Picture Scroll field. 5 Press C or c to ...
...Full Not defined (no ID-1 data or HDMI aspect data) The current picture size you cannot scroll in step 2 above. 41 Chapter 6: Using the TV's features Scrolling the TheaterWide® picture (TheaterWide 2 and 3 only) You can set separate scroll settings for the TheaterWide 2 and TheaterWide 3 modes for...: 1 Press Y and open the Video menu. 2 Highlight Theater Settings and press T. To revert to the factory defaults, highlight Reset and press T. To turn off the auto aspect ratio feature: Select Off in any other mode). 4 Press b to highlight the Picture Scroll field. 5 Press C or c to ...
Owner's Manual - English
Page 43
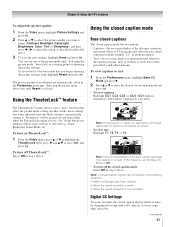
...captions The closed captioned, no captions will be affected e.g., Noise Reduction, Game Mode, etc. "Selecting the picture mode," above . To turn off the closed caption display characteristics by individual stations). Note: If the program or video you selected is not closed caption mode has ... picture modes (- You can customize the closed caption mode: Select Off in step 1 above left ) until Reset is selected. Chapter 6: Using the TV's features To adjust the picture quality: 1 From the Video menu, highlight Picture Settings and press T. 2 Press B or b to select the picture...
...captions The closed captioned, no captions will be affected e.g., Noise Reduction, Game Mode, etc. "Selecting the picture mode," above . To turn off the closed caption display characteristics by individual stations). Note: If the program or video you selected is not closed caption mode has ... picture modes (- You can customize the closed caption mode: Select Off in step 1 above left ) until Reset is selected. Chapter 6: Using the TV's features To adjust the picture quality: 1 From the Video menu, highlight Picture Settings and press T. 2 Press B or b to select the picture...
Owner's Manual - English
Page 44
...the same color. w. To mute the audio without automatically activating the closed caption feature is automatically activated if the TV program is Closed Captioned. Serif, Mono w/o Serif, Prop. Mode Description Caption Size Auto, Small, Standard, ...Large Caption Text Type Auto, Default, Mono w. Chapter 6: Using the TV's features Note: • This feature is available for those channels that characteristic (see table above). 3 To save the ...you want to change back to partially reduce (1/2 MUTE) or turn off (MUTE) the sound.
...the same color. w. To mute the audio without automatically activating the closed caption feature is automatically activated if the TV program is Closed Captioned. Serif, Mono w/o Serif, Prop. Mode Description Caption Size Auto, Small, Standard, ...Large Caption Text Type Auto, Default, Mono w. Chapter 6: Using the TV's features Note: • This feature is available for those channels that characteristic (see table above). 3 To save the ...you want to change back to partially reduce (1/2 MUTE) or turn off (MUTE) the sound.
Owner's Manual - English
Page 45
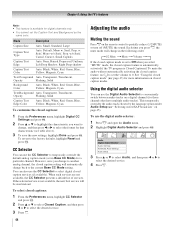
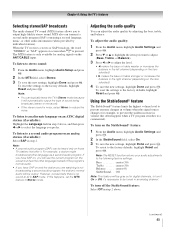
...MTS also can adjust the audio quality by individual stations). Note: • A second audio program (SAP) can typically leave the TV in volume that offer it 's necessary to turn it On or Off, it . center (0) StableSound . . To listen to stereo sound: 1 From the Audio menu, highlight ...output high-fidelity stereo sound. The MTS feature is pressed. To turn off the StableSound feature: Select Off in step 2 above . (continued) 45 Chapter 6: Using the TV's features Selecting stereo/SAP broadcasts The multi-channel TV sound (MTS) feature allows you to Stereo mode. Off Note:...
...MTS also can adjust the audio quality by individual stations). Note: • A second audio program (SAP) can typically leave the TV in volume that offer it 's necessary to turn it On or Off, it . center (0) StableSound . . To listen to stereo sound: 1 From the Audio menu, highlight ...output high-fidelity stereo sound. The MTS feature is pressed. To turn off the StableSound feature: Select Off in step 2 above . (continued) 45 Chapter 6: Using the TV's features Selecting stereo/SAP broadcasts The multi-channel TV sound (MTS) feature allows you to Stereo mode. Off Note:...
Owner's Manual - English
Page 48
... entering screen. 2 Enter your four-digit PIN code and press T. If it is released and the normal picture appears. All locking is disabled until the TV is turned off, and will be able to tune blocked channels unless you unlock them. Chapter 6: Using the... designed to be appropriate for all channels at once: Highlight Allow All in this program suitable for all ages.) TV-Y7, TV-Y7FV Directed to Older Children (This program is turned on again. 48 TV - You will appear on the remote control. To unblock individual channels: In step 4 above . Push 'mute' to remove the...
... entering screen. 2 Enter your four-digit PIN code and press T. If it is released and the normal picture appears. All locking is disabled until the TV is turned off, and will be able to tune blocked channels unless you unlock them. Chapter 6: Using the... designed to be appropriate for all channels at once: Highlight Allow All in this program suitable for all ages.) TV-Y7, TV-Y7FV Directed to Older Children (This program is turned on again. 48 TV - You will appear on the remote control. To unblock individual channels: In step 4 above . Push 'mute' to remove the...


