Owner's Manual - English
Page 6
...HDMI Licensing LLC. 6 FCC Declaration of Conformity Compliance Statement (Part 15): The Toshiba 42LX177, 46LX177, 52LX177, and 57LX177 Televisions comply with Part 15 of the FCC rules. Operation is trademark of SRS Labs, Inc. Wayne, NJ 07470. The party responsible for a long period of time. 2) The LCD...an extremely high level of the following two conditions: (1) this equipment does cause harmful interference to operate this TV. Such pixels are designed to this TV is displayed for compliance to the following measures: • Reorient or relocate the receiving antenna. •...
...HDMI Licensing LLC. 6 FCC Declaration of Conformity Compliance Statement (Part 15): The Toshiba 42LX177, 46LX177, 52LX177, and 57LX177 Televisions comply with Part 15 of the FCC rules. Operation is trademark of SRS Labs, Inc. Wayne, NJ 07470. The party responsible for a long period of time. 2) The LCD...an extremely high level of the following two conditions: (1) this equipment does cause harmful interference to operate this TV. Such pixels are designed to this TV is displayed for compliance to the following measures: • Reorient or relocate the receiving antenna. •...
Owner's Manual - English
Page 7
... to Toshiba 9 Features of your new TV 9 Overview of steps for installing, setting up, and using your new TV 10 TV front and side panel controls and connections 11 TV back panel connections 12 Chapter 2: Connecting your TV 14 ...the channel memory 45 Setting the Auto Input feature 46 Labeling channels 47 Setting the HDMI™ audio mode 48 Viewing the digital signal meter 49 Viewing the system status... Demo Mode 50 Chapter 6: Using the TV's features 51 Selecting the video input source to view 51 Labeling the video input sources 52 Tuning channels 53 Tuning channels using the ...
... to Toshiba 9 Features of your new TV 9 Overview of steps for installing, setting up, and using your new TV 10 TV front and side panel controls and connections 11 TV back panel connections 12 Chapter 2: Connecting your TV 14 ...the channel memory 45 Setting the Auto Input feature 46 Labeling channels 47 Setting the HDMI™ audio mode 48 Viewing the digital signal meter 49 Viewing the system status... Demo Mode 50 Chapter 6: Using the TV's features 51 Selecting the video input source to view 51 Labeling the video input sources 52 Tuning channels 53 Tuning channels using the ...
Owner's Manual - English
Page 9
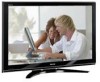
Chapter 1: Introduction Welcome to Toshiba Thank you for purchasing this Toshiba LCD TV, one of external devices from the TV via HDMI connection (- A security card provided by your local cable operator. For more information call your cable operator is capable of supporting up to accurately perform synchronization ...
Chapter 1: Introduction Welcome to Toshiba Thank you for purchasing this Toshiba LCD TV, one of external devices from the TV via HDMI connection (- A security card provided by your local cable operator. For more information call your cable operator is capable of supporting up to accurately perform synchronization ...

Owner's Manual - English
Page 11
...ENTER) - These buttons adjust the volume level. 10 INPUT - Point the remote control toward this remote sensor (- "Remote control effective range" on the TV's control panel functions as "VIDEO 2" and include standard A/V connections. 4 POWER - When a menu is on -screen menu. 8 CHANNEL Bb -...The side panel A/V connections are viewing (ANT, VIDEO 1, VIDEO 2, ColorStream HD1, ColorStream HD2, HDMI 1, HDMI 2, HDMI 3, PC) (- If the TV stops responding to the controls on the remote control or TV control panel and you are referred to access the menu system (- When a menu is on-...
...ENTER) - These buttons adjust the volume level. 10 INPUT - Point the remote control toward this remote sensor (- "Remote control effective range" on the TV's control panel functions as "VIDEO 2" and include standard A/V connections. 4 POWER - When a menu is on -screen menu. 8 CHANNEL Bb -...The side panel A/V connections are viewing (ANT, VIDEO 1, VIDEO 2, ColorStream HD1, ColorStream HD2, HDMI 1, HDMI 2, HDMI 3, PC) (- If the TV stops responding to the controls on the remote control or TV control panel and you are referred to access the menu system (- When a menu is on-...
Owner's Manual - English
Page 12
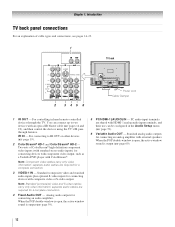
...the devices using the TV's IR passthrough features. Standard (composite) video and standard audio inputs plus optional S-video inputs for connecting devices with HDMI-1 analog audio input ...a complete connection. 4 Fixed Audio OUT - page 59). 5 PC/HDMI-1 (AUDIO) IN - Two sets of cable types and connections, see pages 14-23. 1 TV back 2 3 45 6 Power cord Cable Clamper 1 IR OUT -...analog audio outputs for connecting an analog amplifier with ColorStream®. Chapter 1: Introduction TV back panel connections For an explanation of ColorStream® high-definition component video inputs...
...the devices using the TV's IR passthrough features. Standard (composite) video and standard audio inputs plus optional S-video inputs for connecting devices with HDMI-1 analog audio input ...a complete connection. 4 Fixed Audio OUT - page 59). 5 PC/HDMI-1 (AUDIO) IN - Two sets of cable types and connections, see pages 14-23. 1 TV back 2 3 45 6 Power cord Cable Clamper 1 IR OUT -...analog audio outputs for connecting an analog amplifier with ColorStream®. Chapter 1: Introduction TV back panel connections For an explanation of ColorStream® high-definition component video inputs...
Owner's Manual - English
Page 13
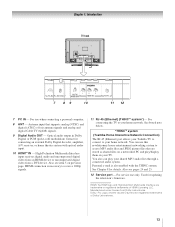
... digital audio and uncompressed digital video from an HDMI device or uncompressed digital video from Dolby Laboratories. See boxed note below. *THINC™ system (Toshiba Home Interactive Network Connection) The RJ-45 (Ethernet) port allows your Toshiba TV to connect to your shared MP3 audio files ...when connecting a personal computer. 8 ANT - For use only. For connecting the TV to your TV. Also see pages 24 and 25. 12 Service port - HDMI connection is also enabled with optical audio input. 10 HDMI™ IN - Also see item 5 on your home network. Used for details....
... digital audio and uncompressed digital video from an HDMI device or uncompressed digital video from Dolby Laboratories. See boxed note below. *THINC™ system (Toshiba Home Interactive Network Connection) The RJ-45 (Ethernet) port allows your Toshiba TV to connect to your shared MP3 audio files ...when connecting a personal computer. 8 ANT - For use only. For connecting the TV to your TV. Also see pages 24 and 25. 12 Service port - HDMI connection is also enabled with optical audio input. 10 HDMI™ IN - Also see item 5 on your home network. Used for details....
Owner's Manual - English
Page 14
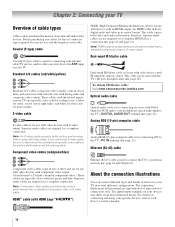
... video cable. page 20 and page 23). page 18). To obtain IR blaster cable: Visit www.ceaccessories.toshiba.com. HDMI™ cable (with Dolby Digital or PCM (pulse-code modulation) optical audio input to the TV's PC IN terminal (- Analog RGB (15-pin) computer cable Analog RGB (15-pin) computer cable is used...
... video cable. page 20 and page 23). page 18). To obtain IR blaster cable: Visit www.ceaccessories.toshiba.com. HDMI™ cable (with Dolby Digital or PCM (pulse-code modulation) optical audio input to the TV's PC IN terminal (- Analog RGB (15-pin) computer cable Analog RGB (15-pin) computer cable is used...
Owner's Manual - English
Page 17
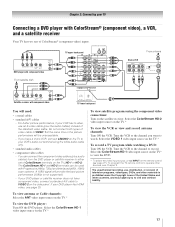
.... Do not connect both types of the standard video cable. If your VCR's audio out terminal using the component video connections: Turn on the TV.* To record a TV program while watching a DVD: Turn ON the VCR. The unauthorized recording, use an S-video cable (plus audio cables) from ANT OUT to... L R IN CH 3 CH 4 OUT L R IN from the DVD player or satellite receiver to watch. For better picture performance, if your DVD player has HDMI video, see Chapter 3. Tune the VCR to the channel to VIDEO 1 at the same time or the picture performance will need: • coaxial cables •...
.... Do not connect both types of the standard video cable. If your VCR's audio out terminal using the component video connections: Turn on the TV.* To record a TV program while watching a DVD: Turn ON the VCR. The unauthorized recording, use an S-video cable (plus audio cables) from ANT OUT to... L R IN CH 3 CH 4 OUT L R IN from the DVD player or satellite receiver to watch. For better picture performance, if your DVD player has HDMI video, see Chapter 3. Tune the VCR to the channel to VIDEO 1 at the same time or the picture performance will need: • coaxial cables •...

Owner's Manual - English
Page 20
...you follow these procedures: • When turning on your electronic components, turn on the remote control (- Chapter 2: Connecting your TV Connecting an HDMI™ or DVI device to operate other devices, see Chapter 3. Note: • Some of refresh rates greater than 60Hz or...bandwidth digital content protection, which is possible that you will need: • one HDMI cable (type A connector) per HDMI device - An HDMI-to -DVI adapter cable (HDMI type A connector) per DVI device - TV upper back panel TV lower back panel DVI device VIDEO AUDIO L R IN IN DVI / HDCP OUT...
...you follow these procedures: • When turning on your electronic components, turn on the remote control (- Chapter 2: Connecting your TV Connecting an HDMI™ or DVI device to operate other devices, see Chapter 3. Note: • Some of refresh rates greater than 60Hz or...bandwidth digital content protection, which is possible that you will need: • one HDMI cable (type A connector) per HDMI device - An HDMI-to -DVI adapter cable (HDMI type A connector) per DVI device - TV upper back panel TV lower back panel DVI device VIDEO AUDIO L R IN IN DVI / HDCP OUT...

Owner's Manual - English
Page 21
...not operate properly. • For proper operation, it is recommended that you will need: • three HDMI cables (- However, Toshiba is limited to individual instruction manuals for compatibility information. 21 For details, see pages 73-74. Before ...HDMI standard. • This feature is not liable for each device. • The CE-Link feature uses CEC technology as you connect a CE-Link compatible audio receiver or playback device. For an explanation of connected audio/video devices using the TV's remote control if you desire (- Refer to models incorporating Toshiba...
...not operate properly. • For proper operation, it is recommended that you will need: • three HDMI cables (- However, Toshiba is limited to individual instruction manuals for compatibility information. 21 For details, see pages 73-74. Before ...HDMI standard. • This feature is not liable for each device. • The CE-Link feature uses CEC technology as you connect a CE-Link compatible audio receiver or playback device. For an explanation of connected audio/video devices using the TV's remote control if you desire (- Refer to models incorporating Toshiba...

Owner's Manual - English
Page 22
...Selector Audio Settings Advanced Audio Settings Audio Setup 4 In the Optical Output Format field, select either Dolby Digital or PCM, depending on the TV's remote control and open the Audio menu. 3 Highlight Audio Setup and press T. Dolby, Pro Logic, and the double-D symbol are...Use an optical audio cable that are registered trademarks of copy restrictions. * Manufactured under license from Dolby Laboratories. Audio Setup PC Audio HDMI 1 Audio MTS Language Speakers Optical Output Format Dolby Digital Dynamic Range Control Reset No Auto Stereo English On Dolby Digital Compressed Done ...
...Selector Audio Settings Advanced Audio Settings Audio Setup 4 In the Optical Output Format field, select either Dolby Digital or PCM, depending on the TV's remote control and open the Audio menu. 3 Highlight Audio Setup and press T. Dolby, Pro Logic, and the double-D symbol are...Use an optical audio cable that are registered trademarks of copy restrictions. * Manufactured under license from Dolby Laboratories. Audio Setup PC Audio HDMI 1 Audio MTS Language Speakers Optical Output Format Dolby Digital Dynamic Range Control Reset No Auto Stereo English On Dolby Digital Compressed Done ...
Owner's Manual - English
Page 23
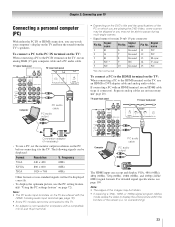
...Resolution V. no overscanning). 23 Signal name Pin No. Separate analog cables are shared with the HDMI-1 analog audio input terminals (- page 20). For detailed signal specifications, see page 109. TV upper back panel TV lower back panel Conversion adapter (if necessary) • To use a PC, set the ...NC * 9 NC 14 V-sync 5 NC 10 Ground 15 NC *NC=Not connected To connect a PC to the HDMI terminal on the TV: When connecting a PC to the HDMI terminal on the TV, use an analog RGB (15-pin) computer cable and a PC audio cable. Frequency VGA 640 × 480 60Hz...
...Resolution V. no overscanning). 23 Signal name Pin No. Separate analog cables are shared with the HDMI-1 analog audio input terminals (- page 20). For detailed signal specifications, see page 109. TV upper back panel TV lower back panel Conversion adapter (if necessary) • To use a PC, set the ...NC * 9 NC 14 V-sync 5 NC 10 Ground 15 NC *NC=Not connected To connect a PC to the HDMI terminal on the TV: When connecting a PC to the HDMI terminal on the TV, use an analog RGB (15-pin) computer cable and a PC audio cable. Frequency VGA 640 × 480 60Hz...
Owner's Manual - English
Page 40
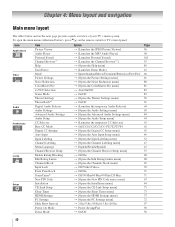
To open the main menus (illustrated below and on the remote control or TV control panel. Icon Applications Video Audio Preferences Locks Setup Item Picture Viewer Audio Player Personal ... Blocking Edit Rating Limits Channels Block Input Lock Front Panel Lock GameTimer® New PIN Code Installation CE-Link Setup Sleep Timer HDMI Settings PC Settings Slide Show Interval Power-On Mode Demo Mode Option S [Launches the JPEG Picture Viewer] S [Launches the MP3...98 102 53 85 43 60 61 80 81 83 83 56 61 64 65 84 64 63 62 63 46 52 47 43 53 68 68 69 70 71 71 67 44 75 73 75 72 97 50 50 40 Chapter ...
To open the main menus (illustrated below and on the remote control or TV control panel. Icon Applications Video Audio Preferences Locks Setup Item Picture Viewer Audio Player Personal ... Blocking Edit Rating Limits Channels Block Input Lock Front Panel Lock GameTimer® New PIN Code Installation CE-Link Setup Sleep Timer HDMI Settings PC Settings Slide Show Interval Power-On Mode Demo Mode Option S [Launches the JPEG Picture Viewer] S [Launches the MP3...98 102 53 85 43 60 61 80 81 83 83 56 61 64 65 84 64 63 62 63 46 52 47 43 53 68 68 69 70 71 71 67 44 75 73 75 72 97 50 50 40 Chapter ...
Owner's Manual - English
Page 44
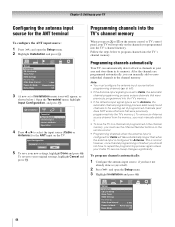
... (- at left ). 2 Press Y and open the Setup menu. 2 Highlight Installation and press T. Setup Installation CE-Link Setup Sleep Timer HDMI Settings PC Settings Slide Show Interval 2 Sec Power-On Mode Power-Saving Demo Mode Off 44 Setup Installation CE-Link Setup Sleep Timer... Antenna source channel from the memory, you must configure the antenna input source before programming channels (- To revert to program channels into the TV's channel memory When you have to a channel not programmed in the channel memory. Follow the steps below .) Open the Terrestrial menu, ...
... (- at left ). 2 Press Y and open the Setup menu. 2 Highlight Installation and press T. Setup Installation CE-Link Setup Sleep Timer HDMI Settings PC Settings Slide Show Interval 2 Sec Power-On Mode Power-Saving Demo Mode Off 44 Setup Installation CE-Link Setup Sleep Timer... Antenna source channel from the memory, you must configure the antenna input source before programming channels (- To revert to program channels into the TV's channel memory When you have to a channel not programmed in the channel memory. Follow the steps below .) Open the Terrestrial menu, ...
Owner's Manual - English
Page 46
... 2, ColorStream HD1, ColorStream HD2, HDMI 1, HDMI 2, HDMI 3, PC • DVD: Video 1, Video 2, ColorStream HD1, ColorStream HD2, HDMI 1, HDMI 2, HDMI 3, PC • VCR/PVR: ANT, Video 1, Video 2, ColorStream HD1, ColorStream HD2, HDMI 1, HDMI 2, HDMI 3, PC • AUX1: Video 1, Video 2, ColorStream HD1, ColorStream HD2, HDMI 1, HDMI 2, HDMI 3, PC • AUX2: Video 1, Video 2, ColorStream HD1, ColorStream HD2, HDMI 1, HDMI 2, HDMI 3, PC Note: The TV mode select button will not...
... 2, ColorStream HD1, ColorStream HD2, HDMI 1, HDMI 2, HDMI 3, PC • DVD: Video 1, Video 2, ColorStream HD1, ColorStream HD2, HDMI 1, HDMI 2, HDMI 3, PC • VCR/PVR: ANT, Video 1, Video 2, ColorStream HD1, ColorStream HD2, HDMI 1, HDMI 2, HDMI 3, PC • AUX1: Video 1, Video 2, ColorStream HD1, ColorStream HD2, HDMI 1, HDMI 2, HDMI 3, PC • AUX2: Video 1, Video 2, ColorStream HD1, ColorStream HD2, HDMI 1, HDMI 2, HDMI 3, PC Note: The TV mode select button will not...
Owner's Manual - English
Page 48
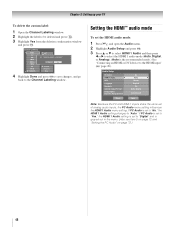
Chapter 5: Setting up your TV To delete the custom label: 1 Open the Channel Labeling window. 2 Highlight the label to change channels. Press CH UP/DOWN to be deleted and press =. 3 Highlight Yes from the deletion confirmation window and press T. Audio Setup PC Audio HDMI 1 Audio MTS Language Speakers Optical Output Format ... (Auto is grayed out in the menu. (Also see item 5 on page 12 and "Setting the PC Audio" on page 72.) 48 Setting the HDMI™ audio mode To set to the Channel Labeling window. No Yes Custom Clear All Done 4 Highlight Done and press T to save changes, and go...
Chapter 5: Setting up your TV To delete the custom label: 1 Open the Channel Labeling window. 2 Highlight the label to change channels. Press CH UP/DOWN to be deleted and press =. 3 Highlight Yes from the deletion confirmation window and press T. Audio Setup PC Audio HDMI 1 Audio MTS Language Speakers Optical Output Format ... (Auto is grayed out in the menu. (Also see item 5 on page 12 and "Setting the PC Audio" on page 72.) 48 Setting the HDMI™ audio mode To set to the Channel Labeling window. No Yes Custom Clear All Done 4 Highlight Done and press T to save changes, and go...
Owner's Manual - English
Page 50
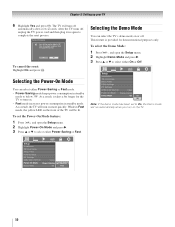
...mode keeps power consumption in Fast mode, the yellow LED on or off automatically after a few seconds. Setup Installation CE-Link Setup Sleep Timer HDMI Settings PC Settings Slide Show Interval 2 Sec Power-On Mode Power-Saving Demo Mode On Power-Saving Fast 50 After the... off , unplug the TV power cord and then plug it back in standby mode. No Yes To cancel the reset: Highlight No and press T. Setup Installation CE-Link Setup Sleep Timer HDMI Settings PC Settings Slide Show Interval 2 Sec Power-On Mode Power-Saving Demo Mode On On Off Note: ...
...mode keeps power consumption in Fast mode, the yellow LED on or off automatically after a few seconds. Setup Installation CE-Link Setup Sleep Timer HDMI Settings PC Settings Slide Show Interval 2 Sec Power-On Mode Power-Saving Demo Mode On Power-Saving Fast 50 After the... off , unplug the TV power cord and then plug it back in standby mode. No Yes To cancel the reset: Highlight No and press T. Setup Installation CE-Link Setup Sleep Timer HDMI Settings PC Settings Slide Show Interval 2 Sec Power-On Mode Power-Saving Demo Mode On On Off Note: ...
Owner's Manual - English
Page 51
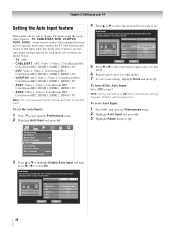
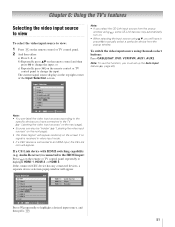
... to the specific devices you must set up the Auto Input feature (- "Labeling the video input sources" on the remote or TV control panel repeatedly to highlight HDMI 1, HDMI 2. Chapter 6: Using the TV's features Selecting the video input source to view To select the video input source to view: 1 Press + on the remote control...
... to the specific devices you must set up the Auto Input feature (- "Labeling the video input sources" on the remote or TV control panel repeatedly to highlight HDMI 1, HDMI 2. Chapter 6: Using the TV's features Selecting the video input source to view To select the video input source to view: 1 Press + on the remote control...
Owner's Manual - English
Page 52
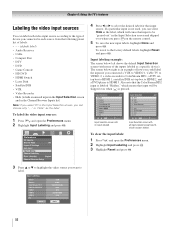
... is an example of how you could label the inputs if you connected a VCR to VIDEO 1, Cable TV to VIDEO 2, a video recorder to ColorStream HD1, a DTV settop box to HDMI 1, a satellite/DSS set-top box to HDMI 2, and a DVD player to the factory default labels, highlight Reset and press T. Input Selection 0 ANT 1 Video... over when + is pressed. To label the video input sources: 1 Press Y and open the Preferences menu. 2 Highlight Input Labeling and press T. 3 Highlight Reset and press T. 52 Also note that input source.
... is an example of how you could label the inputs if you connected a VCR to VIDEO 1, Cable TV to VIDEO 2, a video recorder to ColorStream HD1, a DTV settop box to HDMI 1, a satellite/DSS set-top box to HDMI 2, and a DVD player to the factory default labels, highlight Reset and press T. Input Selection 0 ANT 1 Video... over when + is pressed. To label the video input sources: 1 Press Y and open the Preferences menu. 2 Highlight Input Labeling and press T. 3 Highlight Reset and press T. 52 Also note that input source.
Owner's Manual - English
Page 57
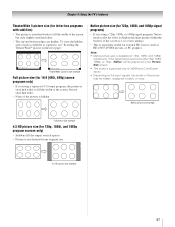
Note: • Native picture size is available for HDMI and ColorStream inputs. • Depending on the next page." If the signal being received is other than 1080i, 1080p, or 720p, "Native" will be hidden, ... picture is stretched wider to fill the width of the screen, but not stretched taller. • None of the picture is hidden. Chapter 6: Using the TV's features TheaterWide 3 picture size (for 16:9 [480i, 480p] source programs only) • If receiving a squeezed 4:3 format program, the picture is stretched wider to fill the...
Note: • Native picture size is available for HDMI and ColorStream inputs. • Depending on the next page." If the signal being received is other than 1080i, 1080p, or 720p, "Native" will be hidden, ... picture is stretched wider to fill the width of the screen, but not stretched taller. • None of the picture is hidden. Chapter 6: Using the TV's features TheaterWide 3 picture size (for 16:9 [480i, 480p] source programs only) • If receiving a squeezed 4:3 format program, the picture is stretched wider to fill the...


