Owner's Manual - English
Page 2
.... Before operating the TV, please read and understand the other electronic components). DO NOT OPEN. The consumer electronics industry is NOT COVERED BY YOUR WARRANTY. Tune Into Safety One size does NOT fit all! Thank you use of this manual completely, and keep these safety tips in the picture tube. THE CableCARD™ CAN REACH A HIGH TEMPERATURE IF THE COOLING FAN STOPS...
.... Before operating the TV, please read and understand the other electronic components). DO NOT OPEN. The consumer electronics industry is NOT COVERED BY YOUR WARRANTY. Tune Into Safety One size does NOT fit all! Thank you use of this manual completely, and keep these safety tips in the picture tube. THE CableCARD™ CAN REACH A HIGH TEMPERATURE IF THE COOLING FAN STOPS...
Owner's Manual - English
Page 4
..., video game patterns, TV station logos, closed captions, and websites. • Special Formats that the TV is serviced, you have the TV serviced: • Ask the service technician to evaporate. 31) For added protection of your TV on the screen. Opening and removing the covers may make sure the antenna system is being turned on or off the TV for 6 to 7 hours to allow the condensation to use...
..., video game patterns, TV station logos, closed captions, and websites. • Special Formats that the TV is serviced, you have the TV serviced: • Ask the service technician to evaporate. 31) For added protection of your TV on the screen. Opening and removing the covers may make sure the antenna system is being turned on or off the TV for 6 to 7 hours to allow the condensation to use...
Owner's Manual - English
Page 5
... 18 Connecting an HDMI™ or a DVI device to the HDMI input 19 Connecting a digital audio system 20 Connecting an analog audio system 20 Controlling infrared remote-controlled devices through the TV (IR pass-through 21 Connecting IEEE-1394 video devices 22 G-LINK™ connection 25 Chapter 3: Using the remote control 26 Learning about the remote control 26 Installing the remote control batteries 27 Using the remote control MODE button to control your other devices 27 Remote Control functional key chart 28 Programming the remote control...
... 18 Connecting an HDMI™ or a DVI device to the HDMI input 19 Connecting a digital audio system 20 Connecting an analog audio system 20 Controlling infrared remote-controlled devices through the TV (IR pass-through 21 Connecting IEEE-1394 video devices 22 G-LINK™ connection 25 Chapter 3: Using the remote control 26 Learning about the remote control 26 Installing the remote control batteries 27 Using the remote control MODE button to control your other devices 27 Remote Control functional key chart 28 Programming the remote control...
Owner's Manual - English
Page 6
... codes 46 Adjusting the color convergence 49 Setting the AVHD device skip time 50 Setting the HDMI™ audio mode 50 Setting the time and date 51 Viewing the CableCARD™ menu 51 Viewing the digital signal meter 52 Viewing the system status 52 Chapter 7: Using the TV Guide On Screen™ interactive program guide 53 Setting up the TV Guide On Screen system 53 Navigating the TV Guide On Screen system 54 TV Guide On Screen remote control functions .......... 54 Video Window 55 Panel Menus 55 Info Box 56 TV Guide On Screen...
... codes 46 Adjusting the color convergence 49 Setting the AVHD device skip time 50 Setting the HDMI™ audio mode 50 Setting the time and date 51 Viewing the CableCARD™ menu 51 Viewing the digital signal meter 52 Viewing the system status 52 Chapter 7: Using the TV Guide On Screen™ interactive program guide 53 Setting up the TV Guide On Screen system 53 Navigating the TV Guide On Screen system 54 TV Guide On Screen remote control functions .......... 54 Video Window 55 Panel Menus 55 Info Box 56 TV Guide On Screen...
Owner's Manual - English
Page 7
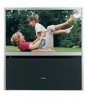
... your new Toshiba integrated HD, widescreen, projection TV: • Integrated digital tuning (8VSB ATSC and QAM) eliminates the need for a separate digital converter set the convergence by pressing the TouchFocus button on the market. You can use the controls on the TV front panel if they have the same name as possible. • This manual applies to models 51H94 and 57H94. In the United States, TV GUIDE and other...
... your new Toshiba integrated HD, widescreen, projection TV: • Integrated digital tuning (8VSB ATSC and QAM) eliminates the need for a separate digital converter set the convergence by pressing the TouchFocus button on the market. You can use the controls on the TV front panel if they have the same name as possible. • This manual applies to models 51H94 and 57H94. In the United States, TV GUIDE and other...
Owner's Manual - English
Page 8
... light does not reflect on the remote control to open ). 2) Use the x • buttons to select the SETUP menu. 3) Use the yz buttons to select CHANGE DEFAULT OPTIONS, and then press ENTER. 4) Use the yz buttons to select GENERAL DEFAULT OPTION, and then press ENTER. 5) Set the AUTO GUIDE option to OFF. 6) Use the yz buttons to automatically adjust the color convergence after setting up your TV. To disable this feature: 1) Press TV GUIDE...
... light does not reflect on the remote control to open ). 2) Use the x • buttons to select the SETUP menu. 3) Use the yz buttons to select CHANGE DEFAULT OPTIONS, and then press ENTER. 4) Use the yz buttons to select GENERAL DEFAULT OPTION, and then press ENTER. 5) Set the AUTO GUIDE option to OFF. 6) Use the yz buttons to automatically adjust the color convergence after setting up your TV. To disable this feature: 1) Press TV GUIDE...
Owner's Manual - English
Page 9
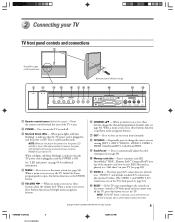
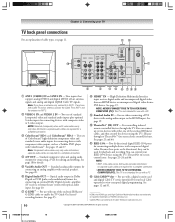
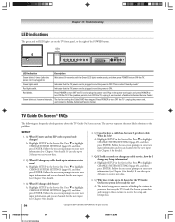
... POWER is on-screen, these buttons change the source you cannot turn off . 3 Red and Green LEDs - When no menu is called standby mode. When no menu is ON. Press to automatically adjust the color convergence (see page 34). This is on-screen, these buttons adjust the volume level. Press to as a "slide show" on your TV TV front panel controls and connections 1 Press/lift to close an on-screen menu instantly. 8 TV/VIDEO - The front panel A/V connections are referred to access...
... POWER is on-screen, these buttons change the source you cannot turn off . 3 Red and Green LEDs - When no menu is called standby mode. When no menu is ON. Press to automatically adjust the color convergence (see page 34). This is on-screen, these buttons adjust the volume level. Press to as a "slide show" on your TV TV front panel controls and connections 1 Press/lift to close an on-screen menu instantly. 8 TV/VIDEO - The front panel A/V connections are referred to access...
Owner's Manual - English
Page 10
...-2 IN - Two sets of the enclosed IR blaster cables, and then control the devices using the TV's TheaterNet on -screen device control) features. See page 20. 7 G-LINK™ - See page 25. 8 HDMI™ IN - You can connect up to enable the TV Guide On Screen® recording features. High-Definition Multimedia Interface input receives digital audio and uncompressed digital video from an HDMI device or uncompressed digital video from a DVI device. See pages...
...-2 IN - Two sets of the enclosed IR blaster cables, and then control the devices using the TV's TheaterNet on -screen device control) features. See page 20. 7 G-LINK™ - See page 25. 8 HDMI™ IN - You can connect up to enable the TV Guide On Screen® recording features. High-Definition Multimedia Interface input receives digital audio and uncompressed digital video from an HDMI device or uncompressed digital video from a DVI device. See pages...
Owner's Manual - English
Page 12
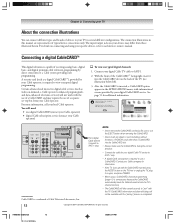
..., digital basic, and digital premium cable television programming by direct connection to Antenna 1. See page 51 for information. • If the TV locks up with the CableCARD inserted, press the RESET button on the TV front or unplug the TV, plug it into the TV's channel memory. • The CableCARD will not work with informational screens provided by your Cable operator. The input/output jacks on -demand, a Cable operator's enhanced program guide, and data-enhanced television services) will...
..., digital basic, and digital premium cable television programming by direct connection to Antenna 1. See page 51 for information. • If the TV locks up with the CableCARD inserted, press the RESET button on the TV front or unplug the TV, plug it into the TV's channel memory. • The CableCARD will not work with informational screens provided by your Cable operator. The input/output jacks on -demand, a Cable operator's enhanced program guide, and data-enhanced television services) will...

Owner's Manual - English
Page 20
.... Audio Audio Settings Advanced Audio Settings Audio Setup Turn off the built-in the same AUDIO SETUP menu (above). Note: To hear sound when using an external audio amplifier, the volume of copy restrictions. THIS DAMAGE IS NOT COVERED BY YOUR WARRANTY. • The DIGITAL AUDIO OUT jack may not output some digital audio sources because of both the TV and the amplifier must be compatible with standard optical out signals may not work properly, creating a high noise...
.... Audio Audio Settings Advanced Audio Settings Audio Setup Turn off the built-in the same AUDIO SETUP menu (above). Note: To hear sound when using an external audio amplifier, the volume of copy restrictions. THIS DAMAGE IS NOT COVERED BY YOUR WARRANTY. • The DIGITAL AUDIO OUT jack may not output some digital audio sources because of both the TV and the amplifier must be compatible with standard optical out signals may not work properly, creating a high noise...

Owner's Manual - English
Page 49
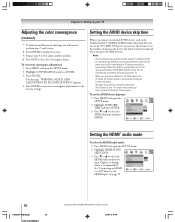
... convergence This projection TV uses three separate image tubes: red, green, and blue. Press MENU and open the SETUP menu. 2. If you move the cursor to the position you need to adjust. 5. TV front panel MENU VOLUME CHANNEL EXIT TV/VIDEO TouchFocus TouchFocus The TV will enter auto-convergence mode. Press ENTER repeatedly to select RED or BLUE adjusting mode (red crossed lines or blue crossed lines), depending on the remote control to form a full-color picture. Press y (up your TV screen, skip this procedure. Setup Installation Sleep Timer On/Off Timer HDMI Audio...
... convergence This projection TV uses three separate image tubes: red, green, and blue. Press MENU and open the SETUP menu. 2. If you move the cursor to the position you need to adjust. 5. TV front panel MENU VOLUME CHANNEL EXIT TV/VIDEO TouchFocus TouchFocus The TV will enter auto-convergence mode. Press ENTER repeatedly to select RED or BLUE adjusting mode (red crossed lines or blue crossed lines), depending on the remote control to form a full-color picture. Press y (up your TV screen, skip this procedure. Setup Installation Sleep Timer On/Off Timer HDMI Audio...
Owner's Manual - English
Page 50
Press RECALL. The message, "WARNING: RESETS USER ADJUSTMENT TO FACTORY SETTINGS" appears. 4. Note: • This TV will work best with the Toshiba Symbio™ 160HD4 AVHD, for recording high definition and standard definition material from Auto, Digital, or Analog (Auto is automatically configured to allow pausing of minutes the device will need to the HDMI input" on page 19. Highlight AVHD SKIP TIME and press ENTER. 3. Highlight HDMI AUDIO SELECTION. 3. Repeat...
Press RECALL. The message, "WARNING: RESETS USER ADJUSTMENT TO FACTORY SETTINGS" appears. 4. Note: • This TV will work best with the Toshiba Symbio™ 160HD4 AVHD, for recording high definition and standard definition material from Auto, Digital, or Analog (Auto is automatically configured to allow pausing of minutes the device will need to the HDMI input" on page 19. Highlight AVHD SKIP TIME and press ENTER. 3. Highlight HDMI AUDIO SELECTION. 3. Repeat...
Owner's Manual - English
Page 51
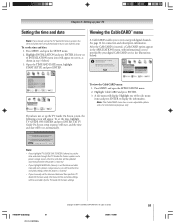
... APPLICATIONS menu, with cable signal connected to set automatically. Note: The CableCARD menu has no user-adjustable options and is recommended you set up TV Guide On Screen first and use it to obtain the time and date. Manual TV Guide On Screen Cancel Note: • If you highlight TV GUIDE ON SCREEN (above) to set the time and date through the TV Guide On Screen system and a power outage occurs, the time and date will be updated automatically...
... APPLICATIONS menu, with cable signal connected to set automatically. Note: The CableCARD menu has no user-adjustable options and is recommended you set up TV Guide On Screen first and use it to obtain the time and date. Manual TV Guide On Screen Cancel Note: • If you highlight TV GUIDE ON SCREEN (above) to set the time and date through the TV Guide On Screen system and a power outage occurs, the time and date will be updated automatically...
Owner's Manual - English
Page 52
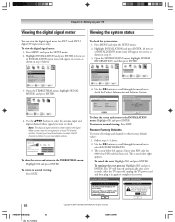
... view the digital signal meter: 1. Press MENU and open the SETUP menu. 2. Setup Installation Sleep Timer On/Off Timer HDMI Audio Selection Side Show Interval AVHD Skip Time Convergence Auto 2 Sec 15 min Navigate Select DVD RTN CH RTN Back EXIT Exit 3. Open the TERRESTRIAL menu, highlight SIGNAL METER, and press ENTER. Use the yzx • buttons to select the antenna input and digital channel whose signal you want to their factory default values: 1. Signal Meter Signal Locked 78 Antenna...
... view the digital signal meter: 1. Press MENU and open the SETUP menu. 2. Setup Installation Sleep Timer On/Off Timer HDMI Audio Selection Side Show Interval AVHD Skip Time Convergence Auto 2 Sec 15 min Navigate Select DVD RTN CH RTN Back EXIT Exit 3. Open the TERRESTRIAL menu, highlight SIGNAL METER, and press ENTER. Use the yzx • buttons to select the antenna input and digital channel whose signal you want to their factory default values: 1. Signal Meter Signal Locked 78 Antenna...
Owner's Manual - English
Page 92
.... Black box on screen • Set the CLOSED CAPTION feature to VIDEO-1 or VIDEO-2 on the TV back (or VIDEO-3 on the TV front panel to automatically adjust the color convergence, or manually adjust the color convergence (page 49). • When the ColorStream signal source is connected to OFF (page 90). All rights reserved. 8/5/04, 11:25 AM Try another channel. • Adjust the TINT and/or COLOR (page 77). • If the red, green, and blue color...
.... Black box on screen • Set the CLOSED CAPTION feature to VIDEO-1 or VIDEO-2 on the TV back (or VIDEO-3 on the TV front panel to automatically adjust the color convergence, or manually adjust the color convergence (page 49). • When the ColorStream signal source is connected to OFF (page 90). All rights reserved. 8/5/04, 11:25 AM Try another channel. • Adjust the TINT and/or COLOR (page 77). • If the red, green, and blue color...
Owner's Manual - English
Page 93
... you hear audio that is set to the controls on the remote control or TV front panel and you are unable to tune digital channels, check the antenna configuration (page 41). Refer to the owner's manual for details). Rating Blocking (V-Chip) problems • If you will not hear any sound (page 20). The PIN code you stored will appear on-screen. • It is displayed, press RECALL four times within 5 seconds...
... you hear audio that is set to the controls on the remote control or TV front panel and you are unable to tune digital channels, check the antenna configuration (page 41). Refer to the owner's manual for details). Rating Blocking (V-Chip) problems • If you will not hear any sound (page 20). The PIN code you stored will appear on-screen. • It is displayed, press RECALL four times within 5 seconds...
Owner's Manual - English
Page 94
...) 94 8/5/04, 11:28 AM Q: If I change my Setup information? The fan for cooling the CableCARD has stopped. LEDs { MENU VOLUME CHANNEL EXIT TV/VIDEO TouchFocus S-VIDEO VIDEO L/MONO R AUDIO RESET LED Indication Description Green blinks 3 times (after the power cord is called "standby mode." Press z to receive the setup and listings data. 94 Copyright © 2004 TOSHIBA CORPORATION. A: Highlight SETUP in ). Q: I used to have a cable box, but now I move and my ZIP code or postal code changes? Wait about the TV Guide On Screen system.
...) 94 8/5/04, 11:28 AM Q: If I change my Setup information? The fan for cooling the CableCARD has stopped. LEDs { MENU VOLUME CHANNEL EXIT TV/VIDEO TouchFocus S-VIDEO VIDEO L/MONO R AUDIO RESET LED Indication Description Green blinks 3 times (after the power cord is called "standby mode." Press z to receive the setup and listings data. 94 Copyright © 2004 TOSHIBA CORPORATION. A: Highlight SETUP in ). Q: I used to have a cable box, but now I move and my ZIP code or postal code changes? Wait about the TV Guide On Screen system.

Owner's Manual - English
Page 95
... G-LINK™ input on . A: The TV Guide On Screen system will I connect the G-LINK (IR blaster) cable to a clock or time display once the channel changes. Q: If I make changes to receive program listings during the next download cycle, which will be ON. 18. Q: What if the channel number is on the TV? A: Your cable box may use within the next 24-hour period. 17. Press z to select CHANGE CHANNEL DISPLAY. c) The VCR record timer is not...
... G-LINK™ input on . A: The TV Guide On Screen system will I connect the G-LINK (IR blaster) cable to a clock or time display once the channel changes. Q: If I make changes to receive program listings during the next download cycle, which will be ON. 18. Q: What if the channel number is on the TV? A: Your cable box may use within the next 24-hour period. 17. Press z to select CHANGE CHANNEL DISPLAY. c) The VCR record timer is not...
Owner's Manual - English
Page 96
... settings," and then press ENTER. Dark Blue = Children's; Use the "Change channel display" feature to the top of the station. Q: Can I add, delete, or change channels with the video window on -screen prompts to enter "24," and then press MENU. OPERATIONS 26. A: There are several possibilities: a) The incorrect cable box code was entered.) Redo the initial setup. 24. Press the INFO button again to its scheduled program listing and the TV Guide...
... settings," and then press ENTER. Dark Blue = Children's; Use the "Change channel display" feature to the top of the station. Q: Can I add, delete, or change channels with the video window on -screen prompts to enter "24," and then press MENU. OPERATIONS 26. A: There are several possibilities: a) The incorrect cable box code was entered.) Redo the initial setup. 24. Press the INFO button again to its scheduled program listing and the TV Guide...
Owner's Manual - English
Page 99
... television is purchased and operated in electric power), improper installation, improper maintenance, or use of these warranties. THESE LIMITED WARRANTIES EXTEND TO THE ORIGINAL CONSUMER PURCHASER OR ANY PERSON RECEIVING THIS TELEVISION AS A GIFT FROM THE ORIGINAL CONSUMER PURCHASER AND TO NO OTHER PURCHASER OR TRANSFEREE. or Puerto Rico. (4) Labor charges for installation, setup, adjustment of customer controls, and installation or repair of Toshiba...
... television is purchased and operated in electric power), improper installation, improper maintenance, or use of these warranties. THESE LIMITED WARRANTIES EXTEND TO THE ORIGINAL CONSUMER PURCHASER OR ANY PERSON RECEIVING THIS TELEVISION AS A GIFT FROM THE ORIGINAL CONSUMER PURCHASER AND TO NO OTHER PURCHASER OR TRANSFEREE. or Puerto Rico. (4) Labor charges for installation, setup, adjustment of customer controls, and installation or repair of Toshiba...


