Owner's Manual - English
Page 3
... or eyes, or your skin is dropped and the cabinet or enclosure surface has been damaged or the TV does not operate normally, take the following precautions: • ALWAYS turn off the TV and unplug the power cord to avoid possible electric shock or fire. • NEVER allow your body...has been spilled or objects have fallen into your outlet, consult an electrician for replacement of fire, keep candles or other immovable structure. The LCD panel inside the TV contains glass and a toxic liquid. fully insert. 16) WARNING: To prevent the spread of the obsolete outlet. 10) Protect the power...
... or eyes, or your skin is dropped and the cabinet or enclosure surface has been damaged or the TV does not operate normally, take the following precautions: • ALWAYS turn off the TV and unplug the power cord to avoid possible electric shock or fire. • NEVER allow your body...has been spilled or objects have fallen into your outlet, consult an electrician for replacement of fire, keep candles or other immovable structure. The LCD panel inside the TV contains glass and a toxic liquid. fully insert. 16) WARNING: To prevent the spread of the obsolete outlet. 10) Protect the power...
Owner's Manual - English
Page 4
...products may damage the surface of the panel. If you need to clean the LCD screen, follow the instructions in item 30 on this manual to a Toshiba Authorized Service Center. 38) If you have the TV serviced: • Ask the service technician to use only replacement parts specified ... 25) Never overload wall outlets and extension cords. 26) Always operate this product can accidentally touch overhead power lines. This is being turned on or off. Opening and removing the covers may damage the surface. Never spill liquids or push objects of the following during lightning activity...
...products may damage the surface of the panel. If you need to clean the LCD screen, follow the instructions in item 30 on this manual to a Toshiba Authorized Service Center. 38) If you have the TV serviced: • Ask the service technician to use only replacement parts specified ... 25) Never overload wall outlets and extension cords. 26) Always operate this product can accidentally touch overhead power lines. This is being turned on or off. Opening and removing the covers may damage the surface. Never spill liquids or push objects of the following during lightning activity...
Owner's Manual - English
Page 10
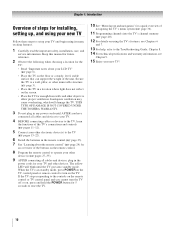
...control. 8 Program the remote control to turn the TV off or on the floor or a sturdy, level, stable surface that can support the weight of the TV's connections and controls (- Keep this manual ... cords until the TV goes into the TV's channel memory (- page 23). 7 See "Learning about your LCD TV" (- If the TV stops responding to the controls on the remote control or TV control panel and ...installation, care, and service information. Secure the TV to the TV, learn the functions of the unit. THIS TYPE OF DAMAGE IS NOT COVERED UNDER THE TOSHIBA WARRANTY. 3 Do not plug in the remote ...
...control. 8 Program the remote control to turn the TV off or on the floor or a sturdy, level, stable surface that can support the weight of the TV's connections and controls (- Keep this manual ... cords until the TV goes into the TV's channel memory (- page 23). 7 See "Learning about your LCD TV" (- If the TV stops responding to the controls on the remote control or TV control panel and ...installation, care, and service information. Secure the TV to the TV, learn the functions of the unit. THIS TYPE OF DAMAGE IS NOT COVERED UNDER THE TOSHIBA WARRANTY. 3 Do not plug in the remote ...
Owner's Manual - English
Page 11
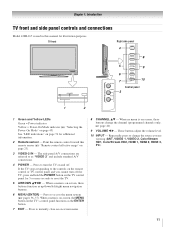
... Bb - pages 36-37). When no menu is on-screen, these buttons change the source you cannot turn the TV on and off the TV, press and hold the POWER button on the TV control panel for additional information. 2 Remote sensor - "Remote control effective range" on page 74 for ...5 or more seconds to turn off . When a menu is on-screen, these buttons function as "VIDEO 2" and include standard A/V connections. 4 POWER - When a menu is used in this remote sensor (- Chapter 1: Introduction TV front and side panel controls and connections Model 42HL167 is...
... Bb - pages 36-37). When no menu is on-screen, these buttons change the source you cannot turn the TV on and off the TV, press and hold the POWER button on the TV control panel for additional information. 2 Remote sensor - "Remote control effective range" on page 74 for ...5 or more seconds to turn off . When a menu is on-screen, these buttons function as "VIDEO 2" and include standard A/V connections. 4 POWER - When a menu is used in this remote sensor (- Chapter 1: Introduction TV front and side panel controls and connections Model 42HL167 is...
Owner's Manual - English
Page 14
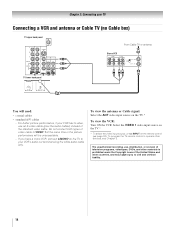
... back panel You will be unacceptable. - If you to civil and criminal liability. 14 Select the VIDEO 1 video input source on the TV.* * To select the video input source, press INPUT on the remote control (- The unauthorized recording, use an S-video cable (plus the audio cables) ...instead of video cable to operate other countries, and may subject you have a mono VCR, connect L/MONO on the TV.* To view the VCR: Turn ON the VCR. To program the TV remote control to VIDEO 1 at the same time or the picture performance will need: • coaxial cables • standard A/V...
... back panel You will be unacceptable. - If you to civil and criminal liability. 14 Select the VIDEO 1 video input source on the TV.* * To select the video input source, press INPUT on the remote control (- The unauthorized recording, use an S-video cable (plus the audio cables) ...instead of video cable to operate other countries, and may subject you have a mono VCR, connect L/MONO on the TV.* To view the VCR: Turn ON the VCR. To program the TV remote control to VIDEO 1 at the same time or the picture performance will need: • coaxial cables • standard A/V...
Owner's Manual - English
Page 15
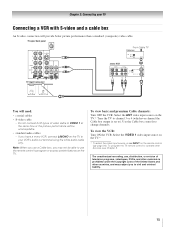
... or 4 (whichever channel the Cable box output is prohibited under the Copyright Laws of television programs, videotapes, DVDs, and other materials is set to your TV Connecting a VCR with S-video and a cable box An S-video connection will need: • coaxial cables • S-video cable - The unauthorized recording...on the TV. To view the VCR: Turn ON the VCR. To program the TV remote control to civil and criminal liability. 15 To view basic and premium Cable channels: Turn OFF the VCR. page 24). TV upper back panel From Cable TV Cable box IN CH 3 CH 4 OUT TV lower back...
... or 4 (whichever channel the Cable box output is prohibited under the Copyright Laws of television programs, videotapes, DVDs, and other materials is set to your TV Connecting a VCR with S-video and a cable box An S-video connection will need: • coaxial cables • S-video cable - The unauthorized recording...on the TV. To view the VCR: Turn ON the VCR. To program the TV remote control to civil and criminal liability. 15 To view basic and premium Cable channels: Turn OFF the VCR. page 24). TV upper back panel From Cable TV Cable box IN CH 3 CH 4 OUT TV lower back...
Owner's Manual - English
Page 16
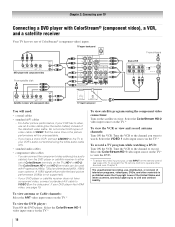
..., see page 19. Select the ColorStream HD-1 video input source on the TV* to your VCR's audio out terminal using the component video connections: Turn on the remote control (- Select the ColorStream HD-1 video input source on the TV.* To view satellite programs using the white audio cable only. • standard... L/MONO on the side panel. Do not connect both types of video cable to watch. Select the ColorStream HD-2 video input source on the TV.* To view the DVD player: Turn ON the DVD player. Tune the VCR to the channel to either set of ColorStream terminals on the...
..., see page 19. Select the ColorStream HD-1 video input source on the TV* to your VCR's audio out terminal using the component video connections: Turn on the remote control (- Select the ColorStream HD-1 video input source on the TV.* To view satellite programs using the white audio cable only. • standard... L/MONO on the side panel. Do not connect both types of video cable to watch. Select the ColorStream HD-2 video input source on the TV.* To view the DVD player: Turn ON the DVD player. Tune the VCR to the channel to either set of ColorStream terminals on the...
Owner's Manual - English
Page 17
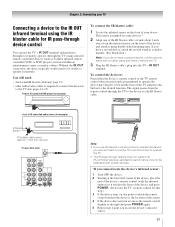
...of the device and attach it using the IR blaster cable for the desired function. page 13) • other audio/video cables as Toshiba infrared remotecontrolled VCRs or DVD players) enclosed within an entertainment center or similar cabinet. To control the device(s): Point either the device's ... back panel Note: • If you use the TV's IR OUT terminal (infrared passthrough) to remotely operate (through device control You can use the device's remote control to operate the device, you cannot locate the device's infrared sensor: 1 Turn OFF the device. 2 Starting at which the remote ...
...of the device and attach it using the IR blaster cable for the desired function. page 13) • other audio/video cables as Toshiba infrared remotecontrolled VCRs or DVD players) enclosed within an entertainment center or similar cabinet. To control the device(s): Point either the device's ... back panel Note: • If you use the TV's IR OUT terminal (infrared passthrough) to remotely operate (through device control You can use the device's remote control to operate the device, you cannot locate the device's infrared sensor: 1 Turn OFF the device. 2 Starting at which the remote ...
Owner's Manual - English
Page 19
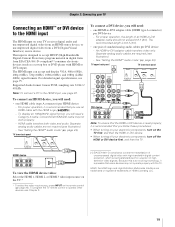
...; or DVI device to the HDMI input The HDMI input on your electronic components, turn on the TV first, and then the HDMI or DVI device. • When turning off the HDMI or DVI device first, and then the TV. To display an 1080p/60Hz signal format, you will need : • one...To view the HDMI device video: Select the HDMI 1, HDMI 2, or HDMI 3 video input source on the TV.* * To select the video input source, press INPUT on your electronic components, turn off your TV receives digital audio and uncompressed digital video from an HDMI source device, or uncompressed digital video from EIA...
...; or DVI device to the HDMI input The HDMI input on your electronic components, turn on the TV first, and then the HDMI or DVI device. • When turning off the HDMI or DVI device first, and then the TV. To display an 1080p/60Hz signal format, you will need : • one...To view the HDMI device video: Select the HDMI 1, HDMI 2, or HDMI 3 video input source on the TV.* * To select the video input source, press INPUT on your electronic components, turn off your TV receives digital audio and uncompressed digital video from an HDMI source device, or uncompressed digital video from EIA...
Owner's Manual - English
Page 21
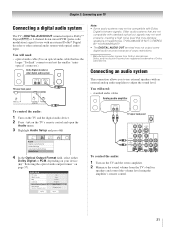
...Format Dolby Digital Dynamic Range Control Reset No Auto Stereo English Dolby Digital Compressed Done To control the audio: 1 Turn on your TV Connecting a digital audio system The TV's DIGITAL AUDIO OUT terminal outputs a Dolby®* Digital g or 2-channel down-mixed PCM (pulse-code modulation...that may damage speakers or headphones. You will need : • standard audio cables Analog audio amplifier To control the audio: 1 Turn on the TV and the digital audio device. 2 Press Y on page 57). Older audio systems that are registered trademarks of copy restrictions. * Manufactured...
...Format Dolby Digital Dynamic Range Control Reset No Auto Stereo English Dolby Digital Compressed Done To control the audio: 1 Turn on your TV Connecting a digital audio system The TV's DIGITAL AUDIO OUT terminal outputs a Dolby®* Digital g or 2-channel down-mixed PCM (pulse-code modulation...that may damage speakers or headphones. You will need : • standard audio cables Analog audio amplifier To control the audio: 1 Turn on the TV and the digital audio device. 2 Press Y on page 57). Older audio systems that are registered trademarks of copy restrictions. * Manufactured...
Owner's Manual - English
Page 24
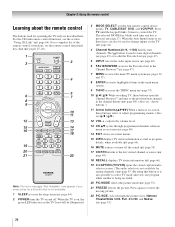
page 27). page 47). 5 INPUT selects the video input source (- page 47). 7 MENU accesses the main TV menu system (- page 37). 10 3 C / # c While watching TV, these buttons select or adjust programming menus. (Also see 3 C / # c.) 12 VOL + - When the TV is being recorded. 20 PIC MODE selects the picture mode (- The = ... and view one program while another is on, the green LED indicator on the TV (- page 53). 21 FREEZE freezes the picture. page 53). 24 page 64). page 64). 2 POWER turns the TV on -screen (- page 55). 17 CH RTN returns to edit the Favorite List (- For a ...
page 27). page 47). 5 INPUT selects the video input source (- page 47). 7 MENU accesses the main TV menu system (- page 37). 10 3 C / # c While watching TV, these buttons select or adjust programming menus. (Also see 3 C / # c.) 12 VOL + - When the TV is being recorded. 20 PIC MODE selects the picture mode (- The = ... and view one program while another is on, the green LED indicator on the TV (- page 53). 21 FREEZE freezes the picture. page 53). 24 page 64). page 64). 2 POWER turns the TV on -screen (- page 55). 17 CH RTN returns to edit the Favorite List (- For a ...
Owner's Manual - English
Page 42
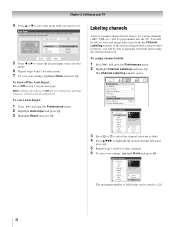
...field you want to label. 4 Press BbC c to manually enter/edit labels using the software keyboard. To turn off the Auto Input: Select Off in the list, you will be programmed into the TV. You will be able to highlight the desired channel label and press T. 5 Repeat steps 3 and 4 for...open the Preferences menu. 2 Highlight Auto Input and press T. 3 Highlight Reset and press T. Enable Auto Input On SLEEP POWER MODE SELECT CABLE/SAT DVD TV VCR/PVR TV CABLE/SAT DVD VCR/PVR -ColorStream HD1 HDMI 1 Video 1 Reset Done 5 Press C or c to Off will be able to change channels. The...
...field you want to label. 4 Press BbC c to manually enter/edit labels using the software keyboard. To turn off the Auto Input: Select Off in the list, you will be programmed into the TV. You will be able to highlight the desired channel label and press T. 5 Repeat steps 3 and 4 for...open the Preferences menu. 2 Highlight Auto Input and press T. 3 Highlight Reset and press T. Enable Auto Input On SLEEP POWER MODE SELECT CABLE/SAT DVD TV VCR/PVR TV CABLE/SAT DVD VCR/PVR -ColorStream HD1 HDMI 1 Video 1 Reset Done 5 Press C or c to Off will be able to change channels. The...
Owner's Manual - English
Page 45
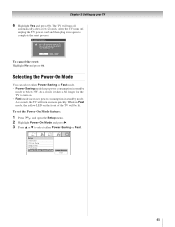
...or Fast. System Information Press YES to complete the reset. As a result, the TV will turn off , unplug the TV power cord and then plug it takes a bit longer for the TV to turn on the front of the TV will turn on more quickly. To set the Power-On Mode feature: 1 Press Y, and ... Power-Saving or Fast mode. • Power-Saving mode keeps power consumption in again to below 3W. After the TV turns off automatically after a few seconds. Chapter 5: Setting up your TV 6 Highlight Yes and press T. Setup Installation CE-Link Setup Sleep Timer PC Settings Power-On Mode Power-Saving Power...
...or Fast. System Information Press YES to complete the reset. As a result, the TV will turn off , unplug the TV power cord and then plug it takes a bit longer for the TV to turn on the front of the TV will turn on more quickly. To set the Power-On Mode feature: 1 Press Y, and ... Power-Saving or Fast mode. • Power-Saving mode keeps power consumption in again to below 3W. After the TV turns off automatically after a few seconds. Chapter 5: Setting up your TV 6 Highlight Yes and press T. Setup Installation CE-Link Setup Sleep Timer PC Settings Power-On Mode Power-Saving Power...
Owner's Manual - English
Page 48
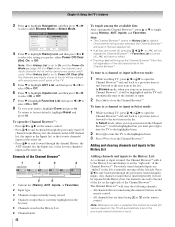
...; will not display the Channel Browser™. To tune to a channel or input in Select mode: 1 While watching TV, press 3 C or # c to open in the last selected list. • If all lists are turned off, pressing 3 C, # c, or n will open the Channel Browser™ and surf back to a previous item or... store the following channels: • All channels that are tuned using the numeric buttons on the remote control. • All channels that is turned off cycle. The Channel Browser™ will be repeated in the History List, but instead is in Fast mode, the channels and inputs stored ...
...; will not display the Channel Browser™. To tune to a channel or input in Select mode: 1 While watching TV, press 3 C or # c to open in the last selected list. • If all lists are turned off, pressing 3 C, # c, or n will open the Channel Browser™ and surf back to a previous item or... store the following channels: • All channels that are tuned using the numeric buttons on the remote control. • All channels that is turned off cycle. The Channel Browser™ will be repeated in the History List, but instead is in Fast mode, the channels and inputs stored ...
Owner's Manual - English
Page 49
...external inputs. 49 Note:This feature will be removed from a non-antenna input, the TV will return to "Power Off Clear (On)," turning off the TV will clear the History List. page 40)-you will be tuned. The TV will return to the memorized channel one channel to the R button. 3 You can ...then change channels again, the CH RTN memory will have to program into the TV's channel memory (- The previous...
...external inputs. 49 Note:This feature will be removed from a non-antenna input, the TV will return to "Power Off Clear (On)," turning off the TV will clear the History List. page 40)-you will be tuned. The TV will return to the memorized channel one channel to the R button. 3 You can ...then change channels again, the CH RTN memory will have to program into the TV's channel memory (- The previous...

Owner's Manual - English
Page 52
...the Video menu. 2 Highlight Theater Settings and press T. 3 In the Cinema Mode field, select Film. To turn off the auto aspect ratio feature: Select Off in step 3 above . To turn on the TV, smoother motion can be obtained by setting the Cinema Mode to Film: 1 Press Y and open the Video ... Done and press T. Aspect ratio of Automatic aspect size (automatically signal source selected when Auto Aspect is left in step 3 above . Note: If the TV is On) 4:3 normal Natural (with sidebars) 4:3 letter box TheaterWide 2 16:9 full Full Not defined (no ID-1 data or HDMI aspect data) The...
...the Video menu. 2 Highlight Theater Settings and press T. 3 In the Cinema Mode field, select Film. To turn off the auto aspect ratio feature: Select Off in step 3 above . To turn on the TV, smoother motion can be obtained by setting the Cinema Mode to Film: 1 Press Y and open the Video ... Done and press T. Aspect ratio of Automatic aspect size (automatically signal source selected when Auto Aspect is left in step 3 above . Note: If the TV is On) 4:3 normal Natural (with sidebars) 4:3 letter box TheaterWide 2 16:9 full Full Not defined (no ID-1 data or HDMI aspect data) The...

Owner's Manual - English
Page 54
...translation of the primary language in your area.) Giant pandas eat leaves. If this happens, set the Base CC Mode to Off. • To turn off the closed caption mode: Select Off in step 3 above. 54 Note: A closed caption signal may appear on screen. Note: • ...; When the signal reception is available for that are closed captioned (usually marked "CC" in program guides). • Text-An on-screen display of TV programs and videos that characteristic (see table below). w/o Serif, Casual, Cursive, Small Capitals Caption Text Edge Auto, None, Raised, Depressed, Uniform, Left...
...translation of the primary language in your area.) Giant pandas eat leaves. If this happens, set the Base CC Mode to Off. • To turn off the closed caption mode: Select Off in step 3 above. 54 Note: A closed caption signal may appear on screen. Note: • ...; When the signal reception is available for that are closed captioned (usually marked "CC" in program guides). • Text-An on-screen display of TV programs and videos that characteristic (see table below). w/o Serif, Casual, Cursive, Small Capitals Caption Text Edge Auto, None, Raised, Depressed, Uniform, Left...
Owner's Manual - English
Page 55
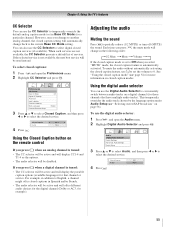
...Selector Audio Settings Advanced Audio Settings Audio Setup 3 Press B or b to select Audio, and then press C or c to partially reduce (1/2 MUTE) or turn off (MUTE) the sound. Closed Caption Audio 4 Press O. CC 1 None 55 However, once you press ; When such services are not available, the CC... mute the audio without automatically activating the closed caption modes. See "Using the closed caption services (if available). Chapter 6: Using the TV's features CC Selector You can use the CC Selector to temporarily override the default analog caption mode (set the volume to 0. You can...
...Selector Audio Settings Advanced Audio Settings Audio Setup 3 Press B or b to select Audio, and then press C or c to partially reduce (1/2 MUTE) or turn off (MUTE) the sound. Closed Caption Audio 4 Press O. CC 1 None 55 However, once you press ; When such services are not available, the CC... mute the audio without automatically activating the closed caption modes. See "Using the closed caption services (if available). Chapter 6: Using the TV's features CC Selector You can use the CC Selector to temporarily override the default analog caption mode (set the volume to 0. You can...
Owner's Manual - English
Page 57
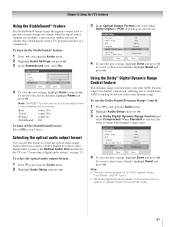
...Control will be further compressed, allowing you connect a Dolby Digital decoder or other digital audio system to the Optical Audio Out terminal on the TV (see "Connecting a digital audio system" on page 21). To select the optical audio output format: 1 Press Y and open the Audio ... center (50) Balance center (0) StableSound . . To revert to the factory defaults, highlight Reset and press T. To revert to a commercial). To turn off the StableSound feature: Select Off in step 3 above. Audio Settings Bass Treble Balance StableSound Reset 100 100 0 On Done 4 To save the new...
...Control will be further compressed, allowing you connect a Dolby Digital decoder or other digital audio system to the Optical Audio Out terminal on the TV (see "Connecting a digital audio system" on page 21). To select the optical audio output format: 1 Press Y and open the Audio ... center (50) Balance center (0) StableSound . . To revert to the factory defaults, highlight Reset and press T. To revert to a commercial). To turn off the StableSound feature: Select Off in step 3 above. Audio Settings Bass Treble Balance StableSound Reset 100 100 0 On Done 4 To save the new...
Owner's Manual - English
Page 61
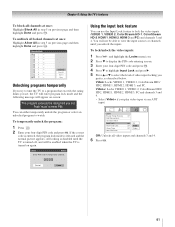
...on again. Push 'mute' to watch. Channels Block 1 2 3 4 5 6 7 8 9 10 Allow All Block All Cancel Done Unlocking programs temporarily If you try to tune the TV to lock the video inputs (VIDEO 1, VIDEO 2, ColorStream HD-1, ColorStream HD-2, HDMI 1, HDMI 2, HDMI 3 and PC) and channels 3 and 4. Video: Locks VIDEO 1, VIDEO 2, ColorStream... below. To unblock all video inputs and channels 3 and 4. 6 Press T. 61 If the correct code is entered, the program lock mode is turned off, and will not be enabled when the TV is turned on previous page and then highlight Done and press T.
...on again. Push 'mute' to watch. Channels Block 1 2 3 4 5 6 7 8 9 10 Allow All Block All Cancel Done Unlocking programs temporarily If you try to tune the TV to lock the video inputs (VIDEO 1, VIDEO 2, ColorStream HD-1, ColorStream HD-2, HDMI 1, HDMI 2, HDMI 3 and PC) and channels 3 and 4. Video: Locks VIDEO 1, VIDEO 2, ColorStream... below. To unblock all video inputs and channels 3 and 4. 6 Press T. 61 If the correct code is entered, the program lock mode is turned off, and will not be enabled when the TV is turned on previous page and then highlight Done and press T.


