Owner's Manual - English
Page 7
...LCD TV 5 Chapter 1: Introduction 9 Features of your new TV 9 Overview of steps for installing, setting up, and using your new TV 9 TV front and side panel controls and connections . . . . 10 TV back panel connections 11 Chapter 2: Connecting your TV...zone 39 Selecting the location 39 Selecting the TOSHIBA Illumination mode 39 Selecting the Power-On ...Tuning to the next programmed channel 44 Tuning to a specific channel (programmed or unprogrammed 45 Switching between two channels using ...channels using SurfLock 45 Selecting the picture size 46 Scrolling the picture 48 Using the Auto ...
...LCD TV 5 Chapter 1: Introduction 9 Features of your new TV 9 Overview of steps for installing, setting up, and using your new TV 9 TV front and side panel controls and connections . . . . 10 TV back panel connections 11 Chapter 2: Connecting your TV...zone 39 Selecting the location 39 Selecting the TOSHIBA Illumination mode 39 Selecting the Power-On ...Tuning to the next programmed channel 44 Tuning to a specific channel (programmed or unprogrammed 45 Switching between two channels using ...channels using SurfLock 45 Selecting the picture size 46 Scrolling the picture 48 Using the Auto ...
Owner's Manual - English
Page 8
... 61 Setting the HDMI audio mode 61 Displaying TV status information 62 Understanding the auto power off feature 62 Understanding the last... mode memory feature 62 Chapter 7: Using the TV's advanced features 63 Using the advanced picture settings features ...Using the surround sound feature 66 Using the Media Player 67 Media Player Specifications 67 Basic operation 67 Playing DivX® files (only for USB devices... 8: Troubleshooting 71 General troubleshooting 71 LED indications 73 Chapter 9: Appendix 74 Specifications 74 Acceptable signal formats for PC IN and HDMI terminals 75 PC IN ...
... 61 Setting the HDMI audio mode 61 Displaying TV status information 62 Understanding the auto power off feature 62 Understanding the last... mode memory feature 62 Chapter 7: Using the TV's advanced features 63 Using the advanced picture settings features ...Using the surround sound feature 66 Using the Media Player 67 Media Player Specifications 67 Basic operation 67 Playing DivX® files (only for USB devices... 8: Troubleshooting 71 General troubleshooting 71 LED indications 73 Chapter 9: Appendix 74 Specifications 74 Acceptable signal formats for PC IN and HDMI terminals 75 PC IN ...

Owner's Manual - English
Page 9
...are just a few of the many exciting features of your new Toshiba widescreen, integrated HD, LCD TV: •Integrated digital tuning (8VSB ATSC and QAM) eliminates the need for a separate digital converter set up your TV and begin using new Backlight Scanning technology (- HDMI INSTAPORT™ ...•AutoView™ allows you turn on using your new TV Follow these steps to set -top box (in the power cords for your TV and other electronic device(s) to the Troubleshooting Guide, see Chapter 8. 11 For technical specifications and warranty information, see Chapter 9. 9 page 59). &#...
...are just a few of the many exciting features of your new Toshiba widescreen, integrated HD, LCD TV: •Integrated digital tuning (8VSB ATSC and QAM) eliminates the need for a separate digital converter set up your TV and begin using new Backlight Scanning technology (- HDMI INSTAPORT™ ...•AutoView™ allows you turn on using your new TV Follow these steps to set -top box (in the power cords for your TV and other electronic device(s) to the Troubleshooting Guide, see Chapter 8. 11 For technical specifications and warranty information, see Chapter 9. 9 page 59). &#...
Owner's Manual - English
Page 12
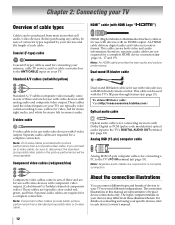
... your antenna, cable TV service, and/or cable converter box to the ANT/CABLE input on connecting and using your specific devices, refer to each cable. To obtain IR blaster cable: Visit http://ceaccessories.toshiba.com/ Optical audio cable Optical audio cable is Toshiba's brand of component... video.) These cables are not required for a complete connection. therefore, separate audio cables are typically color-coded red, green, and blue. If you connect an S-video cable, be sure to your TV Overview of each device's ...
... your antenna, cable TV service, and/or cable converter box to the ANT/CABLE input on connecting and using your specific devices, refer to each cable. To obtain IR blaster cable: Visit http://ceaccessories.toshiba.com/ Optical audio cable Optical audio cable is Toshiba's brand of component... video.) These cables are not required for a complete connection. therefore, separate audio cables are typically color-coded red, green, and blue. If you connect an S-video cable, be sure to your TV Overview of each device's ...
Owner's Manual - English
Page 16
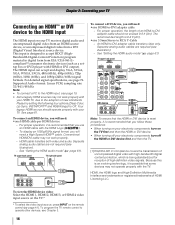
...input, see Chapter 3. See page 61. Separate analog audio cables are trademarks or registered trademarks of uncompressed digital video with your TV receives digital audio and uncompressed digital video from an HDMI source device, or uncompressed digital video from EIA/CEA-861-E- Separate analog... XGA, WXGA, SXGA, 480i (60Hz), 480p (60Hz), 720p (60Hz), 1080i (60Hz), and 1080p (24Hz/60Hz) signal formats. For detailed signal specifications, see illustration). - To display an 1080p/60Hz signal format, you will need : •one HDMI cable per HDMI device - HDMI cable transfers ...
...input, see Chapter 3. See page 61. Separate analog audio cables are trademarks or registered trademarks of uncompressed digital video with your TV receives digital audio and uncompressed digital video from an HDMI source device, or uncompressed digital video from EIA/CEA-861-E- Separate analog... XGA, WXGA, SXGA, 480i (60Hz), 480p (60Hz), 720p (60Hz), 1080i (60Hz), and 1080p (24Hz/60Hz) signal formats. For detailed signal specifications, see illustration). - To display an 1080p/60Hz signal format, you will need : •one HDMI cable per HDMI device - HDMI cable transfers ...
Owner's Manual - English
Page 19
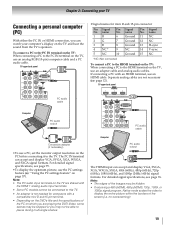
... PC models cannot be connected to the PC IN terminal on the TV: When connecting a PC to this TV. • An adapter is not needed for mini D-sub 15-pin connector Pin Signal No. name Pin Signal No. For detailed signal specifications, see page 76. To connect a PC to the PC IN terminal... on the TV, use the PC settings feature (- If connecting a PC with a compatible mini D-sub15-pin terminal. • Depending on the...
... PC models cannot be connected to the PC IN terminal on the TV: When connecting a PC to this TV. • An adapter is not needed for mini D-sub 15-pin connector Pin Signal No. name Pin Signal No. For detailed signal specifications, see page 76. To connect a PC to the PC IN terminal... on the TV, use the PC settings feature (- If connecting a PC with a compatible mini D-sub15-pin terminal. • Depending on the...
Owner's Manual - English
Page 25
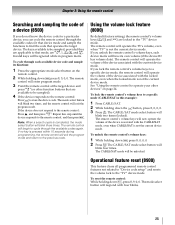
Chapter 3: Using the remote control Searching and sampling the code of a device (8500) If you do not know the device code for a particular device, you can cycle the remote control through the available codes for that device mode and sample the functions to that operates the target device. The keys available to be sampled, provided they are applicable to find the code that mode, are p, 1, z,
Chapter 3: Using the remote control Searching and sampling the code of a device (8500) If you do not know the device code for a particular device, you can cycle the remote control through the available codes for that device mode and sample the functions to that operates the target device. The keys available to be sampled, provided they are applicable to find the code that mode, are p, 1, z,
Owner's Manual - English
Page 39
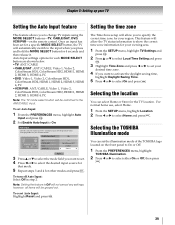
..., highlight Location. 2 Press C or c to the input when you want to set the illumination mode of the TOSHIBA logo located on the front panel to On or Off. 1 From the PREFERENCES menu, highlight TOSHIBA Illumination. 2 Press C or c to On. Once an input has been set Auto Input: 1 From the PREFERENCES... either On or Off, then press O. 39 To turn off Auto Input: Select Off in step 2. To set for a specific MODE SELECT button, the TV will allow the TV status information to show the correct time zone information for your desired time zone. 4 If you press and hold the MODE SELECT...
..., highlight Location. 2 Press C or c to the input when you want to set the illumination mode of the TOSHIBA logo located on the front panel to On or Off. 1 From the PREFERENCES menu, highlight TOSHIBA Illumination. 2 Press C or c to On. Once an input has been set Auto Input: 1 From the PREFERENCES... either On or Off, then press O. 39 To turn off Auto Input: Select Off in step 2. To set for a specific MODE SELECT button, the TV will allow the TV status information to show the correct time zone information for your desired time zone. 4 If you press and hold the MODE SELECT...
Owner's Manual - English
Page 41
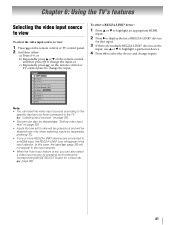
... To select the video input source to the TV (- Inputs 0 ANT/CABLE 1 Video 1 2 Video 2 3 ColorStream HD1 4 ColorStream HD2 5 HDMI 1 REGZA-LINK 6 HDMI 2 7 HDMI 3 8 HDMI 4 9 PC Note: • You can label the video input sources according to the specific devices you can also be skipped over only... input source by repeatedly pressing +. • If one or more REGZA-LINK® devices are multiple REGZA-LINK® devices on the remote control or TV control panel. 2 And then either: a) Press 0-9; page 38) will not appear in the input selector. To select a REGZA-LINK® device: ...
... To select the video input source to the TV (- Inputs 0 ANT/CABLE 1 Video 1 2 Video 2 3 ColorStream HD1 4 ColorStream HD2 5 HDMI 1 REGZA-LINK 6 HDMI 2 7 HDMI 3 8 HDMI 4 9 PC Note: • You can label the video input sources according to the specific devices you can also be skipped over only... input source by repeatedly pressing +. • If one or more REGZA-LINK® devices are multiple REGZA-LINK® devices on the remote control or TV control panel. 2 And then either: a) Press 0-9; page 38) will not appear in the input selector. To select a REGZA-LINK® device: ...

Owner's Manual - English
Page 45
... and forth between two channels without entering an actual channel number each time. 1 Select the first channel you press R, the TV will be cleared and the button will return to the last-viewed input. Switching between two channels using the Channel Number buttons...tuned.This feature also works for about 2 seconds until the message "Memorized" appears on the remote control. Chapter 6: Using the TV's features Tuning to a specific channel (programmed or unprogrammed) Tuning analog channels: Press the Channel Number (0-9) on -screen. Tuning digital channels: Enter the major ...
... and forth between two channels without entering an actual channel number each time. 1 Select the first channel you press R, the TV will be cleared and the button will return to the last-viewed input. Switching between two channels using the Channel Number buttons...tuned.This feature also works for about 2 seconds until the message "Memorized" appears on the remote control. Chapter 6: Using the TV's features Tuning to a specific channel (programmed or unprogrammed) Tuning analog channels: Press the Channel Number (0-9) on -screen. Tuning digital channels: Enter the major ...

Owner's Manual - English
Page 55
... Content themes TV-MA Mature Audience Only (This program is specifically designed to be viewed by adults and therefore may be unsuitable for children under 17.) L) Crude or indecent language S) Explicit sexual activity V) Graphic violence TV-14 Parents Strongly... children under 14 years of age.) D) Intensely suggestive dialogue L) Strong, coarse language S) Intense sexual situations V) Intense violence TV-PG Parental Guidance Suggested (This program contains material parents may be blocked. • TporedssisE playothnethreatrienmg ootfethceonptrroogl.rIaf mit isyorauteadre"Nwoantceh,"...
... Content themes TV-MA Mature Audience Only (This program is specifically designed to be viewed by adults and therefore may be unsuitable for children under 17.) L) Crude or indecent language S) Explicit sexual activity V) Graphic violence TV-14 Parents Strongly... children under 14 years of age.) D) Intensely suggestive dialogue L) Strong, coarse language S) Intense sexual situations V) Intense violence TV-PG Parental Guidance Suggested (This program contains material parents may be blocked. • TporedssisE playothnethreatrienmg ootfethceonptrroogl.rIaf mit isyorauteadre"Nwoantceh,"...
Owner's Manual - English
Page 56
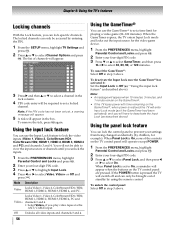
...entry will appear when the buttons on the TV control panel will appear in step 3 above . Mode Description Video Locks Video 1, Video 2, ColorStream HD1/HD2, HDMI 1, HDMI 2, HDMI 3, HDMI 4, and PC. Using the input lock feature You can lock specific channels. "Using the input lock feature" as... described above ). To deactivate the Input Lock once the GameTimer® has activated it: Set the Input Lock to deactivate the Input Lock (as described above ). Chapter 6: Using the TV's features Locking channels...
...entry will appear when the buttons on the TV control panel will appear in step 3 above . Mode Description Video Locks Video 1, Video 2, ColorStream HD1/HD2, HDMI 1, HDMI 2, HDMI 3, HDMI 4, and PC. Using the input lock feature You can lock specific channels. "Using the input lock feature" as... described above ). To deactivate the Input Lock once the GameTimer® has activated it: Set the Input Lock to deactivate the Input Lock (as described above ). Chapter 6: Using the TV's features Locking channels...

Owner's Manual - English
Page 63
..., highlight Advanced Picture Settings and press T. 2 Press B or b to select Film Stabilization. 3 Press C or c to AutoView. a device with a specific enhancer function). Note: If the Picture Mode is set to select Smooth, Standard or Off and press O. Note: If the Picture Mode is set to...From the PICTURE menu, highlight Advanced Picture Settings and press T. 2 Press B or b to select DynaLight. 3 Press C or c to the TV (e.g. Using the DynaLight™ feature The DynaLight™ feature automatically strengthens the black coloring of dark areas in the plus direction, the detail of...
..., highlight Advanced Picture Settings and press T. 2 Press B or b to select Film Stabilization. 3 Press C or c to AutoView. a device with a specific enhancer function). Note: If the Picture Mode is set to select Smooth, Standard or Off and press O. Note: If the Picture Mode is set to...From the PICTURE menu, highlight Advanced Picture Settings and press T. 2 Press B or b to select DynaLight. 3 Press C or c to the TV (e.g. Using the DynaLight™ feature The DynaLight™ feature automatically strengthens the black coloring of dark areas in the plus direction, the detail of...

Owner's Manual - English
Page 67
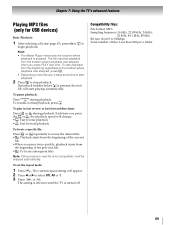
Toshiba cannot and does not grant such permission. Manual Start: 1 Insert USB device into the USB terminal or SD Memory Card into the SD card slot on the right side of the TV. 2 A prompt will appear. 4 Press B or b to select USB device or SD Memory Card if the selection window is ...of files (for Movie and Music) will return to the last-viewed channel or video input. 67 To close the Media Player: Press O. Media Player Specifications Device USB device: USB Mass Storage Class devices (MSC) Note: •Connectivity is not available during playback. SD Memory Card: SD Memory Card: up...
Toshiba cannot and does not grant such permission. Manual Start: 1 Insert USB device into the USB terminal or SD Memory Card into the SD card slot on the right side of the TV. 2 A prompt will appear. 4 Press B or b to select USB device or SD Memory Card if the selection window is ...of files (for Movie and Music) will return to the last-viewed channel or video input. 67 To close the Media Player: Press O. Media Player Specifications Device USB device: USB Mass Storage Class devices (MSC) Note: •Connectivity is not available during playback. SD Memory Card: SD Memory Card: up...

Owner's Manual - English
Page 68
... Fast reverse playback •J: Fast forward playback To locate a specific file: Press F or G repeatedly to registered DivX Certified devices. To play those DivX files, register your TV to your device and submit it will be displayed and your TV to a DivX® account: 1 From the APPLICATIONS menu,...174; account (- The content resumes playback from the beginning of the previous file. •G: To locate subsequent files. Chapter 7: Using the TV's advanced features Playing DivX® files (only for USB devices) Note: Some DivX® files will not play without registration of your...
... Fast reverse playback •J: Fast forward playback To locate a specific file: Press F or G repeatedly to registered DivX Certified devices. To play those DivX files, register your TV to your device and submit it will be displayed and your TV to a DivX® account: 1 From the APPLICATIONS menu,...174; account (- The content resumes playback from the beginning of the previous file. •G: To locate subsequent files. Chapter 7: Using the TV's advanced features Playing DivX® files (only for USB devices) Note: Some DivX® files will not play without registration of your...
Owner's Manual - English
Page 69
... Press A during playback. To set the repeat mode: 1 Press C. The current repeat setting will be skipped automatically. The setting is effective until the TV is not compatible, it takes some time to start playing automatically. page 67), press T or S to select Off, All or 1. 3 Press ... memorizes the location where playback is pressed, the next file will change. •H: Fast reverse playback •J: Fast forward playback To locate a specific file: Press F or G repeatedly to access the desired file. •F: Playback starts from the beginning of the current file. •When ...
... Press A during playback. To set the repeat mode: 1 Press C. The current repeat setting will be skipped automatically. The setting is effective until the TV is not compatible, it takes some time to start playing automatically. page 67), press T or S to select Off, All or 1. 3 Press ... memorizes the location where playback is pressed, the next file will change. •H: Fast reverse playback •J: Fast forward playback To locate a specific file: Press F or G repeatedly to access the desired file. •F: Playback starts from the beginning of the current file. •When ...
Owner's Manual - English
Page 72
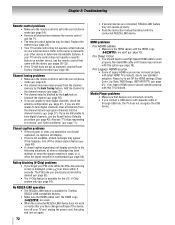
...not available, a black rectangle may not operate properly. • Read the instruction manual furnished with separate cable or through USB hub, the TV does not recognize the USB device. page 71). b) when the signal reception is nonstandard (- page 50). page 54). No REGZA-LINK ...; The V-Chip feature is available for Toshiba REGZA-LINK compatible devices. • Make sure the HDMI cables with the HDMI Logo ( ) are connected, REGZA-LINK feature may appear. V-Chip system only (- If your TV remote control does not operate a specific feature on your other device to tune ...
...not available, a black rectangle may not operate properly. • Read the instruction manual furnished with separate cable or through USB hub, the TV does not recognize the USB device. page 71). b) when the signal reception is nonstandard (- page 50). page 54). No REGZA-LINK ...; The V-Chip feature is available for Toshiba REGZA-LINK compatible devices. • Make sure the HDMI cables with the HDMI Logo ( ) are connected, REGZA-LINK feature may appear. V-Chip system only (- If your TV remote control does not operate a specific feature on your other device to tune ...

Owner's Manual - English
Page 74
... through 69 Cable TV: Mid band (A-8 through A-1, A through I) Super band (J through W) Hyper band (AA through ZZ, AAA, BBB) Ultra band (65 through 94, 100 through 135) Power Source: 120 V AC, 60 Hz Power Consumption 46SV670U: 2.4 Arms (maximum current) 0.3 W in standby mode 55SV670U: 3.1 Arms (maximum current) 0.3 W in the future. Chapter 9: Appendix Specifications Note: •...
... through 69 Cable TV: Mid band (A-8 through A-1, A through I) Super band (J through W) Hyper band (AA through ZZ, AAA, BBB) Ultra band (65 through 94, 100 through 135) Power Source: 120 V AC, 60 Hz Power Consumption 46SV670U: 2.4 Arms (maximum current) 0.3 W in standby mode 55SV670U: 3.1 Arms (maximum current) 0.3 W in the future. Chapter 9: Appendix Specifications Note: •...
Owner's Manual - English
Page 77
...DEFECTIVE PART WITH A NEW OR REFURBISHED PART WITHOUT CHARGE TO YOU FOR PARTS OR LABOR. By registering your LCD Television you will enable TACP to bring you new products specifically designed to meet your home when warranty service is required. Reception problems caused by TACP; How to contact ...is required under the U.S. Your Responsibility THE ABOVE WARRANTIES ARE SUBJECT TO THE FOLLOWING CONDITIONS: (1) You must retain your home at www.tacp.toshiba.com/service as soon as possible. WITH THE EXCEPTION OF ANY WARRANTIES IMPLIED BY THE LAW OF ANY STATE OF THE U.S.A. Depending on ...
...DEFECTIVE PART WITH A NEW OR REFURBISHED PART WITHOUT CHARGE TO YOU FOR PARTS OR LABOR. By registering your LCD Television you will enable TACP to bring you new products specifically designed to meet your home when warranty service is required. Reception problems caused by TACP; How to contact ...is required under the U.S. Your Responsibility THE ABOVE WARRANTIES ARE SUBJECT TO THE FOLLOWING CONDITIONS: (1) You must retain your home at www.tacp.toshiba.com/service as soon as possible. WITH THE EXCEPTION OF ANY WARRANTIES IMPLIED BY THE LAW OF ANY STATE OF THE U.S.A. Depending on ...
Owner's Manual - English
Page 78
... as follows: all parts are warranted against material defects in materials or workmanship that result in the Television failing for Toshiba Brand Flat Panel Televisions Toshiba of these warranties in Canada. DURING THIS PERIOD, TCL WILL, THESE LIMITED WARRANTIES EXTEND TO THE ORIGINAL CONSUMER PURCHASER ...LOST PROFITS, BUSINESS INTERRUPTION, OR MODIFICATION OR ERASURE OF RECORDED DATA CAUSED BY USE, MISUSE OR INABILITY TO USE THIS LCD TELEVISION). THIS WARRANTY GIVES YOU SPECIFIC LEGAL RIGHTS AND YOU MAY ALSO HAVE OTHER RIGHTS WHICH MAY VARY FROM STATE TO STATE IN THE U.S.A. DO NOT...
... as follows: all parts are warranted against material defects in materials or workmanship that result in the Television failing for Toshiba Brand Flat Panel Televisions Toshiba of these warranties in Canada. DURING THIS PERIOD, TCL WILL, THESE LIMITED WARRANTIES EXTEND TO THE ORIGINAL CONSUMER PURCHASER ...LOST PROFITS, BUSINESS INTERRUPTION, OR MODIFICATION OR ERASURE OF RECORDED DATA CAUSED BY USE, MISUSE OR INABILITY TO USE THIS LCD TELEVISION). THIS WARRANTY GIVES YOU SPECIFIC LEGAL RIGHTS AND YOU MAY ALSO HAVE OTHER RIGHTS WHICH MAY VARY FROM STATE TO STATE IN THE U.S.A. DO NOT...

