Printable Spec Sheet
Page 2
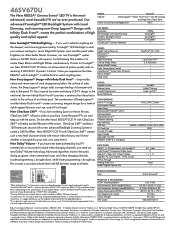
... HDMI Licensing LLC. Product design and specifications subject to your Toshiba television, always use a UL Listed wall bracket appropriate for a level of character and AUDIO: Speaker System Volume Limiter style to Resolution+TM AutoViewTM Video Scan Rate create Deep Blacks and Bright Whites simultaneously. If you decide to wall mount your seat, or to attain better blacks. Thanks to FocaLightTM, Cinema Mode 24fps3 our New REGZA® LCD TV...
... HDMI Licensing LLC. Product design and specifications subject to your Toshiba television, always use a UL Listed wall bracket appropriate for a level of character and AUDIO: Speaker System Volume Limiter style to Resolution+TM AutoViewTM Video Scan Rate create Deep Blacks and Bright Whites simultaneously. If you decide to wall mount your seat, or to attain better blacks. Thanks to FocaLightTM, Cinema Mode 24fps3 our New REGZA® LCD TV...
Owner's Manual - English
Page 2
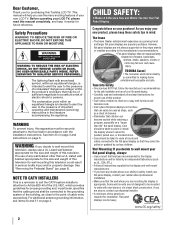
... important operating and maintenance (servicing) instructions in accordance with arrowhead symbol, within an equilateral triangle, is a growing trend and larger flat panel displays are not always supported on the proper stands or installed according to wall mount your flat panel display, contact your LCD TV, please read and understand all instructions supplied by an independent laboratory (such as practical. Flat panel displays can become excited while watching a program...
... important operating and maintenance (servicing) instructions in accordance with arrowhead symbol, within an equilateral triangle, is a growing trend and larger flat panel displays are not always supported on the proper stands or installed according to wall mount your flat panel display, contact your LCD TV, please read and understand all instructions supplied by an independent laboratory (such as practical. Flat panel displays can become excited while watching a program...
Owner's Manual - English
Page 4
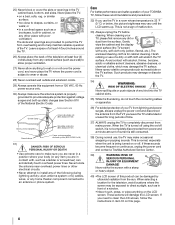
... back, bottom, and sides. This is not a sign of your TV, please first remove any other electrical circuits. • Never attempt to install any home theater component connected to clean the LCD screen, follow these sounds become frequent or continuous, unplug the power cord and contact a Toshiba Authorized Service Center. 39) WARNING: RISK OF SERIOUS PERSONAL INJURY OR EQUIPMENT DAMAGE! Never place...
... back, bottom, and sides. This is not a sign of your TV, please first remove any other electrical circuits. • Never attempt to install any home theater component connected to clean the LCD screen, follow these sounds become frequent or continuous, unplug the power cord and contact a Toshiba Authorized Service Center. 39) WARNING: RISK OF SERIOUS PERSONAL INJURY OR EQUIPMENT DAMAGE! Never place...
Owner's Manual - English
Page 5
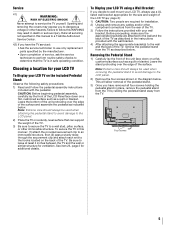
... end to the hooks located on the included Pedestal Stand: Observe the following safety precautions: 1) Read and Follow the pedestal assembly instructions included with your LCD TV using a Wall Bracket: If you to leave at least 4 inches between the TV and the wall or similar structure for additional details. Choosing a location for installation. 2) Unplug and remove any cables and/or other hazards. Removing the Pedestal Stand 1) Carefully lay the...
... end to the hooks located on the included Pedestal Stand: Observe the following safety precautions: 1) Read and Follow the pedestal assembly instructions included with your LCD TV using a Wall Bracket: If you to leave at least 4 inches between the TV and the wall or similar structure for additional details. Choosing a location for installation. 2) Unplug and remove any cables and/or other hazards. Removing the Pedestal Stand 1) Carefully lay the...
Owner's Manual - English
Page 6
... and the receiver. • Connect the equipment into an outlet on the award-winning Audyssey MultEQ technology. Enabling or changing certain features and functionality (e.g. Picture Settings, Auto Brightness Sensor, Power-On Mode) may not work with this equipment. For more intelligible dialog. • Manufactured under your television is connected. • Consult the dealer or an experienced radio/TV technician for help. therefore, Toshiba is not...
... and the receiver. • Connect the equipment into an outlet on the award-winning Audyssey MultEQ technology. Enabling or changing certain features and functionality (e.g. Picture Settings, Auto Brightness Sensor, Power-On Mode) may not work with this equipment. For more intelligible dialog. • Manufactured under your television is connected. • Consult the dealer or an experienced radio/TV technician for help. therefore, Toshiba is not...
Owner's Manual - English
Page 7
... Using the volume lock feature (8000 25 Operational feature reset (8900 25 Multi-brand remote control device codes 26 Chapter 4: Menu layout and navigation 34 Main menu layout 34 THINC™ menu 34 Navigating the menu system 35 Chapter 5: Setting up your TV 36 Initial Setup 36 Quick Setup from the SETUP menu 36 Selecting the menu language 36 Configuring the antenna input source for the ANT/CABLE terminal 37 Programming channels into the TV's channel memory 37 Auto...
... Using the volume lock feature (8000 25 Operational feature reset (8900 25 Multi-brand remote control device codes 26 Chapter 4: Menu layout and navigation 34 Main menu layout 34 THINC™ menu 34 Navigating the menu system 35 Chapter 5: Setting up your TV 36 Initial Setup 36 Quick Setup from the SETUP menu 36 Selecting the menu language 36 Configuring the antenna input source for the ANT/CABLE terminal 37 Programming channels into the TV's channel memory 37 Auto...

Owner's Manual - English
Page 9
... location (- page 14). •Digital Audio Out optical audio connection with red, green and blue color selections (- page 65). •Expert Mode allows detailed calibration with Dolby® Digital optical output format (- page 67). • ENERGY STAR® qualified Overview of navigating the TV's menu system (page 34). 8 Program channels into the TV's channel memory (- pages 13-19). 5 See "Chapter 3: Using the remote control" (- Lip-Sync feature activates an auto audio/video display timing adjustment function that allows HDMI source devices to adjust...
... location (- page 14). •Digital Audio Out optical audio connection with red, green and blue color selections (- page 65). •Expert Mode allows detailed calibration with Dolby® Digital optical output format (- page 67). • ENERGY STAR® qualified Overview of navigating the TV's menu system (page 34). 8 Program channels into the TV's channel memory (- pages 13-19). 5 See "Chapter 3: Using the remote control" (- Lip-Sync feature activates an auto audio/video display timing adjustment function that allows HDMI source devices to adjust...
Owner's Manual - English
Page 10
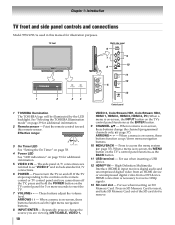
... Interface (HDMI 4) input receives digital audio and uncompressed digital video from an HDMI device or uncompressed digital video from a DVI device. ARROWS U u - Press in this remote sensor. TV front 1 2 34 Right side panel 6 7 9 10 8 11 12 5 13 Control panel 1 TOSHIBA Illumination The TOSHIBA logo will be illuminated by the LED backlight. The side panel A/V connections are viewing (ANT/CABLE, VIDEO 1, 10 VIDEO 2, ColorStream HD1, ColorStream HD2, HDMI 1, HDMI 2, HDMI 3, HDMI 4, PC).When a menu is on-screen, the INPUT button on the TV control panel for additional...
... Interface (HDMI 4) input receives digital audio and uncompressed digital video from an HDMI device or uncompressed digital video from a DVI device. ARROWS U u - Press in this remote sensor. TV front 1 2 34 Right side panel 6 7 9 10 8 11 12 5 13 Control panel 1 TOSHIBA Illumination The TOSHIBA logo will be illuminated by the LED backlight. The side panel A/V connections are viewing (ANT/CABLE, VIDEO 1, 10 VIDEO 2, ColorStream HD1, ColorStream HD2, HDMI 1, HDMI 2, HDMI 3, HDMI 4, PC).When a menu is on-screen, the INPUT button on the TV control panel for additional...
Owner's Manual - English
Page 11
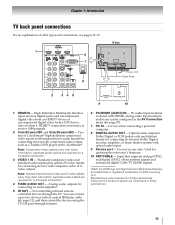
... HDMI logo and High-Definition Multimedia Interface are required for connecting devices with component video output, such as a Toshiba DVD player with composite video or Svideo output. Manufactured under license from a DVI device. Chapter 1: Introduction TV back panel connections For an explanation of cable types and connections, see item 6. Two sets of Dolby Laboratories. 11 Optical audio output in the AV Connection menu (- Input that supports analog (NTSC) and digital (ATSC) off-air antenna signals and analog and digital Cable TV (QAM) signals...
... HDMI logo and High-Definition Multimedia Interface are required for connecting devices with component video output, such as a Toshiba DVD player with composite video or Svideo output. Manufactured under license from a DVI device. Chapter 1: Introduction TV back panel connections For an explanation of cable types and connections, see item 6. Two sets of Dolby Laboratories. 11 Optical audio output in the AV Connection menu (- Input that supports analog (NTSC) and digital (ATSC) off-air antenna signals and analog and digital Cable TV (QAM) signals...
Owner's Manual - English
Page 12
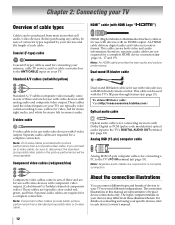
... types required by your devices and the length of each device's owner's manual. 12 An HDMI cable delivers digital audio and video in this manual are typically color-coded red, green, and blue. This cable carries both video and audio information; page 15). Separate audio cables are typically colorcoded according to use with video devices with S-video output. The connection illustrations in its native format. Note: An HDMI cable provides the best audio and picture performance. S-video cable S-video cable is Toshiba's brand of component video...
... types required by your devices and the length of each device's owner's manual. 12 An HDMI cable delivers digital audio and video in this manual are typically color-coded red, green, and blue. This cable carries both video and audio information; page 15). Separate audio cables are typically colorcoded according to use with video devices with S-video output. The connection illustrations in its native format. Note: An HDMI cable provides the best audio and picture performance. S-video cable S-video cable is Toshiba's brand of component video...
Owner's Manual - English
Page 13
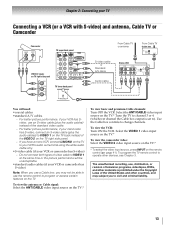
... S-video) - To program the TV remote control to change channels. Chapter 2: Connecting your TV Connecting a VCR (or a VCR with S-video) and antenna, Cable TV or Camcorder Camcorder AUDIO OUT L R VIDEO TV upper back panel VIDEO 2 inputs on the TV.* Tune the TV to channel 3 or 4 (whichever channel the Cable box output is prohibited under the Copyright Laws of the VIDEO 2 on the TV.* To view basic and premium Cable channels: Turn OFF the VCR. Select the VIDEO 1 video input source on the TV.* To view the camcorder video: Select the VIDEO 2 video input source...
... S-video) - To program the TV remote control to change channels. Chapter 2: Connecting your TV Connecting a VCR (or a VCR with S-video) and antenna, Cable TV or Camcorder Camcorder AUDIO OUT L R VIDEO TV upper back panel VIDEO 2 inputs on the TV.* Tune the TV to channel 3 or 4 (whichever channel the Cable box output is prohibited under the Copyright Laws of the VIDEO 2 on the TV.* To view basic and premium Cable channels: Turn OFF the VCR. Select the VIDEO 1 video input source on the TV.* To view the camcorder video: Select the VIDEO 2 video input source...
Owner's Manual - English
Page 18
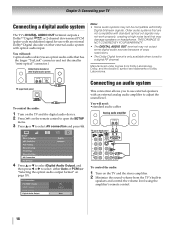
...terminal outputs a Dolby®* Digital or 2-channel down-mixed PCM (pulse-code modulation) signal for use external speakers with an external analog audio amplifier to adjust the sound level. AV Connection PC/HDMI 1 Audio HDMI 1 Audio HDMI Settings Digital Audio Output PC Digital Auto Note: • Some audio systems may damage speakers or headphones. You will need : •optical audio cable (Use an optical audio cable that may not be compatible with Dolby Digital bitstream signals. Older audio systems that are trademarks of copy restrictions. • The Dolby Digital format...
...terminal outputs a Dolby®* Digital or 2-channel down-mixed PCM (pulse-code modulation) signal for use external speakers with an external analog audio amplifier to adjust the sound level. AV Connection PC/HDMI 1 Audio HDMI 1 Audio HDMI Settings Digital Audio Output PC Digital Auto Note: • Some audio systems may damage speakers or headphones. You will need : •optical audio cable (Use an optical audio cable that may not be compatible with Dolby Digital bitstream signals. Older audio systems that are trademarks of copy restrictions. • The Dolby Digital format...
Owner's Manual - English
Page 19
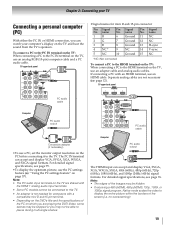
... IN or HDMI connection, you can watch your computer's display on the PC before connecting it to the TV. TV upper back panel PC audio cable Computer PC audio output PC audio cable Conversion adapter (if necessary) •To use an HDMI cable. Note: • The PC audio input terminals on the TV are shared with an HDMI terminal, use a PC, set the monitor output resolution on the TV and hear the sound from the TV's speakers. To connect a PC to...
... IN or HDMI connection, you can watch your computer's display on the PC before connecting it to the TV. TV upper back panel PC audio cable Computer PC audio output PC audio cable Conversion adapter (if necessary) •To use an HDMI cable. Note: • The PC audio input terminals on the TV are shared with an HDMI terminal, use a PC, set the monitor output resolution on the TV and hear the sound from the TV's speakers. To connect a PC to...
Owner's Manual - English
Page 21
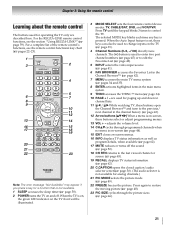
... menu is on -screen menus. 16 INFO displays TV status information as well as program details, when available (- page 46). 21 are described here. page 45). 19 RECALL displays TV status information (- The = button is not available. 1 SLEEP accesses the sleep timer (- page 42). 5 INPUT selects the video input source (- page 34). 10 PAGE + / - page 62). 20 C.CAPTION opens the closed caption/audio selector screen(- Chapter 3: Using the remote control Learning about the remote control The buttons used for operating the TV...
... menu is on -screen menus. 16 INFO displays TV status information as well as program details, when available (- page 46). 21 are described here. page 45). 19 RECALL displays TV status information (- The = button is not available. 1 SLEEP accesses the sleep timer (- page 42). 5 INPUT selects the video input source (- page 34). 10 PAGE + / - page 62). 20 C.CAPTION opens the closed caption/audio selector screen(- Chapter 3: Using the remote control Learning about the remote control The buttons used for operating the TV...
Owner's Manual - English
Page 22
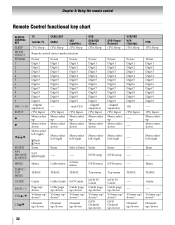
... control Remote Control functional key chart REMOTE CONTROL KEY SLEEP MODE SELECT POWER 1 2 3 4 5 6 7 8 9 0 100/-/+10 INPUT B b C 3 # c ENTER FAV BROWSE R/SETUP MENU THINC/ TOP MENU GUIDE PAGE +/- Menu Cable menu Action, menu THINC THINC THINC Guide Cable Guide SAT Guide Page up/ down Volume up/ down*1 Cable page up/down Volume up/ down*1 Guide page up/down Volume up/ down*1 Channel up/down Channel up/down Channel up/down DVD DVD/VCR (Orion) (TV) Sleep Power Digit 1 Digit 2 Digit 3 Digit 4 Digit 5 Digit 6 Digit 7 Digit 8 Digit 9 Digit 0 - (digital separator) (TV) Input Menu...
... control Remote Control functional key chart REMOTE CONTROL KEY SLEEP MODE SELECT POWER 1 2 3 4 5 6 7 8 9 0 100/-/+10 INPUT B b C 3 # c ENTER FAV BROWSE R/SETUP MENU THINC/ TOP MENU GUIDE PAGE +/- Menu Cable menu Action, menu THINC THINC THINC Guide Cable Guide SAT Guide Page up/ down Volume up/ down*1 Cable page up/down Volume up/ down*1 Guide page up/down Volume up/ down*1 Channel up/down Channel up/down Channel up/down DVD DVD/VCR (Orion) (TV) Sleep Power Digit 1 Digit 2 Digit 3 Digit 4 Digit 5 Digit 6 Digit 7 Digit 8 Digit 9 Digit 0 - (digital separator) (TV) Input Menu...
Owner's Manual - English
Page 56
... list of standby by using the remote control. To remove the tick, press T again. You will appear when the buttons on the TV control panel are pressed. When Panel Lock is set a time limit for the video game device. 1 From the PREFERENCES menu, highlight Parental Control and Locks and press T. 2 Enter your four-digit PIN code. 3 Press B or b to highlight Input Lock. 4 Press C or c to select Video, Video+ or Off and press O. Mode Description Video Locks Video 1, Video 2, ColorStream HD1/HD2, HDMI 1, HDMI 2, HDMI 3, HDMI...
... list of standby by using the remote control. To remove the tick, press T again. You will appear when the buttons on the TV control panel are pressed. When Panel Lock is set a time limit for the video game device. 1 From the PREFERENCES menu, highlight Parental Control and Locks and press T. 2 Enter your four-digit PIN code. 3 Press B or b to highlight Input Lock. 4 Press C or c to select Video, Video+ or Off and press O. Mode Description Video Locks Video 1, Video 2, ColorStream HD1/HD2, HDMI 1, HDMI 2, HDMI 3, HDMI...
Owner's Manual - English
Page 71
... the POWER button on the TV control panel for 5 or more of the following suggestions, which will display when you select that the sound and picture are slightly out of this phenomenon: - Picture problems General picture problems • Check the antenna/cable connections (- Try another channel. • Adjust the Tint and/or Color (- Cannot view external signals or channel 3 or 4 • If you cannot view signals from external devices connected to VIDEO 1, VIDEO 2, ColorStream HD1, ColorStream HD2, HDMI 1, HDMI 2, HDMI 3, HDMI 4, PC...
... the POWER button on the TV control panel for 5 or more of the following suggestions, which will display when you select that the sound and picture are slightly out of this phenomenon: - Picture problems General picture problems • Check the antenna/cable connections (- Try another channel. • Adjust the Tint and/or Color (- Cannot view external signals or channel 3 or 4 • If you cannot view signals from external devices connected to VIDEO 1, VIDEO 2, ColorStream HD1, ColorStream HD2, HDMI 1, HDMI 2, HDMI 3, HDMI 4, PC...
Owner's Manual - English
Page 77
... service charges for set installation, setup, adjustment of customer controls, and installation or repair of instructions furnished by inadequate antenna systems, misaligned satellite dishes, cable television distribution, VCRs, DVD players/recorders, personal computer level IEEE-1394 devices, and any other connected signal source device are effective only if this LCD Television is purchased and operated in this LCD Television and connected equipment; For additional information, visit TACP's website: www.tacp.toshiba.com ALL WARRANTIES IMPLIED...
... service charges for set installation, setup, adjustment of customer controls, and installation or repair of instructions furnished by inadequate antenna systems, misaligned satellite dishes, cable television distribution, VCRs, DVD players/recorders, personal computer level IEEE-1394 devices, and any other connected signal source device are effective only if this LCD Television is purchased and operated in this LCD Television and connected equipment; For additional information, visit TACP's website: www.tacp.toshiba.com ALL WARRANTIES IMPLIED...
Owner's Manual - English
Page 79
... WRITTEN LIMITED WARRANTY. THIS WARRANTY DOES NOT APPLY AND SHALL BE VOID AND UNENFORCEABLE IF THE 79 c. Service on Toshiba-branded accessory items (such accessory items may be taken to an ASP for set installation, setup, adjustment of customer controls, and installation or repair of repair required, the service will either be performed on-site or the Television will come on the type of antenna systems...
... WRITTEN LIMITED WARRANTY. THIS WARRANTY DOES NOT APPLY AND SHALL BE VOID AND UNENFORCEABLE IF THE 79 c. Service on Toshiba-branded accessory items (such accessory items may be taken to an ASP for set installation, setup, adjustment of customer controls, and installation or repair of repair required, the service will either be performed on-site or the Television will come on the type of antenna systems...
Owner's Manual - English
Page 82
... Timer 58 Optical audio output format 53 P Panel Lock 56 PC Audio 57 PC connection 19 PC settings 57 Picture mode 49 Picture quality 49 Picture scroll 48 Picture size selection 46 PIN code 53 POWER button 10, 21 Power-On Mode 40 R RECALL button 62 REGZA-LINK® connection 17 REGZA-LINK® feature 59 Remote control Battery installation 20 Device code table 26 Functional key chart 22 Programming 24 Reset Factory Defaults 40 Resolution 63 RGB Range 61 S SAP sound 52 Satellite receiver connection ...........14 Sleep Timer 58...
... Timer 58 Optical audio output format 53 P Panel Lock 56 PC Audio 57 PC connection 19 PC settings 57 Picture mode 49 Picture quality 49 Picture scroll 48 Picture size selection 46 PIN code 53 POWER button 10, 21 Power-On Mode 40 R RECALL button 62 REGZA-LINK® connection 17 REGZA-LINK® feature 59 Remote control Battery installation 20 Device code table 26 Functional key chart 22 Programming 24 Reset Factory Defaults 40 Resolution 63 RGB Range 61 S SAP sound 52 Satellite receiver connection ...........14 Sleep Timer 58...


