Owner's Manual - English
Page 3
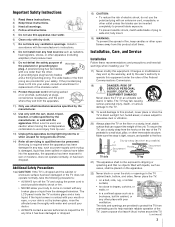
... cord or plug is dropped and the cabinet or enclosure surface has been damaged or the TV does not operate normally, take the following precautions: • ALWAYS turn off the TV and unplug the power cord to avoid possible electric shock or fire. • NEVER allow your body to come ... not block any way, such as possible) 4" min. or areas subject to operate this product, never place or store the TV in any ventilation openings. The LCD panel inside the TV contains glass and a toxic liquid. The slots and openings are provided for long periods of the unit. Servicing is cut by...
... cord or plug is dropped and the cabinet or enclosure surface has been damaged or the TV does not operate normally, take the following precautions: • ALWAYS turn off the TV and unplug the power cord to avoid possible electric shock or fire. • NEVER allow your body to come ... not block any way, such as possible) 4" min. or areas subject to operate this product, never place or store the TV in any ventilation openings. The LCD panel inside the TV contains glass and a toxic liquid. The slots and openings are provided for long periods of the unit. Servicing is cut by...

Owner's Manual - English
Page 4
.... Never strike the screen with a sharp or heavy object. 36) • The LCD screen of this product can accidentally touch overhead power lines. Refer all servicing not specified in this manual to a Toshiba Authorized Service Center. 38) If you leave the TV unattended or unused for the television, avoid locations where the screen may...
.... Never strike the screen with a sharp or heavy object. 36) • The LCD screen of this product can accidentally touch overhead power lines. Refer all servicing not specified in this manual to a Toshiba Authorized Service Center. 38) If you leave the TV unattended or unused for the television, avoid locations where the screen may...
Owner's Manual - English
Page 6
...not work with this TV is not permanent and will not occur in this TV. Trademark Information • Manufactured under your LCD TV The following measures: &#...therefore, Toshiba is not responsible for a Class B digital device, pursuant to these symptoms. 1) An afterimage (ghost) may be determined by removing and applying power to ...LCD Display technology and are designed to radio or television reception, which the receiver is displayed for 46" and 52" models) 6 FCC Declaration of Conformity Compliance Statement (Part 15): The Toshiba 32RV530U, 37RV530U, 42RV530U, 46RV530U...
...not work with this TV is not permanent and will not occur in this TV. Trademark Information • Manufactured under your LCD TV The following measures: &#...therefore, Toshiba is not responsible for a Class B digital device, pursuant to these symptoms. 1) An afterimage (ghost) may be determined by removing and applying power to ...LCD Display technology and are designed to radio or television reception, which the receiver is displayed for 46" and 52" models) 6 FCC Declaration of Conformity Compliance Statement (Part 15): The Toshiba 32RV530U, 37RV530U, 42RV530U, 46RV530U...
Owner's Manual - English
Page 7
...audio mode 32 Viewing the digital signal meter 33 Setting the time zone 33 Viewing the system status 34 Selecting the Power-On Mode 34 Chapter 6: Using the TV's features 35 Selecting the video input source to view 35 Labeling the video input sources 35 Tuning channels 36 Tuning ...; feature 45 Selecting the optical audio output format 46 Using the Dolby® Digital Dynamic Range Control feature 46 Using the Locks menu 46 Entering the PIN code 46 If you cannot remember your PIN code 46 Changing your PIN code 47 Blocking TV programs and movies by rating (V-Chip 47 Downloading ...
...audio mode 32 Viewing the digital signal meter 33 Setting the time zone 33 Viewing the system status 34 Selecting the Power-On Mode 34 Chapter 6: Using the TV's features 35 Selecting the video input source to view 35 Labeling the video input sources 35 Tuning channels 36 Tuning ...; feature 45 Selecting the optical audio output format 46 Using the Dolby® Digital Dynamic Range Control feature 46 Using the Locks menu 46 Entering the PIN code 46 If you cannot remember your PIN code 46 Changing your PIN code 47 Blocking TV programs and movies by rating (V-Chip 47 Downloading ...

Owner's Manual - English
Page 9
...TV's channel memory (- page 46). • CableClear® digital picture noise reduction (- The menu for this feature has a unique "black" design to adjust the TV's standard colors. Overview of steps for a separate digital converter set up your TV and begin using your new Toshiba widescreen, integrated HD, LCD TV...page 31). • IR OUT infrared terminal using the TV's features, see Chapter 9. 9 page 6). • Place the TV in the power cords for IR pass-through device control (- pages 2-5) 2 Do not plug in any power cords until AFTER you 're watching (- page 30). ...
...TV's channel memory (- page 46). • CableClear® digital picture noise reduction (- The menu for this feature has a unique "black" design to adjust the TV's standard colors. Overview of steps for a separate digital converter set up your TV and begin using your new Toshiba widescreen, integrated HD, LCD TV...page 31). • IR OUT infrared terminal using the TV's features, see Chapter 9. 9 page 6). • Place the TV in the power cords for IR pass-through device control (- pages 2-5) 2 Do not plug in any power cords until AFTER you 're watching (- page 30). ...

Owner's Manual - English
Page 10
...sensor. Used for 5 or more seconds to reset the TV. 12 Control panel 5 ARROWS BbC c - If the TV stops responding to the controls on -screen, these buttons change the source you cannot turn the TV on and off the TV, press and hold the POWER button on -screen menu. 8 CHANNEL Bb - Press ...to instantly close an on the TV control panel for updating the television's firmware. 10 Press to turn off . Press...
...sensor. Used for 5 or more seconds to reset the TV. 12 Control panel 5 ARROWS BbC c - If the TV stops responding to the controls on -screen, these buttons change the source you cannot turn the TV on and off the TV, press and hold the POWER button on -screen menu. 8 CHANNEL Bb - Press ...to instantly close an on the TV control panel for updating the television's firmware. 10 Press to turn off . Press...
Owner's Manual - English
Page 11
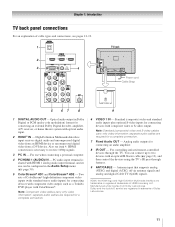
... (composite) video and standard audio inputs plus optional S-video inputs for connecting devices with component video output, such as a Toshiba DVD player with ColorStream®. separate audio cables are registered trademarks of cable types and connections, see item 4. Analog audio ...Standard (composite) video and S-video cables carry only video information; Manufactured under license from a DVI device. Also see pages 12-19. 1 TV back 2 3 4 Power cord Cable Strap 5 67 8 9 1 DIGITAL AUDIO OUT - You can be configured in Dolby Digital or PCM (pulse-code modulation) format...
... (composite) video and standard audio inputs plus optional S-video inputs for connecting devices with component video output, such as a Toshiba DVD player with ColorStream®. separate audio cables are registered trademarks of cable types and connections, see item 4. Analog audio ...Standard (composite) video and S-video cables carry only video information; Manufactured under license from a DVI device. Also see pages 12-19. 1 TV back 2 3 4 Power cord Cable Strap 5 67 8 9 1 DIGITAL AUDIO OUT - You can be configured in Dolby Digital or PCM (pulse-code modulation) format...
Owner's Manual - English
Page 15
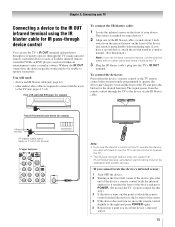
...(with a rubber band and leave it touches the front of the device and press POWER. (Do not use the TV's remote control for the desired function. page 12) • other audio/video cables as Toshiba infrared remotecontrolled VCRs or DVD players) enclosed within an entertainment center or similar cabinet....turn on, move the remote control slightly to the right and press POWER again. 5 Repeat step 4 until you also will need to use the TV's remote control to operate the TV. • The IR pass-through the TV) many infrared remote-controlled devices (such as required to connect the device...
...(with a rubber band and leave it touches the front of the device and press POWER. (Do not use the TV's remote control for the desired function. page 12) • other audio/video cables as Toshiba infrared remotecontrolled VCRs or DVD players) enclosed within an entertainment center or similar cabinet....turn on, move the remote control slightly to the right and press POWER again. 5 Repeat step 4 until you also will need to use the TV's remote control to operate the TV. • The IR pass-through the TV) many infrared remote-controlled devices (such as required to connect the device...

Owner's Manual - English
Page 21
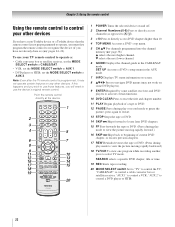
... 23). 1 POWER turns the TV on -screen (- page 42). 3 SLEEP accesses the sleep timer (- page 51). 4 PIC SIZE cycles through programmed channels when no menu is not available. 21 page 38) or to the previous/next channel in the channel history (- page 44). 13 INFO displays TV status information as...37). (Also see the remote control functional key chart (- Note: The error message "Not Available" may appear if you press a key for operating the TV only are described here. page 36). 6 INPUT selects the video input source (- page 27). 18 EXIT closes on -screen, these buttons open the ...
... 23). 1 POWER turns the TV on -screen (- page 42). 3 SLEEP accesses the sleep timer (- page 51). 4 PIC SIZE cycles through programmed channels when no menu is not available. 21 page 38) or to the previous/next channel in the channel history (- page 44). 13 INFO displays TV status information as...37). (Also see the remote control functional key chart (- Note: The error message "Not Available" may appear if you press a key for operating the TV only are described here. page 36). 6 INPUT selects the video input source (- page 27). 18 EXIT closes on -screen, these buttons open the ...
Owner's Manual - English
Page 22
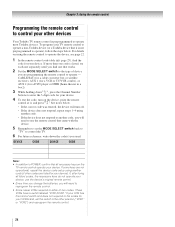
... and you wish to use those features, you have not already done so) (- Point the remote control directly at the device. 16 17 18 19 1 POWER Turns the selected device on and off. 2 Channel Numbers (0-9) Press to directly access channels (as opposed to < ,). 3 +10 Press to control a VCR; SET...to control a cable converter box or satellite receiver; pages 24-26). Note: Even after the TV remote control is programmed, it may not work on any other devices If you have a non-Toshiba device or a Toshiba device that the remote control is not preprogrammed to operate, you must first program the remote...
... and you wish to use those features, you have not already done so) (- Point the remote control directly at the device. 16 17 18 19 1 POWER Turns the selected device on and off. 2 Channel Numbers (0-9) Press to directly access channels (as opposed to < ,). 3 +10 Press to control a VCR; SET...to control a cable converter box or satellite receiver; pages 24-26). Note: Even after the TV remote control is programmed, it may not work on any other devices If you have a non-Toshiba device or a Toshiba device that the remote control is not preprogrammed to operate, you must first program the remote...
Owner's Manual - English
Page 23
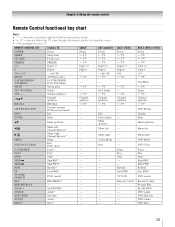
... Record (2 click AUX 2 (DVD or HTIB) Power s TV s TV s TV Digit 1-9 Digit 0 +10 s TV Top Menu s TV Setup s TV Channel up/down s TV DVD Return Display Enter Menu up/down Menu left c # Menu right/ Channel Browser™ --- REMOTE CONTROL KEY Toshiba TV CABLE SAT (satellite) POWER SLEEP PIC SIZE FREEZE Power Sleep timer Picture size FREEZE Power s TV s TV s TV Power s TV s TV s TV 1-9 Digit 1-9 Digit 1-9 Digit 1-9 0 Digit 0 Digit 0 Digit...
... Record (2 click AUX 2 (DVD or HTIB) Power s TV s TV s TV Digit 1-9 Digit 0 +10 s TV Top Menu s TV Setup s TV Channel up/down s TV DVD Return Display Enter Menu up/down Menu left c # Menu right/ Channel Browser™ --- REMOTE CONTROL KEY Toshiba TV CABLE SAT (satellite) POWER SLEEP PIC SIZE FREEZE Power Sleep timer Picture size FREEZE Power s TV s TV s TV Power s TV s TV s TV 1-9 Digit 1-9 Digit 1-9 Digit 1-9 0 Digit 0 Digit 0 Digit...
Owner's Manual - English
Page 24
... the batteries, you will need to use the remote control that came with the device. 5 Remember to set the switch to the other devices Your Toshiba TV remote control is not preprogrammed to operate), follow the steps below . • If the correct code was entered, the device will turn on the ... (if other codes are not operational, repeat the device code setup using another code, you used: DEVICE CODE DEVICE CODE Note: • In addition to POWER, confirm that all listed codes, the necessary keys do not operate your device. 4 To test the code, turn off. • If the device does...
... the batteries, you will need to use the remote control that came with the device. 5 Remember to set the switch to the other devices Your Toshiba TV remote control is not preprogrammed to operate), follow the steps below . • If the correct code was entered, the device will turn on the ... (if other codes are not operational, repeat the device code setup using another code, you used: DEVICE CODE DEVICE CODE Note: • In addition to POWER, confirm that all listed codes, the necessary keys do not operate your device. 4 To test the code, turn off. • If the device does...
Owner's Manual - English
Page 27
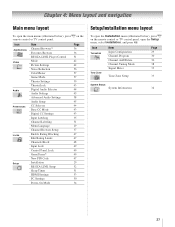
... and navigation Main menu layout To open the main menus (illustrated below ), press Y on the remote control or TV control panel, open the Installation menu (illustrated below ), press Y on the remote control or TV control panel. Icon Applications Video Audio Preferences Locks Setup Item Channel Browser™ Favorites Browser REGZA-LINK Player... Edit Rating Limits Channels Block Input Lock Control Panel Lock GameTimer® New PIN Code Installation REGZA-LINK Setup Sleep Timer HDMI Settings PC Settings Power-On Mode Page 36 36 51 42 42 56 57 57 39 43 44 45 58 45 44 43 43 35 31 29 37 47...
... and navigation Main menu layout To open the main menus (illustrated below ), press Y on the remote control or TV control panel, open the Installation menu (illustrated below ), press Y on the remote control or TV control panel. Icon Applications Video Audio Preferences Locks Setup Item Channel Browser™ Favorites Browser REGZA-LINK Player... Edit Rating Limits Channels Block Input Lock Control Panel Lock GameTimer® New PIN Code Installation REGZA-LINK Setup Sleep Timer HDMI Settings PC Settings Power-On Mode Page 36 36 51 42 42 56 57 57 39 43 44 45 58 45 44 43 43 35 31 29 37 47...

Owner's Manual - English
Page 29
...Preferences menu. 2 Highlight Menu Language and press c. 3 Press B or b to select the input source (Cable or Antenna) for the on the TV. Installation Terrestrial Input Configuration Channel Program Channel Add/Delete Channel Tuning Mode Signal Meter Auto 4 Press C or c to select your...ñol 4 Press O to your new settings, highlight Done and press T. Setup Installation REGZA-LINK Setup Sleep Timer HDMI Settings PC Settings Power-On Mode Power-Saving 3 (A new set of menus and messages. Chapter 5: Setting up your preferred menu language and press T. To select the menu language:...
...Preferences menu. 2 Highlight Menu Language and press c. 3 Press B or b to select the input source (Cable or Antenna) for the on the TV. Installation Terrestrial Input Configuration Channel Program Channel Add/Delete Channel Tuning Mode Signal Meter Auto 4 Press C or c to select your...ñol 4 Press O to your new settings, highlight Done and press T. Setup Installation REGZA-LINK Setup Sleep Timer HDMI Settings PC Settings Power-On Mode Power-Saving 3 (A new set of menus and messages. Chapter 5: Setting up your preferred menu language and press T. To select the menu language:...
Owner's Manual - English
Page 34
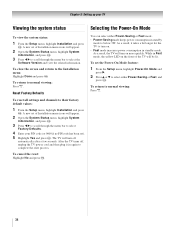
...highlight System Information, and press T. 3 Press C c to scroll through the menu bar to select Factory Defaults. 4 Enter your TV Viewing the system status Selecting the Power-On Mode To view the system status: 1 From the Setup menu, highlight Installation and press T. To cancel the reset: Highlight...T. As a result, the TV will turn off , unplug the TV power cord and then plug it takes a bit longer for the TV to turn on. • Fast mode increases power consumption in again to select either Power-Saving or Fast mode. • Power-Saving mode keeps power consumption in Fast mode, the...
...highlight System Information, and press T. 3 Press C c to scroll through the menu bar to select Factory Defaults. 4 Enter your TV Viewing the system status Selecting the Power-On Mode To view the system status: 1 From the Setup menu, highlight Installation and press T. To cancel the reset: Highlight...T. As a result, the TV will turn off , unplug the TV power cord and then plug it takes a bit longer for the TV to turn on. • Fast mode increases power consumption in again to select either Power-Saving or Fast mode. • Power-Saving mode keeps power consumption in Fast mode, the...

Owner's Manual - English
Page 37
... (continued) 37 In Browse mode, when you stop on page 53 for more information.) 8 To save your entries, highlight Done and press T. Chapter 6: Using the TV's features To set up the Channel Browser™ Favorites list regardless of the Channel Browser™ 1 History 88 2 10 TVLAND 2 ABCHD 3 4 11 3 8 ... Browser™ will open the Channel Browser™ and surf back to a previous item or forward to select On or Off. If Favorites List is powered off. 4 Press b to highlight ANT/CABLE List, and then press C or c to select On or Off. 5 Press b to highlight Inputs List...
... (continued) 37 In Browse mode, when you stop on page 53 for more information.) 8 To save your entries, highlight Done and press T. Chapter 6: Using the TV's features To set up the Channel Browser™ Favorites list regardless of the Channel Browser™ 1 History 88 2 10 TVLAND 2 ABCHD 3 4 11 3 8 ... Browser™ will open the Channel Browser™ and surf back to a previous item or forward to select On or Off. If Favorites List is powered off. 4 Press b to highlight ANT/CABLE List, and then press C or c to select On or Off. 5 Press b to highlight Inputs List...
Owner's Manual - English
Page 49
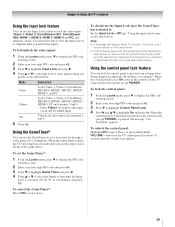
...you unlock the inputs. When the control panel is locked and any button on the control panel (except POWER) is activated (30, 60, 90, or 120 minutes) and press T. Chapter 6: Using the TV's features Using the input lock feature You can use the GameTimer to set the GameTimer®: 1 .... Note: • A message will appear when 10 minutes, 3 minutes, and 1 minute remain on the GameTimer. • If the TV loses power with time remaining on the GameTimer, when power is On, none of video input locking you play video tapes via an ANT/CABLE input. Using the control panel lock...
...you unlock the inputs. When the control panel is locked and any button on the control panel (except POWER) is activated (30, 60, 90, or 120 minutes) and press T. Chapter 6: Using the TV's features Using the input lock feature You can use the GameTimer to set the GameTimer®: 1 .... Note: • A message will appear when 10 minutes, 3 minutes, and 1 minute remain on the GameTimer. • If the TV loses power with time remaining on the GameTimer, when power is On, none of video input locking you play video tapes via an ANT/CABLE input. Using the control panel lock...
Owner's Manual - English
Page 51
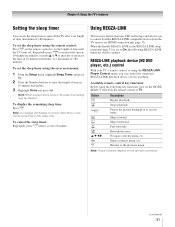
... of time (maximum of 180 minutes). Note: When a power failure occurs, the sleep timer setting may be enabled. page...new feature that uses CEC technology and allows you to 0 minute. To set to control Toshiba REGZA-LINK compatible devices from the TV remote via HDMI connection (- Note: A message will be cleared. When the Enable REGZA-LINK... backward. Rewinds/reverses. To display the remaining sleep time: Press [. Skips forward. Chapter 6: Using the TV's features Setting the sleep timer You can control the connected REGZA-LINK playback device you are watching. Repeatedly ...
... of time (maximum of 180 minutes). Note: When a power failure occurs, the sleep timer setting may be enabled. page...new feature that uses CEC technology and allows you to 0 minute. To set to control Toshiba REGZA-LINK compatible devices from the TV remote via HDMI connection (- Note: A message will be cleared. When the Enable REGZA-LINK... backward. Rewinds/reverses. To display the remaining sleep time: Press [. Skips forward. Chapter 6: Using the TV's features Setting the sleep timer You can control the connected REGZA-LINK playback device you are watching. Repeatedly ...
Owner's Manual - English
Page 52
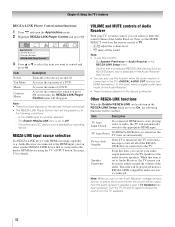
...be enabled. Accesses the contents list when you want to Off. - REGZA-LINK input source selection If a REGZA-LINK device with HDMI switching capability (e.g. TV Auto Power If a REGZA-LINK device is selected for details. Accesses the menu of a DVD. The Enable REGZA-LINK item is set your... TV's remote control, you can select another REGZA-LINK device that a connected REGZA-LINK device (such as HD DVD player, etc) is turned on, the TV turns on the ...
...be enabled. Accesses the contents list when you want to Off. - REGZA-LINK input source selection If a REGZA-LINK device with HDMI switching capability (e.g. TV Auto Power If a REGZA-LINK device is selected for details. Accesses the menu of a DVD. The Enable REGZA-LINK item is set your... TV's remote control, you can select another REGZA-LINK device that a connected REGZA-LINK device (such as HD DVD player, etc) is turned on, the TV turns on the ...
Owner's Manual - English
Page 53
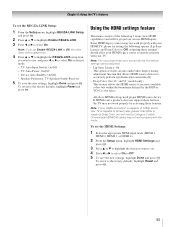
...source devices to accurately perform synchronization automatically. • Deep Color: On (46" and 52" models only) This feature allows the HDMI source to select On or desired mode. • TV Auto Input Switch: On/Off • TV Auto Power: On/Off • Device Auto Standby: On/Off • Speaker ...Preference: TV Speakers/Audio Receiver 5 To save the new settings, highlight Done and press T. Note: ...
...source devices to accurately perform synchronization automatically. • Deep Color: On (46" and 52" models only) This feature allows the HDMI source to select On or desired mode. • TV Auto Input Switch: On/Off • TV Auto Power: On/Off • Device Auto Standby: On/Off • Speaker ...Preference: TV Speakers/Audio Receiver 5 To save the new settings, highlight Done and press T. Note: ...


