
Owner's Manual - English
Page 7
...remote control to control your other devices 25 Remote control codes 26 Chapter 4: Menu layout and navigation 28 Main menu layout 28 Setup/Installation menu layout 29 Navigating the menu system 29 Chapter 5: Setting up your TV 30 Selecting the menu language 30 TOSHIBA...46 Entering the PIN code 46 If you cannot remember your PIN code 46 Changing your PIN code 46 Blocking TV programs and movies by rating (V-Chip 46 Downloading an additional rating system for blocking TV... for LCD Televisions 26" and Larger 59 Limited Canadian Warranty for Toshiba Brand Flat Panel Televisions 60 7
...remote control to control your other devices 25 Remote control codes 26 Chapter 4: Menu layout and navigation 28 Main menu layout 28 Setup/Installation menu layout 29 Navigating the menu system 29 Chapter 5: Setting up your TV 30 Selecting the menu language 30 TOSHIBA...46 Entering the PIN code 46 If you cannot remember your PIN code 46 Changing your PIN code 46 Blocking TV programs and movies by rating (V-Chip 46 Downloading an additional rating system for blocking TV... for LCD Televisions 26" and Larger 59 Limited Canadian Warranty for Toshiba Brand Flat Panel Televisions 60 7
Owner's Manual - English
Page 8
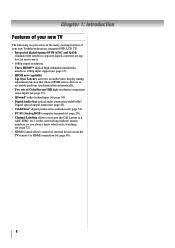
... ( page 32). • HDMI Control allows control of external devices from the TV remote via HDMI connection ( page 50). 8 Chapter 1: Introduction Features of your new TV The following are just a few of the many exciting features of your new Toshiba widescreen, integrated HD, LCD TV: • Integrated digital tuning (8VSB ATSC and QAM) eliminates the need...
... ( page 32). • HDMI Control allows control of external devices from the TV remote via HDMI connection ( page 50). 8 Chapter 1: Introduction Features of your new TV The following are just a few of the many exciting features of your new Toshiba widescreen, integrated HD, LCD TV: • Integrated digital tuning (8VSB ATSC and QAM) eliminates the need...
Owner's Manual - English
Page 9
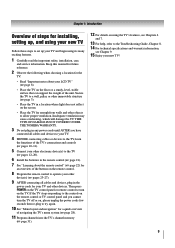
THIS TYPE OF DAMAGE IS NOT COVERED UNDER THE TOSHIBA WARRANTY. 3 Do not plug in the power cords for installing, setting up, and using your new TV Follow these steps to set up your TV and begin using the TV's features, see Chapters 6 and 7. 13 For help, refer to try ... the TV control panel or remote control to allow proper ventilation. If the TV stops responding to the controls on the TV. Secure the TV to a wall, pillar, or other immovable structure ( page 3). • Place the TV in the remote control ( page 21). 7 See "Learning about your LCD TV" ( page 6). • Place the TV on...
THIS TYPE OF DAMAGE IS NOT COVERED UNDER THE TOSHIBA WARRANTY. 3 Do not plug in the power cords for installing, setting up, and using your new TV Follow these steps to set up your TV and begin using the TV's features, see Chapters 6 and 7. 13 For help, refer to try ... the TV control panel or remote control to allow proper ventilation. If the TV stops responding to the controls on the TV. Secure the TV to a wall, pillar, or other immovable structure ( page 3). • Place the TV in the remote control ( page 21). 7 See "Learning about your LCD TV" ( page 6). • Place the TV on...

Owner's Manual - English
Page 10
... the source you cannot turn the TV on and off the TV, press and hold the POWER button on the TV control panel for illustration purposes. 1 Green LED and TOSHIBA Logo LED Power LED(Green) = Power indicator TOSHIBA Logo LED= On or Off ( page 30). 2 Remote sensor - These buttons adjust the ...volume level. 10 INPUT - Point the remote control toward this manual for 5 ...
... the source you cannot turn the TV on and off the TV, press and hold the POWER button on the TV control panel for illustration purposes. 1 Green LED and TOSHIBA Logo LED Power LED(Green) = Power indicator TOSHIBA Logo LED= On or Off ( page 30). 2 Remote sensor - These buttons adjust the ...volume level. 10 INPUT - Point the remote control toward this manual for 5 ...

Owner's Manual - English
Page 13
... an S-video cable (plus the audio cables) instead of the standard video cable. To program the TV remote control to civil and criminal liability. 13 To view the antenna or Cable signal: Select the ANT/CABLE video input source on the remote control ( page 22). Select the VIDEO 1 video input source on the... TV.* * To select the video input source, press INPUT on the TV.* To view the VCR: Turn ON the VCR. Do not connect both types of...
... an S-video cable (plus the audio cables) instead of the standard video cable. To program the TV remote control to civil and criminal liability. 13 To view the antenna or Cable signal: Select the ANT/CABLE video input source on the remote control ( page 22). Select the VIDEO 1 video input source on the... TV.* * To select the video input source, press INPUT on the TV.* To view the VCR: Turn ON the VCR. Do not connect both types of...

Owner's Manual - English
Page 14
...audio out terminal using the white audio cable only. Select the VIDEO 1 video input source on the TV.* * To select the video input source, press INPUT on the TV. To program the TV remote control to operate other countries, and may not be unacceptable. • standard audio cables − If... picture performance than a standard (composite) video cable. Use the Cable box controls to your TV Connecting a VCR with S-video and a cable box An S-video connection will be able to use the remote control to civil and criminal liability. 14 The unauthorized recording, use a Cable box, you ...
...audio out terminal using the white audio cable only. Select the VIDEO 1 video input source on the TV.* * To select the video input source, press INPUT on the TV. To program the TV remote control to operate other countries, and may not be unacceptable. • standard audio cables − If... picture performance than a standard (composite) video cable. Use the Cable box controls to your TV Connecting a VCR with S-video and a cable box An S-video connection will be able to use the remote control to civil and criminal liability. 14 The unauthorized recording, use a Cable box, you ...

Owner's Manual - English
Page 15
... inputs. Select the ColorStream HD-1 video input source on the TV* to your VCR's audio out terminal using the component video connections: Turn on the TV.* To view the DVD player: Turn ON the DVD player. To program the TV remote control to record. The ColorStream HD-1 and HD-2 terminals can... − You can be unacceptable. − If you have component video, connect a standard A/V cable to either set of ColorStream terminals on the remote control ( page 22). Tune the VCR to the channel to operate other devices, see page 17. To view antenna or Cable channels: Select the ...
... inputs. Select the ColorStream HD-1 video input source on the TV* to your VCR's audio out terminal using the component video connections: Turn on the TV.* To view the DVD player: Turn ON the DVD player. To program the TV remote control to record. The ColorStream HD-1 and HD-2 terminals can... − You can be unacceptable. − If you have component video, connect a standard A/V cable to either set of ColorStream terminals on the remote control ( page 22). Tune the VCR to the channel to operate other devices, see page 17. To view antenna or Cable channels: Select the ...
Owner's Manual - English
Page 16
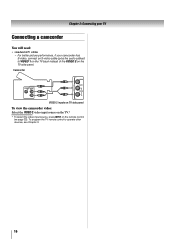
Chapter 2: Connecting your TV Connecting a camcorder You will need: • standard A/V cables − For better picture performance, if your camcorder has S-video, connect an S-video cable (plus the audio cables) to operate other devices, see Chapter 3. 16 Camcorder VIDEO AUDIO OUT L R VIDEO 2 inputs on TV side panel To view the camcorder video: Select the VIDEO 2 video input source on the TV.* * To select the video input source, press INPUT on the TV side panel. To program the TV remote control to VIDEO 1 on the TV back instead of the VIDEO 2 on the remote control ( page 22).
Chapter 2: Connecting your TV Connecting a camcorder You will need: • standard A/V cables − For better picture performance, if your camcorder has S-video, connect an S-video cable (plus the audio cables) to operate other devices, see Chapter 3. 16 Camcorder VIDEO AUDIO OUT L R VIDEO 2 inputs on TV side panel To view the camcorder video: Select the VIDEO 2 video input source on the TV.* * To select the video input source, press INPUT on the TV side panel. To program the TV remote control to VIDEO 1 on the TV back instead of the VIDEO 2 on the remote control ( page 22).

Owner's Manual - English
Page 17
...LLC. To view the HDMI device video: Select the HDMI 1, HDMI 2 or HDMI 3 video input source on the TV.* * To select the video input source, press INPUT on the remote control ( page 22). Supported Audio format: Linear PCM, sampling rate 32/44.1/ 48 kHz Note: To connect a PC... and audio. For detailed signal specifications, see illustration). − See "Setting the HDMI™ audio mode" ( page 33). To program the TV remote control to operate other devices, see Chapter 3. 17 This input is designed to accept HDCP (High-Bandwidth Digital-Content Protection) program material in digital ...
...LLC. To view the HDMI device video: Select the HDMI 1, HDMI 2 or HDMI 3 video input source on the TV.* * To select the video input source, press INPUT on the remote control ( page 22). Supported Audio format: Linear PCM, sampling rate 32/44.1/ 48 kHz Note: To connect a PC... and audio. For detailed signal specifications, see illustration). − See "Setting the HDMI™ audio mode" ( page 33). To program the TV remote control to operate other devices, see Chapter 3. 17 This input is designed to accept HDCP (High-Bandwidth Digital-Content Protection) program material in digital ...

Owner's Manual - English
Page 18
... you desire ( page 50). • The connected devices must also be set the HDMI Control Setup menu as regulated by the HDMI standard. TV back panel VIDEO AUDIO L R IN OUT L R Audio receiver HDMI IN HDMI OUT Playback device (HDMI Control DVD player,etc.) VIDEO AUDIO ...For details, see page 50. For an explanation of connected audio/video devices using the TV's remote control if you connect a HDMI Control compatible audio receiver or playback device. Chapter 2: Connecting your TV HDMI Control connection You can control the basic functions of setup and operations, see the...
... you desire ( page 50). • The connected devices must also be set the HDMI Control Setup menu as regulated by the HDMI standard. TV back panel VIDEO AUDIO L R IN OUT L R Audio receiver HDMI IN HDMI OUT Playback device (HDMI Control DVD player,etc.) VIDEO AUDIO ...For details, see page 50. For an explanation of connected audio/video devices using the TV's remote control if you connect a HDMI Control compatible audio receiver or playback device. Chapter 2: Connecting your TV HDMI Control connection You can control the basic functions of setup and operations, see the...
Owner's Manual - English
Page 19
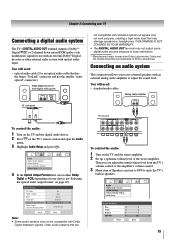
...with an external analog audio amplifier to adjust the sound level. Dolby and the double-D symbol are To control the audio: 1 Turn on the TV and the stereo amplifier. 2 Set up a optimum volume level of Dolby Laboratories. Chapter 2: Connecting your device ( "Selecting the optical audio output...under license from Dolby Laboratories. You will need : • standard audio cables To control the audio: 1 Turn on the TV and the digital audio device. 2 Press on the TV's remote control and open the Audio menu. 3 Highlight Audio Setup and press . Audio Setup PC Audio HDMI 1 Audio MTS Language ...
...with an external analog audio amplifier to adjust the sound level. Dolby and the double-D symbol are To control the audio: 1 Turn on the TV and the stereo amplifier. 2 Set up a optimum volume level of Dolby Laboratories. Chapter 2: Connecting your device ( "Selecting the optical audio output...under license from Dolby Laboratories. You will need : • standard audio cables To control the audio: 1 Turn on the TV and the digital audio device. 2 Press on the TV's remote control and open the Audio menu. 3 Highlight Audio Setup and press . Audio Setup PC Audio HDMI 1 Audio MTS Language ...

Owner's Manual - English
Page 21
... batteries with new ones. • When necessary to use Your TV remote control can program the TV remote control so it will prevent battery acid from leaking into the battery compartment. If you have a Toshiba device: Your TV remote control is no obstruction between the remote control and the TV. Note: • Be sure to replace batteries in the...
... batteries with new ones. • When necessary to use Your TV remote control can program the TV remote control so it will prevent battery acid from leaking into the battery compartment. If you have a Toshiba device: Your TV remote control is no obstruction between the remote control and the TV. Note: • Be sure to replace batteries in the...

Owner's Manual - English
Page 22
... 11 CH RTN returns to the last viewed channel or source ( page 39). 12 MUTE reduces or turns off . Set to "TV" to control the TV. For a complete list of the remote control's functions, see / .) 16 ENTER activates highlighted items in the channel history ( page 37). (Also see "Arrow buttons.") ... channel in the main menu system. 17 MENU accesses the main TV menu system ( pages 28 and 29). 18 EXIT closes on the TV front will be illuminated. 2 FREEZE freezes the picture. Chapter 3: Using the remote control Learning about the remote control The buttons used to tune digital channels ( page 38)...
... 11 CH RTN returns to the last viewed channel or source ( page 39). 12 MUTE reduces or turns off . Set to "TV" to control the TV. For a complete list of the remote control's functions, see / .) 16 ENTER activates highlighted items in the channel history ( page 37). (Also see "Arrow buttons.") ... channel in the main menu system. 17 MENU accesses the main TV menu system ( pages 28 and 29). 18 EXIT closes on the TV front will be illuminated. 2 FREEZE freezes the picture. Chapter 3: Using the remote control Learning about the remote control The buttons used to tune digital channels ( page 38)...

Owner's Manual - English
Page 23
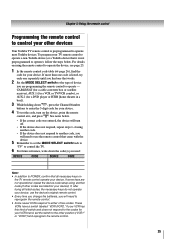
...TV remote control is not preprogrammed to operate, you must first program the remote control to recognize the device (if you will need to use your other devices. If this happens and you wish to use those features, you have a non-Toshiba device or a Toshiba device that the remote...1" to control a cable converter box or satellite receiver; "AUX 2" to control the TV; To use the device's original remote control. Chapter 3: Using the remote control Using the remote control to control your TV remote control to operate a: • Cable converter box or satellite receiver, set the MODE...
...TV remote control is not preprogrammed to operate, you must first program the remote control to recognize the device (if you will need to use your other devices. If this happens and you wish to use those features, you have a non-Toshiba device or a Toshiba device that the remote...1" to control a cable converter box or satellite receiver; "AUX 2" to control the TV; To use the device's original remote control. Chapter 3: Using the remote control Using the remote control to control your TV remote control to operate a: • Cable converter box or satellite receiver, set the MODE...

Owner's Manual - English
Page 24
REMOTE CONTROL KEY Toshiba TV CABLE SAT (satellite) POWER Power Power Power SLEEP Sleep timer TV TV PIC SIZE Picture size TV TV FREEZE FREEZE TV TV 1-9 Digit 1-9 Digit 1-9 Digit 1-9 0 Digit 0 Digit 0 Digit 0 100/-/+10 - (sub CH) --- - (sub CH) INPUT TV/Video select TV TV FAV BROWSER/ TOP MENU FAV BROWSER DVD TOP Menu* --- --- INFO Info --- Action Menu EXIT/DVD CLEAR Exit DVD...
REMOTE CONTROL KEY Toshiba TV CABLE SAT (satellite) POWER Power Power Power SLEEP Sleep timer TV TV PIC SIZE Picture size TV TV FREEZE FREEZE TV TV 1-9 Digit 1-9 Digit 1-9 Digit 1-9 0 Digit 0 Digit 0 Digit 0 100/-/+10 - (sub CH) --- - (sub CH) INPUT TV/Video select TV TV FAV BROWSER/ TOP MENU FAV BROWSER DVD TOP Menu* --- --- INFO Info --- Action Menu EXIT/DVD CLEAR Exit DVD...
Owner's Manual - English
Page 25
... in a box]). 3 While holding down the code(s) you are listed for your VCR brand, set the switch to the other devices Your Toshiba TV remote control is not preprogrammed to operate), follow the steps below . • If the correct code was entered, the device will turn off. ...after trying all necessary keys on the device, point the remote control at it is preprogrammed to operate most Toshiba devices. These VCRs have a switch labeled "VCR1/VCR2." To program your TV remote control to operate a non-Toshiba device (or a Toshiba device that all listed codes, the necessary keys do not...
... in a box]). 3 While holding down the code(s) you are listed for your VCR brand, set the switch to the other devices Your Toshiba TV remote control is not preprogrammed to operate), follow the steps below . • If the correct code was entered, the device will turn off. ...after trying all necessary keys on the device, point the remote control at it is preprogrammed to operate most Toshiba devices. These VCRs have a switch labeled "VCR1/VCR2." To program your TV remote control to operate a non-Toshiba device (or a Toshiba device that all listed codes, the necessary keys do not...

Owner's Manual - English
Page 26
...Samsung Scientific Atlanta Sears Signature Signature 2000 Sprucer Starcom Stargate Sylvania TeleView Texscan Tocom U. If this happens, use a code that is not recognized by the TV remote control. Electronics United Cable Universal Wards 061, 062, 063, 082, 084, 087, 092, 096, 098 065, 092, 097, 099 064, ... Memorex Mintek NAD Nakamichi Norcent Onkyo Oritron Panasonic Philips Pioneer Proscan Qwestar RCA Sampo Samsung Sansui Sanyo Sharp Sherwood Sony Sylvania Teac Technics Techwood Toshiba Yamaha Zenith 019 020 021 022, 023, 024, 025 026, 027 028 027 001, 029, 030 087 031 005, 032, 033...
...Samsung Scientific Atlanta Sears Signature Signature 2000 Sprucer Starcom Stargate Sylvania TeleView Texscan Tocom U. If this happens, use a code that is not recognized by the TV remote control. Electronics United Cable Universal Wards 061, 062, 063, 082, 084, 087, 092, 096, 098 065, 092, 097, 099 064, ... Memorex Mintek NAD Nakamichi Norcent Onkyo Oritron Panasonic Philips Pioneer Proscan Qwestar RCA Sampo Samsung Sansui Sanyo Sharp Sherwood Sony Sylvania Teac Technics Techwood Toshiba Yamaha Zenith 019 020 021 022, 023, 024, 025 026, 027 028 027 001, 029, 030 087 031 005, 032, 033...

Owner's Manual - English
Page 27
... 018 005, 006, 007, 012, 014, 037, 043, 053, 054, 067, 070 010 009 010, 049, 065 031 Chapter 3: Using the remote control Orion Panasonic Pentax Pentex Research Philco Philips Pioneer Portland Proscan Proton Quasar Radio Shack Radio Shack/Realistic Radix RCA Realistic Ricoh Runco Samsung Sansui... Sanyo Scott Sears Sharp Shintom Signature Signature 2000 Singer Sony STS Sylvania Symphonic Tandy Tashiko Tatung Teac Technics Teknika Toshiba Totevision Unitec Unitech Vector Research 054, 057, 062, 065, 068, 072 036, 045, 046, 057, 061, 072, 079 012, 024, 025...
... 018 005, 006, 007, 012, 014, 037, 043, 053, 054, 067, 070 010 009 010, 049, 065 031 Chapter 3: Using the remote control Orion Panasonic Pentax Pentex Research Philco Philips Pioneer Portland Proscan Proton Quasar Radio Shack Radio Shack/Realistic Radix RCA Realistic Ricoh Runco Samsung Sansui... Sanyo Scott Sears Sharp Shintom Signature Signature 2000 Singer Sony STS Sylvania Symphonic Tandy Tashiko Tatung Teac Technics Teknika Toshiba Totevision Unitec Unitech Vector Research 054, 057, 062, 065, 068, 072 036, 045, 046, 057, 061, 072, 079 012, 024, 025...
Owner's Manual - English
Page 28
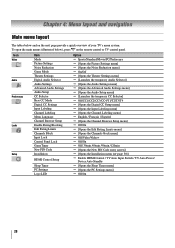
To open the main menus (illustrated below and on the remote control or TV control panel. Chapter 4: Menu layout and navigation Main menu layout The tables below ), press on the next page provide a quick overview of your TV's menu system. Icon Video Audio Preferences Locks Setup Item Mode Picture Settings ... Off/On p Off/ 30min /60min /90min /120min p [Opens the New PIN Code entry screen] p [Opens the Installation menu ( page 30)] p Enable HDMI Control / TV Auto Input Switch / TV Auto Power/ Device Auto Standby p [Opens the Sleep Timer menu] p [Opens the PC Settings menu] p Off/On 28
To open the main menus (illustrated below and on the remote control or TV control panel. Chapter 4: Menu layout and navigation Main menu layout The tables below ), press on the next page provide a quick overview of your TV's menu system. Icon Video Audio Preferences Locks Setup Item Mode Picture Settings ... Off/On p Off/ 30min /60min /90min /120min p [Opens the New PIN Code entry screen] p [Opens the Installation menu ( page 30)] p Enable HDMI Control / TV Auto Input Switch / TV Auto Power/ Device Auto Standby p [Opens the Sleep Timer menu] p [Opens the PC Settings menu] p Off/On 28
Owner's Manual - English
Page 29
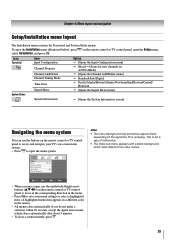
...to open the Setup menu, select Installation, and press . This is receiving. Note: • The menu background may sometimes appear black, depending on the remote control or TV control panel to move in the corresponding direction in the menu. • Press to access and navigate your menu settings or select a highlighted item... Game Mode Theater Settings Sports Off Navigate ENTER Select CH RTN Back EXIT Exit • When a menu is open, use the buttons on the remote control or TV control panel to save your TV's on the remote control or TV control panel, open the menu system.
...to open the Setup menu, select Installation, and press . This is receiving. Note: • The menu background may sometimes appear black, depending on the remote control or TV control panel to move in the corresponding direction in the menu. • Press to access and navigate your menu settings or select a highlighted item... Game Mode Theater Settings Sports Off Navigate ENTER Select CH RTN Back EXIT Exit • When a menu is open, use the buttons on the remote control or TV control panel to save your TV's on the remote control or TV control panel, open the menu system.


