Owner's Manual - English
Page 7
...and Service 3 Chapter 1: Introduction 9 Welcome to Toshiba 9 Features of your new TV 9 Overview of steps for installing, setting up, and using your new TV 10 TV front and side panel controls and connections 11 TV back panel connections 12 Chapter 2: Connecting your TV 13 Overview of cable types 13 About the ... 44 Selecting the Blue LED Illumination level 45 Selecting the Power-On Mode 45 Chapter 6: Using the TV's features 46 Selecting the video input source to view 46 Labeling the video input sources 47 Tuning channels 48 Tuning channels using the Channel Browser 48 Setting the...
...and Service 3 Chapter 1: Introduction 9 Welcome to Toshiba 9 Features of your new TV 9 Overview of steps for installing, setting up, and using your new TV 10 TV front and side panel controls and connections 11 TV back panel connections 12 Chapter 2: Connecting your TV 13 Overview of cable types 13 About the ... 44 Selecting the Blue LED Illumination level 45 Selecting the Power-On Mode 45 Chapter 6: Using the TV's features 46 Selecting the video input source to view 46 Labeling the video input sources 47 Tuning channels 48 Tuning channels using the Channel Browser 48 Setting the...

Owner's Manual - English
Page 11
... on page 45) See "LED indications" on page 77 for additional information. 2 Green and Yellow LEDs Green = See "LED indications" on the TV control panel for 5 or more seconds to change the channel (programmed channels only; - Point the remote control toward this remote sensor (- Press to ... responding to instantly close an on the remote control or TV control panel and you are referred to access the menu system (- Press to the controls on -screen menu. 9 CHANNEL Bb - page 40). 10 VOLUME C c - page 46). 11 Yellow = Power-On Mode indicator (- These buttons adjust the volume level...
... on page 45) See "LED indications" on page 77 for additional information. 2 Green and Yellow LEDs Green = See "LED indications" on the TV control panel for 5 or more seconds to change the channel (programmed channels only; - Point the remote control toward this remote sensor (- Press to ... responding to instantly close an on the remote control or TV control panel and you are referred to access the menu system (- Press to the controls on -screen menu. 9 CHANNEL Bb - page 40). 10 VOLUME C c - page 46). 11 Yellow = Power-On Mode indicator (- These buttons adjust the volume level...

Owner's Manual - English
Page 24
... history (- Press again to restore the moving picture. 22 PIC SIZE cycles through programmed channels when no menu is on the TV front will be used for analog channels.) (- page 46). 6 FAV BROWSER accesses the Favorites List in the main menu system. 9 THINC accesses the THINC menu (- page 27). page 41). 4 Channel...
... history (- Press again to restore the moving picture. 22 PIC SIZE cycles through programmed channels when no menu is on the TV front will be used for analog channels.) (- page 46). 6 FAV BROWSER accesses the Favorites List in the main menu system. 9 THINC accesses the THINC menu (- page 27). page 41). 4 Channel...

Owner's Manual - English
Page 46
... +, some CE-Link devices may automatically turn on the remote or TV control panel repeatedly to highlight HDMI 1, HDMI 2, or HDMI 3. page 41). 46 or c) Repeatedly press + on the remote control or TV control panel. 2 And then either: a) Press 0-8; Chapter 6: Using the TV's features Selecting the video input source to view To select the...
... +, some CE-Link devices may automatically turn on the remote or TV control panel repeatedly to highlight HDMI 1, HDMI 2, or HDMI 3. page 41). 46 or c) Repeatedly press + on the remote control or TV control panel. 2 And then either: a) Press 0-8; Chapter 6: Using the TV's features Selecting the video input source to view To select the...
Owner's Manual - English
Page 65
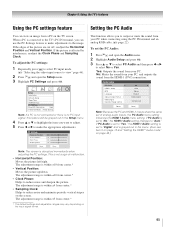
... "Yes," the HDMI 1 Audio setting is set of the picture are cut off, readjust the Horizontal Position and Vertical Position. Chapter 6: Using the TV's features Using the PC settings feature Setting the PC Audio You can use the PC Settings feature to make the appropriate adjustments. To adjust the... PC settings: 1 Repeatedly press + to view" page 46). 2 Press Y and open the Audio menu. 2 Highlight Audio Setup and press T. 3 Press B or b to select PC Audio and then press C or c to ...
... "Yes," the HDMI 1 Audio setting is set of the picture are cut off, readjust the Horizontal Position and Vertical Position. Chapter 6: Using the TV's features Using the PC settings feature Setting the PC Audio You can use the PC Settings feature to make the appropriate adjustments. To adjust the... PC settings: 1 Repeatedly press + to view" page 46). 2 Press Y and open the Audio menu. 2 Highlight Audio Setup and press T. 3 Press B or b to select PC Audio and then press C or c to ...
Owner's Manual - English
Page 67
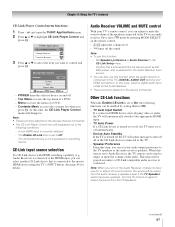
... HD DVD player, etc) is connected. Note: • These functions depend on and off the sound. The Enable CE-Link item is turned off the TV will send a message to turn on the remote control. • z Z adjust the volume level. • W turns off . - CE-Link input source selection If a CE.... (continued) 67 Chapter 6: Using the TV's features CE-Link Player Control menu functions: 1 Press C and open the THINC Applications menu. 2 Press B or b to adjust or mute the volume of the audio. See page 46 for the Audio Receiver input source. • You can adjust or mute the sound volume of the...
... HD DVD player, etc) is connected. Note: • These functions depend on and off the sound. The Enable CE-Link item is turned off the TV will send a message to turn on the remote control. • z Z adjust the volume level. • W turns off . - CE-Link input source selection If a CE.... (continued) 67 Chapter 6: Using the TV's features CE-Link Player Control menu functions: 1 Press C and open the THINC Applications menu. 2 Press B or b to adjust or mute the volume of the audio. See page 46 for the Audio Receiver input source. • You can adjust or mute the sound volume of the...

Owner's Manual - English
Page 74
... use the Game Mode feature, the current video input must be Video 1, Video 2, ColorStream HD1, ColorStream HD2, HDMI 1, HDMI 2, HDMI 3 or PC. Your TV's audio will not work. • WOW: SRS Focus - Note: If the broadcast is more effective for shorter frame delays when playing a video game requiring split...Off. • WOW: SRS TruBass - To turn the surround sound effect On or Off. To revert to select On and then press T. page 46). • The Game Mode feature does not function if the following signals are trademarks of SRS Labs audio technologies (SRS 3D, SRS Focus, and SRS...
... use the Game Mode feature, the current video input must be Video 1, Video 2, ColorStream HD1, ColorStream HD2, HDMI 1, HDMI 2, HDMI 3 or PC. Your TV's audio will not work. • WOW: SRS Focus - Note: If the broadcast is more effective for shorter frame delays when playing a video game requiring split...Off. • WOW: SRS TruBass - To turn the surround sound effect On or Off. To revert to select On and then press T. page 46). • The Game Mode feature does not function if the following signals are trademarks of SRS Labs audio technologies (SRS 3D, SRS Focus, and SRS...

Owner's Manual - English
Page 75
... caption feature is set to an A/V receiver that has a programmable audio delay feature, use the Restore Factory Defaults procedure (- TV will display when you select that particular input source. page 46). Try another channel. • Adjust the Tint and/or Color (- page 24). • Do not connect both a ...standard video cable and an S-video cable to Stereo mode (- page 71). If the TV is not addressed in rare instances, when ...
... caption feature is set to an A/V receiver that has a programmable audio delay feature, use the Restore Factory Defaults procedure (- TV will display when you select that particular input source. page 46). Try another channel. • Adjust the Tint and/or Color (- page 24). • Do not connect both a ...standard video cable and an S-video cable to Stereo mode (- page 71). If the TV is not addressed in rare instances, when ...
Owner's Manual - English
Page 79
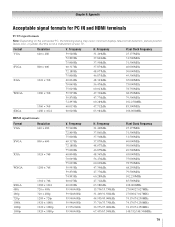
Frequency 31.469kHz 37.861kHz 37.500kHz 37.879kHz 48.077kHz 46.875kHz 48.363kHz 56.476kHz 60.023kHz 47.396kHz 47.776kHz 60.289kHz 47....215; 1080i 1920 × 1080p 1920 × 1080p V. Frequency 31.469kHz 37.861kHz 37.500kHz 37.879kHz 48.077kHz 46.875kHz 48.363kHz 56.476kHz 60.023kHz 47.396kHz 47.776kHz 60.289kHz 47.712kHz 63.981kHz 15.734/15.750kHz 31.469...250MHz 74.176/74.250MHz 74.176/74.250MHz 148.352/148.500MHz 79 But this is not a malfunction of your TV. incorrect display, false format detection, picture position failure, blur, or judder. Frequency 59.940Hz 72.809Hz 75.000Hz 60...
Frequency 31.469kHz 37.861kHz 37.500kHz 37.879kHz 48.077kHz 46.875kHz 48.363kHz 56.476kHz 60.023kHz 47.396kHz 47.776kHz 60.289kHz 47....215; 1080i 1920 × 1080p 1920 × 1080p V. Frequency 31.469kHz 37.861kHz 37.500kHz 37.879kHz 48.077kHz 46.875kHz 48.363kHz 56.476kHz 60.023kHz 47.396kHz 47.776kHz 60.289kHz 47.712kHz 63.981kHz 15.734/15.750kHz 31.469...250MHz 74.176/74.250MHz 74.176/74.250MHz 148.352/148.500MHz 79 But this is not a malfunction of your TV. incorrect display, false format detection, picture position failure, blur, or judder. Frequency 59.940Hz 72.809Hz 75.000Hz 60...
Owner's Manual - English
Page 84
... audio mode 43 HDMI cable 13 HDMI settings 68 Lip-Sync Latency 68 xvYCC 68 HDMI™ connection 19 I INFO button 69 INPUT button 46 Installation, care, and service 3 Installation, setup 10 Integrated digital tuning 9 IR blaster 17 IR OUT connection 17 L Labeling video input 47 ... 58 SurfLock 50 S-video cable 13 System status 44 T TheaterLock™ feature 55 TheaterWide® picture size 51 THINC button 24 Troubleshooting 75 TV status information 69 V V-Chip blocking (Locks menu) .........60 VCR connection 14, 15, 16 Video cables 13 Video input label 47 Video input...
... audio mode 43 HDMI cable 13 HDMI settings 68 Lip-Sync Latency 68 xvYCC 68 HDMI™ connection 19 I INFO button 69 INPUT button 46 Installation, care, and service 3 Installation, setup 10 Integrated digital tuning 9 IR blaster 17 IR OUT connection 17 L Labeling video input 47 ... 58 SurfLock 50 S-video cable 13 System status 44 T TheaterLock™ feature 55 TheaterWide® picture size 51 THINC button 24 Troubleshooting 75 TV status information 69 V V-Chip blocking (Locks menu) .........60 VCR connection 14, 15, 16 Video cables 13 Video input label 47 Video input...
Printable Spec Sheet
Page 1
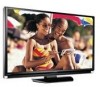
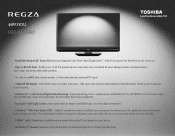
... available colors and improves the color accuracy. Toshiba's new 10-bit LCD provides 64 times more colors than a standard 8-bit panel, offering smoother transitions between the TV and compatible source devices, • SoundStrip ...2™ Speaker System for strong sound quality with lower chin height for deeper, more color than existing HDTV signals. • 1080p Full HD Display - 46RF35OU PRELIMINARY • Beautifully-designed 46...
... available colors and improves the color accuracy. Toshiba's new 10-bit LCD provides 64 times more colors than a standard 8-bit panel, offering smoother transitions between the TV and compatible source devices, • SoundStrip ...2™ Speaker System for strong sound quality with lower chin height for deeper, more color than existing HDTV signals. • 1080p Full HD Display - 46RF35OU PRELIMINARY • Beautifully-designed 46...

