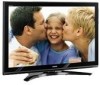

Owner's Manual - English
Page 2
...-40 of the U.S. Use appropriate furniture large enough to support the weight of your new LCD TV. a Carefully read this manual completely, and keep these safety tips in your LCD TV, please read and understand the other electronic components). Before operating your home. This manual will help you use a UL Listed wall bracket appropriate for purchasing this Toshiba LCD TV. Dear Customer, Thank you for the size and weight of this television.
...-40 of the U.S. Use appropriate furniture large enough to support the weight of your new LCD TV. a Carefully read this manual completely, and keep these safety tips in your LCD TV, please read and understand the other electronic components). Before operating your home. This manual will help you use a UL Listed wall bracket appropriate for purchasing this Toshiba LCD TV. Dear Customer, Thank you for the size and weight of this television.
Owner's Manual - English
Page 4
... wipe the display panel surface (the TV screen) using a dry, soft cloth only (cotton, flannel, etc.). A hard cloth may damage or discolor the cabinet. 31) WARNING: RISK OF ELECTRIC SHOCK! Never spill liquids or push objects of any home theater component connected to clean the LCD screen, follow these sounds become frequent or continuous, unplug the power cord and contact a Toshiba Authorized Service Center. 35...
... wipe the display panel surface (the TV screen) using a dry, soft cloth only (cotton, flannel, etc.). A hard cloth may damage or discolor the cabinet. 31) WARNING: RISK OF ELECTRIC SHOCK! Never spill liquids or push objects of any home theater component connected to clean the LCD screen, follow these sounds become frequent or continuous, unplug the power cord and contact a Toshiba Authorized Service Center. 35...
Owner's Manual - English
Page 7
... 40 Setup/Installation menu layout 41 THINC™ menu 41 Navigating the menu system 42 Chapter 5: Setting up your TV 43 Setting the Demo Mode 43 Selecting the menu language 43 Configuring the antenna input source for the ANT terminal 44 Programming channels into the TV's channel memory . . . . 44 Programming channels automatically 44 Manually adding and deleting channels in the channel memory 45 Setting the Auto Input feature 46 Labeling channels 47 Setting the HDMI™ audio mode 48 Viewing the digital signal meter 49 Viewing...
... 40 Setup/Installation menu layout 41 THINC™ menu 41 Navigating the menu system 42 Chapter 5: Setting up your TV 43 Setting the Demo Mode 43 Selecting the menu language 43 Configuring the antenna input source for the ANT terminal 44 Programming channels into the TV's channel memory . . . . 44 Programming channels automatically 44 Manually adding and deleting channels in the channel memory 45 Setting the Auto Input feature 46 Labeling channels 47 Setting the HDMI™ audio mode 48 Viewing the digital signal meter 49 Viewing...
Owner's Manual - English
Page 9
... cable for a separate digital converter set -top box. page 73). • The Personal E-mail feature allows you to access your TV (page 85). 9 Chapter 1: Introduction Welcome to Toshiba Thank you for connecting the TV to a home network to enable file sharing (JPEG, MP3), and use of a set -top box (in the HDMI signals, then allows sending wider color signals from HDMI source. • Two sets of ColorStream® HD high-resolution component video inputs...
... cable for a separate digital converter set -top box. page 73). • The Personal E-mail feature allows you to access your TV (page 85). 9 Chapter 1: Introduction Welcome to Toshiba Thank you for connecting the TV to a home network to enable file sharing (JPEG, MP3), and use of a set -top box (in the HDMI signals, then allows sending wider color signals from HDMI source. • Two sets of ColorStream® HD high-resolution component video inputs...
Owner's Manual - English
Page 10
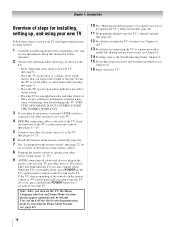
... of the buttons on the TV control panel or remote control to allow proper ventilation. pages 14-25). 6 Install the batteries in standby mode, press POWER on the remote control. 8 Program the remote control to operate your other devices. page 44). 12 For details on the TV. pages 11-13). 5 Connect your other objects to turn the TV off the On-Screen demonstration mode by default. Note: After you cannot turn on using its many...
... of the buttons on the TV control panel or remote control to allow proper ventilation. pages 14-25). 6 Install the batteries in standby mode, press POWER on the remote control. 8 Program the remote control to operate your other devices. page 44). 12 For details on the TV. pages 11-13). 5 Connect your other objects to turn the TV off the On-Screen demonstration mode by default. Note: After you cannot turn on using its many...
Owner's Manual - English
Page 12
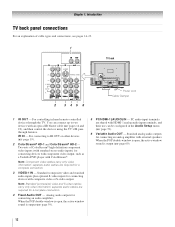
... component video inputs (with standard stereo audio inputs) for connecting devices with component video output, such as a Toshiba DVD player with ColorStream®. IR IN - Two sets of cable types and connections, see pages 14-23. 1 TV back 2 3 45 6 Power cord Cable Clamper 1 IR OUT - Analog audio outputs for connecting an analog amplifier with an optical IR blaster cable (- page 59). 5 PC/HDMI-1 (AUDIO) IN - Note: Component video cables carry only video information; When the POP double-window is open , the active window sound...
... component video inputs (with standard stereo audio inputs) for connecting devices with component video output, such as a Toshiba DVD player with ColorStream®. IR IN - Two sets of cable types and connections, see pages 14-23. 1 TV back 2 3 45 6 Power cord Cable Clamper 1 IR OUT - Analog audio outputs for connecting an analog amplifier with an optical IR blaster cable (- page 59). 5 PC/HDMI-1 (AUDIO) IN - Note: Component video cables carry only video information; When the POP double-window is open , the active window sound...
Owner's Manual - English
Page 13
... Interface input receives digital audio and uncompressed digital video from an HDMI device or uncompressed digital video from Dolby Laboratories. For connecting the TV to access MP3 audio files and JPEG picture files that supports analog (NTSC) and digital (ATSC) off-air antenna signals and analog and digital Cable TV (QAM) signals. 9 Digital Audio OUT - Optical audio output in Dolby Digital or PCM (pulse-code modulation) format for connecting an external Dolby Digital decoder, amplifier, A/V receiver, or home theater system with the THINC system. For service use when connecting...
... Interface input receives digital audio and uncompressed digital video from an HDMI device or uncompressed digital video from Dolby Laboratories. For connecting the TV to access MP3 audio files and JPEG picture files that supports analog (NTSC) and digital (ATSC) off-air antenna signals and analog and digital Cable TV (QAM) signals. 9 Digital Audio OUT - Optical audio output in Dolby Digital or PCM (pulse-code modulation) format for connecting an external Dolby Digital decoder, amplifier, A/V receiver, or home theater system with the THINC system. For service use when connecting...
Owner's Manual - English
Page 14
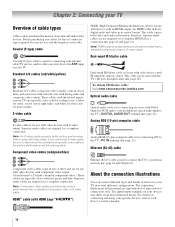
...-code modulation) optical audio input to disconnect the standard (composite) video cable or the picture performance will be sure of connector types required by your devices and the length of each device's owner's manual. 14 If you connect an S-video cable, be sure to the TV's DIGITAL AUDIO OUT terminal (- Optical audio cable Optical audio cable is for connecting receivers with S-video output. Chapter 2: Connecting your TV Overview of cable types Cables can be purchased from those illustrated herein. Standard A/V cables (red/white/yellow...
...-code modulation) optical audio input to disconnect the standard (composite) video cable or the picture performance will be sure of connector types required by your devices and the length of each device's owner's manual. 14 If you connect an S-video cable, be sure to the TV's DIGITAL AUDIO OUT terminal (- Optical audio cable Optical audio cable is for connecting receivers with S-video output. Chapter 2: Connecting your TV Overview of cable types Cables can be purchased from those illustrated herein. Standard A/V cables (red/white/yellow...
Owner's Manual - English
Page 16
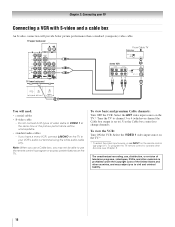
... premium Cable channels: Turn OFF the VCR. To program the TV remote control to change channels. Select the VIDEO 1 video input source on the TV.* * To select the video input source, press INPUT on the TV.* Tune the TV to channel 3 or 4 (whichever channel the Cable box output is prohibited under the Copyright Laws of video cable to VIDEO 1 at the same time or the picture performance will need: • coaxial cables • S-video cable - The unauthorized recording, use, distribution, or revision of television programs, videotapes, DVDs, and...
... premium Cable channels: Turn OFF the VCR. To program the TV remote control to change channels. Select the VIDEO 1 video input source on the TV.* * To select the video input source, press INPUT on the TV.* Tune the TV to channel 3 or 4 (whichever channel the Cable box output is prohibited under the Copyright Laws of video cable to VIDEO 1 at the same time or the picture performance will need: • coaxial cables • S-video cable - The unauthorized recording, use, distribution, or revision of television programs, videotapes, DVDs, and...
Owner's Manual - English
Page 23
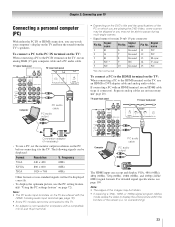
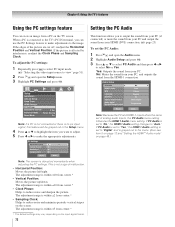
... No. Separate analog cables are shared with an HDMI terminal, use an HDMI cable (type A connector). Frequency VGA 640 × 480 60Hz SVGA 800 × 600 60Hz XGA 1024 × 768 60Hz Other formats or non-standard signals will not be displayed: Format Resolution V. Chapter 2: Connecting your computer's display on the TV, use the PC setting feature (- TV upper back panel TV lower back panel Computer PC audio cable PC audio output • Depending on...
... No. Separate analog cables are shared with an HDMI terminal, use an HDMI cable (type A connector). Frequency VGA 640 × 480 60Hz SVGA 800 × 600 60Hz XGA 1024 × 768 60Hz Other formats or non-standard signals will not be displayed: Format Resolution V. Chapter 2: Connecting your computer's display on the TV, use the PC setting feature (- TV upper back panel TV lower back panel Computer PC audio cable PC audio output • Depending on...
Owner's Manual - English
Page 40
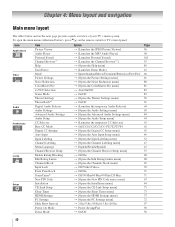
... Video Audio Preferences Locks Setup Item Picture Viewer Audio Player Personal E-mail Channel Browser™ Help Start Demo Mode Picture Settings Noise Reduction ColorMaster Pro xvYCC Selection Game Mode Theater Settings TheaterLock™ Digital Audio Selector Audio Settings Advanced Audio Settings Audio Setup CC Selector Base CC Mode Digital CC Settings Auto Input Input Labeling Channel Labeling Menu Language Channel Browser Setup Enable Rating Blocking Edit Rating Limits Channels Block Input Lock Front Panel Lock GameTimer® New PIN Code Installation CE-Link Setup Sleep Timer HDMI...
... Video Audio Preferences Locks Setup Item Picture Viewer Audio Player Personal E-mail Channel Browser™ Help Start Demo Mode Picture Settings Noise Reduction ColorMaster Pro xvYCC Selection Game Mode Theater Settings TheaterLock™ Digital Audio Selector Audio Settings Advanced Audio Settings Audio Setup CC Selector Base CC Mode Digital CC Settings Auto Input Input Labeling Channel Labeling Menu Language Channel Browser Setup Enable Rating Blocking Edit Rating Limits Channels Block Input Lock Front Panel Lock GameTimer® New PIN Code Installation CE-Link Setup Sleep Timer HDMI...
Owner's Manual - English
Page 44
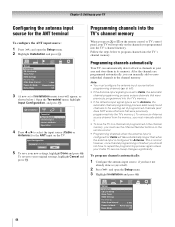
...the remote control or TV control panel, your TV Configuring the antenna input source for the ANT terminal To configure the ANT input source: 1 Press Y and open the Setup menu. 3 Highlight Installation and press T. Programming channels automatically Your TV can manually add or erase individual channels in the channel memory. Setup Installation CE-Link Setup Sleep Timer HDMI Settings PC Settings Slide Show Interval 2 Sec Power-On Mode Power-Saving Demo Mode Off 3 (A new set to Cable, the automatic channel programming process erases channels that were previously programmed into...
...the remote control or TV control panel, your TV Configuring the antenna input source for the ANT terminal To configure the ANT input source: 1 Press Y and open the Setup menu. 3 Highlight Installation and press T. Programming channels automatically Your TV can manually add or erase individual channels in the channel memory. Setup Installation CE-Link Setup Sleep Timer HDMI Settings PC Settings Slide Show Interval 2 Sec Power-On Mode Power-Saving Demo Mode Off 3 (A new set to Cable, the automatic channel programming process erases channels that were previously programmed into...
Owner's Manual - English
Page 48
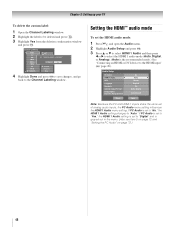
... T to save changes, and go back to "Digital" and is set of analog audio inputs, the PC Audio menu setting influences the HDMI 1 Audio menu setting. Audio Setup PC Audio HDMI 1 Audio MTS Language Speakers Optical Output Format Dolby Digital Dynamic Range Control Reset No Auto Stereo English On Dolby Digital Compressed Done Note: Because the PC and HDMI-1 inputs share the same set to "No," the HDMI 1 Audio setting changes to change channels. Setting the HDMI™ audio mode To set to the Channel Labeling window. Chapter 5: Setting up your TV To delete...
... T to save changes, and go back to "Digital" and is set of analog audio inputs, the PC Audio menu setting influences the HDMI 1 Audio menu setting. Audio Setup PC Audio HDMI 1 Audio MTS Language Speakers Optical Output Format Dolby Digital Dynamic Range Control Reset No Auto Stereo English On Dolby Digital Compressed Done Note: Because the PC and HDMI-1 inputs share the same set to "No," the HDMI 1 Audio setting changes to change channels. Setting the HDMI™ audio mode To set to the Channel Labeling window. Chapter 5: Setting up your TV To delete...
Owner's Manual - English
Page 72
... "Setting the HDMI™ Audio mode" on the input signal format. 72 This function allows you can view an image from center.* • Vertical Position: Moves the picture up/down. page 23) To set of analog audio inputs, the PC Audio menu setting influences the HDMI 1 Audio menu setting. Audio Setup PC Audio HDMI 1 Audio MTS Language Speakers Optical Output Format Dolby Digital Dynamic Range Control No Auto Stereo English On Dolby Digital Compressed Reset Done Note: Because the PC and HDMI-1 inputs share the same set...
... "Setting the HDMI™ Audio mode" on the input signal format. 72 This function allows you can view an image from center.* • Vertical Position: Moves the picture up/down. page 23) To set of analog audio inputs, the PC Audio menu setting influences the HDMI 1 Audio menu setting. Audio Setup PC Audio HDMI 1 Audio MTS Language Speakers Optical Output Format Dolby Digital Dynamic Range Control No Auto Stereo English On Dolby Digital Compressed Reset Done Note: Because the PC and HDMI-1 inputs share the same set...

Owner's Manual - English
Page 104
... you cannot view signals from external devices connected to VIDEO 1, VIDEO 2, ColorStream®, HDMI 1, HDMI 2, HDMI 3, PC, or from standby • When you then attempt to Off (- If you plug the power cord in, the yellow LED will appear (page 59). Do not connect both a standard video cable and an S-video cable to one or more seconds to a particular input on the remote control or TV, press + a second time, which may help synchronize the sound to...
... you cannot view signals from external devices connected to VIDEO 1, VIDEO 2, ColorStream®, HDMI 1, HDMI 2, HDMI 3, PC, or from standby • When you then attempt to Off (- If you plug the power cord in, the yellow LED will appear (page 59). Do not connect both a standard video cable and an S-video cable to one or more seconds to a particular input on the remote control or TV, press + a second time, which may help synchronize the sound to...
Owner's Manual - English
Page 107
... is incorrect. Make sure the user name and password settings in the TV exactly match the settings in HTML mail are supported. Connect all . Chapter 9: Troubleshooting Home server setup problems The PC ("Home Server") name is not displayed • The Ethernet cables are not connected properly or at one time. Personal E-mail problems Cannot receive mail • Your e-mail settings may not display. 107 Images in the networked PC.
... is incorrect. Make sure the user name and password settings in the TV exactly match the settings in HTML mail are supported. Connect all . Chapter 9: Troubleshooting Home server setup problems The PC ("Home Server") name is not displayed • The Ethernet cables are not connected properly or at one time. Personal E-mail problems Cannot receive mail • Your e-mail settings may not display. 107 Images in the networked PC.
Owner's Manual - English
Page 111
... this warranty. Rental Units The warranty for repair and returned to the rental firm, whichever comes first. Owner's Manual and Product Registration Card Read this owner's manual thoroughly before operating this LCD Television must be taken to a TACP Authorized Service Station for LCD Television rental units begins on the type of repair required, the service will either be performed in electric power), improper installation, improper maintenance, or use of...
... this warranty. Rental Units The warranty for repair and returned to the rental firm, whichever comes first. Owner's Manual and Product Registration Card Read this owner's manual thoroughly before operating this LCD Television must be taken to a TACP Authorized Service Station for LCD Television rental units begins on the type of repair required, the service will either be performed in electric power), improper installation, improper maintenance, or use of...
Owner's Manual - English
Page 112
... or resellers ("ADR's") and (ii) located/operated in Canada. Replacement of missing, discarded or lost parts, the provision of a Television on -site or the Television will come to service the Television; f. Damage to the Television caused by TCL to your bill of sale or other than those authorized by failure to follow the specifications, User manuals or guides as to usage and/or...
... or resellers ("ADR's") and (ii) located/operated in Canada. Replacement of missing, discarded or lost parts, the provision of a Television on -site or the Television will come to service the Television; f. Damage to the Television caused by TCL to your bill of sale or other than those authorized by failure to follow the specifications, User manuals or guides as to usage and/or...
Owner's Manual - English
Page 113
...WARRANTIES, CONDITIONS AND REPRESENTATIONS FOR THIS TELEVISION, INCLUDING THE IMPLIED WARRANTIES, CONDITIONS AND REPRESENTATIONS OF MERCHANTABILITY AND FITNESS FOR A PARTICULAR PURPOSE, ARE HEREBY DISCLAIMED AND EXCLUDED. How to the ASP. YOU MUST READ AND FOLLOW ALL SET-UP AND USAGE INSTRUCTIONS IN THE APPLICABLE USER GUIDES AND/OR MANUALS... service is needed: (1) To find the nearest ASP, visit TCL's web site at www.toshiba.ca, or call toll free 1-800-268-3404 (2) Present your bill of sale or other applications where Television failure could lead to injury to form part of this warranty,...
...WARRANTIES, CONDITIONS AND REPRESENTATIONS FOR THIS TELEVISION, INCLUDING THE IMPLIED WARRANTIES, CONDITIONS AND REPRESENTATIONS OF MERCHANTABILITY AND FITNESS FOR A PARTICULAR PURPOSE, ARE HEREBY DISCLAIMED AND EXCLUDED. How to the ASP. YOU MUST READ AND FOLLOW ALL SET-UP AND USAGE INSTRUCTIONS IN THE APPLICABLE USER GUIDES AND/OR MANUALS... service is needed: (1) To find the nearest ASP, visit TCL's web site at www.toshiba.ca, or call toll free 1-800-268-3404 (2) Present your bill of sale or other applications where Television failure could lead to injury to form part of this warranty,...

Owner's Manual - English
Page 115
... Base closed captions 62 Blocking channels 69 C C (CLOSED). Index A Antenna cable 14 Antenna input configuration 44 Audio player 98 Audio quality adjustments 65 Audio system connection 22 Auto aspect 58 Auto Input 46 Auto power off 76 B Back of the TV 11 G Game Mode feature 83 GameTimer 71 H HDMI audio mode 48 HDMI cable 14 HDMI settings 75 Deep Color 75 Lip-Sync Latency 75 xvYCC 75 HDMI™ connection 20 Help feature 85 Home file server setup 93 Home network connection 24 I INFO button 76 INPUT button 51 Installation, care, and service 3 Installation, setup...
... Base closed captions 62 Blocking channels 69 C C (CLOSED). Index A Antenna cable 14 Antenna input configuration 44 Audio player 98 Audio quality adjustments 65 Audio system connection 22 Auto aspect 58 Auto Input 46 Auto power off 76 B Back of the TV 11 G Game Mode feature 83 GameTimer 71 H HDMI audio mode 48 HDMI cable 14 HDMI settings 75 Deep Color 75 Lip-Sync Latency 75 xvYCC 75 HDMI™ connection 20 Help feature 85 Home file server setup 93 Home network connection 24 I INFO button 76 INPUT button 51 Installation, care, and service 3 Installation, setup...


