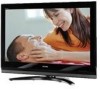

Owner's Manual - English
Page 2
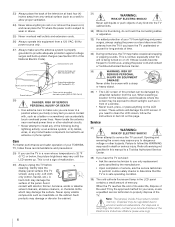
... system installer's attention to the wall (but never screw anything directly into the TV). Tune Into Safety a One size does NOT fit all! Thank you use of any item on your LCD TV, please read and understand the other electronic components). NO USER-SERVICEABLE PARTS INSIDE. a Do not allow children to secure your TV (such as practical. a Share our safety message about television safety...
... system installer's attention to the wall (but never screw anything directly into the TV). Tune Into Safety a One size does NOT fit all! Thank you use of any item on your LCD TV, please read and understand the other electronic components). NO USER-SERVICEABLE PARTS INSIDE. a Do not allow children to secure your TV (such as practical. a Share our safety message about television safety...
Owner's Manual - English
Page 4
... panel. These actions will damage the LCD screen. Opening and removing the covers may expose you to dangerous voltage or other electrical circuits. • Never attempt to install any home theater component connected to an antenna or phone system. If these recommendations and precautions: 29) If you use only replacement parts specified by the manufacturer. • Upon completion of service, ask the service...
... panel. These actions will damage the LCD screen. Opening and removing the covers may expose you to dangerous voltage or other electrical circuits. • Never attempt to install any home theater component connected to an antenna or phone system. If these recommendations and precautions: 29) If you use only replacement parts specified by the manufacturer. • Upon completion of service, ask the service...
Owner's Manual - English
Page 7
... the picture mode 53 Adjusting the picture quality 53 Using the closed caption mode 54 Base closed captions 54 Digital CC Settings 54 CC Selector 55 Using the Closed Caption button on the remote control 55 Adjusting the audio 55 Muting the sound 55 Using the digital audio selector 55 Selecting stereo/SAP broadcasts 56 Adjusting the audio quality 56 Using the StableSound® feature 57 Selecting the optical audio output format 57 Using the Dolby® Digital Dynamic Range Control feature 57 Using the Locks menu 58...
... the picture mode 53 Adjusting the picture quality 53 Using the closed caption mode 54 Base closed captions 54 Digital CC Settings 54 CC Selector 55 Using the Closed Caption button on the remote control 55 Adjusting the audio 55 Muting the sound 55 Using the digital audio selector 55 Selecting stereo/SAP broadcasts 56 Adjusting the audio quality 56 Using the StableSound® feature 57 Selecting the optical audio output format 57 Using the Dolby® Digital Dynamic Range Control feature 57 Using the Locks menu 58...

Owner's Manual - English
Page 9
... output resolution. • Three HDMI™ digital, high-definition multimedia interfaces 1080p input support (- page 69). • CE-Link allows control of ColorStream® HD high-resolution component video inputs (- page 19). • Two sets of external devices from the TV remote via HDMI connection (- pages 13 and 17). • ColorMaster™ allows you 're adjusting the color (- page 42). • IR OUT infrared terminal using the IR blaster cable for this Toshiba LCD TV...
... output resolution. • Three HDMI™ digital, high-definition multimedia interfaces 1080p input support (- page 69). • CE-Link allows control of ColorStream® HD high-resolution component video inputs (- page 19). • Two sets of external devices from the TV remote via HDMI connection (- pages 13 and 17). • ColorMaster™ allows you 're adjusting the color (- page 42). • IR OUT infrared terminal using the IR blaster cable for this Toshiba LCD TV...
Owner's Manual - English
Page 10
... to operate your other immovable structure (- pages 13-22). 6 Install the batteries in standby mode, press POWER on the TV control panel or remote control to the Troubleshooting Guide, Chapter 8. 14 For technical specifications and warranty information, see Chapters 6 and 7. 13 For help, refer to turn the TV off or on the TV. page 24) for an overview of the buttons on the remote control. 8 Program the remote control to reset the TV. 10 See "Menu layout...
... to operate your other immovable structure (- pages 13-22). 6 Install the batteries in standby mode, press POWER on the TV control panel or remote control to the Troubleshooting Guide, Chapter 8. 14 For technical specifications and warranty information, see Chapters 6 and 7. 13 For help, refer to turn the TV off or on the TV. page 24) for an overview of the buttons on the remote control. 8 Program the remote control to reset the TV. 10 See "Menu layout...
Owner's Manual - English
Page 12
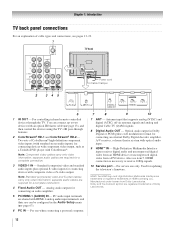
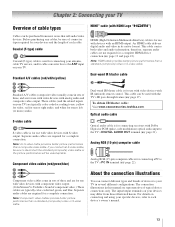
... use only. Optical audio output in the Audio Setup menu (- Chapter 1: Introduction TV back panel connections For an explanation of cable types and connections, see item 5. separate audio cables are trademarks or registered trademarks of Dolby Laboratories. 12 PC audio input terminals are shared with HDMI-1 analog audio input terminals, and their use can connect up to receive 1080p signals. 10 Service port - Antenna input that supports analog (NTSC) and digital (ATSC) off-air antenna signals and analog and digital Cable TV (QAM) signals. 8 Digital Audio OUT - HDMI, the HDMI...
... use only. Optical audio output in the Audio Setup menu (- Chapter 1: Introduction TV back panel connections For an explanation of cable types and connections, see item 5. separate audio cables are trademarks or registered trademarks of Dolby Laboratories. 12 PC audio input terminals are shared with HDMI-1 analog audio input terminals, and their use can connect up to receive 1080p signals. 10 Service port - Antenna input that supports analog (NTSC) and digital (ATSC) off-air antenna signals and analog and digital Cable TV (QAM) signals. 8 Digital Audio OUT - HDMI, the HDMI...
Owner's Manual - English
Page 13
... can connect different types and brands of devices to the ANT input on connecting and using your specific devices, refer to the TV's PC IN terminal (- An HDMI cable delivers digital audio and video in sets of three and are typically color-coded red, green, and blue. Separate audio cables are not required for use with video devices with S-video output. Component video cables (red/green/blue) Dual-wand IR blaster cable is for use with video devices with IR (infrared) remote control. Analog...
... can connect different types and brands of devices to the ANT input on connecting and using your specific devices, refer to the TV's PC IN terminal (- An HDMI cable delivers digital audio and video in sets of three and are typically color-coded red, green, and blue. Separate audio cables are not required for use with video devices with S-video output. Component video cables (red/green/blue) Dual-wand IR blaster cable is for use with video devices with IR (infrared) remote control. Analog...
Owner's Manual - English
Page 15
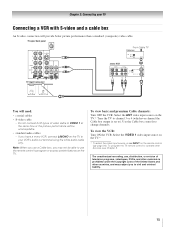
... the picture performance will need: • coaxial cables • S-video cable - Select the ANT video input source on the TV. To program the TV remote control to ). To view the VCR: Turn ON the VCR. Chapter 2: Connecting your VCR's audio out terminal using the white audio cable only. To view basic and premium Cable channels: Turn OFF the VCR. Use the Cable box controls to your TV Connecting a VCR with S-video and a cable box An S-video connection will provide better picture performance than a standard (composite) video cable. Select the VIDEO 1 video input source...
... the picture performance will need: • coaxial cables • S-video cable - Select the ANT video input source on the TV. To program the TV remote control to ). To view the VCR: Turn ON the VCR. Chapter 2: Connecting your VCR's audio out terminal using the white audio cable only. To view basic and premium Cable channels: Turn OFF the VCR. Use the Cable box controls to your TV Connecting a VCR with S-video and a cable box An S-video connection will provide better picture performance than a standard (composite) video cable. Select the VIDEO 1 video input source...
Owner's Manual - English
Page 22
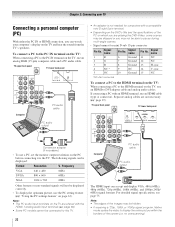
... HDMI terminal on the TV, use an HDMI-to the TV. The following signals can be displayed correctly. • To display the optimum picture, use a PC, set the monitor output resolution on the TV and hear the sound from the TV's speakers. "Using the PC settings feature" on the TV are shared with the HDMI-1 analog audio input terminals (- TV upper back panel TV lower back panel PC audio output Conversion adapter (if necessary) • To use the PC setting feature (- Separate analog cables are playing the DVD-Video...
... HDMI terminal on the TV, use an HDMI-to the TV. The following signals can be displayed correctly. • To display the optimum picture, use a PC, set the monitor output resolution on the TV and hear the sound from the TV's speakers. "Using the PC settings feature" on the TV are shared with the HDMI-1 analog audio input terminals (- TV upper back panel TV lower back panel PC audio output Conversion adapter (if necessary) • To use the PC setting feature (- Separate analog cables are playing the DVD-Video...
Owner's Manual - English
Page 36
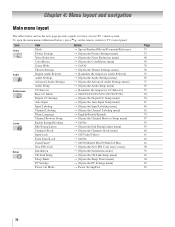
...the next page provide a quick overview of your TV's menu system. Icon Video Audio Preferences Locks Setup Item Mode Picture Settings Noise Reduction ColorMaster Game Mode Theater Settings Digital Audio Selector Audio Settings Advanced Audio Settings Audio Setup CC Selector Base CC Mode Digital CC Settings Auto Input Input Labeling Channel Labeling Menu Language Channel Browser Setup Enable Rating Blocking Edit Rating Limits Channels Block Input Lock Front Panel Lock GameTimer® New PIN Code Installation CE-Link Setup Sleep Timer PC Settings Power-On Mode Option S Sports/Standard/Movie...
...the next page provide a quick overview of your TV's menu system. Icon Video Audio Preferences Locks Setup Item Mode Picture Settings Noise Reduction ColorMaster Game Mode Theater Settings Digital Audio Selector Audio Settings Advanced Audio Settings Audio Setup CC Selector Base CC Mode Digital CC Settings Auto Input Input Labeling Channel Labeling Menu Language Channel Browser Setup Enable Rating Blocking Edit Rating Limits Channels Block Input Lock Front Panel Lock GameTimer® New PIN Code Installation CE-Link Setup Sleep Timer PC Settings Power-On Mode Option S Sports/Standard/Movie...
Owner's Manual - English
Page 40
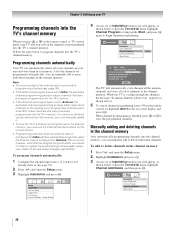
... unless your area and store them in the on the remote control. • Programming channels when the antenna input is set to Cable, the automatic channel programming process erases channels that were previously programmed into the TV's channel memory. Note: • You must use the Channel Number buttons on -screen display and press T). page 39). • If the Antenna input signal type is configured for Antenna. Chapter 5: Setting up the Start, and press T again to begin...
... unless your area and store them in the on the remote control. • Programming channels when the antenna input is set to Cable, the automatic channel programming process erases channels that were previously programmed into the TV's channel memory. Note: • You must use the Channel Number buttons on -screen display and press T). page 39). • If the Antenna input signal type is configured for Antenna. Chapter 5: Setting up the Start, and press T again to begin...
Owner's Manual - English
Page 43
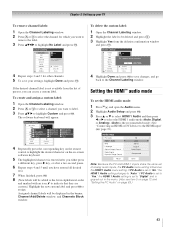
...: 1 Open the Channel Labeling window. 2 Highlight the label to select the HDMI 1 audio mode (Auto, Digital, or Analog). (Auto is not available from the deletion confirmation window and press T. Audio Setup PC Audio HDMI 1 Audio MTS Language Optical Output Format Dolby Digital Dynamic Range Control Reset No Auto Stereo English Dolby Digital Compressed Done Note: Because the PC and HDMI-1 inputs share the same set the HDMI audio mode: 1 Press Y and open the Audio menu. 2 Highlight Audio Setup and press T. 3 Press...
...: 1 Open the Channel Labeling window. 2 Highlight the label to select the HDMI 1 audio mode (Auto, Digital, or Analog). (Auto is not available from the deletion confirmation window and press T. Audio Setup PC Audio HDMI 1 Audio MTS Language Optical Output Format Dolby Digital Dynamic Range Control Reset No Auto Stereo English Dolby Digital Compressed Done Note: Because the PC and HDMI-1 inputs share the same set the HDMI audio mode: 1 Press Y and open the Audio menu. 2 Highlight Audio Setup and press T. 3 Press...
Owner's Manual - English
Page 55
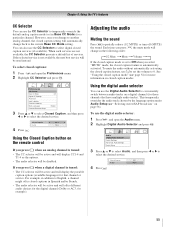
... override the default analog caption mode (set to Off when you press W, the mute mode will display the possible caption options (available languages) for those channels that channel or service. Closed Caption Audio CC 1 None 4 Press O. Audio Digital Audio Selector Audio Settings Advanced Audio Settings Audio Setup 3 Press B or b to select Audio, and then press C or c to conveniently switch between audio tracks on the remote control If you press ; Chapter 6: Using the TV's features CC Selector You can use the CC...
... override the default analog caption mode (set to Off when you press W, the mute mode will display the possible caption options (available languages) for those channels that channel or service. Closed Caption Audio CC 1 None 4 Press O. Audio Digital Audio Selector Audio Settings Advanced Audio Settings Audio Setup 3 Press B or b to select Audio, and then press C or c to conveniently switch between audio tracks on the remote control If you press ; Chapter 6: Using the TV's features CC Selector You can use the CC...
Owner's Manual - English
Page 63
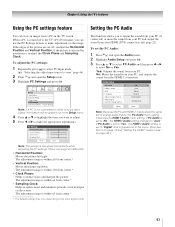
... "Setting the HDMI™ Audio mode" on the TV screen. page 22) To set of the picture are cut off, readjust the Horizontal Position and Vertical Position. No: Mutes the sound from your PC, and outputs the sound from your PC. Audio Setup PC Audio HDMI 1 Audio MTS Language Optical Output Format Dolby Digital Dynamic Range Control No Auto Stereo English Dolby Digital Compressed Reset Done Note: Because the PC and HDMI-1 inputs share the same set...
... "Setting the HDMI™ Audio mode" on the TV screen. page 22) To set of the picture are cut off, readjust the Horizontal Position and Vertical Position. No: Mutes the sound from your PC, and outputs the sound from your PC. Audio Setup PC Audio HDMI 1 Audio MTS Language Optical Output Format Dolby Digital Dynamic Range Control No Auto Stereo English Dolby Digital Compressed Reset Done Note: Because the PC and HDMI-1 inputs share the same set...
Owner's Manual - English
Page 65
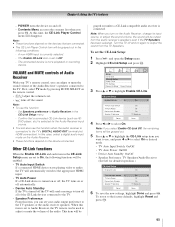
... connected to output the sound from the audio receiver's speakers even if the TV Speakers has been selected. First, select TV mode by pressing MODE SELECT on again to the TV's DIGITAL AUDIO OUT terminal (not HDMI connection). In this function: - POWER turns the device on the device connected. Set Speakers preference to Off. - CE-Link Setup Enable CE-Link On TV Auto Input Switch TV Auto Power Device Auto Standby Speaker Preference On Off On TV Speakers Reset Done 4 Press C or c to the factory defaults, highlight Reset...
... connected to output the sound from the audio receiver's speakers even if the TV Speakers has been selected. First, select TV mode by pressing MODE SELECT on again to the TV's DIGITAL AUDIO OUT terminal (not HDMI connection). In this function: - POWER turns the device on the device connected. Set Speakers preference to Off. - CE-Link Setup Enable CE-Link On TV Auto Input Switch TV Auto Power Device Auto Standby Speaker Preference On Off On TV Speakers Reset Done 4 Press C or c to the factory defaults, highlight Reset...
Owner's Manual - English
Page 72
.... Sound problems • Check the antenna/cable connections (- Try another channel. • Adjust the Tint and/or Color (- Press VOLUME. • If you hear audio that particular input source. Remote control problems • Make sure the remote control is set -top box, etc.) try one of the Text modes (T1, T2, T3, or T4). TV stops responding to controls • If the TV stops responding to the controls on the TV control panel for the program you plug the power cord...
.... Sound problems • Check the antenna/cable connections (- Try another channel. • Adjust the Tint and/or Color (- Press VOLUME. • If you hear audio that particular input source. Remote control problems • Make sure the remote control is set -top box, etc.) try one of the Text modes (T1, T2, T3, or T4). TV stops responding to controls • If the TV stops responding to the controls on the TV control panel for the program you plug the power cord...
Owner's Manual - English
Page 76
... card does not diminish your responsibility. (5) Warranties extend only to defects in electric power), improper installation, improper maintenance, or use of instructions furnished by an Authorized TACP Service Station. (3) The warranties from the date you or to damage to the LCD Television or parts caused by inadequate antenna systems, misaligned satellite dishes, cable 76 television distribution, VCRs, DVD players/recorders, personal computer level IEEE-1394...
... card does not diminish your responsibility. (5) Warranties extend only to defects in electric power), improper installation, improper maintenance, or use of instructions furnished by an Authorized TACP Service Station. (3) The warranties from the date you or to damage to the LCD Television or parts caused by inadequate antenna systems, misaligned satellite dishes, cable 76 television distribution, VCRs, DVD players/recorders, personal computer level IEEE-1394...
Owner's Manual - English
Page 77
.... (4) Labour charges for set installation, setup, adjustment of customer controls, and installation or repair of antenna systems are your bill of sale or other than those authorized by failure to follow the specifications, User manuals or guides as to service the Television; Service on which the TOSHIBA label or logo, rating label or serial number have been defaced or removed; Chapter 9: Appendix Limited Canadian Warranty for Toshiba Brand Flat Panel Televisions Toshiba of Canada Limited...
.... (4) Labour charges for set installation, setup, adjustment of customer controls, and installation or repair of antenna systems are your bill of sale or other than those authorized by failure to follow the specifications, User manuals or guides as to service the Television; Service on which the TOSHIBA label or logo, rating label or serial number have been defaced or removed; Chapter 9: Appendix Limited Canadian Warranty for Toshiba Brand Flat Panel Televisions Toshiba of Canada Limited...
Owner's Manual - English
Page 78
...collectively referred to as agreed to form part of TCL. For additional information, visit TCL's website at the time that result from the warranty and deemed not to between this manual and checking the "Troubleshooting" section, you find that you may...WARRANTY DOES NOT APPLY AND SHALL BE VOID AND UNENFORCEABLE IF THE TELEVISION IS OPENED, SERVICED, OR REPAIRED BY PERSONS OTHER THAN THOSE AUTHORIZED BY TCL TO SERVICE OR REPAIR THE TELEVISION. No person, agent, distributor, dealer or company is needed: (1) To find the nearest ASP, visit TCL's web site at www.toshiba.ca, or call toll free...
...collectively referred to as agreed to form part of TCL. For additional information, visit TCL's website at the time that result from the warranty and deemed not to between this manual and checking the "Troubleshooting" section, you find that you may...WARRANTY DOES NOT APPLY AND SHALL BE VOID AND UNENFORCEABLE IF THE TELEVISION IS OPENED, SERVICED, OR REPAIRED BY PERSONS OTHER THAN THOSE AUTHORIZED BY TCL TO SERVICE OR REPAIR THE TELEVISION. No person, agent, distributor, dealer or company is needed: (1) To find the nearest ASP, visit TCL's web site at www.toshiba.ca, or call toll free...

Owner's Manual - English
Page 80
... Unlocking programs temporarily 61 Video inputs, locking 61 Locks menu 58 M MODE SELECT 24, 27 MPEG noise reduction 69 MTS feature 56 MUTE button 55 O Optical audio cable 13 Optical audio output format 57 P PC Audio 63 PC connection 22 PC settings 63 Picture adjustment 53 Picture mode 53 Picture quality 53 Picture scroll 51 Picture size selection 50 POWER button 11, 24 Power-On Mode 45 R RECALL button 66 Remote control Battery installation 23 Effective range 23 Learning about the buttons .......24 Operational feature 28 Volume lock feature 28 Reset Factory Defaults...
... Unlocking programs temporarily 61 Video inputs, locking 61 Locks menu 58 M MODE SELECT 24, 27 MPEG noise reduction 69 MTS feature 56 MUTE button 55 O Optical audio cable 13 Optical audio output format 57 P PC Audio 63 PC connection 22 PC settings 63 Picture adjustment 53 Picture mode 53 Picture quality 53 Picture scroll 51 Picture size selection 50 POWER button 11, 24 Power-On Mode 45 R RECALL button 66 Remote control Battery installation 23 Effective range 23 Learning about the buttons .......24 Operational feature 28 Volume lock feature 28 Reset Factory Defaults...


