Owner's Manual - English
Page 2
... your new LCD TV. TOSHIBA Cares! • The consumer electronics industry is appropriate. Care should be taken to route all cords and cables connected to the flat panel displays are not always supported on a "larger than a UL Listed wall bracket appropriate for the size and weight of this television. Before operating your flat panel display. See item 23 on page 3 and instructions on page 4. The use the many...
... your new LCD TV. TOSHIBA Cares! • The consumer electronics industry is appropriate. Care should be taken to route all cords and cables connected to the flat panel displays are not always supported on a "larger than a UL Listed wall bracket appropriate for the size and weight of this television. Before operating your flat panel display. See item 23 on page 3 and instructions on page 4. The use the many...
Owner's Manual - English
Page 4
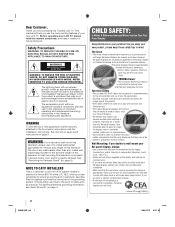
... anything to rest on the LCD screen. Harsh rubbing or use of the National Electric Code). When the TV is turned off using the on/off . Never locate the antenna near overhead power lines or other place with poor ventilation. Gently wipe the cabinet and the display panel surface (the TV screen) with a sharp or heavy object. 40) •The LCD screen of malfunction. 33) Always unplug...
... anything to rest on the LCD screen. Harsh rubbing or use of the National Electric Code). When the TV is turned off using the on/off . Never locate the antenna near overhead power lines or other place with poor ventilation. Gently wipe the cabinet and the display panel surface (the TV screen) with a sharp or heavy object. 40) •The LCD screen of malfunction. 33) Always unplug...
Owner's Manual - English
Page 5
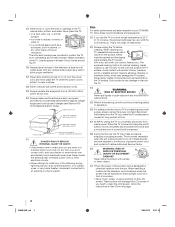
... pedestal stand to avoid damage to the LCD panel. 2) Remove the four screws shown in the instructions provided with your LCD TV, always use a UL listed wall bracket appropriate for installation. 2) Unplug and remove any cables and/or other hazards. CAUTION: Before beginning pedestal assembly, carefully lay the front of the TV. 3) Be sure to secure the TV to determine that can support the weight of the LCD Panel face down on a flat...
... pedestal stand to avoid damage to the LCD panel. 2) Remove the four screws shown in the instructions provided with your LCD TV, always use a UL listed wall bracket appropriate for installation. 2) Unplug and remove any cables and/or other hazards. CAUTION: Before beginning pedestal assembly, carefully lay the front of the TV. 3) Be sure to secure the TV to determine that can support the weight of the LCD Panel face down on a flat...
Owner's Manual - English
Page 6
... Conformity Compliance Statement (Part 15): The Toshiba 40XV648U, 46XV648U and 52XV648U Televisions comply with the limits for normal home use. If this TV is not covered under license from a normal viewing distance. To return to [Home] mode settings, select [AutoView] picture mode, set the Auto Brightness Sensor to [On] mode, and set by Toshiba could void the user's authority to Part 15 of time. 2) The LCD panel contained in a residential installation. ENERGY STAR...
... Conformity Compliance Statement (Part 15): The Toshiba 40XV648U, 46XV648U and 52XV648U Televisions comply with the limits for normal home use. If this TV is not covered under license from a normal viewing distance. To return to [Home] mode settings, select [AutoView] picture mode, set the Auto Brightness Sensor to [On] mode, and set by Toshiba could void the user's authority to Part 15 of time. 2) The LCD panel contained in a residential installation. ENERGY STAR...
Owner's Manual - English
Page 7
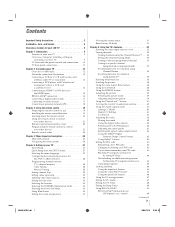
... installing, setting up, and using your new TV 9 TV front and side panel controls and connections . . . . 10 TV back panel connections 11 Chapter 2: Connecting your TV 12 Overview of cable types 12 About the connection illustrations 12 Connecting a VCR (or a VCR with S-video) and antenna, Cable TV or Camcorder 13 Connecting a DVD player with ColorStream® (component video), a VCR, and a satellite receiver 14 Connecting an HDMI™ or DVI device to the HDMI input 15 REGZA-LINK® connection 16 Connecting a digital audio system 17 Connecting...
... installing, setting up, and using your new TV 9 TV front and side panel controls and connections . . . . 10 TV back panel connections 11 Chapter 2: Connecting your TV 12 Overview of cable types 12 About the connection illustrations 12 Connecting a VCR (or a VCR with S-video) and antenna, Cable TV or Camcorder 13 Connecting a DVD player with ColorStream® (component video), a VCR, and a satellite receiver 14 Connecting an HDMI™ or DVI device to the HDMI input 15 REGZA-LINK® connection 16 Connecting a digital audio system 17 Connecting...
Owner's Manual - English
Page 9
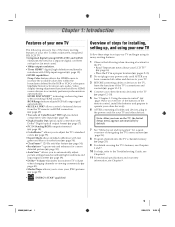
... by default. 7 See "Menu layout and navigation" for your TV and other electronic device(s) to operate your other device(s). 6 AFTER connecting all cables and devices, plug in any power cords until AFTER you to automatically adjust picture settings based on using your other devices. HDMI INSTAPORT™ technology reduces lag time when switching HDMI sources. page 14). •Digital Audio Out optical audio connection with red, green and blue color selections (- page 15). •HDMI capabilities Deep Color feature...
... by default. 7 See "Menu layout and navigation" for your TV and other electronic device(s) to operate your other device(s). 6 AFTER connecting all cables and devices, plug in any power cords until AFTER you to automatically adjust picture settings based on using your other devices. HDMI INSTAPORT™ technology reduces lag time when switching HDMI sources. page 14). •Digital Audio Out optical audio connection with red, green and blue color selections (- page 15). •HDMI capabilities Deep Color feature...
Owner's Manual - English
Page 10
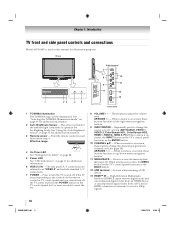
... "Setting the On Timer" on page 48. 5 Power LED See "LED indications" on page 55 for 5 or more seconds to reset the TV. 8 VOLUME+ - - When a menu is on and off the TV, press and hold the POWER button on the TV control panel for additional information. 3 Remote sensor - For use when inserting a USB device. 13 HDMI™ IN - High-Definition Multimedia Interface (HDMI 3) input receives digital audio and uncompressed digital video from an HDMI device or uncompressed digital video from...
... "Setting the On Timer" on page 48. 5 Power LED See "LED indications" on page 55 for 5 or more seconds to reset the TV. 8 VOLUME+ - - When a menu is on and off the TV, press and hold the POWER button on the TV control panel for additional information. 3 Remote sensor - For use when inserting a USB device. 13 HDMI™ IN - High-Definition Multimedia Interface (HDMI 3) input receives digital audio and uncompressed digital video from an HDMI device or uncompressed digital video from...
Owner's Manual - English
Page 11
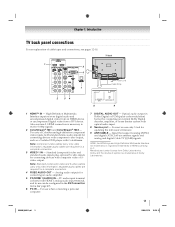
... HDMI 1 analog audio input terminal, and its use can be configured in Dolby Digital or PCM (pulse-code modulation) format for connecting devices with component video output, such as a Toshiba DVD player with optical audio input. 8 Service port - Note: Standard (composite) video and S-video cables carry only video information; Analog audio outputs for updating the television's firmware. 9 ANT/CABLE - For use only. Used for connecting an audio amplifier. 5 PC/HDMI 1 (AUDIO) IN - Input that supports analog (NTSC) and digital (ATSC) off-air antenna signals and analog and digital Cable TV...
... HDMI 1 analog audio input terminal, and its use can be configured in Dolby Digital or PCM (pulse-code modulation) format for connecting devices with component video output, such as a Toshiba DVD player with optical audio input. 8 Service port - Note: Standard (composite) video and S-video cables carry only video information; Analog audio outputs for updating the television's firmware. 9 ANT/CABLE - For use only. Used for connecting an audio amplifier. 5 PC/HDMI 1 (AUDIO) IN - Input that supports analog (NTSC) and digital (ATSC) off-air antenna signals and analog and digital Cable TV...

Owner's Manual - English
Page 12
.... S-video cable S-video cable is for connecting receivers with component video output. (ColorStream® is Toshiba's brand of component video.) These cables are not required for connecting your antenna, cable TV service, and/or cable converter box to the TV's DIGITAL AUDIO OUT terminal (- Note: Separate audio cables are required for use with video devices with Dolby Digital or PCM (pulse-code modulation) optical audio input to the ANT/CABLE input on your TV in its native format. Note: Component video cables provide better picture performance than a composite video cable...
.... S-video cable S-video cable is for connecting receivers with component video output. (ColorStream® is Toshiba's brand of component video.) These cables are not required for connecting your antenna, cable TV service, and/or cable converter box to the TV's DIGITAL AUDIO OUT terminal (- Note: Separate audio cables are required for use with video devices with Dolby Digital or PCM (pulse-code modulation) optical audio input to the ANT/CABLE input on your TV in its native format. Note: Component video cables provide better picture performance than a composite video cable...

Owner's Manual - English
Page 13
... the picture performance will need: •coaxial cables •standard A/V cables - To view the antenna or Cable signal: Select the ANT/CABLE video input source on the TV.* To view basic and premium Cable channels: Turn OFF the VCR. Do not connect both types of television programs, videotapes, DVDs, and other devices, see Chapter 3. Chapter 2: Connecting your TV Connecting a VCR (or a VCR with S-video) and antenna, Cable TV or Camcorder Camcorder AUDIO OUT L R VIDEO TV upper back panel VIDEO 2 inputs on TV right side panel TV lower back panel S-video cable...
... the picture performance will need: •coaxial cables •standard A/V cables - To view the antenna or Cable signal: Select the ANT/CABLE video input source on the TV.* To view basic and premium Cable channels: Turn OFF the VCR. Do not connect both types of television programs, videotapes, DVDs, and other devices, see Chapter 3. Chapter 2: Connecting your TV Connecting a VCR (or a VCR with S-video) and antenna, Cable TV or Camcorder Camcorder AUDIO OUT L R VIDEO TV upper back panel VIDEO 2 inputs on TV right side panel TV lower back panel S-video cable...

Owner's Manual - English
Page 17
... WARRANTY. • The DIGITAL AUDIO OUT terminal may not be compatible with Dolby Digital bitstream signals. You will need : •optical audio cable (Use an optical audio cable that may To control the audio: 1 Turn on the TV and the stereo amplifier. 2 Minimize the sound volume from Dolby Laboratories. Chapter 2: Connecting your TV Connecting a digital audio system The TV's DIGITAL AUDIO OUT terminal outputs a Dolby®* Digital or 2-channel down-mixed PCM (pulse-code modulation) signal for use external speakers with an external analog audio amplifier to adjust the sound...
... WARRANTY. • The DIGITAL AUDIO OUT terminal may not be compatible with Dolby Digital bitstream signals. You will need : •optical audio cable (Use an optical audio cable that may To control the audio: 1 Turn on the TV and the stereo amplifier. 2 Minimize the sound volume from Dolby Laboratories. Chapter 2: Connecting your TV Connecting a digital audio system The TV's DIGITAL AUDIO OUT terminal outputs a Dolby®* Digital or 2-channel down-mixed PCM (pulse-code modulation) signal for use external speakers with an external analog audio amplifier to adjust the sound...
Owner's Manual - English
Page 18
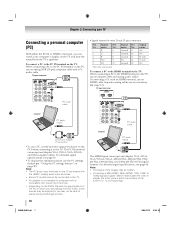
..., or 1080p signal program, Native mode scales the video to the PC IN terminal on the TV, use a PC, set the monitor output resolution on page 47). TV upper back panel PC audio cable Computer PC audio output PC audio cable Conversion adapter (if necessary) •To use an adapter cable and analog audio cables. Computer PC audio output The HDMI input can accept and display VGA, SVGA, XGA, WXGA, and SXGA signal formats. TV upper back panel •Signal names for computers with a compatible mini...
..., or 1080p signal program, Native mode scales the video to the PC IN terminal on the TV, use a PC, set the monitor output resolution on page 47). TV upper back panel PC audio cable Computer PC audio output PC audio cable Conversion adapter (if necessary) •To use an adapter cable and analog audio cables. Computer PC audio output The HDMI input can accept and display VGA, SVGA, XGA, WXGA, and SXGA signal formats. TV upper back panel •Signal names for computers with a compatible mini...
Owner's Manual - English
Page 28
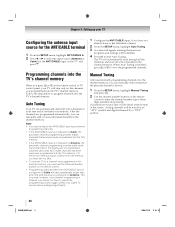
... channel programming process erases channels that were previously programmed into the TV's memory.) To remove an Antenna source channel from the memory, you can manually enter channels if the physical channel is known. 1 From the SETUP menu, highlight Manual Tuning and press T. 2 Use the channel number buttons on the remote control to enter the channel number (up your Cable TV service lineup changes significantly. 1 Configure the ANT/CABLE input, if you must use the Channel Number buttons on the remote control. • Programming channels when the ANT/CABLE input...
... channel programming process erases channels that were previously programmed into the TV's memory.) To remove an Antenna source channel from the memory, you can manually enter channels if the physical channel is known. 1 From the SETUP menu, highlight Manual Tuning and press T. 2 Use the channel number buttons on the remote control to enter the channel number (up your Cable TV service lineup changes significantly. 1 Configure the ANT/CABLE input, if you must use the Channel Number buttons on the remote control. • Programming channels when the ANT/CABLE input...
Owner's Manual - English
Page 35
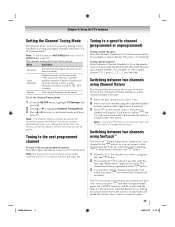
... "Memorized" appears on the remote control. For example, to program into the TV's channel memory (- To memorize a channel to the R button: 1 Tune the TV to the channel you want to a specific channel (programmed or unprogrammed) Tuning analog channels: Press the Channel Number (0-9) on -screen. Note: To use this feature, ANT/CABLE In must be set the Channel Tuning Mode: 1 From the SETUP menu, highlight TV Settings and press T. 2 Press B or b to highlight Channel Tuning Mode. 3 Press C or c to...
... "Memorized" appears on the remote control. For example, to program into the TV's channel memory (- To memorize a channel to the R button: 1 Tune the TV to the channel you want to a specific channel (programmed or unprogrammed) Tuning analog channels: Press the Channel Number (0-9) on -screen. Note: To use this feature, ANT/CABLE In must be set the Channel Tuning Mode: 1 From the SETUP menu, highlight TV Settings and press T. 2 Press B or b to highlight Channel Tuning Mode. 3 Press C or c to...
Owner's Manual - English
Page 59
... POWER button on certain TV channels, please contact your TV's problem is set to the picture. - Chapter 2). • Press + on the remote control or the TV control panel, press + a second time, which may have broadcast difficulties. Use a highly directional outdoor antenna (if applicable). • The station may help synchronize the sound to Off (- DVD player, video game system, set-top box, etc.) try . This phenomenon can try using either the PC IN terminal or an HDMI...
... POWER button on certain TV channels, please contact your TV's problem is set to the picture. - Chapter 2). • Press + on the remote control or the TV control panel, press + a second time, which may have broadcast difficulties. Use a highly directional outdoor antenna (if applicable). • The station may help synchronize the sound to Off (- DVD player, video game system, set-top box, etc.) try . This phenomenon can try using either the PC IN terminal or an HDMI...
Owner's Manual - English
Page 65
... connected signal source device are effective only if this manual and reviewing the section entitled "Troubleshooting," you find that service is required. Depending on Parts and Labor TACP warrants this warranty. Limited Warranty for Commercial Units TACP warrants LCD Televisions that have been modified or had the serial number removed, altered, defaced, or rendered illegible. Consumer Product Safety Act. or Puerto Rico. (4) Labor service charges for set installation, setup, adjustment...
... connected signal source device are effective only if this manual and reviewing the section entitled "Troubleshooting," you find that service is required. Depending on Parts and Labor TACP warrants this warranty. Limited Warranty for Commercial Units TACP warrants LCD Televisions that have been modified or had the serial number removed, altered, defaced, or rendered illegible. Consumer Product Safety Act. or Puerto Rico. (4) Labor service charges for set installation, setup, adjustment...
Owner's Manual - English
Page 67
... SALE DISPLAY, ETC.). THIS WARRANTY WILL NOT COVER ANY SERVICE THAT IS REQUIRED, IN PART OR IN WHOLE, AS A RESULT OF ANY FAILURE TO FOLLOW THE SET-UP AND USAGE INSTRUCTIONS. Reception problems caused by the use or installation of the Television; c. Service on which the TOSHIBA label or logo, rating label or serial number have been defaced or removed; Damage to the Television; Service, repairs or replacement made...
... SALE DISPLAY, ETC.). THIS WARRANTY WILL NOT COVER ANY SERVICE THAT IS REQUIRED, IN PART OR IN WHOLE, AS A RESULT OF ANY FAILURE TO FOLLOW THE SET-UP AND USAGE INSTRUCTIONS. Reception problems caused by the use or installation of the Television; c. Service on which the TOSHIBA label or logo, rating label or serial number have been defaced or removed; Damage to the Television; Service, repairs or replacement made...
Owner's Manual - English
Page 68
..., visit TCL's website at www.toshiba.ca A copy of the operating instructions in this limited warranty shall prevail. A copy of the LGPL source code in any manner whatsoever. Portions of this limited warranty as agreed to between this limited warranty, on the work of these warranties in respect of that result from this warranty; (ii) the Television; (iii) any provision of this...
..., visit TCL's website at www.toshiba.ca A copy of the operating instructions in this limited warranty shall prevail. A copy of the LGPL source code in any manner whatsoever. Portions of this limited warranty as agreed to between this limited warranty, on the work of these warranties in respect of that result from this warranty; (ii) the Television; (iii) any provision of this...
Owner's Manual - English
Page 69
... Timer 48 Optical audio output format 43 P Panel Lock 46 PC Audio 47 PC connection 18 PC settings 47 Picture mode 39 Picture quality 39 Picture scroll 38 Picture size selection 36 PIN code 43 POWER button 20, 21 Power-On Mode 30 R RECALL button 52 REGZA-LINK® connection 16 REGZA-LINK® feature 49 Remote control Battery installation 19 Device code table 24 Functional key chart 22 Programming 23 Reset Factory Defaults 31 Resolution 53 RGB Range 51 S SAP sound 42 Satellite receiver connection ...........14 Sleep Timer...
... Timer 48 Optical audio output format 43 P Panel Lock 46 PC Audio 47 PC connection 18 PC settings 47 Picture mode 39 Picture quality 39 Picture scroll 38 Picture size selection 36 PIN code 43 POWER button 20, 21 Power-On Mode 30 R RECALL button 52 REGZA-LINK® connection 16 REGZA-LINK® feature 49 Remote control Battery installation 19 Device code table 24 Functional key chart 22 Programming 23 Reset Factory Defaults 31 Resolution 53 RGB Range 51 S SAP sound 42 Satellite receiver connection ...........14 Sleep Timer...
Printable Spec Sheet
Page 2
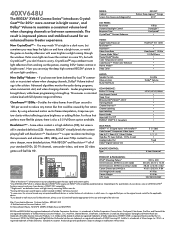
... the television. Now you decide to wall mount your standard DVDs, SD TV channels, camcorder videos, and even SD video games will feel like picture, there is super resolution technology that could be caused by the U.S. If you use a UL Listed wall bracket appropriate for 30%+ more contrast in . (without notice. SERIES: Cabinet Screen Size (measured diagonally) LCD PANEL: Resolution Dynamic Backlight Control Response Time CrystalCoatTM Contrast Enhancer VIDEO: Digital Video Processor Resolution+TM1 AutoViewTM Video Scan Rate Cinema Mode...
... the television. Now you decide to wall mount your standard DVDs, SD TV channels, camcorder videos, and even SD video games will feel like picture, there is super resolution technology that could be caused by the U.S. If you use a UL Listed wall bracket appropriate for 30%+ more contrast in . (without notice. SERIES: Cabinet Screen Size (measured diagonally) LCD PANEL: Resolution Dynamic Backlight Control Response Time CrystalCoatTM Contrast Enhancer VIDEO: Digital Video Processor Resolution+TM1 AutoViewTM Video Scan Rate Cinema Mode...


