
Owners Manual
Page 2
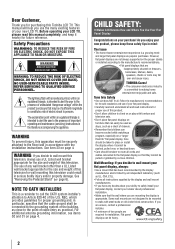
...; Follow all cords and cables connected to the flat panel display so that they cannot be pulled or grabbed by the display and wall mount manufacturers. • If you have any wall bracket other than life" flat panel display. NO USER-SERVICEABLE PARTS INSIDE. See item 23 on page 4. NOTE TO CATV INSTALLERS This is intended to alert the user to the presence of important operating and maintenance (servicing) instructions in the...
...; Follow all cords and cables connected to the flat panel display so that they cannot be pulled or grabbed by the display and wall mount manufacturers. • If you have any wall bracket other than life" flat panel display. NO USER-SERVICEABLE PARTS INSIDE. See item 23 on page 4. NOTE TO CATV INSTALLERS This is intended to alert the user to the presence of important operating and maintenance (servicing) instructions in the...
Owners Manual
Page 4
... to drapes, curtains, or walls; Care For better performance and safer operation of time. (continued) 4 Make sure the strap is thundering, do not touch the connecting cables or apparatus. 36) For added protection of your TV from lightning and power surges, always unplug the power cord and disconnect the antenna from any home theater component connected to a wall stud, pillar, or other...
... to drapes, curtains, or walls; Care For better performance and safer operation of time. (continued) 4 Make sure the strap is thundering, do not touch the connecting cables or apparatus. 36) For added protection of your TV from lightning and power surges, always unplug the power cord and disconnect the antenna from any home theater component connected to a wall stud, pillar, or other...

Owners Manual
Page 5
... pedestal stand from the rear of the TV. 3) Remove the screws of the TV. 3) Be sure to secure the TV to wall mount your wall bracket. For disposal or recycling information, contact your LCD TV on a flat, cushioned surface such as described below . To Display your LCD TV using the on the LCD screen. If these sounds become frequent or continuous, unplug the power cord and contact a Toshiba Authorized Service...
... pedestal stand from the rear of the TV. 3) Remove the screws of the TV. 3) Be sure to secure the TV to wall mount your wall bracket. For disposal or recycling information, contact your LCD TV on a flat, cushioned surface such as described below . To Display your LCD TV using the on the LCD screen. If these sounds become frequent or continuous, unplug the power cord and contact a Toshiba Authorized Service...
Owners Manual
Page 8
... the menu language 29 TOSHIBA Logo LED 29 Configuring the antenna input source for the ANT/CABLE terminal 29 Programming channels into the TV's channel memory..... 30 Programming channels automatically 30 Manually adding and deleting channels in the channel memory 30 Labeling channels 31 Setting the HDMI™ audio mode 32 Viewing the digital signal meter 33 Setting the time zone 33 Viewing the system status 33 Chapter 6: Using the TV's features 34 Selecting the video input source to view 34...
... the menu language 29 TOSHIBA Logo LED 29 Configuring the antenna input source for the ANT/CABLE terminal 29 Programming channels into the TV's channel memory..... 30 Programming channels automatically 30 Manually adding and deleting channels in the channel memory 30 Labeling channels 31 Setting the HDMI™ audio mode 32 Viewing the digital signal meter 33 Setting the time zone 33 Viewing the system status 33 Chapter 6: Using the TV's features 34 Selecting the video input source to view 34...
Owners Manual
Page 11
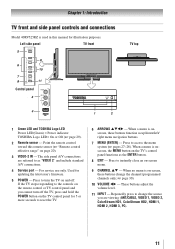
Point the remote control toward this manual for illustration purposes. The side panel A/V connections are viewing (ANT/CABLE, VIDEO 1, VIDEO 2, ColorStream HD1, ColorStream HD2, HDMI 1, HDMI 2, HDMI 3, PC). 11 Press to instantly close an on -screen, these buttons function as "VIDEO 2" and include standard A/V connections. 4無 Service port - Press to turn off . Press to change the channel (programmed channels only; page 30). 10無 VOLUME tu - When no menu is on -screen menu. 9無 CHANNEL pq - These buttons adjust the volume level...
Point the remote control toward this manual for illustration purposes. The side panel A/V connections are viewing (ANT/CABLE, VIDEO 1, VIDEO 2, ColorStream HD1, ColorStream HD2, HDMI 1, HDMI 2, HDMI 3, PC). 11 Press to instantly close an on -screen, these buttons function as "VIDEO 2" and include standard A/V connections. 4無 Service port - Press to turn off . Press to change the channel (programmed channels only; page 30). 10無 VOLUME tu - When no menu is on -screen menu. 9無 CHANNEL pq - These buttons adjust the volume level...
Owners Manual
Page 12
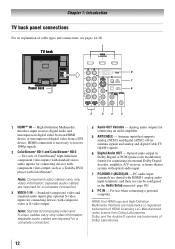
... audio inputs) for connecting devices with component video output, such as a Toshiba DVD player with ColorStream®. HDMI connection is necessary to receive 1080p signals. 2無 ColorStream® HD-1 and ColorStream® HD-2 - Optical audio output in the Audio Setup menu ( page 50). 8無 PC IN - PC audio input terminals are required for connecting an audio amplifier. 5無 ANT/CABLE - Two sets of cable types and connections, see pages 14-20. separate audio cables are required for connecting an external Dolby Digital...
... audio inputs) for connecting devices with component video output, such as a Toshiba DVD player with ColorStream®. HDMI connection is necessary to receive 1080p signals. 2無 ColorStream® HD-1 and ColorStream® HD-2 - Optical audio output in the Audio Setup menu ( page 50). 8無 PC IN - PC audio input terminals are required for connecting an audio amplifier. 5無 ANT/CABLE - Two sets of cable types and connections, see pages 14-20. separate audio cables are required for connecting an external Dolby Digital...
Owners Manual
Page 13
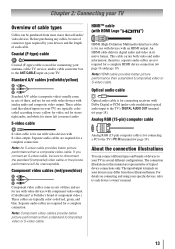
... (F-type) cable is used for use with video devices with S-video output. S-video cable HDMI™ cable (with HDMI Logo " ") HDMI (High-Definition Multimedia Interface) cable is Toshiba's brand of three, and are typically color-coded red, green, and blue. Analog RGB (15-pin) computer cable S-video cable is for use with devices with component video output. (ColorStream® is for connecting your antenna, cable TV service, and/or cable converter box to the ANT/CABLE input on connecting and using your specific devices, refer to the TV's DIGITAL AUDIO...
... (F-type) cable is used for use with video devices with S-video output. S-video cable HDMI™ cable (with HDMI Logo " ") HDMI (High-Definition Multimedia Interface) cable is Toshiba's brand of three, and are typically color-coded red, green, and blue. Analog RGB (15-pin) computer cable S-video cable is for use with devices with component video output. (ColorStream® is for connecting your antenna, cable TV service, and/or cable converter box to the ANT/CABLE input on connecting and using your specific devices, refer to the TV's DIGITAL AUDIO...

Owners Manual
Page 14
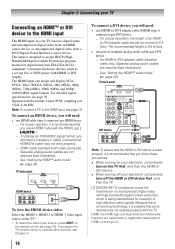
... video cable. To view the antenna or Cable signal: Select the ANT/CABLE video input source on the TV.* To view basic and premium Cable channels: Turn OFF the VCR. To program the TV remote control to change channels. Chapter 2: Connecting your TV Connecting a VCR (or a VCR with S-video) and antenna, Cable TV or Camcorder Camcorder AUDIO OUT L R VIDEO TV back panel VIDEO 2 inputs on TV right side panel From Cable TV or From Cable TV antenna Cable box IN CH 3 CH 4 OUT S-video cable or Standard A/V cable...
... video cable. To view the antenna or Cable signal: Select the ANT/CABLE video input source on the TV.* To view basic and premium Cable channels: Turn OFF the VCR. To program the TV remote control to change channels. Chapter 2: Connecting your TV Connecting a VCR (or a VCR with S-video) and antenna, Cable TV or Camcorder Camcorder AUDIO OUT L R VIDEO TV back panel VIDEO 2 inputs on TV right side panel From Cable TV or From Cable TV antenna Cable box IN CH 3 CH 4 OUT S-video cable or Standard A/V cable...
Owners Manual
Page 16
.../60Hz signal format, you will need : • one pair of standard analog audio cables per DVI device −− For proper operation, the length of uncompressed digital video with HDMI or DVI output). To program the TV remote control to operate other devices, see page 19. The recommended length is being standardized for reception of HDMI Licensing LLC. compliant[1] consumer electronic devices (such as a set-top box or DVD player...
.../60Hz signal format, you will need : • one pair of standard analog audio cables per DVI device −− For proper operation, the length of uncompressed digital video with HDMI or DVI output). To program the TV remote control to operate other devices, see page 19. The recommended length is being standardized for reception of HDMI Licensing LLC. compliant[1] consumer electronic devices (such as a set-top box or DVD player...

Owners Manual
Page 18
... panel standard optical out signals may not work properly, creating a high noise level that may damage speakers or headphones. THIS DAMAGE IS NOT COVERED BY YOUR WARRANTY. •• The DIGITAL AUDIO OUT terminal may not be compatible with Dolby Digital bitstream signals. Connecting an audio system This connection allows you can turn to OFF to adjust the sound level. Audio Setup PC Audio HDMI 1 Audio MTS Language Optical Output Format Dolby Digital Dynamic Range Control Reset No Auto...
... panel standard optical out signals may not work properly, creating a high noise level that may damage speakers or headphones. THIS DAMAGE IS NOT COVERED BY YOUR WARRANTY. •• The DIGITAL AUDIO OUT terminal may not be compatible with Dolby Digital bitstream signals. Connecting an audio system This connection allows you can turn to OFF to adjust the sound level. Audio Setup PC Audio HDMI 1 Audio MTS Language Optical Output Format Dolby Digital Dynamic Range Control Reset No Auto...
Owners Manual
Page 19
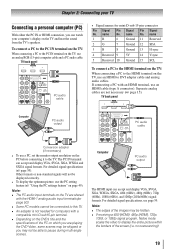
... the TV, use an HDMI cable (type A connector). name Pin Signal No. TV back panel Computer PC audio output PC audio cable Conversion adapter (if necessary) • To use a PC, set the monitor output resolution on page 49). For detailed signal specifications ( page 59). name Pin Signal No. Separate analog cables are playing the DVD-Video, some scenes may be skipped or you may be displayed correctly. • To display the optimum picture, use an analog RGB (15...
... the TV, use an HDMI cable (type A connector). name Pin Signal No. TV back panel Computer PC audio output PC audio cable Conversion adapter (if necessary) • To use a PC, set the monitor output resolution on page 49). For detailed signal specifications ( page 59). name Pin Signal No. Separate analog cables are playing the DVD-Video, some scenes may be skipped or you may be displayed correctly. • To display the optimum picture, use an analog RGB (15...
Owners Manual
Page 27
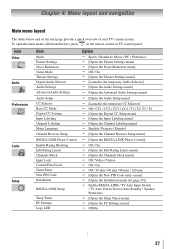
...(illustrated below and on the remote control or TV control panel. Icon Video Audio Preferences Locks Setup Item Mode Picture Settings Noise Reduction Game Mode Theater Settings Digital Audio Selector Audio Settings Advanced Audio Settings Audio Setup CC Selector Base CC Mode Digital CC Settings Input Labeling Channel Labeling Menu Language Channel Browser Setup REGZA-LINK Player Control Enable Rating Blocking Edit Rating Limits Channels Block Input Lock Control Panel Lock GameTimer New PIN Code Installation REGZA-LINK Setup Sleep Timer PC Settings Logo LED Option Sports / Standard...
...(illustrated below and on the remote control or TV control panel. Icon Video Audio Preferences Locks Setup Item Mode Picture Settings Noise Reduction Game Mode Theater Settings Digital Audio Selector Audio Settings Advanced Audio Settings Audio Setup CC Selector Base CC Mode Digital CC Settings Input Labeling Channel Labeling Menu Language Channel Browser Setup REGZA-LINK Player Control Enable Rating Blocking Edit Rating Limits Channels Block Input Lock Control Panel Lock GameTimer New PIN Code Installation REGZA-LINK Setup Sleep Timer PC Settings Logo LED Option Sports / Standard...
Owners Manual
Page 32
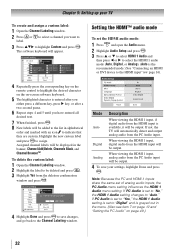
... will appear. The software keyboard will automatically detect and output analog audio from the HDMI input is set of analog audio inputs, the PC Audio menu setting influences the HDMI 1 Audio menu setting. Highlight the new custom label and press to the Channel Labeling window. Mode Description Auto When viewing the HDMI 1 input, if digital audio from the PC Audio input. Chapter 5: Setting up your settings, highlight Done and press . Assigned channel labels will be output. 4無 To save changes, and go...
... will appear. The software keyboard will automatically detect and output analog audio from the HDMI input is set of analog audio inputs, the PC Audio menu setting influences the HDMI 1 Audio menu setting. Highlight the new custom label and press to the Channel Labeling window. Mode Description Auto When viewing the HDMI 1 input, if digital audio from the PC Audio input. Chapter 5: Setting up your settings, highlight Done and press . Assigned channel labels will be output. 4無 To save changes, and go...
Owners Manual
Page 43
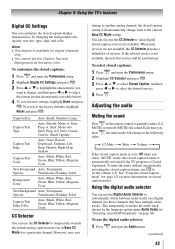
... Color Auto, Black, White, Red, Green, Blue, Yellow, Magenta, Cyan CC Selector You can use the CC Selector to conveniently switch between audio tracks on closed caption mode is Closed Captioned. When such services are not available, the CC Selector presents a default list of services. See "Using the closed caption mode" ( page 42) for more information on a digital channel (for digital channels only. ••You cannot set in the following order: 1/2 Mute Mute Volume If the closed caption modes. Using...
... Color Auto, Black, White, Red, Green, Blue, Yellow, Magenta, Cyan CC Selector You can use the CC Selector to conveniently switch between audio tracks on closed caption mode is Closed Captioned. When such services are not available, the CC Selector presents a default list of services. See "Using the closed caption mode" ( page 42) for more information on a digital channel (for digital channels only. ••You cannot set in the following order: 1/2 Mute Mute Volume If the closed caption modes. Using...
Owners Manual
Page 50
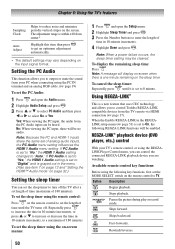
...; Highlight Sleep Timer and press . 3無 Press the Number buttons to "Auto." No: When viewing the PC input, there will be cleared. To display the remaining sleep time: Press . REGZA-LINK® playback device (DVD player, etc.) control With your PC when connecting using the PC IN terminal and an analog RGB cable. ( page 19) To set to output or mute the sound from your TV's remote control, or using the REGZALINK Player Control menu...
...; Highlight Sleep Timer and press . 3無 Press the Number buttons to "Auto." No: When viewing the PC input, there will be cleared. To display the remaining sleep time: Press . REGZA-LINK® playback device (DVD player, etc.) control With your PC when connecting using the PC IN terminal and an analog RGB cable. ( page 19) To set to output or mute the sound from your TV's remote control, or using the REGZALINK Player Control menu...

Owners Manual
Page 51
... time, the REGZA-LINK Player Control menu will be enabled. When this function when the audio receiver is turned off the TV will automatically switch to the previous menu. Device Auto Standby If the TV is connected to the HDMI input, you press . Contents Menu Accesses the contents list when you can adjust or mute the sound volume of the REGZA-LINK devices connected to the TV speakers or the audio receiver speakers. Item Description Power Turns...
... time, the REGZA-LINK Player Control menu will be enabled. When this function when the audio receiver is turned off the TV will automatically switch to the previous menu. Device Auto Standby If the TV is connected to the HDMI input, you press . Contents Menu Accesses the contents list when you can adjust or mute the sound volume of the REGZA-LINK devices connected to the TV speakers or the audio receiver speakers. Item Description Power Turns...
Owners Manual
Page 52
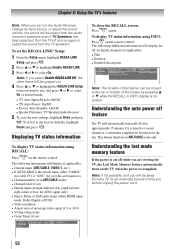
...; Stereo, Mono or SAP audio status (when HDMI input mode, Dolby Digital or PCM) • Video resolution • Aspect ratio of incoming video signal (4:3 or 16:9) • V-Chip rating status • Game Timer (if set ) • Digital signal strength indicator (bar graph in ANT/CABLE mode only. This feature functions in lower right corner of box; Chapter 6: Using the TV's features Note: When you turn itself off after approximately...
...; Stereo, Mono or SAP audio status (when HDMI input mode, Dolby Digital or PCM) • Video resolution • Aspect ratio of incoming video signal (4:3 or 16:9) • V-Chip rating status • Game Timer (if set ) • Digital signal strength indicator (bar graph in ANT/CABLE mode only. This feature functions in lower right corner of box; Chapter 6: Using the TV's features Note: When you turn itself off after approximately...
Owners Manual
Page 56
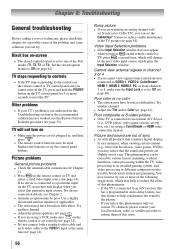
... you cannot view signals from external devices connected to VIDEO 1, VIDEO 2, ColorStream® HDMI 1, HDMI 2, HDMI 3, PC, or from channels 3 or 4, make sure on the remote control is connected to a particular input on the TV control panel for 5 or more of sync •• As with all products that contain a digital display, in , and then press . •• The remote control batteries may help synchronize the sound to an external A/V device (e.g., DVD player, video game system, set the...
... you cannot view signals from external devices connected to VIDEO 1, VIDEO 2, ColorStream® HDMI 1, HDMI 2, HDMI 3, PC, or from channels 3 or 4, make sure on the remote control is connected to a particular input on the TV control panel for 5 or more of sync •• As with all products that contain a digital display, in , and then press . •• The remote control batteries may help synchronize the sound to an external A/V device (e.g., DVD player, video game system, set the...
Owners Manual
Page 60
..., ARE EXPRESSLY LIMITED TO THE DURATION OF THE LIMITED WARRANTIES SET FORTH ABOVE. or Puerto Rico. (4) Labor service charges for set installation, setup, adjustment of customer controls, and installation or repair of antenna systems are not covered by this manual and reviewing the section entitled "Troubleshooting," you new products specifically designed to meet your needs and help us to complete and return the product registration card does...
..., ARE EXPRESSLY LIMITED TO THE DURATION OF THE LIMITED WARRANTIES SET FORTH ABOVE. or Puerto Rico. (4) Labor service charges for set installation, setup, adjustment of customer controls, and installation or repair of antenna systems are not covered by this manual and reviewing the section entitled "Troubleshooting," you new products specifically designed to meet your needs and help us to complete and return the product registration card does...
Owners Manual
Page 62
... NOT FUNCTION PROPERLY AND YOU MAY SUFFER DAMAGE. THIS WARRANTY WILL NOT COVER ANY SERVICE THAT IS REQUIRED, IN PART OR IN WHOLE, AS A RESULT OF ANY FAILURE TO FOLLOW THE SET-UP AND USAGE INSTRUCTIONS. g. Damage to the Television caused by failure to follow the specifications, User manuals or guides as wear and tear, scratches and dents; TO THE...
... NOT FUNCTION PROPERLY AND YOU MAY SUFFER DAMAGE. THIS WARRANTY WILL NOT COVER ANY SERVICE THAT IS REQUIRED, IN PART OR IN WHOLE, AS A RESULT OF ANY FAILURE TO FOLLOW THE SET-UP AND USAGE INSTRUCTIONS. g. Damage to the Television caused by failure to follow the specifications, User manuals or guides as wear and tear, scratches and dents; TO THE...


