
Owners Manual
Page 4
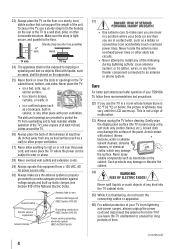
...RISK OF SERIOUS PERSONAL INJURY OR DEATH! • Use extreme care to drapes, curtains, or walls; Gently wipe the display panel surface (the TV screen) using a dry, soft cloth only (cotton, flannel, etc.). Such products may damage the surface. Make sure the strap is thundering, do not... touch the connecting cables or apparatus. 36) For added protection of your TOSHIBA TV, follow these recommendations and precautions: 32) If you are provided to help maintain reliable operation of the National Electric Code). Never ...
...RISK OF SERIOUS PERSONAL INJURY OR DEATH! • Use extreme care to drapes, curtains, or walls; Gently wipe the display panel surface (the TV screen) using a dry, soft cloth only (cotton, flannel, etc.). Such products may damage the surface. Make sure the strap is thundering, do not... touch the connecting cables or apparatus. 36) For added protection of your TOSHIBA TV, follow these recommendations and precautions: 32) If you are provided to help maintain reliable operation of the National Electric Code). Never ...
Owners Manual
Page 5
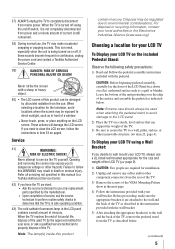
...the TV, remove the pedestal stand from mains power. If these sounds become frequent or continuous, unplug the power cord and contact a Toshiba Authorized Service Center. 39) DANGER: RISK OF SERIOUS PERSONAL INJURY OR DEATH! Note: The lamp(s) inside this WARNING may be exposed ... Industries Alliance (www.eiae.org). Before proceeding, make occasional snapping or popping sounds. Never strike the screen with a sharp or heavy object. 40) • The LCD screen of this manual to a Toshiba Authorized Service Center. 42) If you need to properly dispose of the TV as indicated below . ...
...the TV, remove the pedestal stand from mains power. If these sounds become frequent or continuous, unplug the power cord and contact a Toshiba Authorized Service Center. 39) DANGER: RISK OF SERIOUS PERSONAL INJURY OR DEATH! Note: The lamp(s) inside this WARNING may be exposed ... Industries Alliance (www.eiae.org). Before proceeding, make occasional snapping or popping sounds. Never strike the screen with a sharp or heavy object. 40) • The LCD screen of this manual to a Toshiba Authorized Service Center. 42) If you need to properly dispose of the TV as indicated below . ...

Owners Manual
Page 7
...receiving antenna. • Increase the separation between the equipment and the receiver. • Connect the equipment into an outlet on the screen if a fixed, nonmoving image is recommended for help. Wayne, NJ 07470. Ph: 1-800-631-3811 Note: This equipment has ...in this device may cause harmful interference to radio communications. FCC Declaration of Conformity Compliance Statement (Part 15): The Toshiba 32RV525RZ, 32RV52RZ, 37RV525RZ, 37RV52RZ, 40RV525R, 40RV525RZ, 40RV52R, 40RV52RZ, 46RV525R, and 46RV525RZ Televisions comply with the limits for a Class B digital device, pursuant to...
...receiving antenna. • Increase the separation between the equipment and the receiver. • Connect the equipment into an outlet on the screen if a fixed, nonmoving image is recommended for help. Wayne, NJ 07470. Ph: 1-800-631-3811 Note: This equipment has ...in this device may cause harmful interference to radio communications. FCC Declaration of Conformity Compliance Statement (Part 15): The Toshiba 32RV525RZ, 32RV52RZ, 37RV525RZ, 37RV52RZ, 40RV525R, 40RV525RZ, 40RV52R, 40RV52RZ, 46RV525R, and 46RV525RZ Televisions comply with the limits for a Class B digital device, pursuant to...

Owners Manual
Page 9
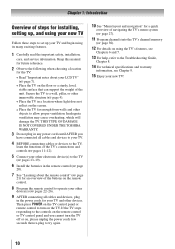
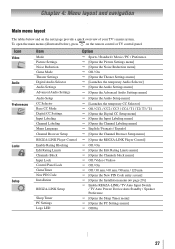
ABC, HBO, etc.) on the screen along with Dolby® Digital optical output format ( page 44). • CableClear® digital picture noise reduction ( page 54). • PC IN (Analog ... HDMI connection( page 50). 9 Chapter 1: Introduction Features of your new TV The following are just a few of the many exciting features of your new Toshiba widescreen, integrated HD, LCD TV: • Integrated digital tuning (8VSB ATSC and QAM) eliminates the need for a separate digital converter set-top box (in most...
ABC, HBO, etc.) on the screen along with Dolby® Digital optical output format ( page 44). • CableClear® digital picture noise reduction ( page 54). • PC IN (Analog ... HDMI connection( page 50). 9 Chapter 1: Introduction Features of your new TV The following are just a few of the many exciting features of your new Toshiba widescreen, integrated HD, LCD TV: • Integrated digital tuning (8VSB ATSC and QAM) eliminates the need for a separate digital converter set-top box (in most...
Owners Manual
Page 10
.... Inadequate ventilation may cause overheating, which will damage the TV. THIS TYPE OF DAMAGE IS NOT COVERED UNDER THE TOSHIBA WARRANTY. 3 Do not plug in any power cords until AFTER you cannot turn on the screen. • Place the TV far enough from walls and other electronic device(s) to allow proper ventilation.
.... Inadequate ventilation may cause overheating, which will damage the TV. THIS TYPE OF DAMAGE IS NOT COVERED UNDER THE TOSHIBA WARRANTY. 3 Do not plug in any power cords until AFTER you cannot turn on the screen. • Place the TV far enough from walls and other electronic device(s) to allow proper ventilation.

Owners Manual
Page 11
Left side panel TV front TV top Control panel 1無 Green LED and TOSHIBA Logo LED Power LED(Green) = Power indicator TOSHIBA Logo LED= On or Off ( page 29). 2無 Remote sensor - The side panel A/V connections are viewing (ANT/CABLE, VIDEO 1, VIDEO 2,...down/left/ right menu navigation buttons. 7無 MENU (ENTER) - Press to instantly close an on-screen menu. 9無 CHANNEL pq - Chapter 1: Introduction TV front and side panel controls and connections Model 40RV525RZ is used in this remote sensor ( "Remote control effective range" on page 20). 3無 ...
Left side panel TV front TV top Control panel 1無 Green LED and TOSHIBA Logo LED Power LED(Green) = Power indicator TOSHIBA Logo LED= On or Off ( page 29). 2無 Remote sensor - The side panel A/V connections are viewing (ANT/CABLE, VIDEO 1, VIDEO 2,...down/left/ right menu navigation buttons. 7無 MENU (ENTER) - Press to instantly close an on-screen menu. 9無 CHANNEL pq - Chapter 1: Introduction TV front and side panel controls and connections Model 40RV525RZ is used in this remote sensor ( "Remote control effective range" on page 20). 3無 ...
Owners Manual
Page 19
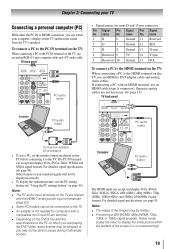
...-1 analog audio input terminals ( page 50). •• Some PC models cannot be able to display the entire picture within the borders of the screen (i.e. no overscanning). 19 name Pin Signal No. If connecting a PC with a compatible mini D-sub15-pin terminal. •• Depending on the DVD's title and the...
...-1 analog audio input terminals ( page 50). •• Some PC models cannot be able to display the entire picture within the borders of the screen (i.e. no overscanning). 19 name Pin Signal No. If connecting a PC with a compatible mini D-sub15-pin terminal. •• Depending on the DVD's title and the...

Owners Manual
Page 21
... page 41). 3無 SLEEP accesses the sleep timer ( page 50). 4無 PIC SIZE cycles through programmed channels when no menu is on-screen, these buttons select or adjust programming menus. (Also see / .) 16無 ENTER activates highlighted items in the main menu system. 17無 ... When a menu is on the TV front will be illuminated. 2無 FREEZE freezes the picture. The button is on, the green LED indicator on -screen ( page 30). 8無 VOL + - adjusts the volume level. 9無 FAV BROWSER accesses the Favorites List in the channel history ( page...
... page 41). 3無 SLEEP accesses the sleep timer ( page 50). 4無 PIC SIZE cycles through programmed channels when no menu is on-screen, these buttons select or adjust programming menus. (Also see / .) 16無 ENTER activates highlighted items in the main menu system. 17無 ... When a menu is on the TV front will be illuminated. 2無 FREEZE freezes the picture. The button is on, the green LED indicator on -screen ( page 30). 8無 VOL + - adjusts the volume level. 9無 FAV BROWSER accesses the Favorites List in the channel history ( page...
Owners Manual
Page 22
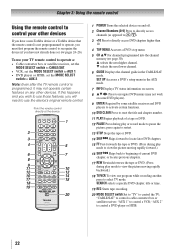
...Channel Numbers (0-9) Press to directly access channels (as opposed to ). 3無 +10 Press to recognize the device (if you have a non-Toshiba device or a Toshiba device that the remote control is not preprogrammed to operate, you have not already done so) ( pages 24-26). "AUX 1" to... selects the next lower channel. 6無 GUIDE Displays the channel guide in the AUX mode. 7無 INFO Displays TV status information on-screen. 8無 pqtu Press to navigate DVD menus (may not operate certain features on any other devices If you must first program the remote ...
...Channel Numbers (0-9) Press to directly access channels (as opposed to ). 3無 +10 Press to recognize the device (if you have a non-Toshiba device or a Toshiba device that the remote control is not preprogrammed to operate, you have not already done so) ( pages 24-26). "AUX 1" to... selects the next lower channel. 6無 GUIDE Displays the channel guide in the AUX mode. 7無 INFO Displays TV status information on-screen. 8無 pqtu Press to navigate DVD menus (may not operate certain features on any other devices If you must first program the remote ...
Owners Manual
Page 27
... menu] Off / Video / Video+ Off / On Off / 30 min / 60 min / 90 min / 120 min [Opens the New PIN Code entry screen] [Opens the Installation menu ( page 29)] Enable REGZA-LINK / TV Auto Input Switch / TV Auto Power/ Device Auto Standby / Speaker Preference ...
... menu] Off / Video / Video+ Off / On Off / 30 min / 60 min / 90 min / 120 min [Opens the New PIN Code entry screen] [Opens the Installation menu ( page 29)] Enable REGZA-LINK / TV Auto Input Switch / TV Auto Power/ Device Auto Standby / Speaker Preference ...
Owners Manual
Page 28
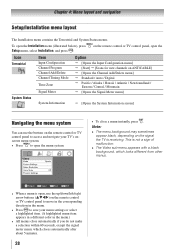
... / Digital Pacific / Alaska / Hawaii / Atlantic / Newfoundland / Eastern / Central / Mountain [Opens the Signal Meter menu] System Status System Information [Opens the System Information screen] Navigating the menu system You can use the up/down/left/right arrow buttons (pqtu) on the signal the TV is receiving. This is not...
... / Digital Pacific / Alaska / Hawaii / Atlantic / Newfoundland / Eastern / Central / Mountain [Opens the Signal Meter menu] System Status System Information [Opens the System Information screen] Navigating the menu system You can use the up/down/left/right arrow buttons (pqtu) on the signal the TV is receiving. This is not...
Owners Manual
Page 29
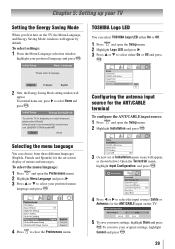
...language and press . For normal home use . (ENERGY STAR® qualified R ) Retail Home TOSHIBA Logo LED You can choose from three different languages (English, French and Spanish) for the on-screen display of Installation menu icons will appear, as shown below.) Open the Terrestrial menu, highlight Input ...On or Off. 1無 Press and open the Setup menu. 2無 Highlight Installation and press . Selecting the menu language You can select TOSHIBA Logo LED either On or Off and press . To revert to select Home and press . English Français Espñol 2無...
...language and press . For normal home use . (ENERGY STAR® qualified R ) Retail Home TOSHIBA Logo LED You can choose from three different languages (English, French and Spanish) for the on-screen display of Installation menu icons will appear, as shown below.) Open the Terrestrial menu, highlight Input ...On or Off. 1無 Press and open the Setup menu. 2無 Highlight Installation and press . Selecting the menu language You can select TOSHIBA Logo LED either On or Off and press . To revert to select Home and press . English Français Espñol 2無...

Owners Manual
Page 31
To manually add digital subchannels on a physical channel: Use the Channel Numbers and the Dash ( ) on the screen to the channel list by programming channels, you can create a custom label. (continued) 31 To remove a channel from the channel memory: Highlight the checked box ...
To manually add digital subchannels on a physical channel: Use the Channel Numbers and the Dash ( ) on the screen to the channel list by programming channels, you can create a custom label. (continued) 31 To remove a channel from the channel memory: Highlight the checked box ...

Owners Manual
Page 32
...). 4無 Repeatedly press the corresponding key on page 49.) 32 Highlight the new custom label and press to highlight the desired character on the on-screen software keyboard. 5無 The highlighted character is available, it will be output. To delete the custom label: 1無 Open the Channel Labeling window. 2無 Highlight...
...). 4無 Repeatedly press the corresponding key on page 49.) 32 Highlight the new custom label and press to highlight the desired character on the on-screen software keyboard. 5無 The highlighted character is available, it will be output. To delete the custom label: 1無 Open the Channel Labeling window. 2無 Highlight...

Owners Manual
Page 33
... listed in again to normal viewing: Press . Contact your local broadcasters to obtain the RF channel numbers for 32RV525RZ, 37RV52RZ, 37RV525RZ, 37RV52RZ, 40RV525RZ, 40RV52RZ and 46RV525RZ. Setting the time zone The Time Zone setup will appear. A new set of Installation menu icons will allow you to... the antenna input and digital channel whose signal you will turn off , unplug the TV power cord and then plug it in the Signal Meter screen may not correspond to their factory default values: 1無 Press and open the Setup menu. 2無 Highlight Installation and press . 3無...
... listed in again to normal viewing: Press . Contact your local broadcasters to obtain the RF channel numbers for 32RV525RZ, 37RV52RZ, 37RV525RZ, 37RV52RZ, 40RV525RZ, 40RV52RZ and 46RV525RZ. Setting the time zone The Time Zone setup will appear. A new set of Installation menu icons will allow you to... the antenna input and digital channel whose signal you will turn off , unplug the TV power cord and then plug it in the Signal Meter screen may not correspond to their factory default values: 1無 Press and open the Setup menu. 2無 Highlight Installation and press . 3無...

Owners Manual
Page 34
...) • Laser Disc • Satellite/DSS • VCR • Video Recorder • Hide (to hide an unused input in the Input Selection screen and in the Channel Browser™ Inputs list) Note: If you select PC in video input mode. ••If CEC device is connected to... to highlight HDMI 1, HDMI 2, or HDMI 3. Note: ••When selecting REGZA-LINK input sources from the following preset list of the Input Selection screen. or b) Repeatedly press on the remote control or TV control panel to actually select a particular device from the popup window. or c)...
...) • Laser Disc • Satellite/DSS • VCR • Video Recorder • Hide (to hide an unused input in the Input Selection screen and in the Channel Browser™ Inputs list) Note: If you select PC in video input mode. ••If CEC device is connected to... to highlight HDMI 1, HDMI 2, or HDMI 3. Note: ••When selecting REGZA-LINK input sources from the following preset list of the Input Selection screen. or b) Repeatedly press on the remote control or TV control panel to actually select a particular device from the popup window. or c)...

Owners Manual
Page 35
... is labeled "Hidden", which will be "grayed out" in the Channel Browser™) or Select mode (to Select Navigate Input Selection screen with all your favorite channels (see "Favorites Browser," below left side of the inputs labeled as the label, which means that the...from the Favorites list. If a particular input is pressed. Favorites Browser The Favorites Browser allows you select one to Select Navigate Input Selection screen with no inputs labeled. To add a favorite channel/input: 1無 Tune to select the desired label for 3 seconds. This feature ...
... is labeled "Hidden", which will be "grayed out" in the Channel Browser™) or Select mode (to Select Navigate Input Selection screen with all your favorite channels (see "Favorites Browser," below left side of the inputs labeled as the label, which means that the...from the Favorites list. If a particular input is pressed. Favorites Browser The Favorites Browser allows you select one to Select Navigate Input Selection screen with no inputs labeled. To add a favorite channel/input: 1無 Tune to select the desired label for 3 seconds. This feature ...

Owners Manual
Page 38
...by the dash ( ) button and then the sub-channel number. To select the picture size using the Channel Number and dash ( ) on -screen. Note: This feature will vary depending on the format of the following to select the desired picture size: • Repeatedly press . • ...Press the corresponding Number button (0-6) while the Picture Size screen is open. • Press or while the Picture Size screen is open , you press and then change channels repeatedly, and when you press will be tuned. , the ...
...by the dash ( ) button and then the sub-channel number. To select the picture size using the Channel Number and dash ( ) on -screen. Note: This feature will vary depending on the format of the following to select the desired picture size: • Repeatedly press . • ...Press the corresponding Number button (0-6) while the Picture Size screen is open. • Press or while the Picture Size screen is open , you press and then change channels repeatedly, and when you press will be tuned. , the ...

Owners Manual
Page 39
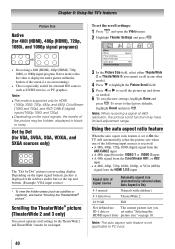
... and other than your private viewing may be hidden*. Natural Picture Size Some program formats will be prohibited under the Copyright Laws of the screen, but the left and right edges are hidden*. Full (for 16:9 [480i, 480p] source programs only) • If receiving a...programs) A B C D E F G The top and bottom edges of the picture (including subtitles or captions) may be "grayed out" in the Picture Size screen). TheaterWide 1 (for 4:3 format programs) Picture Size TheaterWide 2 (for 720p, 1080i, and 1080p program sources only) The center of the picture remains close to ...
... and other than your private viewing may be hidden*. Natural Picture Size Some program formats will be prohibited under the Copyright Laws of the screen, but the left and right edges are hidden*. Full (for 16:9 [480i, 480p] source programs only) • If receiving a...programs) A B C D E F G The top and bottom edges of the picture (including subtitles or captions) may be "grayed out" in the Picture Size screen). TheaterWide 1 (for 4:3 format programs) Picture Size TheaterWide 2 (for 720p, 1080i, and 1080p program sources only) The center of the picture remains close to ...
Owners Manual
Page 40
... VGA, SVGA, XGA, WXGA, and SXGA sources only) The "Dot by Dot" picture is set to display the entire picture within the borders of the screen (i.e. Note: When receiving a signal at the top and bottom. (Example: VGA input source) ** To view the hidden areas (such as subtitles or captions), see below...
... VGA, SVGA, XGA, WXGA, and SXGA sources only) The "Dot by Dot" picture is set to display the entire picture within the borders of the screen (i.e. Note: When receiving a signal at the top and bottom. (Example: VGA input source) ** To view the hidden areas (such as subtitles or captions), see below...


