User Manual
Page 2
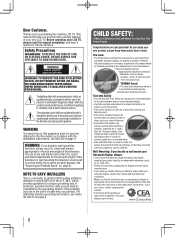
... a UL Listed wall bracket appropriate for the size and weight of this Toshiba LCD TV. WARNING RISK OF ELECTRIC SHOCK DO NOT OPEN. The lightning flash with the installation instructions. Follow the manufacturer's recommendations for the safe installation and use of your flat panel display. • Carefully read this television could result in serious bodily injury and/or property damage. See "Removing the Pedestal Stand" ( page 6). TOSHIBA Cares...
... a UL Listed wall bracket appropriate for the size and weight of this Toshiba LCD TV. WARNING RISK OF ELECTRIC SHOCK DO NOT OPEN. The lightning flash with the installation instructions. Follow the manufacturer's recommendations for the safe installation and use of your flat panel display. • Carefully read this television could result in serious bodily injury and/or property damage. See "Removing the Pedestal Stand" ( page 6). TOSHIBA Cares...
User Manual
Page 4
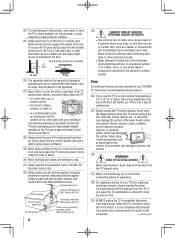
...use the TV in cabinet, or any home theater component connected to this equipment from overheating and to drapes, curtains, or walls; Hook TV side TV top 26) The apparatus shall not be placed on a bed, sofa, rug, or similar surface; • too close to help maintain reliable operation of the TV. When the TV is turned off switch... wall stud, pillar, or other immovable structure. Gently wipe the display panel surface (the TV screen) using the on the rear of your TV from lightning and power surges, always unplug the power cord and disconnect the antenna from mains power....
...use the TV in cabinet, or any home theater component connected to this equipment from overheating and to drapes, curtains, or walls; Hook TV side TV top 26) The apparatus shall not be placed on a bed, sofa, rug, or similar surface; • too close to help maintain reliable operation of the TV. When the TV is turned off switch... wall stud, pillar, or other immovable structure. Gently wipe the display panel surface (the TV screen) using the on the rear of your TV from lightning and power surges, always unplug the power cord and disconnect the antenna from mains power....
User Manual
Page 5
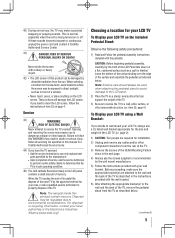
... DEATH! 40) During normal use, the TV may make sure the appropriate bracket(s) are required for installation. 2) Unplug and remove any cables and/or other component connectors from the rear of the TV. 3) Remove the screws of the TV, remove the pedestal stand from the sun. To Display your LCD TV, always use a UL listed wall bracket appropriate for the size and weight of the LCD TV ( page 2): 1) CAUTION...
... DEATH! 40) During normal use, the TV may make sure the appropriate bracket(s) are required for installation. 2) Unplug and remove any cables and/or other component connectors from the rear of the TV. 3) Remove the screws of the TV, remove the pedestal stand from the sun. To Display your LCD TV, always use a UL listed wall bracket appropriate for the size and weight of the LCD TV ( page 2): 1) CAUTION...
User Manual
Page 8
... Remote control codes 26 Chapter 4: Menu layout and navigation 28 Main menu layout 28 Setup/Installation menu layout 29 Navigating the menu system 29 Chapter 5: Setting up your TV 30 Initial Setup 30 Selecting the menu language 30 TOSHIBA Logo LED 30 Configuring the antenna input source for the ANT/CABLE terminal 30 Programming channels into the TV's channel memory 31 Programming channels automatically 31 Setting channel skip 31 Labeling channels 32 Setting the HDMI® audio mode 33 Viewing the digital signal...
... Remote control codes 26 Chapter 4: Menu layout and navigation 28 Main menu layout 28 Setup/Installation menu layout 29 Navigating the menu system 29 Chapter 5: Setting up your TV 30 Initial Setup 30 Selecting the menu language 30 TOSHIBA Logo LED 30 Configuring the antenna input source for the ANT/CABLE terminal 30 Programming channels into the TV's channel memory 31 Programming channels automatically 31 Setting channel skip 31 Labeling channels 32 Setting the HDMI® audio mode 33 Viewing the digital signal...
User Manual
Page 12
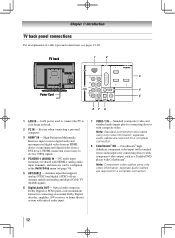
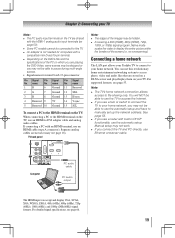
... uncompressed digital video from an HDMI device or uncompressed digital video from a DVI device. Antenna input that supports analog (NTSC) and digital (ATSC) off-air antenna signals and analog and digital Cable TV (QAM) signals. 6無 Digital Audio OUT - separate audio cables are required for connecting an external Dolby Digital decoder, amplifier, A/V receiver, or home theater system with composite video. PC audio input terminals are shared with ColorStream®. TV back 1 2 3 4 Power Cord 5 87 6 1無 LAN IN - Optical audio output in the Audio Setup menu...
... uncompressed digital video from an HDMI device or uncompressed digital video from a DVI device. Antenna input that supports analog (NTSC) and digital (ATSC) off-air antenna signals and analog and digital Cable TV (QAM) signals. 6無 Digital Audio OUT - separate audio cables are required for connecting an external Dolby Digital decoder, amplifier, A/V receiver, or home theater system with composite video. PC audio input terminals are shared with ColorStream®. TV back 1 2 3 4 Power Cord 5 87 6 1無 LAN IN - Optical audio output in the Audio Setup menu...

User Manual
Page 13
... use : yellow for video, red for stereo right audio, and white for connecting your antenna, cable TV service, and/or cable converter box to the ANT/CABLE input on your devices may differ from most stores that sell audio/ video devices. Note: Component video cables provide better picture performance than a standard (composite) video. 13 HDMI® cable (with HDMI Logo " ") Optical audio cable Optical audio cable is Toshiba's brand of component video.) These cables are for connecting receivers with an HDMI output. An HDMI cable delivers digital audio and video in this manual...
... use : yellow for video, red for stereo right audio, and white for connecting your antenna, cable TV service, and/or cable converter box to the ANT/CABLE input on your devices may differ from most stores that sell audio/ video devices. Note: Component video cables provide better picture performance than a standard (composite) video. 13 HDMI® cable (with HDMI Logo " ") Optical audio cable Optical audio cable is Toshiba's brand of component video.) These cables are for connecting receivers with an HDMI output. An HDMI cable delivers digital audio and video in this manual...
User Manual
Page 16
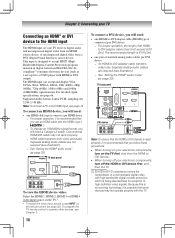
...) and 1080p (24Hz/60Hz) signal formats. This input is possible that you use an HDMI cable with the HDMI Logo ( ). −− To display an 1080i/60Hz signal format, you will need : • one HDMI cable (type A connector) per HDMI device −− For proper operation, it is designed to -DVI adapter cable transfers video only. compliant[1] consumer electronic devices (such as a set-top box or DVD player with the TV. Because this...
...) and 1080p (24Hz/60Hz) signal formats. This input is possible that you use an HDMI cable with the HDMI Logo ( ). −− To display an 1080i/60Hz signal format, you will need : • one HDMI cable (type A connector) per HDMI device −− For proper operation, it is designed to -DVI adapter cable transfers video only. compliant[1] consumer electronic devices (such as a set-top box or DVD player with the TV. Because this...
User Manual
Page 18
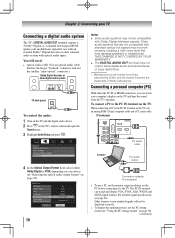
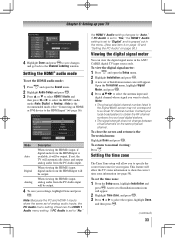
...; Digital or 2-channel down-mixed PCM (pulse-code modulation) signal for use with an external Dolby® Digital decoder or other digital audio system TV back panel To control the audio: 1無 Turn on the TV and the digital audio device. 2無 Press on the TV's remote control and open the Sound menu. 3無 Highlight Audio Setup and press . For detailed signal specifications ( page 66). You will not be compatible with optical audio input. To connect a PC...
...; Digital or 2-channel down-mixed PCM (pulse-code modulation) signal for use with an external Dolby® Digital decoder or other digital audio system TV back panel To control the audio: 1無 Turn on the TV and the digital audio device. 2無 Press on the TV's remote control and open the Sound menu. 3無 Highlight Audio Setup and press . For detailed signal specifications ( page 66). You will not be compatible with optical audio input. To connect a PC...
User Manual
Page 19
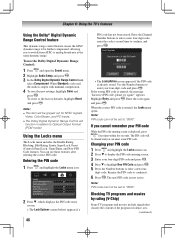
... (HDMI), 480p (HDMI), 720p, 1080i, or 1080p signal program, Native mode scales the video to display the entire picture within the borders of the PC on which you are playing the DVD-Video, some scenes may be skipped or you may not work. •• If you use a router with built-in DHCP functionality, use an HDMI cable (type A connector). If connecting a PC with an HDMI terminal, use the automatic setup...
... (HDMI), 480p (HDMI), 720p, 1080i, or 1080p signal program, Native mode scales the video to display the entire picture within the borders of the PC on which you are playing the DVD-Video, some scenes may be skipped or you may not work. •• If you use a router with built-in DHCP functionality, use an HDMI cable (type A connector). If connecting a PC with an HDMI terminal, use the automatic setup...
User Manual
Page 28
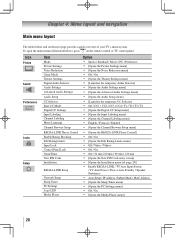
...Icon Picture Sound Preferences Locks Setup Item Mode Picture Settings Noise Reduction Game Mode Theater Settings Digital Audio Selector Audio Settings Advanced Audio Settings Audio Setup CC Selector Base CC Mode Digital CC Settings Input Labeling Channel Labeling Menu Language Channel Browser Setup REGZA-LINK Player Control Enable Rating Blocking Edit Rating Limits Input Lock Control Panel Lock GameTimer New PIN Code Installation REGZA-LINK Setup Network Setup Sleep Timer PC Settings Logo LED Media Player Option Sports / Standard / Movie / PC / Preference [Opens the Picture...
...Icon Picture Sound Preferences Locks Setup Item Mode Picture Settings Noise Reduction Game Mode Theater Settings Digital Audio Selector Audio Settings Advanced Audio Settings Audio Setup CC Selector Base CC Mode Digital CC Settings Input Labeling Channel Labeling Menu Language Channel Browser Setup REGZA-LINK Player Control Enable Rating Blocking Edit Rating Limits Input Lock Control Panel Lock GameTimer New PIN Code Installation REGZA-LINK Setup Network Setup Sleep Timer PC Settings Logo LED Media Player Option Sports / Standard / Movie / PC / Preference [Opens the Picture...

User Manual
Page 31
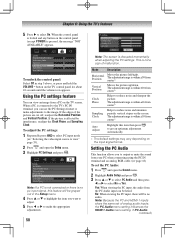
... the Setup menu. 3無 Highlight Installation and press . 4無 (A new set of channels will appear, as shown above). 5無 To cancel channel programming, press on the channels you must use the Channel Number buttons on the remote control. •• Programming channels when the ANT/ CABLE input is cycling through all the antenna channels, and store all active channels in your Cable TV service lineup changes significantly. Setting channel skip To prevent certain channels from being viewed, channel positions...
... the Setup menu. 3無 Highlight Installation and press . 4無 (A new set of channels will appear, as shown above). 5無 To cancel channel programming, press on the channels you must use the Channel Number buttons on the remote control. •• Programming channels when the ANT/ CABLE input is cycling through all the antenna channels, and store all active channels in your Cable TV service lineup changes significantly. Setting channel skip To prevent certain channels from being viewed, channel positions...
User Manual
Page 33
... the Sound menu. 2無 Highlight Audio Setup and press . 3無 Press p or q to select HDMI 1 Audio and then press t or u to select the HDMI 1 audio mode (Auto, Digital, or Analog). (Auto is the recommended mode.) See "Connecting an HDMI or DVI device to obtain the RF channel numbers for your region. To close the screen and return to "Digital" and is set of analog audio inputs, the PC Audio menu setting influences the HDMI 1 Audio menu setting. To set of Installation menu icons will be output...
... the Sound menu. 2無 Highlight Audio Setup and press . 3無 Press p or q to select HDMI 1 Audio and then press t or u to select the HDMI 1 audio mode (Auto, Digital, or Analog). (Auto is the recommended mode.) See "Connecting an HDMI or DVI device to obtain the RF channel numbers for your region. To close the screen and return to "Digital" and is set of analog audio inputs, the PC Audio menu setting influences the HDMI 1 Audio menu setting. To set of Installation menu icons will be output...
User Manual
Page 44
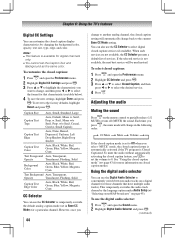
...) the sound. Each time you want to change in Base CC Mode) for that have multiple audio tracks). Caption Size Auto, Small, Standard, Large Caption Text Type Auto, Default, Mono w. When such services are not available, the CC Selector presents a default list of services. Adjusting the audio Muting the sound Press on the remote control to the factory defaults, highlight Reset and press . See "Using the closed caption mode" ( page 43) for digital channels only. ••You cannot set in...
...) the sound. Each time you want to change in Base CC Mode) for that have multiple audio tracks). Caption Size Auto, Small, Standard, Large Caption Text Type Auto, Default, Mono w. When such services are not available, the CC Selector presents a default list of services. Adjusting the audio Muting the sound Press on the remote control to the factory defaults, highlight Reset and press . See "Using the closed caption mode" ( page 43) for digital channels only. ••You cannot set in...
User Manual
Page 46
... in relation to Optical Output Format (PCM mode). Press the Channel Number buttons to enter a new four-digit code, enter the code a second time to the factory defaults, highlight Reset and press . Enter the code again and press . The PIN code will be grayed out for NTSC signals, Video, ColorStream, and PC inputs. ••The Dolby Digital Dynamic Range Control will be cleared and you can not be set to "0000...
... in relation to Optical Output Format (PCM mode). Press the Channel Number buttons to enter a new four-digit code, enter the code a second time to the factory defaults, highlight Reset and press . Enter the code again and press . The PIN code will be grayed out for NTSC signals, Video, ColorStream, and PC inputs. ••The Dolby Digital Dynamic Range Control will be cleared and you can not be set to "0000...
User Manual
Page 50
... the control panel (except POWER) is within ±10 from center.* Clock Phase Helps to view" page 35). 2無 Press and open the Sound menu. 2無 Highlight Audio Setup and press . 3無 Press or to select PC Audio and then press or to get an optimum adjustment automatically. ** The default settings may vary depending on the input signal format. To unlock the control panel: Select...
... the control panel (except POWER) is within ±10 from center.* Clock Phase Helps to view" page 35). 2無 Press and open the Sound menu. 2無 Highlight Audio Setup and press . 3無 Press or to select PC Audio and then press or to get an optimum adjustment automatically. ** The default settings may vary depending on the input signal format. To unlock the control panel: Select...
User Manual
Page 58
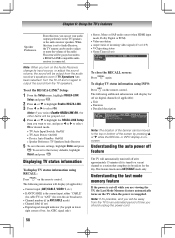
... or SAP audio status (when HDMI input mode, Dolby Digital or PCM) • Video resolution • Aspect ratio of box; for over-the-air broadcasts). • Channel number (if in ANT/CABLE mode) • Channel label (if set your audio output preference to the TV speakers or the audio receiver speakers. This feature functions in lower right corner of incoming video signal (4:3 or 16:9) • V-Chip rating status • Game Timer (if set the REGZA...
... or SAP audio status (when HDMI input mode, Dolby Digital or PCM) • Video resolution • Aspect ratio of box; for over-the-air broadcasts). • Channel number (if in ANT/CABLE mode) • Channel label (if set your audio output preference to the TV speakers or the audio receiver speakers. This feature functions in lower right corner of incoming video signal (4:3 or 16:9) • V-Chip rating status • Game Timer (if set the REGZA...
User Manual
Page 62
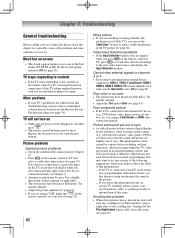
... HDMI video connection instead. Turning Off the Film Stabilization feature will not turn off - Other problems •• If your local broadcast, cable, or satellite provider to a particular input on the remote control or TV control panel and you select that particular input source. Picture problems General picture problems •• Check the antenna/cable connections ( Chapter 2). •• Press on the remote control or TV, press a second time, which may help synchronize the sound...
... HDMI video connection instead. Turning Off the Film Stabilization feature will not turn off - Other problems •• If your local broadcast, cable, or satellite provider to a particular input on the remote control or TV control panel and you select that particular input source. Picture problems General picture problems •• Check the antenna/cable connections ( Chapter 2). •• Press on the remote control or TV, press a second time, which may help synchronize the sound...
User Manual
Page 67
... the product's specification listed in the Owner's manual as well as exposure to commercial use in warranty service. or Puerto Rico. (4) Removal and reinstallation of product that service is needed, follow the instructions provided on our Customer Support Web site "www.tacp.toshiba. If you find that is mounted in the United States. Limited Warranty for Commercial Units TACP warrants parts and labor for LCD Televisions that is...
... the product's specification listed in the Owner's manual as well as exposure to commercial use in warranty service. or Puerto Rico. (4) Removal and reinstallation of product that service is needed, follow the instructions provided on our Customer Support Web site "www.tacp.toshiba. If you find that is mounted in the United States. Limited Warranty for Commercial Units TACP warrants parts and labor for LCD Televisions that is...
User Manual
Page 68
.... 68 Your Responsibility Read the owner's manual thoroughly before operating this LCD Television. Rental Units The warranty for Toshiba Brand Flat Panel Televisions Toshiba of shipment to original consumers in writing by TCL, and service made necessary by the simultaneous use of this Television must be commenced to service the Television; Reception problems caused by inadequate antenna systems are not covered by use or installation of the U.S.A. f. IN NO EVENT...
.... 68 Your Responsibility Read the owner's manual thoroughly before operating this LCD Television. Rental Units The warranty for Toshiba Brand Flat Panel Televisions Toshiba of shipment to original consumers in writing by TCL, and service made necessary by the simultaneous use of this Television must be commenced to service the Television; Reception problems caused by inadequate antenna systems are not covered by use or installation of the U.S.A. f. IN NO EVENT...
Brochure
Page 2
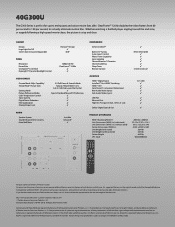
...3 3 3 3 AUDIO Speaker System Sound Enhancement Circuitry Mute/Half Mute Invisible Q Sound® 3 CONVENIENCE DLNA CertifiedTM Built-in TV Tuning Auto Aspect Control Photo Frame Capability Input Labeling Channel BrowserTM/Favorites Channel Labeling Sleep Timer Remote Control 3 NTSC/ATSC/QAM 3 3 3 3 3 3 4 Item Universal2 JACK PACK HDMI® Digital Inputs InstaPortTM Fast HDMI® Switching HDMI®-CEC3 ColorStream® Component Video Input Rear Audio/Video Inputs Side Audio/Video Inputs USB Port Ethernet Port High Res PC Input (S-XGA, 15 Pin, D-sub) Dolby® Digital Optical Out...
...3 3 3 3 AUDIO Speaker System Sound Enhancement Circuitry Mute/Half Mute Invisible Q Sound® 3 CONVENIENCE DLNA CertifiedTM Built-in TV Tuning Auto Aspect Control Photo Frame Capability Input Labeling Channel BrowserTM/Favorites Channel Labeling Sleep Timer Remote Control 3 NTSC/ATSC/QAM 3 3 3 3 3 3 4 Item Universal2 JACK PACK HDMI® Digital Inputs InstaPortTM Fast HDMI® Switching HDMI®-CEC3 ColorStream® Component Video Input Rear Audio/Video Inputs Side Audio/Video Inputs USB Port Ethernet Port High Res PC Input (S-XGA, 15 Pin, D-sub) Dolby® Digital Optical Out...


