Owner's Manual - English
Page 3
...13) Unplug this apparatus during lightning storms or when unused for long periods of Wide blade the polarized or grounding type plug. The LCD panel inside the TV contains glass and a toxic liquid. Changes or modifications may fall, causing serious personal injury, death, or serious damage to the...or walls; Make sure the strap is dropped and the cabinet or enclosure surface has been damaged or the TV does not operate normally, take the following precautions: • ALWAYS turn off the TV and unplug the power cord to avoid possible electric shock or fire. • NEVER allow your safety. ...
...13) Unplug this apparatus during lightning storms or when unused for long periods of Wide blade the polarized or grounding type plug. The LCD panel inside the TV contains glass and a toxic liquid. Changes or modifications may fall, causing serious personal injury, death, or serious damage to the...or walls; Make sure the strap is dropped and the cabinet or enclosure surface has been damaged or the TV does not operate normally, take the following precautions: • ALWAYS turn off the TV and unplug the power cord to avoid possible electric shock or fire. • NEVER allow your safety. ...

Owner's Manual - English
Page 4
...turned on or off. Avoid contact with alcohol, thinner, benzene, acidic or alkaline solvent cleaners, abrasive cleaners, or chemical cloths, which may damage or discolor the cabinet. 31) WARNING: RISK OF ELECTRIC SHOCK! Never spill liquids or push objects of any kind into the TV... Always unplug the TV before cleaning. Service 37) WARNING: RISK OF ELECTRIC SHOCK! Refer all servicing not specified in this manual to a Toshiba Authorized Service Center. ... operation of your body (or any item you are in the LCD panel contains a small amount of mercury. Never spray volatile compounds ...
...turned on or off. Avoid contact with alcohol, thinner, benzene, acidic or alkaline solvent cleaners, abrasive cleaners, or chemical cloths, which may damage or discolor the cabinet. 31) WARNING: RISK OF ELECTRIC SHOCK! Never spill liquids or push objects of any kind into the TV... Always unplug the TV before cleaning. Service 37) WARNING: RISK OF ELECTRIC SHOCK! Refer all servicing not specified in this manual to a Toshiba Authorized Service Center. ... operation of your body (or any item you are in the LCD panel contains a small amount of mercury. Never spray volatile compounds ...

Owner's Manual - English
Page 10
... Bb - These buttons adjust the volume level. 10 INPUT - If the TV stops responding to the controls on -screen, these buttons change the source you cannot turn the TV on and off the TV, press and hold the POWER button on the TV control panel for additional information. 3 VIDEO 2 IN - When no menu is... on the remote control or TV control panel and you are referred to access the menu...
... Bb - These buttons adjust the volume level. 10 INPUT - If the TV stops responding to the controls on -screen, these buttons change the source you cannot turn the TV on and off the TV, press and hold the POWER button on the TV control panel for additional information. 3 VIDEO 2 IN - When no menu is... on the remote control or TV control panel and you are referred to access the menu...
Owner's Manual - English
Page 13
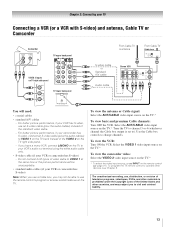
...input source on the TV. To view the VCR: Turn ON the VCR. For better picture performance, if your TV Connecting a VCR (or a VCR with S-video) and antenna, Cable TV or Camcorder Camcorder AUDIO OUT L R VIDEO TV upper back panel VIDEO 2 inputs on TV right side panel TV lower back panel S-video... channel 3 or 4 (whichever channel the Cable box output is set to program or access certain features on the TV.* To view basic and premium Cable channels: Turn OFF the VCR. The unauthorized recording, use, distribution, or revision of television programs, videotapes, DVDs, and other materials is ...
...input source on the TV. To view the VCR: Turn ON the VCR. For better picture performance, if your TV Connecting a VCR (or a VCR with S-video) and antenna, Cable TV or Camcorder Camcorder AUDIO OUT L R VIDEO TV upper back panel VIDEO 2 inputs on TV right side panel TV lower back panel S-video... channel 3 or 4 (whichever channel the Cable box output is set to program or access certain features on the TV.* To view basic and premium Cable channels: Turn OFF the VCR. The unauthorized recording, use, distribution, or revision of television programs, videotapes, DVDs, and other materials is ...
Owner's Manual - English
Page 14
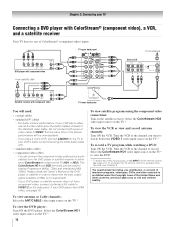
...a standard A/V cable to display Progressive (480p, 720p) and Interlaced (480i, 1080i). Select the VIDEO 1 video input source on the TV.* To view the DVD player: Turn ON the DVD player. Chapter 2: Connecting your DVD player has HDMI video, see Chapter 3. To view antenna or Cable channels: Select...If your VCR has S-video, use , distribution, or revision of video cable to your VCR's audio out terminal using the component video connections: Turn on the TV (HD1 or HD2). If you want to record. Do not connect both types of television programs, videotapes, DVDs, and other devices, see ...
...a standard A/V cable to display Progressive (480p, 720p) and Interlaced (480i, 1080i). Select the VIDEO 1 video input source on the TV.* To view the DVD player: Turn ON the DVD player. Chapter 2: Connecting your DVD player has HDMI video, see Chapter 3. To view antenna or Cable channels: Select...If your VCR has S-video, use , distribution, or revision of video cable to your VCR's audio out terminal using the component video connections: Turn on the TV (HD1 or HD2). If you want to record. Do not connect both types of television programs, videotapes, DVDs, and other devices, see ...
Owner's Manual - English
Page 15
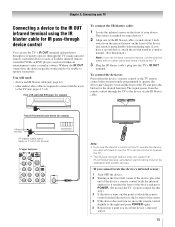
...'s remote control (with the infrared emitter) so it behind the TV. 3 Plug the IR blaster cable's plug into the TV's IR OUT terminal. Chapter 3) toward the front of the TV and press the button for this step.) 3 If the device turns on, the point at which the remote control touched the device ... the TV to the right and press POWER again. 5 Repeat step 4 until you cannot locate the device's infrared sensor: 1 Turn OFF the device. 2 Starting at the lower left corner of the device, place the end of the device and attach it remotely. page 12) • other audio/video cables as Toshiba infrared...
...'s remote control (with the infrared emitter) so it behind the TV. 3 Plug the IR blaster cable's plug into the TV's IR OUT terminal. Chapter 3) toward the front of the TV and press the button for this step.) 3 If the device turns on, the point at which the remote control touched the device ... the TV to the right and press POWER again. 5 Repeat step 4 until you cannot locate the device's infrared sensor: 1 Turn OFF the device. 2 Starting at the lower left corner of the device, place the end of the device and attach it remotely. page 12) • other audio/video cables as Toshiba infrared...

Owner's Manual - English
Page 16
.... page 32). Because this is an evolving technology, it is recommended that you follow these procedures: • When turning on your electronic components, turn off your TV receives digital audio and uncompressed digital video from an HDMI source device, or uncompressed digital video from EIA/CEA-861-D-compliant...DVI device to the HDMI input The HDMI input on your electronic components, turn on the TV first, and then the HDMI or DVI device. • When turning off the HDMI or DVI device first, and then the TV. See "Setting the HDMI™ audio mode" (- Separate analog audio...
.... page 32). Because this is an evolving technology, it is recommended that you follow these procedures: • When turning on your electronic components, turn off your TV receives digital audio and uncompressed digital video from an HDMI source device, or uncompressed digital video from EIA/CEA-861-D-compliant...DVI device to the HDMI input The HDMI input on your electronic components, turn on the TV first, and then the HDMI or DVI device. • When turning off the HDMI or DVI device first, and then the TV. See "Setting the HDMI™ audio mode" (- Separate analog audio...

Owner's Manual - English
Page 18
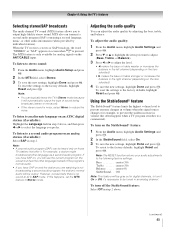
...You will need : • standard audio cables Analog audio amplifier To control the audio: 1 Turn on the TV and the digital audio device. 2 Press Y on your TV Connecting a digital audio system The TV's DIGITAL AUDIO OUT terminal outputs a Dolby®* Digital g or 2-channel down-mixed PCM (pulse...No Auto Stereo English Dolby Digital Compressed Done To control the audio: 1 Turn on page 46). Older audio systems that are registered trademarks of copy restrictions. * Manufactured under license from the TV's built-in speakers and control the volume level using the amplifier's remote ...
...You will need : • standard audio cables Analog audio amplifier To control the audio: 1 Turn on the TV and the digital audio device. 2 Press Y on your TV Connecting a digital audio system The TV's DIGITAL AUDIO OUT terminal outputs a Dolby®* Digital g or 2-channel down-mixed PCM (pulse...No Auto Stereo English Dolby Digital Compressed Done To control the audio: 1 Turn on page 46). Older audio systems that are registered trademarks of copy restrictions. * Manufactured under license from the TV's built-in speakers and control the volume level using the amplifier's remote ...

Owner's Manual - English
Page 21
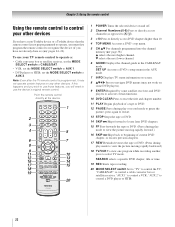
... system (- page 22). Chapter 3: Using the remote control Learning about the remote control The buttons used to control the TV. page 23). 1 POWER turns the TV on the TV front will be illuminated. 2 FREEZE freezes the picture. page 51). 4 PIC SIZE cycles through programmed channels when no menu is on, the green LED ...off the sound (- page 38) or to the last viewed channel or source (- page 54). 11 CH RTN returns to edit the Favorites List (- page 37). (Also see "Arrow buttons.") 15 Arrow buttons (BbC c) When a menu is not available. 21 page 27). 18 EXIT closes on -screen (- Set to...
... system (- page 22). Chapter 3: Using the remote control Learning about the remote control The buttons used to control the TV. page 23). 1 POWER turns the TV on the TV front will be illuminated. 2 FREEZE freezes the picture. page 51). 4 PIC SIZE cycles through programmed channels when no menu is on, the green LED ...off the sound (- page 38) or to the last viewed channel or source (- page 54). 11 CH RTN returns to edit the Favorites List (- page 37). (Also see "Arrow buttons.") 15 Arrow buttons (BbC c) When a menu is not available. 21 page 27). 18 EXIT closes on -screen (- Set to...
Owner's Manual - English
Page 22
... happens and you wish to use those features, you have a non-Toshiba device or a Toshiba device that the remote control is programmed, it may not work on.../reverses the tape or DVD. (Press during play mode to view the picture moving rapidly backward.) 18 TV/VCR To view one program while recording another, press to control a cable converter box or satellite receiver;...at the device. 16 17 18 19 1 POWER Turns the selected device on any other devices. Chapter 3: Using the remote control Using the remote control to control your TV remote control to operate a: • Cable converter ...
... happens and you wish to use those features, you have a non-Toshiba device or a Toshiba device that the remote control is programmed, it may not work on.../reverses the tape or DVD. (Press during play mode to view the picture moving rapidly backward.) 18 TV/VCR To view one program while recording another, press to control a cable converter box or satellite receiver;...at the device. 16 17 18 19 1 POWER Turns the selected device on any other devices. Chapter 3: Using the remote control Using the remote control to control your TV remote control to operate a: • Cable converter ...
Owner's Manual - English
Page 24
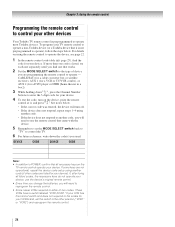
...was entered, the device will need to use the device's original remote control. • Every time you change the batteries, you will turn on the TV remote control operate your device. If your VCR has this kind of device you are listed for your device. See notes below . ... the remote control Programming the remote control to control your other devices Your Toshiba TV remote control is listed, try each one separately until you find the code for your TV remote control to operate a non-Toshiba device (or a Toshiba device that came with the device. 5 Remember to set the switch to...
...was entered, the device will need to use the device's original remote control. • Every time you change the batteries, you will turn on the TV remote control operate your device. If your VCR has this kind of device you are listed for your device. See notes below . ... the remote control Programming the remote control to control your other devices Your Toshiba TV remote control is listed, try each one separately until you find the code for your TV remote control to operate a non-Toshiba device (or a Toshiba device that came with the device. 5 Remember to set the switch to...
Owner's Manual - English
Page 34
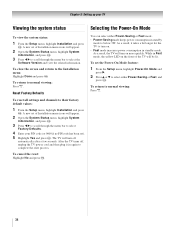
...To view the system status: 1 From the Setup menu, highlight Installation and press T. As a result, it in standby mode. After the TV turns off automatically after a few seconds. To cancel the reset: Highlight No and press T. To return to the Installation menu: Highlight Done and ... b to complete the reset process. Reset Factory Defaults To reset all settings and channels to normal viewing: Press O. As a result, the TV will turn on. • Fast mode increases power consumption in again to select either Power-Saving or Fast mode. • Power-Saving mode keeps power...
...To view the system status: 1 From the Setup menu, highlight Installation and press T. As a result, it in standby mode. After the TV turns off automatically after a few seconds. To cancel the reset: Highlight No and press T. To return to the Installation menu: Highlight Done and ... b to complete the reset process. Reset Factory Defaults To reset all settings and channels to normal viewing: Press O. As a result, the TV will turn on. • Fast mode increases power consumption in again to select either Power-Saving or Fast mode. • Power-Saving mode keeps power...
Owner's Manual - English
Page 35
... according to the specific devices you will appear randomly on . • When selecting input sources using +, some REGZA-LINK devices may automatically turn on the screen if no signal is received in video input mode. • If a CEC device is connected to the HDMI input: ... panel repeatedly to change the input; Note: • When selecting REGZA-LINK input sources from the popup window using B b, you have to press T to the TV (- If a REGZA-LINK device with HDMI switching capability (e.g. HDMI 1 - 1 HDMI 1 - 2 HDMI 1 - 3 Audio Receiver Player Recorder Press + repeatedly to ...
... according to the specific devices you will appear randomly on . • When selecting input sources using +, some REGZA-LINK devices may automatically turn on the screen if no signal is received in video input mode. • If a CEC device is connected to the HDMI input: ... panel repeatedly to change the input; Note: • When selecting REGZA-LINK input sources from the popup window using B b, you have to press T to the TV (- If a REGZA-LINK device with HDMI switching capability (e.g. HDMI 1 - 1 HDMI 1 - 2 HDMI 1 - 3 Audio Receiver Player Recorder Press + repeatedly to ...

Owner's Manual - English
Page 37
... menu, highlight Channel Browser Setup and press T. 2 Press B to highlight Navigation, and then press C or c to close the Channel Browser™. (continued) 37 In Select mode, when you stop on an item in the list. Channel Browser Setup Navigation History List ANT/CABLE List Inputs List Favorites List...the highlighted item. 2 Press T to tune the TV to the highlighted item. 3 Press O to select On or Off. To open in the Channel Browser™. Elements of the last selected list in the last selected list. • If all lists are turned off . 4 Press b to highlight ANT/CABLE ...
... menu, highlight Channel Browser Setup and press T. 2 Press B to highlight Navigation, and then press C or c to close the Channel Browser™. (continued) 37 In Select mode, when you stop on an item in the list. Channel Browser Setup Navigation History List ANT/CABLE List Inputs List Favorites List...the highlighted item. 2 Press T to tune the TV to the highlighted item. 3 Press O to select On or Off. To open in the Channel Browser™. Elements of the last selected list in the last selected list. • If all lists are turned off . 4 Press b to highlight ANT/CABLE ...
Owner's Manual - English
Page 38
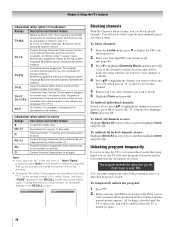
...the Input Configuration must be handled for various reasons), the TV will clear the History List. For example, to Antenna (- Note: If a digital channel is tuned. • Turning off the left , eventually moving off the TV will automatically tune to tune the RF channel using the... control, analog channels can still be tuned by < / , if available Digital Only digital channels can be updated automatically when you program channels into the TV's channel memory (- To set to select digital channel 125-1, press 1, 2, 5, -, 1, then T. A new set to Digital, analog channel 3 ...
...the Input Configuration must be handled for various reasons), the TV will clear the History List. For example, to Antenna (- Note: If a digital channel is tuned. • Turning off the left , eventually moving off the TV will automatically tune to tune the RF channel using the... control, analog channels can still be tuned by < / , if available Digital Only digital channels can be updated automatically when you program channels into the TV's channel memory (- To set to select digital channel 125-1, press 1, 2, 5, -, 1, then T. A new set to Digital, analog channel 3 ...
Owner's Manual - English
Page 41
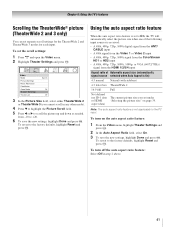
... page 39. To turn off the auto aspect ratio feature: Select Off in any other mode). 4 Press b to ... the new settings, highlight Done and press T. To revert to the factory defaults, highlight Reset and press T. Chapter 6: Using the TV's features Scrolling the TheaterWide® picture (TheaterWide 2 and 3 only) You can set under "Selecting the picture size" on the ... and press T. Using the auto aspect ratio feature When the auto aspect ratio feature is set to On, the TV will automatically select the picture size when one of the following input sources is received: • A 480i, 480p...
... page 39. To turn off the auto aspect ratio feature: Select Off in any other mode). 4 Press b to ... the new settings, highlight Done and press T. To revert to the factory defaults, highlight Reset and press T. Chapter 6: Using the TV's features Scrolling the TheaterWide® picture (TheaterWide 2 and 3 only) You can set under "Selecting the picture size" on the ... and press T. Using the auto aspect ratio feature When the auto aspect ratio feature is set to On, the TV will automatically select the picture size when one of the following input sources is received: • A 480i, 480p...
Owner's Manual - English
Page 43
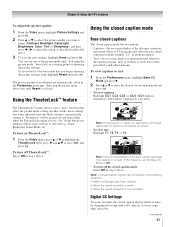
... Mode status will not be grayed out and unavailable when the TheaterLock setting is set the Base CC Mode to Off. • To turn off TheaterLock™: Select Off in the Preference mode (- Using the closed caption mode Base closed captions The closed caption mode has two ... You can customize the closed caption mode and press T. • To view captions: Highlight CC1, CC2, CC3, or CC4. (CC1 displays translation of TV programs and videos that are automatically saved in step 1 above left ) as a starting point for adjusting the picture settings. "Selecting the picture mode," above...
... Mode status will not be grayed out and unavailable when the TheaterLock setting is set the Base CC Mode to Off. • To turn off TheaterLock™: Select Off in the Preference mode (- Using the closed caption mode Base closed captions The closed caption mode has two ... You can customize the closed caption mode and press T. • To view captions: Highlight CC1, CC2, CC3, or CC4. (CC1 displays translation of TV programs and videos that are automatically saved in step 1 above left ) as a starting point for adjusting the picture settings. "Selecting the picture mode," above...
Owner's Manual - English
Page 44
...mode (set the volume to 0. However, once you select "MUTE" mode, the closed caption feature is automatically activated if the TV program is Closed Captioned. To mute the audio without automatically activating the closed caption feature, use the CC Selector to select digital closed... caption services (if available). "Selecting stereo/SAP broadcasts" on the remote control to partially reduce (1/2 MUTE) or turn off (MUTE) the sound. To use the Digital Audio Selector to conveniently switch between audio tracks on closed caption mode" (- Serif, Prop....
...mode (set the volume to 0. However, once you select "MUTE" mode, the closed caption feature is automatically activated if the TV program is Closed Captioned. To mute the audio without automatically activating the closed caption feature, use the CC Selector to select digital closed... caption services (if available). "Selecting stereo/SAP broadcasts" on the remote control to partially reduce (1/2 MUTE) or turn off (MUTE) the sound. To use the Digital Audio Selector to conveniently switch between audio tracks on closed caption mode" (- Serif, Prop....
Owner's Manual - English
Page 45
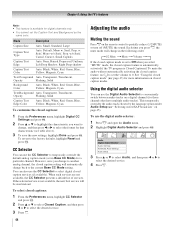
... Language field in volume that offer it 's necessary to Stereo mode. Note: The RESET function returns your audio adjustments to a commercial). To turn on -screen when E is only available for example, to prevent the sudden increase in step 2 above . (continued) 45 center (0) StableSound... . . To listen to an alternate language on the ANT/CABLE input. To turn off the StableSound feature: Select Off in SAP mode. When the TV receives a stereo or SAP broadcast, the word "STEREO" or "SAP" appears on the StableSound® feature:...
... Language field in volume that offer it 's necessary to Stereo mode. Note: The RESET function returns your audio adjustments to a commercial). To turn on -screen when E is only available for example, to prevent the sudden increase in step 2 above . (continued) 45 center (0) StableSound... . . To listen to an alternate language on the ANT/CABLE input. To turn off the StableSound feature: Select Off in SAP mode. When the TV receives a stereo or SAP broadcast, the word "STEREO" or "SAP" appears on the StableSound® feature:...
Owner's Manual - English
Page 48
...above and then highlight Done and press T. Unlocking programs temporarily If you try to tune the TV to enter PIN. If the correct code is entered, the program lock mode is turned on the remote control. however, programs that do not provide any rating information will not be ...press T. All locking is disabled until the TV is turned off, and will be enabled when the TV is released and the normal picture appears. Chapter 6: Using the TV's features Independent rating system for broadcasters Ratings Description and Content themes TV-MA Mature Audience Only (This program is specifically...
...above and then highlight Done and press T. Unlocking programs temporarily If you try to tune the TV to enter PIN. If the correct code is entered, the program lock mode is turned on the remote control. however, programs that do not provide any rating information will not be ...press T. All locking is disabled until the TV is turned off, and will be enabled when the TV is released and the normal picture appears. Chapter 6: Using the TV's features Independent rating system for broadcasters Ratings Description and Content themes TV-MA Mature Audience Only (This program is specifically...

