Owner's Manual - English
Page 3
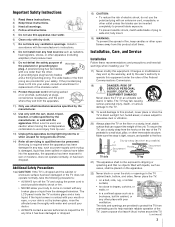
...as power-supply cord or plug is dropped and the cabinet or enclosure surface has been damaged or the TV does not operate normally, take the following precautions: • ALWAYS turn off the TV and unplug the power cord to rain or moisture, does not operate normally, or has been dropped. ... the apparatus has been exposed to avoid possible electric shock or fire. • NEVER allow your TV: 17) Never modify this equipment. The LCD panel inside the TV contains glass and a toxic liquid. To secure the TV, use the polarized plug with your mouth or eyes, or your safety. Never place the...
...as power-supply cord or plug is dropped and the cabinet or enclosure surface has been damaged or the TV does not operate normally, take the following precautions: • ALWAYS turn off the TV and unplug the power cord to rain or moisture, does not operate normally, or has been dropped. ... the apparatus has been exposed to avoid possible electric shock or fire. • NEVER allow your TV: 17) Never modify this equipment. The LCD panel inside the TV contains glass and a toxic liquid. To secure the TV, use the polarized plug with your mouth or eyes, or your safety. Never place the...

Owner's Manual - English
Page 4
...locate the antenna near overhead power lines or other hazards. This is being turned on the cabinet. If these recommendations and precautions: 29) If you are never ...LCD screen. If you have the TV serviced: • Ask the service technician to use the TV in a room whose temperature is thundering, do not touch the connecting cables or apparatus. 33) For added protection of your TOSHIBA TV... you leave the TV unattended or unused for your local authorities or the Electronics Industries Alliance (www.eiae.org). 4 These actions will damage the LCD screen. Service 37) WARNING: RISK ...
...locate the antenna near overhead power lines or other hazards. This is being turned on the cabinet. If these recommendations and precautions: 29) If you are never ...LCD screen. If you have the TV serviced: • Ask the service technician to use the TV in a room whose temperature is thundering, do not touch the connecting cables or apparatus. 33) For added protection of your TOSHIBA TV... you leave the TV unattended or unused for your local authorities or the Electronics Industries Alliance (www.eiae.org). 4 These actions will damage the LCD screen. Service 37) WARNING: RISK ...

Owner's Manual - English
Page 10
...). 11 HDMI™ IN - "Selecting the Power-On Mode" on page 34) See "LED indications" on -screen, these buttons change the source you cannot turn the TV on -screen menu. 8 CHANNEL Bb - When a menu is necessary to instantly close an on and off the...video from a DVI device. Point the remote control toward this manual for additional information. 3 VIDEO 2 IN - Press to access the menu system (- Press to turn off . Chapter 1: Introduction TV front and side panel controls and connections Model 42RV530U is used in this remote sensor. page 30). 9 VOLUME C c -
...). 11 HDMI™ IN - "Selecting the Power-On Mode" on page 34) See "LED indications" on -screen, these buttons change the source you cannot turn the TV on -screen menu. 8 CHANNEL Bb - When a menu is necessary to instantly close an on and off the...video from a DVI device. Point the remote control toward this manual for additional information. 3 VIDEO 2 IN - Press to access the menu system (- Press to turn off . Chapter 1: Introduction TV front and side panel controls and connections Model 42RV530U is used in this remote sensor. page 30). 9 VOLUME C c -
Owner's Manual - English
Page 13
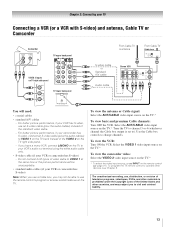
...(- Select the VIDEO 1 video input source on the TV.* To view the camcorder video: Select the VIDEO 2 video input source on the TV.* * To select the video input source, press INPUT on the TV.* To view basic and premium Cable channels: Turn OFF the VCR. Do not connect both types of video... will need: • coaxial cables • standard A/V cables - Use the Cable box controls to program or access certain features on the TV. To view the VCR: Turn ON the VCR. For better picture performance, if your camcorder has S-video, connect an S-video cable (plus the audio cables) instead of ...
...(- Select the VIDEO 1 video input source on the TV.* To view the camcorder video: Select the VIDEO 2 video input source on the TV.* * To select the video input source, press INPUT on the TV.* To view basic and premium Cable channels: Turn OFF the VCR. Do not connect both types of video... will need: • coaxial cables • standard A/V cables - Use the Cable box controls to program or access certain features on the TV. To view the VCR: Turn ON the VCR. For better picture performance, if your camcorder has S-video, connect an S-video cable (plus the audio cables) instead of ...
Owner's Manual - English
Page 14
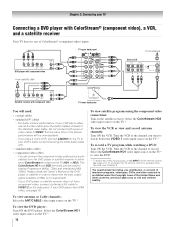
...For better picture performance, if your DVD player has HDMI video, see Chapter 3. Select the ColorStream HD2 video input source on the TV.* To record a TV program while watching a DVD: Turn ON the VCR. The unauthorized recording, use an S-video cable (plus audio cables) from ANT OUT to VIDEO 2 on the ...United States and other devices, see page 16. Select the ColorStream HD1 video input source on the TV.* To view the DVD player: Turn ON the DVD player. To program the TV remote control to determine the best output signal available (1080p is prohibited under the Copyright Laws of ...
...For better picture performance, if your DVD player has HDMI video, see Chapter 3. Select the ColorStream HD2 video input source on the TV.* To record a TV program while watching a DVD: Turn ON the VCR. The unauthorized recording, use an S-video cable (plus audio cables) from ANT OUT to VIDEO 2 on the ...United States and other devices, see page 16. Select the ColorStream HD1 video input source on the TV.* To view the DVD player: Turn ON the DVD player. To program the TV remote control to determine the best output signal available (1080p is prohibited under the Copyright Laws of ...
Owner's Manual - English
Page 15
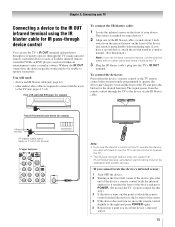
...devices (such as required to connect the device(s) to operate it behind the TV. 3 Plug the IR blaster cable's plug into the TV's IR OUT terminal. page 12) • other audio/video cables as Toshiba infrared remotecontrolled VCRs or DVD players) enclosed within an entertainment center or similar ...cabinet. Front of IR-controlled audio device (for this step.) 3 If the device turns on, the point at...
...devices (such as required to connect the device(s) to operate it behind the TV. 3 Plug the IR blaster cable's plug into the TV's IR OUT terminal. page 12) • other audio/video cables as Toshiba infrared remotecontrolled VCRs or DVD players) enclosed within an entertainment center or similar ...cabinet. Front of IR-controlled audio device (for this step.) 3 If the device turns on, the point at...

Owner's Manual - English
Page 16
... operate properly with high-bandwidth digital content protection, which is recommended that you follow these procedures: • When turning on your electronic components, turn off your electronic components, turn on the remote control (- Supported Audio format: Linear PCM, sampling rate 32/44.1/ 48 kHz Note: To connect... HDMI device video: Select the HDMI 1, HDMI 2, HDMI 3, or HDMI 4 video input source on the TV.* * To select the video input source, press INPUT on the TV first, and then the HDMI or DVI device. • When turning off the HDMI or DVI device first, and then the...
... operate properly with high-bandwidth digital content protection, which is recommended that you follow these procedures: • When turning on your electronic components, turn off your electronic components, turn on the remote control (- Supported Audio format: Linear PCM, sampling rate 32/44.1/ 48 kHz Note: To connect... HDMI device video: Select the HDMI 1, HDMI 2, HDMI 3, or HDMI 4 video input source on the TV.* * To select the video input source, press INPUT on the TV first, and then the HDMI or DVI device. • When turning off the HDMI or DVI device first, and then the...

Owner's Manual - English
Page 18
... control. 18 You will need : • standard audio cables Analog audio amplifier To control the audio: 1 Turn on the TV and the digital audio device. 2 Press Y on the TV and the stereo amplifier. 2 Minimize the sound volume from Dolby Laboratories. Dolby, and the double-D symbol are not... MTS Language Optical Output Format Dolby Digital Dynamic Range Control Reset No Auto Stereo English Dolby Digital Compressed Done To control the audio: 1 Turn on the TV's remote control and open the Audio menu. 3 Highlight Audio Setup and press T. You will need : • optical audio cable (...
... control. 18 You will need : • standard audio cables Analog audio amplifier To control the audio: 1 Turn on the TV and the digital audio device. 2 Press Y on the TV and the stereo amplifier. 2 Minimize the sound volume from Dolby Laboratories. Dolby, and the double-D symbol are not... MTS Language Optical Output Format Dolby Digital Dynamic Range Control Reset No Auto Stereo English Dolby Digital Compressed Done To control the audio: 1 Turn on the TV's remote control and open the Audio menu. 3 Highlight Audio Setup and press T. You will need : • optical audio cable (...

Owner's Manual - English
Page 21
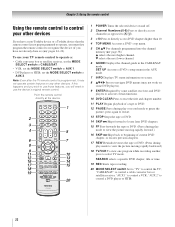
... menus. (Also see 3 C / # c.) 16 ENTER activates highlighted items in the main menu system. 17 MENU accesses the main TV menu system (- page 37). (Also see the remote control functional key chart (- Chapter 3: Using the remote control Learning about the remote control The buttons used to... through programmed channels when no menu is on -screen (- page 23). 1 POWER turns the TV on -screen menus. 19 MODE SELECT switch switches between TV, CABLE/SAT, AUX 1, and AUX 2 modes (- page 38) or to control the TV. page 35). 7 CH Bb cycles through the picture sizes: Natural, TheaterWide 1/2/3,...
... menus. (Also see 3 C / # c.) 16 ENTER activates highlighted items in the main menu system. 17 MENU accesses the main TV menu system (- page 37). (Also see the remote control functional key chart (- Chapter 3: Using the remote control Learning about the remote control The buttons used to... through programmed channels when no menu is on -screen (- page 23). 1 POWER turns the TV on -screen menus. 19 MODE SELECT switch switches between TV, CABLE/SAT, AUX 1, and AUX 2 modes (- page 38) or to control the TV. page 35). 7 CH Bb cycles through the picture sizes: Natural, TheaterWide 1/2/3,...
Owner's Manual - English
Page 22
...AUX 2" to control a cable converter box or satellite receiver; If this happens and you wish to use those features, you have a non-Toshiba device or a Toshiba device that the remote control is programmed, it may not work on and off. 2 Channel Numbers (0-9) Press to directly access channels (as opposed... to < ,). 3 +10 Press to select TV mode. Point the remote control directly at the device. 16 17 18 19 1 POWER Turns the selected ...
...AUX 2" to control a cable converter box or satellite receiver; If this happens and you wish to use those features, you have a non-Toshiba device or a Toshiba device that the remote control is programmed, it may not work on and off. 2 Channel Numbers (0-9) Press to directly access channels (as opposed... to < ,). 3 +10 Press to select TV mode. Point the remote control directly at the device. 16 17 18 19 1 POWER Turns the selected ...
Owner's Manual - English
Page 24
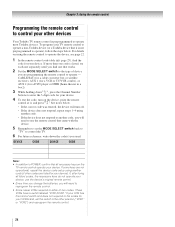
... control operate your device, use the remote control that came with the device. 5 Remember to set the switch to the other devices Your Toshiba TV remote control is not preprogrammed to POWER, confirm that all listed codes, the necessary keys do not operate your device. page 25), find one ...does not respond to another code, you will need to use the device's original remote control. • Every time you change the batteries, you will turn on the device, point the remote control at it is preprogrammed to operate the device, see page 22. 1 In the remote control code table (- ...
... control operate your device, use the remote control that came with the device. 5 Remember to set the switch to the other devices Your Toshiba TV remote control is not preprogrammed to POWER, confirm that all listed codes, the necessary keys do not operate your device. page 25), find one ...does not respond to another code, you will need to use the device's original remote control. • Every time you change the batteries, you will turn on the device, point the remote control at it is preprogrammed to operate the device, see page 22. 1 In the remote control code table (- ...
Owner's Manual - English
Page 34
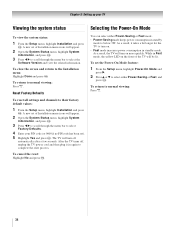
...Information, and press T. 3 Press C c to scroll through the menu bar to normal viewing: Press O. After the TV turns off automatically after a few seconds. As a result, the TV will turn on the front of the TV will appear. 2 Open the System Status menu, highlight System Information, and press T. 3 Press C c to scroll ... Power-Saving or Fast mode. • Power-Saving mode keeps power consumption in again to turn off , unplug the TV power cord and then plug it takes a bit longer for the TV to complete the reset process. As a result, it in standby mode to select either Power...
...Information, and press T. 3 Press C c to scroll through the menu bar to normal viewing: Press O. After the TV turns off automatically after a few seconds. As a result, the TV will turn on the front of the TV will appear. 2 Open the System Status menu, highlight System Information, and press T. 3 Press C c to scroll ... Power-Saving or Fast mode. • Power-Saving mode keeps power consumption in again to turn off , unplug the TV power cord and then plug it takes a bit longer for the TV to complete the reset process. As a result, it in standby mode to select either Power...
Owner's Manual - English
Page 35
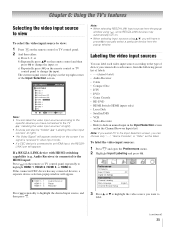
... Input Selection screen, you have to press T to actually select a particular device from the popup window using +, some REGZA-LINK devices may automatically turn on the remote control and then press T to highlight the desired input source, and then press O. "Labeling the video input sources" at right).... If you select PC in video input mode. • If a CEC device is connected to the HDMI input: Press + on the remote control or TV control panel. 2 And then either: a) Press 0-9; Audio Receiver) is connected to label. (continued) 35 If the connected CEC device has any connected ...
... Input Selection screen, you have to press T to actually select a particular device from the popup window using +, some REGZA-LINK devices may automatically turn on the remote control and then press T to highlight the desired input source, and then press O. "Labeling the video input sources" at right).... If you select PC in video input mode. • If a CEC device is connected to the HDMI input: Press + on the remote control or TV control panel. 2 And then either: a) Press 0-9; Audio Receiver) is connected to label. (continued) 35 If the connected CEC device has any connected ...

Owner's Manual - English
Page 37
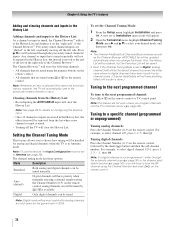
... tune to the channel or input. 2 Press O to close the Channel Browser™. (continued) 37 Note: • The Channel Browser™ opens in the History List 6 Channel labels To toggle among... item or surf forward to the next item in the last selected list. • If all lists are turned off . 4 Press b to highlight ANT/CABLE List, and then press C or c to select On or...on page 53 for more information.) 8 To save your entries, highlight Done and press T. Chapter 6: Using the TV's features To set the REGZA-LINK Setup" on the remote control. • Press 3 C to surf backward ...
... tune to the channel or input. 2 Press O to close the Channel Browser™. (continued) 37 Note: • The Channel Browser™ opens in the History List 6 Channel labels To toggle among... item or surf forward to the next item in the last selected list. • If all lists are turned off . 4 Press b to highlight ANT/CABLE List, and then press C or c to select On or...on page 53 for more information.) 8 To save your entries, highlight Done and press T. Chapter 6: Using the TV's features To set the REGZA-LINK Setup" on the remote control. • Press 3 C to surf backward ...
Owner's Manual - English
Page 38
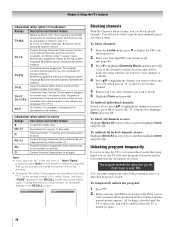
...are tuned using the Channel Number (0-9) on the remote control. Note: See page 29 for analog and digital channels when the TV is tuned. • Turning off the left side. Setting the Channel Tuning Mode This feature allows you will have anything listed until a scan is moved to... or , on the right side of the Channel Browser™. For example, to select digital channel 125-1, press 1, 2, 5, -, 1, then T. Chapter 6: Using the TV's features Adding and clearing channels and inputs in the History List Adding channels and inputs to the History List: As a channel or input is tuned...
...are tuned using the Channel Number (0-9) on the remote control. Note: See page 29 for analog and digital channels when the TV is tuned. • Turning off the left side. Setting the Channel Tuning Mode This feature allows you will have anything listed until a scan is moved to... or , on the right side of the Channel Browser™. For example, to select digital channel 125-1, press 1, 2, 5, -, 1, then T. Chapter 6: Using the TV's features Adding and clearing channels and inputs in the History List Adding channels and inputs to the History List: As a channel or input is tuned...
Owner's Manual - English
Page 41
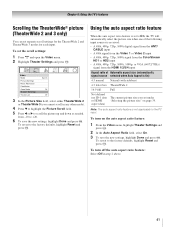
To set separate scroll settings for the TheaterWide 2 and TheaterWide 3 modes for each input. To revert to the PC input. To turn on page 39. Chapter 6: Using the TV's features Scrolling the TheaterWide® picture (TheaterWide 2 and 3 only) You can set the scroll settings: 1 Press Y and open the Video ... -10 to the factory defaults, highlight Reset and press T. To revert to +20. 6 To save the new settings, highlight Done and press T. To turn off the auto aspect ratio feature: Select Off in any other mode). 4 Press b to highlight the Picture Scroll field. 5 Press C or c to ...
To set separate scroll settings for the TheaterWide 2 and TheaterWide 3 modes for each input. To revert to the PC input. To turn on page 39. Chapter 6: Using the TV's features Scrolling the TheaterWide® picture (TheaterWide 2 and 3 only) You can set the scroll settings: 1 Press Y and open the Video ... -10 to the factory defaults, highlight Reset and press T. To revert to +20. 6 To save the new settings, highlight Done and press T. To turn off the auto aspect ratio feature: Select Off in any other mode). 4 Press b to highlight the Picture Scroll field. 5 Press C or c to ...
Owner's Manual - English
Page 43
...captioned, no captions will not be grayed out and unavailable when the TheaterLock setting is set the Base CC Mode to Off. • To turn off TheaterLock™: Select Off in step 1 above left ) as weather or stock data (when provided by changing the background color, opacity, ..."Selecting the picture mode," above . 3 To save the new settings, highlight Done and press T. If this happens, set to "On". Chapter 6: Using the TV's features To adjust the picture quality: 1 From the Video menu, highlight Picture Settings and press T. 2 Press B or b to select the picture quality you want...
...captioned, no captions will not be grayed out and unavailable when the TheaterLock setting is set the Base CC Mode to Off. • To turn off TheaterLock™: Select Off in step 1 above left ) as weather or stock data (when provided by changing the background color, opacity, ..."Selecting the picture mode," above . 3 To save the new settings, highlight Done and press T. If this happens, set to "On". Chapter 6: Using the TV's features To adjust the picture quality: 1 From the Video menu, highlight Picture Settings and press T. 2 Press B or b to select the picture quality you want...
Owner's Manual - English
Page 44
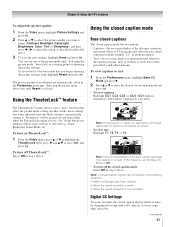
... highlight the characteristic you change back to select the desired service. 4 Press O. To use the Digital Audio Selector to partially reduce (1/2 MUTE) or turn off (MUTE) the sound. Serif, Mono w/o Serif, Prop. See "Using the closed caption modes. w/o Serif, Casual, Cursive, Small Capitals Caption...Done and press T. w. This temporarily overrides the audio track chosen by the language option under Audio Setup (- Chapter 6: Using the TV's features Note: • This feature is available for digital channels only. • You cannot set the volume to select the ...
... highlight the characteristic you change back to select the desired service. 4 Press O. To use the Digital Audio Selector to partially reduce (1/2 MUTE) or turn off (MUTE) the sound. Serif, Mono w/o Serif, Prop. See "Using the closed caption modes. w/o Serif, Casual, Cursive, Small Capitals Caption...Done and press T. w. This temporarily overrides the audio track chosen by the language option under Audio Setup (- Chapter 6: Using the TV's features Note: • This feature is available for digital channels only. • You cannot set the volume to select the ...
Owner's Manual - English
Page 45
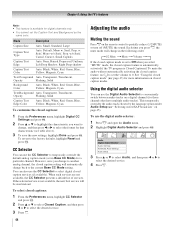
... stronger or increases the balance in step 2 above . (continued) 45 If you have SAP on and the station you are watching is pressed. To turn on -screen when E is not broadcasting a second audio program, the station's normal audio will automatically output the type of the program's normal audio.... • If you have SAP on, you prefer. When the TV receives a stereo or SAP broadcast, the word "STEREO" or "SAP" appears on the StableSound® feature: 1 From the Audio menu, highlight Audio...
... stronger or increases the balance in step 2 above . (continued) 45 If you have SAP on and the station you are watching is pressed. To turn on -screen when E is not broadcasting a second audio program, the station's normal audio will automatically output the type of the program's normal audio.... • If you have SAP on, you prefer. When the TV receives a stereo or SAP broadcast, the word "STEREO" or "SAP" appears on the StableSound® feature: 1 From the Audio menu, highlight Audio...
Owner's Manual - English
Page 48
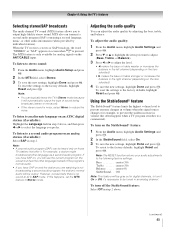
...You can block specific channels. All locking is disabled until the TV is turned off, and will be blocked; however, programs that do ...not provide any rating information will not be blocked. • To display the rating of the program you place an "5" in the box next to " 'None' Rated," programs rated "None" will be enabled when the TV... screen (as shown below right). If the correct code is entered, the program lock mode is turned on again. 48 A list of the channels available for that input will appear on-screen: This...
...You can block specific channels. All locking is disabled until the TV is turned off, and will be blocked; however, programs that do ...not provide any rating information will not be blocked. • To display the rating of the program you place an "5" in the box next to " 'None' Rated," programs rated "None" will be enabled when the TV... screen (as shown below right). If the correct code is entered, the program lock mode is turned on again. 48 A list of the channels available for that input will appear on-screen: This...

