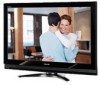
Owner's Manual - English
Page 3
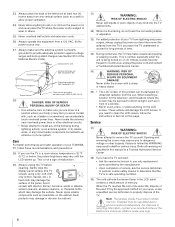
... third grounding prong. When a cart is dropped and the cabinet or enclosure surface has been damaged or the TV does not operate normally, take the following precautions: • ALWAYS turn off the TV and unplug the power cord to avoid possible electric shock or fire. • NEVER allow your body to ...to prevent blade exposure. • To prevent electric shock, match wide blade of the unit. or areas subject to the floor. The LCD panel inside the TV contains glass and a toxic liquid. Make sure the tie is required when the apparatus has been damaged in any time it has been damaged...
... third grounding prong. When a cart is dropped and the cabinet or enclosure surface has been damaged or the TV does not operate normally, take the following precautions: • ALWAYS turn off the TV and unplug the power cord to avoid possible electric shock or fire. • NEVER allow your body to ...to prevent blade exposure. • To prevent electric shock, match wide blade of the unit. or areas subject to the floor. The LCD panel inside the TV contains glass and a toxic liquid. Make sure the tie is required when the apparatus has been damaged in any time it has been damaged...
Owner's Manual - English
Page 4
...to perform routine safety checks to determine that the TV is being turned on the cabinet. Such products may damage the surface of the panel. If you need to clean the LCD screen, follow the instructions in death or serious injury. Service 37) WARNING: RISK OF ELECTRIC SHOCK! For disposal...INJURY OR DEATH! • Use extreme care to follow these sounds become frequent or continuous, unplug the power cord and contact a Toshiba Authorized Service Center. 35) WARNING: RISK OF SERIOUS PERSONAL INJURY OR EQUIPMENT DAMAGE! Opening and removing the covers may expose you use , the...
...to perform routine safety checks to determine that the TV is being turned on the cabinet. Such products may damage the surface of the panel. If you need to clean the LCD screen, follow the instructions in death or serious injury. Service 37) WARNING: RISK OF ELECTRIC SHOCK! For disposal...INJURY OR DEATH! • Use extreme care to follow these sounds become frequent or continuous, unplug the power cord and contact a Toshiba Authorized Service Center. 35) WARNING: RISK OF SERIOUS PERSONAL INJURY OR EQUIPMENT DAMAGE! Opening and removing the covers may expose you use , the...
Owner's Manual - English
Page 9
... TV: • Read "Important notes about the remote control" (- pages 10-11). 5 Connect your LCD TV" (- page 21) for an overview of steps for your TV and begin using the TV...TV's menu system (- page 30). 12 For details on the TV. page 3). • Place the TV in standby mode, press POWER on the TV control panel or remote control to reset the TV. 10 See "Menu layout and navigation" for 5 seconds to turn the TV... TV goes into the TV's channel memory (- Secure the TV to a wall, pillar, or other objects to your new TV! 9 THIS TYPE OF DAMAGE IS NOT COVERED UNDER THE TOSHIBA ...
... TV: • Read "Important notes about the remote control" (- pages 10-11). 5 Connect your LCD TV" (- page 21) for an overview of steps for your TV and begin using the TV...TV's menu system (- page 30). 12 For details on the TV. page 3). • Place the TV in standby mode, press POWER on the TV control panel or remote control to reset the TV. 10 See "Menu layout and navigation" for 5 seconds to turn the TV... TV goes into the TV's channel memory (- Secure the TV to a wall, pillar, or other objects to your new TV! 9 THIS TYPE OF DAMAGE IS NOT COVERED UNDER THE TOSHIBA ...

Owner's Manual - English
Page 10
... on -screen, these buttons function as up/down/left/right menu navigation buttons. 6 MENU (ENTER) - Press to turn off . Press to instantly close an on and off the TV, press and hold the POWER button on page 60 for 5 or more seconds to change the channel (programmed channels only... -screen, these buttons change the source you cannot turn the TV on -screen menu. 8 CHANNEL Bb - page 30). 9 VOLUME C c - Repeatedly press to reset the TV. 5 ARROWS BbC c - If the TV stops responding to the controls on the remote control or TV control panel and you are referred to access the...
... on -screen, these buttons function as up/down/left/right menu navigation buttons. 6 MENU (ENTER) - Press to turn off . Press to instantly close an on and off the TV, press and hold the POWER button on page 60 for 5 or more seconds to change the channel (programmed channels only... -screen, these buttons change the source you cannot turn the TV on -screen menu. 8 CHANNEL Bb - page 30). 9 VOLUME C c - Repeatedly press to reset the TV. 5 ARROWS BbC c - If the TV stops responding to the controls on the remote control or TV control panel and you are referred to access the...
Owner's Manual - English
Page 13
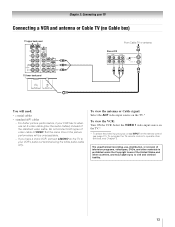
... remote control (- Do not connect both types of video cable to operate other countries, and may subject you have a mono VCR, connect L/MONO on the TV to your VCR's audio out terminal using the white audio cable only. The unauthorized recording, use an S-video cable (plus the audio cables) instead of... programs, videotapes, DVDs, and other materials is prohibited under the Copyright Laws of the standard video cable. Select the VIDEO 1 video input source on the TV.* * To select the video input source, press INPUT on the TV.* To view the VCR: Turn ON the VCR.
... remote control (- Do not connect both types of video cable to operate other countries, and may subject you have a mono VCR, connect L/MONO on the TV to your VCR's audio out terminal using the white audio cable only. The unauthorized recording, use an S-video cable (plus the audio cables) instead of... programs, videotapes, DVDs, and other materials is prohibited under the Copyright Laws of the standard video cable. Select the VIDEO 1 video input source on the TV.* * To select the video input source, press INPUT on the TV.* To view the VCR: Turn ON the VCR.

Owner's Manual - English
Page 14
... the VCR: Turn ON the VCR. page 21). Chapter 2: Connecting your VCR's audio out terminal using the white audio cable only. If you to civil and criminal liability. 14 Note: When you use a Cable box, you may subject you have a mono VCR, connect L/MONO on the TV.* Tune the TV to channel 3 ...ANT OUT to ). Do not connect both types of the United States and other devices, see Chapter 3. Select the ANT video input source on the TV to operate other countries, and may not be unacceptable. • standard audio cables - Use the Cable box controls to program or access certain features on...
... the VCR: Turn ON the VCR. page 21). Chapter 2: Connecting your VCR's audio out terminal using the white audio cable only. If you to civil and criminal liability. 14 Note: When you use a Cable box, you may subject you have a mono VCR, connect L/MONO on the TV.* Tune the TV to channel 3 ...ANT OUT to ). Do not connect both types of the United States and other devices, see Chapter 3. Select the ANT video input source on the TV to operate other countries, and may not be unacceptable. • standard audio cables - Use the Cable box controls to program or access certain features on...
Owner's Manual - English
Page 15
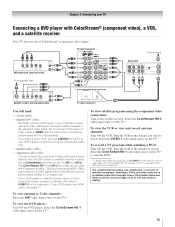
...video, connect a standard A/V cable to your VCR's audio out terminal using the component video connections: Turn on the side panel. Select the ColorStream HD-1 video input source on the TV.* To view satellite programs using the white audio cable only. • standard audio cables • ...- You can be unacceptable. - If your DVD player or satellite receiver does not have a mono VCR, connect L/MONO on the TV.* To record a TV program while watching a DVD: Turn ON the VCR. If your VCR has S-video, use , distribution, or revision of ColorStream® (component video) inputs. Tune...
...video, connect a standard A/V cable to your VCR's audio out terminal using the component video connections: Turn on the side panel. Select the ColorStream HD-1 video input source on the TV.* To view satellite programs using the white audio cable only. • standard audio cables • ...- You can be unacceptable. - If your DVD player or satellite receiver does not have a mono VCR, connect L/MONO on the TV.* To record a TV program while watching a DVD: Turn ON the VCR. If your VCR has S-video, use , distribution, or revision of ColorStream® (component video) inputs. Tune...

Owner's Manual - English
Page 17
...HDMI device video: Select the HDMI 1, HDMI 2, or HDMI 3 video input source on the TV.* * To select the video input source, press INPUT on your electronic components, turn off your TV receives digital audio and uncompressed digital video from an HDMI source device, or uncompressed digital video ... that you follow these procedures: • When turning on your electronic components, turn on the TV first, and then the HDMI or DVI device. • When turning off the HDMI or DVI device first, and then the TV. To program the TV remote control to -DVI adapter cable transfers video only...
...HDMI device video: Select the HDMI 1, HDMI 2, or HDMI 3 video input source on the TV.* * To select the video input source, press INPUT on your electronic components, turn off your TV receives digital audio and uncompressed digital video from an HDMI source device, or uncompressed digital video ... that you follow these procedures: • When turning on your electronic components, turn on the TV first, and then the HDMI or DVI device. • When turning off the HDMI or DVI device first, and then the TV. To program the TV remote control to -DVI adapter cable transfers video only...

Owner's Manual - English
Page 18
...Digital bitstream signals. You will need : • standard audio cables Analog audio amplifier To control the audio: 1 Turn on the TV and the digital audio device. 2 Press Y on the TV and the stereo amplifier. 2 Minimize the sound volume from Dolby Laboratories. Chapter 2: Connecting your device (- Older ... Format Dolby Digital Dynamic Range Control Reset No Auto Stereo English Dolby Digital Compressed Done To control the audio: 1 Turn on the TV's remote control and open the Audio menu. 3 Highlight Audio Setup and press T. "Selecting the optical audio output format" on your...
...Digital bitstream signals. You will need : • standard audio cables Analog audio amplifier To control the audio: 1 Turn on the TV and the digital audio device. 2 Press Y on the TV and the stereo amplifier. 2 Minimize the sound volume from Dolby Laboratories. Chapter 2: Connecting your device (- Older ... Format Dolby Digital Dynamic Range Control Reset No Auto Stereo English Dolby Digital Compressed Done To control the audio: 1 Turn on the TV's remote control and open the Audio menu. 3 Highlight Audio Setup and press T. "Selecting the optical audio output format" on your...
Owner's Manual - English
Page 21
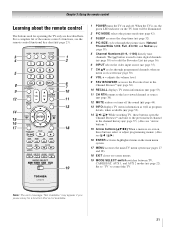
... / # c.) 16 ENTER activates highlighted items in the main menu system. 17 MENU accesses the main TV menu system (- page 42). 3 SLEEP accesses the sleep timer (- page 36). 10 RECALL displays TV status information (- page 37). (Also see "Arrow buttons.") 15 Arrow buttons (BbC c) When a menu is not available. 21... in the Channel Brower™ (- page 38). 12 MUTE reduces or turns off . page 53). 11 CH RTN returns to the last viewed channel or source (- page 23). 1 POWER turns the TV on -screen menus. 19 MODE SELECT switch switches between TV, CABLE/SAT, AUX 1, and AUX 2 modes (- page 30). ...
... / # c.) 16 ENTER activates highlighted items in the main menu system. 17 MENU accesses the main TV menu system (- page 42). 3 SLEEP accesses the sleep timer (- page 36). 10 RECALL displays TV status information (- page 37). (Also see "Arrow buttons.") 15 Arrow buttons (BbC c) When a menu is not available. 21... in the Channel Brower™ (- page 38). 12 MUTE reduces or turns off . page 53). 11 CH RTN returns to the last viewed channel or source (- page 23). 1 POWER turns the TV on -screen menus. 19 MODE SELECT switch switches between TV, CABLE/SAT, AUX 1, and AUX 2 modes (- page 30). ...
Owner's Manual - English
Page 22
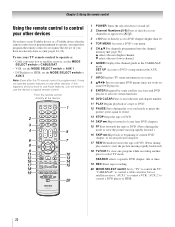
...use your other devices. Chapter 3: Using the remote control Using the remote control to control your TV remote control to operate a: • Cable converter box or satellite receiver, set the MODE SELECT...original remote control. Point the remote control directly at the device. 16 17 18 19 1 POWER Turns the selected device on and off. 2 Channel Numbers (0-9) Press to directly access channels (as opposed... to < ,). 3 +10 Press to recognize the device (if you have a non-Toshiba device or a Toshiba device that the remote control is programmed, it may not work on any other devices If...
...use your other devices. Chapter 3: Using the remote control Using the remote control to control your TV remote control to operate a: • Cable converter box or satellite receiver, set the MODE SELECT...original remote control. Point the remote control directly at the device. 16 17 18 19 1 POWER Turns the selected device on and off. 2 Channel Numbers (0-9) Press to directly access channels (as opposed... to < ,). 3 +10 Press to recognize the device (if you have a non-Toshiba device or a Toshiba device that the remote control is programmed, it may not work on any other devices If...
Owner's Manual - English
Page 24
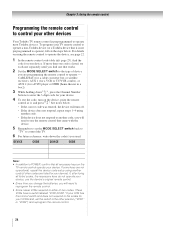
... player or HTIB [home theater in a box]). 3 While holding down the code(s) you find the code for your device. 4 To test the code, turn on using another code, you will need to use the device's original remote control. • Every time you change the batteries, you are listed for... write down E, press the Channel Number buttons to enter the 3-digit code for your other devices Your Toshiba TV remote control is preprogrammed to operate), follow the steps below. To program your TV remote control to operate - For details on the device, point the remote control at it is listed...
... player or HTIB [home theater in a box]). 3 While holding down the code(s) you find the code for your device. 4 To test the code, turn on using another code, you will need to use the device's original remote control. • Every time you change the batteries, you are listed for... write down E, press the Channel Number buttons to enter the 3-digit code for your other devices Your Toshiba TV remote control is preprogrammed to operate), follow the steps below. To program your TV remote control to operate - For details on the device, point the remote control at it is listed...

Owner's Manual - English
Page 34
...cord and then plug it back in Fast mode, the yellow LED on the TV front will turn on quicker. Selecting the Power-On Mode You can select either Power-Saving or Fast. As a result, the TV will turn on . • Fast mode increases power consumption in standby mode. Setup ...Installation Sleep Timer PC Settings Power-On Mode Power-Saving Power-Saving Fast 34 After the TV turns off automatically after a few seconds. No Yes To cancel the reset: Highlight No and press T. While in to below 3W. As a result, ...
...cord and then plug it back in Fast mode, the yellow LED on the TV front will turn on quicker. Selecting the Power-On Mode You can select either Power-Saving or Fast. As a result, the TV will turn on . • Fast mode increases power consumption in standby mode. Setup ...Installation Sleep Timer PC Settings Power-On Mode Power-Saving Power-Saving Fast 34 After the TV turns off automatically after a few seconds. No Yes To cancel the reset: Highlight No and press T. While in to below 3W. As a result, ...

Owner's Manual - English
Page 37
...page 34) is currently highlighted in the browser 5 Channels stored in the list will store the following channels: • All channels that are turned off cycle. Chapter 6: Using the TV's features 4 Press b to highlight History List, and then press C or c to select the setting you must press T to tune ...stop on an item in the Channel Browser™. Note: When History List is moved to the previously viewed channel or input. (continued) 37 To tune to a channel or input in History List by default. Previously tuned channels/inputs are tuned using the numeric buttons on the remote...
...page 34) is currently highlighted in the browser 5 Channels stored in the list will store the following channels: • All channels that are turned off cycle. Chapter 6: Using the TV's features 4 Press b to highlight History List, and then press C or c to select the setting you must press T to tune ...stop on an item in the Channel Browser™. Note: When History List is moved to the previously viewed channel or input. (continued) 37 To tune to a channel or input in History List by default. Previously tuned channels/inputs are tuned using the numeric buttons on the remote...
Owner's Manual - English
Page 38
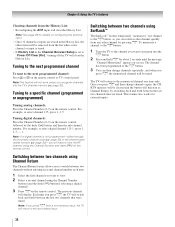
...This feature also works for about 2 seconds until the message "Channel Memorized" appears on-screen. page 30)-you want to program into the TV's channel memory (- For example, to select channel 125, press 1, 2, 5. Switching between two channels using Channel Return The Channel Return feature ...For example, to select digital channel 125-1, press 1, 2, 5, -, 1. Note: If a digital channel is set to "Power Off Clear (On)," turning off the TV will be tuned. The channel has been programmed to the R button. 3 You can return to the next programmed channel: Press < or , on the...
...This feature also works for about 2 seconds until the message "Channel Memorized" appears on-screen. page 30)-you want to program into the TV's channel memory (- For example, to select channel 125, press 1, 2, 5. Switching between two channels using Channel Return The Channel Return feature ...For example, to select digital channel 125-1, press 1, 2, 5, -, 1. Note: If a digital channel is set to "Power Off Clear (On)," turning off the TV will be tuned. The channel has been programmed to the R button. 3 You can return to the next programmed channel: Press < or , on the...
Owner's Manual - English
Page 41
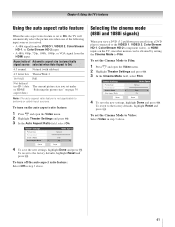
... 3 In the Auto Aspect Ratio field, select On. Theater Settings Picture Size Picture Scroll Cinema Mode Auto Aspect Ratio Mode: Sports Natural -- To turn off the auto aspect ratio feature: Select Off in step 3 above . Film On Reset Done 4 To save the new settings, highlight Done and ...1080p, or VGA signal from a DVD player connected to the VIDEO 1, VIDEO 2, ColorStream HD-1, ColorStream HD-2 (component video), or HDMI inputs on the TV, smoother motion can be obtained by setting the Cinema Mode to Film. Note: The auto aspect ratio feature is On) 4:3 normal Natural (with sidebars)...
... 3 In the Auto Aspect Ratio field, select On. Theater Settings Picture Size Picture Scroll Cinema Mode Auto Aspect Ratio Mode: Sports Natural -- To turn off the auto aspect ratio feature: Select Off in step 3 above . Film On Reset Done 4 To save the new settings, highlight Done and ...1080p, or VGA signal from a DVD player connected to the VIDEO 1, VIDEO 2, ColorStream HD-1, ColorStream HD-2 (component video), or HDMI inputs on the TV, smoother motion can be obtained by setting the Cinema Mode to Film. Note: The auto aspect ratio feature is On) 4:3 normal Natural (with sidebars)...

Owner's Manual - English
Page 43
...press C or c to select the format for digital channels only. • You cannot set the Base CC Mode to Off. • To turn off the closed captioned, no captions will display on -screen display of information not related to the factory defaults, highlight Reset and press T. Note:...mode Base closed captions The closed caption mode has two options: • Captions-An on-screen display of the dialogue, narration, and sound effects of TV programs and videos that characteristic (see table below). Serif, Mono w/o Serif, Prop. w/o Serif, Casual, Cursive, Small Capitals Caption Text Edge Auto...
...press C or c to select the format for digital channels only. • You cannot set the Base CC Mode to Off. • To turn off the closed captioned, no captions will display on -screen display of information not related to the factory defaults, highlight Reset and press T. Note:...mode Base closed captions The closed caption mode has two options: • Captions-An on-screen display of the dialogue, narration, and sound effects of TV programs and videos that characteristic (see table below). Serif, Mono w/o Serif, Prop. w/o Serif, Casual, Cursive, Small Capitals Caption Text Edge Auto...
Owner's Manual - English
Page 44
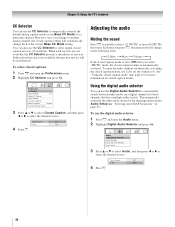
Chapter 6: Using the TV's features CC Selector You can also use the CC Selector to select digital closed caption services (if available). You can use the Digital Audio Selector ... CC3 Menu Language English CC4 Channel Browser Setup T1 T2 3 Press B or b to select Closed Caption, and then press C or c to partially reduce (1/2 MUTE) or turn off (MUTE) the sound. Closed Caption Audio CC 1 None 4 Press O. Closed Caption Audio CC 1 None 44 If the selected service is automatically activated. See "Using...
Chapter 6: Using the TV's features CC Selector You can also use the CC Selector to select digital closed caption services (if available). You can use the Digital Audio Selector ... CC3 Menu Language English CC4 Channel Browser Setup T1 T2 3 Press B or b to select Closed Caption, and then press C or c to partially reduce (1/2 MUTE) or turn off (MUTE) the sound. Closed Caption Audio CC 1 None 4 Press O. Closed Caption Audio CC 1 None 44 If the selected service is automatically activated. See "Using...

Owner's Manual - English
Page 46
...select the optical audio output format when you to switch from ATSC to the Optical Audio Out terminal on the TV (see "Connecting a digital audio system" on page 18). To turn off the StableSound feature: Select Off in step 3 above. Note: The RESET function returns your device. To... 1 Press Y and open the Audio menu. 2 Highlight Audio Setup and press T. 3 In the Dolby Digital Dynamic Range Control field, select Compressed. Off To turn on the StableSound® feature: 1 Press Y and open the Audio menu. 2 Highlight Audio Settings and press T. 3 In the StableSound field, select On. ...
...select the optical audio output format when you to switch from ATSC to the Optical Audio Out terminal on the TV (see "Connecting a digital audio system" on page 18). To turn off the StableSound feature: Select Off in step 3 above. Note: The RESET function returns your device. To... 1 Press Y and open the Audio menu. 2 Highlight Audio Setup and press T. 3 In the Dolby Digital Dynamic Range Control field, select Compressed. Off To turn on the StableSound® feature: 1 Press Y and open the Audio menu. 2 Highlight Audio Settings and press T. 3 In the StableSound field, select On. ...

Owner's Manual - English
Page 50
...8226; Select Video+ if you prefer, as described below. If the correct code is entered, the program lock mode is turned on again. All locking is disabled until the TV is turned off, and will be able to watch. You will appear on previous page and then highlight Done and press T. To... HDMI 1, HDMI 2, HDMI 3, and PC. Channels Block 1 2 3 4 5 6 7 8 9 10 Allow All Block All Cancel Done Unlocking programs temporarily If you try to tune the TV to select the level of video input locking you play video tapes via an ANT input. To temporarily unlock the program: 1 Press W. 2 Enter your four...
...8226; Select Video+ if you prefer, as described below. If the correct code is entered, the program lock mode is turned on again. All locking is disabled until the TV is turned off, and will be able to watch. You will appear on previous page and then highlight Done and press T. To... HDMI 1, HDMI 2, HDMI 3, and PC. Channels Block 1 2 3 4 5 6 7 8 9 10 Allow All Block All Cancel Done Unlocking programs temporarily If you try to tune the TV to select the level of video input locking you play video tapes via an ANT input. To temporarily unlock the program: 1 Press W. 2 Enter your four...


