
Owners Manual
Page 2
... TV. This manual will help you use of this Toshiba Monitor. and (2) analog and/or digital cable. a Do not allow children to receive: (1) analog and/or digital broadcast signals from an antenna; Before operating your home. For more than a UL-approved wall bracket appropriate for the size and weight of the International CES® a Carefully read this monitor. a Share our safety message about television safety. REFER SERVICING TO QUALIFIED SERVICE PERSONNEL. WARNING...
... TV. This manual will help you use of this Toshiba Monitor. and (2) analog and/or digital cable. a Do not allow children to receive: (1) analog and/or digital broadcast signals from an antenna; Before operating your home. For more than a UL-approved wall bracket appropriate for the size and weight of the International CES® a Carefully read this monitor. a Share our safety message about television safety. REFER SERVICING TO QUALIFIED SERVICE PERSONNEL. WARNING...
Owners Manual
Page 3
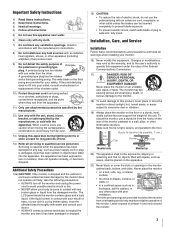
... Service Installation Follow these instructions. 3) Heed all warnings. 4) Follow all instructions. 5) Do not use this apparatus near any heat sources such as a bookcase, built-in cabinet, or any way, such as power-supply cord or plug is damaged, liquid has been spilled or objects have fallen into your outlet, consult an electrician for replacement of the obsolete outlet. 10) Protect the power cord...
... Service Installation Follow these instructions. 3) Heed all warnings. 4) Follow all instructions. 5) Do not use this apparatus near any heat sources such as a bookcase, built-in cabinet, or any way, such as power-supply cord or plug is damaged, liquid has been spilled or objects have fallen into your outlet, consult an electrician for replacement of the obsolete outlet. 10) Protect the power cord...
Owners Manual
Page 4
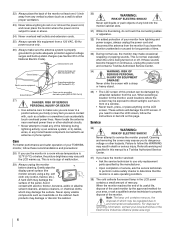
... is thundering, do not touch the connecting cables or apparatus. 32) For added protection of your area, or ask a qualified service technician to properly dispose of the panel. Opening and removing the covers may expose you leave the monitor unattended or unused for long periods of time. 33) During normal use only replacement parts specified by ultraviolet radiation from the sun...
... is thundering, do not touch the connecting cables or apparatus. 32) For added protection of your area, or ask a qualified service technician to properly dispose of the panel. Opening and removing the covers may expose you leave the monitor unattended or unused for long periods of time. 33) During normal use only replacement parts specified by ultraviolet radiation from the sun...
Owners Manual
Page 5
... (Part 15): The Toshiba 26HLC56, 32HLC56, and 37HLC56 LCD Color Monitors comply with the instructions, may not cause harmful interference, and (2) this device must accept any interference that to which can be an occasional pixel (dot of light) that involve shooting a "gun" type of this manual for your monitor. Operation is incorporated under your LCD monitor The following measures: • Reorient or relocate the receiving antenna...
... (Part 15): The Toshiba 26HLC56, 32HLC56, and 37HLC56 LCD Color Monitors comply with the instructions, may not cause harmful interference, and (2) this device must accept any interference that to which can be an occasional pixel (dot of light) that involve shooting a "gun" type of this manual for your monitor. Operation is incorporated under your LCD monitor The following measures: • Reorient or relocate the receiving antenna...
Owners Manual
Page 6
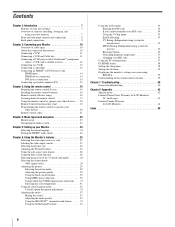
... menu language 24 Setting the HDMI™ audio mode 24 Chapter 6: Using the Monitor's features 25 Selecting the video input source to view 25 Labeling the video input sources 25 Selecting the picture size 26 Adjusting the Picture Position 27 Using the auto aspect ratio feature 28 Using the blue screen function 28 Selecting the gray level for 4:3 mode side panels 28 Selecting the cinema mode (480i signals only 29 Adjusting the picture 29 Selecting the picture mode 29 Adjusting the picture...
... menu language 24 Setting the HDMI™ audio mode 24 Chapter 6: Using the Monitor's features 25 Selecting the video input source to view 25 Labeling the video input sources 25 Selecting the picture size 26 Adjusting the Picture Position 27 Using the auto aspect ratio feature 28 Using the blue screen function 28 Selecting the gray level for 4:3 mode side panels 28 Selecting the cinema mode (480i signals only 29 Adjusting the picture 29 Selecting the picture mode 29 Adjusting the picture...
Owners Manual
Page 7
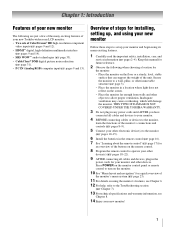
... important safety, installation, care, and service information (- THIS TYPE OF DAMAGE IS NOT COVERED UNDER THE TOSHIBA WARRANTY. 3 Do not plug in any power cords until AFTER you have connected all cables and devices, plug in the remote control (- page 17) for your monitor and other immovable structure (- pages 9 and 14). • SRS WOW™ audio technologies (- Press POWER on the monitor control panel or remote control to the Troubleshooting section (- pages...
... important safety, installation, care, and service information (- THIS TYPE OF DAMAGE IS NOT COVERED UNDER THE TOSHIBA WARRANTY. 3 Do not plug in any power cords until AFTER you have connected all cables and devices, plug in the remote control (- page 17) for your monitor and other immovable structure (- pages 9 and 14). • SRS WOW™ audio technologies (- Press POWER on the monitor control panel or remote control to the Troubleshooting section (- pages...

Owners Manual
Page 9
... Interface input receives digital audio and uncompressed digital video from an HDMI device, or uncompressed digital video from a DVI device (- item 3, at left; Note: Component video cables carry only video information; For use can be configured in the Set Up menu (- One set of cable types and connections, see Chapter 2 (- Composite video and analog audio inputs. Composite video and analog audio outputs for connecting a VCR for connecting devices with component video output, such as a Toshiba DVD player with ColorStream®. page 10). Chapter 1: Introduction Back panel connections...
... Interface input receives digital audio and uncompressed digital video from an HDMI device, or uncompressed digital video from a DVI device (- item 3, at left; Note: Component video cables carry only video information; For use can be configured in the Set Up menu (- One set of cable types and connections, see Chapter 2 (- Composite video and analog audio inputs. Composite video and analog audio outputs for connecting a VCR for connecting devices with component video output, such as a Toshiba DVD player with ColorStream®. page 10). Chapter 1: Introduction Back panel connections...
Owners Manual
Page 11
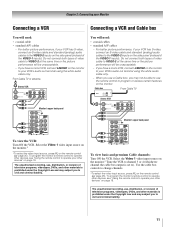
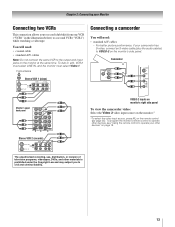
... A/V cables - Select the Video 1 video input source on the monitor.* *To select the video input source, press + on the side panel (instead of television programs, videotapes, DVDs, and other devices, see "Using the remote control to civil and criminal liability. For better picture performance, if your other devices, see "Using the remote control to operate your VCR has S-video, connect an S-video cable and standard (analog) audio cables to TV VIDEO AUDIO L R IN OUT L R Monitor's upper back panel To view the VCR: Turn ON...
... A/V cables - Select the Video 1 video input source on the monitor.* *To select the video input source, press + on the side panel (instead of television programs, videotapes, DVDs, and other devices, see "Using the remote control to civil and criminal liability. For better picture performance, if your other devices, see "Using the remote control to operate your VCR has S-video, connect an S-video cable and standard (analog) audio cables to TV VIDEO AUDIO L R IN OUT L R Monitor's upper back panel To view the VCR: Turn ON...
Owners Manual
Page 12
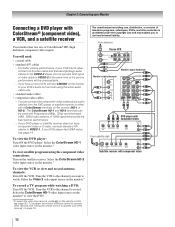
... Monitor Connecting a DVD player with ColorStream® (component video), a VCR, and a satellite receiver Your monitor has two sets of television programs, videotapes, DVDs, and other devices" on the satellite receiver. For better picture performance, if your DVD player or satellite receiver does not have a mono VCR, connect L/MONO on the monitor.* To view the VCR or view and record antenna channels: Turn ON the VCR. Select the ColorStream HD-1 video input source on the monitor.* To view satellite programs using the white audio cable...
... Monitor Connecting a DVD player with ColorStream® (component video), a VCR, and a satellite receiver Your monitor has two sets of television programs, videotapes, DVDs, and other devices" on the satellite receiver. For better picture performance, if your DVD player or satellite receiver does not have a mono VCR, connect L/MONO on the monitor.* To view the VCR or view and record antenna channels: Turn ON the VCR. Select the ColorStream HD-1 video input source on the monitor.* To view satellite programs using the white audio cable...
Owners Manual
Page 13
... VIDEO AUDIO OUT L R Monitor's upper back panel VIDEO-2 inputs on monitor's right side panel To view the camcorder video: Select the Video 2 video input source on the monitor.* *To select the video input source, press + on page 18. page 25). Stereo VCR 2 (records) IN from ANT CH 3 CH 4 OUT to TV VIDEO AUDIO L R IN OUT L R The unauthorized recording, use, distribution, or revision of television programs, videotapes, DVDs, and other devices, see "Using the remote control to operate your Monitor Connecting...
... VIDEO AUDIO OUT L R Monitor's upper back panel VIDEO-2 inputs on monitor's right side panel To view the camcorder video: Select the Video 2 video input source on the monitor.* *To select the video input source, press + on page 18. page 25). Stereo VCR 2 (records) IN from ANT CH 3 CH 4 OUT to TV VIDEO AUDIO L R IN OUT L R The unauthorized recording, use, distribution, or revision of television programs, videotapes, DVDs, and other devices, see "Using the remote control to operate your Monitor Connecting...

Owners Manual
Page 14
... is other than 16.4 ft (5m). - NOTE: DO NOT CONNECT A PC USING THE HDMI PORT. See "Setting the HDMI™ audio mode" on page 24. Always use as short an HDMI cable as a set-top box or DVD player with the monitor. Separate analog audio cables are trademarks or registered trademarks of standard analog audio cables per HDMI device - This input is not designed to support input from EIA/CEA-861-861B-compliant[1] consumer electronic devices...
... is other than 16.4 ft (5m). - NOTE: DO NOT CONNECT A PC USING THE HDMI PORT. See "Setting the HDMI™ audio mode" on page 24. Always use as short an HDMI cable as a set-top box or DVD player with the monitor. Separate analog audio cables are trademarks or registered trademarks of standard analog audio cables per HDMI device - This input is not designed to support input from EIA/CEA-861-861B-compliant[1] consumer electronic devices...
Owners Manual
Page 15
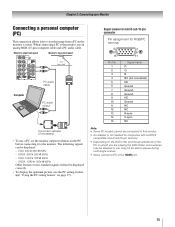
... formats or non-standard signals will not be displayed correctly. • To display the optimum picture, use an analog RGB (15-pin) computer cable and a PC audio cable. Chapter 2: Connecting your Monitor Connecting a personal computer (PC) This connection allows you may not be displayed: - "Using the PC setting feature" on the PC before connecting it to the monitor, use the PC setting feature (- Monitor's upper back panel Monitor's lower back panel Computer PC audio cable PC audio output Conversion adapter...
... formats or non-standard signals will not be displayed correctly. • To display the optimum picture, use an analog RGB (15-pin) computer cable and a PC audio cable. Chapter 2: Connecting your Monitor Connecting a personal computer (PC) This connection allows you may not be displayed: - "Using the PC setting feature" on the PC before connecting it to the monitor, use the PC setting feature (- Monitor's upper back panel Monitor's lower back panel Computer PC audio cable PC audio output Conversion adapter...
Owners Manual
Page 17
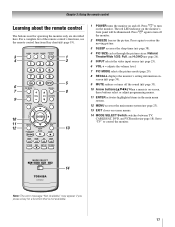
... MODE selects the picture mode (page 29). 8 RECALL displays the monitor's setting information onscreen (- page 23). 13 EXIT closes on and off the sound (- page 18). page 39). 9 MUTE reduces or turns off . For a complete list of the remote control's functions, see the remote control functional key chart (- Set to "TV" to restore the moving picture. 3 SLEEP accesses the sleep timer (- page 19). 1 POWER turns the monitor on -screen menus. 14 MODE SELECT Switch switches between TV, CABLE/SAT, DVD...
... MODE selects the picture mode (page 29). 8 RECALL displays the monitor's setting information onscreen (- page 23). 13 EXIT closes on and off the sound (- page 18). page 39). 9 MUTE reduces or turns off . For a complete list of the remote control's functions, see the remote control functional key chart (- Set to "TV" to restore the moving picture. 3 SLEEP accesses the sleep timer (- page 19). 1 POWER turns the monitor on -screen menus. 14 MODE SELECT Switch switches between TV, CABLE/SAT, DVD...
Owners Manual
Page 18
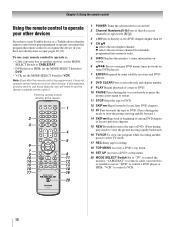
... the tape or DVD. (Press during play mode to view the picture moving rapidly backward.) 16 TV/VCR To view one program while recording another, press to select TV mode. 17 REC Starts tape recording. 18 TOP MENU Accesses a DVD's top menu. 19 SET UP Accesses a DVD's setup menu. 20 MODE SELECT Switch Set to "TV" to control the monitor; b selects the next lower channel (for channels programmed into memory only). 5 INFO Displays the monitor's status information...
... the tape or DVD. (Press during play mode to view the picture moving rapidly backward.) 16 TV/VCR To view one program while recording another, press to select TV mode. 17 REC Starts tape recording. 18 TOP MENU Accesses a DVD's top menu. 19 SET UP Accesses a DVD's setup menu. 20 MODE SELECT Switch Set to "TV" to control the monitor; b selects the next lower channel (for channels programmed into memory only). 5 INFO Displays the monitor's status information...

Owners Manual
Page 29
... color temperature), the picture mode automatically changes to Preference in step 3 above. Adjusting the picture Selecting the picture mode You can select your desired picture settings from a DVD player connected to the VIDEO-1, VIDEO-2, ColorStream HD-1/HD-2 (component video), or HDMI inputs on the monitor, smoother motion can select a different picture mode for darkened room (factory setting) Preference Your personal preferences To select the picture mode: Press u on -screen. Standard Repeatedly press u or C/c to select Film. Chapter 6: Using...
... color temperature), the picture mode automatically changes to Preference in step 3 above. Adjusting the picture Selecting the picture mode You can select your desired picture settings from a DVD player connected to the VIDEO-1, VIDEO-2, ColorStream HD-1/HD-2 (component video), or HDMI inputs on the monitor, smoother motion can select a different picture mode for darkened room (factory setting) Preference Your personal preferences To select the picture mode: Press u on -screen. Standard Repeatedly press u or C/c to select Film. Chapter 6: Using...
Owners Manual
Page 38
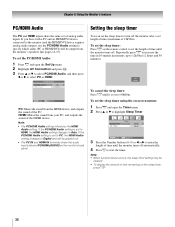
... PC: Mutes the sound from your PC, and outputs the sound of 12h50m). Note: • The PC/HDMI Audio setting influences the HDMI Audio setting. If the PC/HDMI Audio setting is set to HDMI, the HDMI Audio setting changes to 00h00m. Timer 00h00m To cancel the sleep timer: Press [ until the monitor turns off the monitor after a set the length of analog audio inputs. Sleep Timer On Timer Timer 02:00 00:00 MENU Back EXIT Watch TV 3 Press the Number buttons (0-9) or C or...
... PC: Mutes the sound from your PC, and outputs the sound of 12h50m). Note: • The PC/HDMI Audio setting influences the HDMI Audio setting. If the PC/HDMI Audio setting is set to HDMI, the HDMI Audio setting changes to 00h00m. Timer 00h00m To cancel the sleep timer: Press [ until the monitor turns off the monitor after a set the length of analog audio inputs. Sleep Timer On Timer Timer 02:00 00:00 MENU Back EXIT Watch TV 3 Press the Number buttons (0-9) or C or...
Owners Manual
Page 40
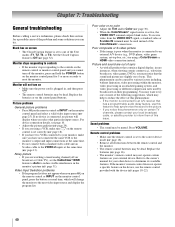
...; Do not connect both a standard video cable and an S-video cable to reset the monitor. page 31). Poor color or no device is connected to the picture. - television broadcasts, video games, DVDs), you select that contain a digital display, in their programming. Press VOLUME. page 18). • Remove all products that particular input source. Refer to the owner's manual for 5 or more of sync. If the monitor's remote control does not operate a specific feature on the remote control or monitor control panel and you...
...; Do not connect both a standard video cable and an S-video cable to reset the monitor. page 31). Poor color or no device is connected to the picture. - television broadcasts, video games, DVDs), you select that contain a digital display, in their programming. Press VOLUME. page 18). • Remove all products that particular input source. Refer to the owner's manual for 5 or more of sync. If the monitor's remote control does not operate a specific feature on the remote control or monitor control panel and you...
Owners Manual
Page 43
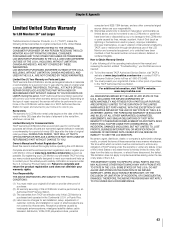
... warranties to original consumers in materials or workmanship for set installation, setup, adjustment of customer controls, and installation or repair of purchase to the rental firm, whichever comes first. DURING THIS PERIOD, TACP WILL, AT TACP'S OPTION, REPAIR OR REPLACE A DEFECTIVE PART WITH A NEW OR REFURBISHED PART WITHOUT CHARGE TO YOU. Complete and mail the enclosed product registration card or register your LCD Monitor online...
... warranties to original consumers in materials or workmanship for set installation, setup, adjustment of customer controls, and installation or repair of purchase to the rental firm, whichever comes first. DURING THIS PERIOD, TACP WILL, AT TACP'S OPTION, REPAIR OR REPLACE A DEFECTIVE PART WITH A NEW OR REFURBISHED PART WITHOUT CHARGE TO YOU. Complete and mail the enclosed product registration card or register your LCD Monitor online...
Owners Manual
Page 44
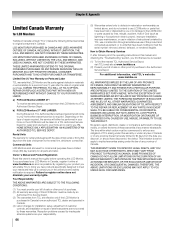
... the serial number removed, altered, defaced, or rendered illegible. or to defects in your home or the LCD Monitor will either be taken to a TCL Authorized Service Depot for installation, setup, adjustment of customer controls, and installation or repair of antenna systems are your needs and help us to contact you or to damage to the LCD Monitor or parts caused by TCL; LCD MONITORS PURCHASED IN CANADA AND USED ANYWHERE...
... the serial number removed, altered, defaced, or rendered illegible. or to defects in your home or the LCD Monitor will either be taken to a TCL Authorized Service Depot for installation, setup, adjustment of customer controls, and installation or repair of antenna systems are your needs and help us to contact you or to damage to the LCD Monitor or parts caused by TCL; LCD MONITORS PURCHASED IN CANADA AND USED ANYWHERE...
Owners Manual
Page 45
...(Digital Noise Reduction)........ 31 DVD player connection 12 DVI connection 14 F Features, monitor 7 Front of the monitor 8 H HDMI audio mode 24 HDMI cable 10 HDMI™ connection 14 I Installation, care, and service 3 Installation, setup 7 L Labeling video input 25 Language selection 24 Last mode memory feature 39 Locks menu 34 M MPEG noise reduction 30 MUTE button 33 P PC connection 15 PC setting 37 Picture adjustment 29 Picture mode 29 Picture quality 30 Picture size selection 26 POWER button 8 R RECALL button 39 Remote control Battery installation 16 Device code...
...(Digital Noise Reduction)........ 31 DVD player connection 12 DVI connection 14 F Features, monitor 7 Front of the monitor 8 H HDMI audio mode 24 HDMI cable 10 HDMI™ connection 14 I Installation, care, and service 3 Installation, setup 7 L Labeling video input 25 Language selection 24 Last mode memory feature 39 Locks menu 34 M MPEG noise reduction 30 MUTE button 33 P PC connection 15 PC setting 37 Picture adjustment 29 Picture mode 29 Picture quality 30 Picture size selection 26 POWER button 8 R RECALL button 39 Remote control Battery installation 16 Device code...


