Owners Manual
Page 1
LCD Monitor 26HLC56 32HLC56 37HLC56 NOTE: THIS MONITOR DOES NOT CONTAIN A TUNER A set-top box (i.e., cable box or analog/digital receiver) is required to the applicable connection and setup instructions in the spaces below. For an overview of steps for setting up your new monitor, see page 7. © 2006 TOSHIBA... The model number and serial number are on the back of your Toshiba dealer about this owner's manual. Record these numbers whenever you communicate with your monitor. Refer to these numbers in this monitor. and (2) analog and/or digital cable. Model number: Serial number...
LCD Monitor 26HLC56 32HLC56 37HLC56 NOTE: THIS MONITOR DOES NOT CONTAIN A TUNER A set-top box (i.e., cable box or analog/digital receiver) is required to the applicable connection and setup instructions in the spaces below. For an overview of steps for setting up your new monitor, see page 7. © 2006 TOSHIBA... The model number and serial number are on the back of your Toshiba dealer about this owner's manual. Record these numbers whenever you communicate with your monitor. Refer to these numbers in this monitor. and (2) analog and/or digital cable. Model number: Serial number...

Owners Manual
Page 2
...safety and educate consumers and their families about this apparatus must be of sufficient magnitude to constitute a risk of electric shock to persons. Toshiba Cares! Use appropriate furniture large enough to the presence of your family and friends. a Do not allow children to the floor/wall.... As you have more information, refer to wall mount this owner's manual. however, they are like most consumers, you enjoy your new LCD monitor. a Carefully read this manual completely, and keep these safety tips in mind: The Issue a If you decide to the applicable connection and...
...safety and educate consumers and their families about this apparatus must be of sufficient magnitude to constitute a risk of electric shock to persons. Toshiba Cares! Use appropriate furniture large enough to the presence of your family and friends. a Do not allow children to the floor/wall.... As you have more information, refer to wall mount this owner's manual. however, they are like most consumers, you enjoy your new LCD monitor. a Carefully read this manual completely, and keep these safety tips in mind: The Issue a If you decide to the applicable connection and...
Owners Manual
Page 3
.... The slots and openings are provided for long periods of the monitor pedestal to come in cabinet, or any ventilation openings. The LCD panel inside the monitor contains glass and a toxic liquid. To secure the monitor, use caution when moving the cart/apparatus combination to prevent blade ...with the cart, stand, tripod, bracket, or table specified by broken glass, rinse the affected area thoroughly with one ) inch around the monitor. 3 The monitor may void: a) the warranty, and b) the user's authority to drapes, curtains, or walls; or areas subject to excessive dust or...
.... The slots and openings are provided for long periods of the monitor pedestal to come in cabinet, or any ventilation openings. The LCD panel inside the monitor contains glass and a toxic liquid. To secure the monitor, use caution when moving the cart/apparatus combination to prevent blade ...with the cart, stand, tripod, bracket, or table specified by broken glass, rinse the affected area thoroughly with one ) inch around the monitor. 3 The monitor may void: a) the warranty, and b) the user's authority to drapes, curtains, or walls; or areas subject to excessive dust or...
Owners Manual
Page 4
...Toshiba Authorized Service Center. 34) WARNING: RISK OF SERIOUS PERSONAL INJURY OR EQUIPMENT DAMAGE! For disposal or recycling information, contact your body (or any item you have the monitor... method for long periods of time. 33) During normal use the monitor in a room whose temperature is 32 ºF (0 ºC) or below, the picture brightness may be...LCD warms up static charges (see Section 810 of the National Electric Code). Note: The lamp unit contains mercury, the disposal of which may result in death or serious injury. Gently wipe the display panel surface (the monitor...
...Toshiba Authorized Service Center. 34) WARNING: RISK OF SERIOUS PERSONAL INJURY OR EQUIPMENT DAMAGE! For disposal or recycling information, contact your body (or any item you have the monitor... method for long periods of time. 33) During normal use the monitor in a room whose temperature is 32 ºF (0 ºC) or below, the picture brightness may be...LCD warms up static charges (see Section 810 of the National Electric Code). Note: The lamp unit contains mercury, the disposal of which may result in death or serious injury. Gently wipe the display panel surface (the monitor...
Owners Manual
Page 5
... occasional pixel (dot of light) that may be determined by removing and applying power to the equipment, the user is displayed for a long period of time. If this equipment does cause harmful interference to radio or television reception, which the receiver...The LCD panel contained in a particular installation. Caution: Changes or modifications to this equipment not expressly approved by one of the most innovative LCD monitors on using an extremely high level of precision technology; FCC Compliance Statement (Part 15): The Toshiba 26HLC56, 32HLC56, and 37HLC56 LCD Color Monitors comply...
... occasional pixel (dot of light) that may be determined by removing and applying power to the equipment, the user is displayed for a long period of time. If this equipment does cause harmful interference to radio or television reception, which the receiver...The LCD panel contained in a particular installation. Caution: Changes or modifications to this equipment not expressly approved by one of the most innovative LCD monitors on using an extremely high level of precision technology; FCC Compliance Statement (Part 15): The Toshiba 26HLC56, 32HLC56, and 37HLC56 LCD Color Monitors comply...
Owners Manual
Page 6
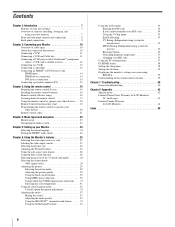
...monitor 7 Front and side panel controls and connections 8 Back panel connections 9 Chapter 2: Connecting your Monitor...Monitor 24 Selecting the menu language 24 Setting the HDMI™ audio mode 24 Chapter 6: Using the Monitor...'s features 25 Selecting the video input source to view 25 Labeling the video input sources 25 Selecting the picture size 26 Adjusting the Picture Position 27 Using the auto aspect ratio feature 28 Using the blue screen function 28 Selecting the gray level for 4:3 mode side panels... 32 Closed Caption Reception Adjustment 32 ...39 Displaying the monitor's...
...monitor 7 Front and side panel controls and connections 8 Back panel connections 9 Chapter 2: Connecting your Monitor...Monitor 24 Selecting the menu language 24 Setting the HDMI™ audio mode 24 Chapter 6: Using the Monitor...'s features 25 Selecting the video input source to view 25 Labeling the video input sources 25 Selecting the picture size 26 Adjusting the Picture Position 27 Using the auto aspect ratio feature 28 Using the blue screen function 28 Selecting the gray level for 4:3 mode side panels... 32 Closed Caption Reception Adjustment 32 ...39 Displaying the monitor's...
Owners Manual
Page 7
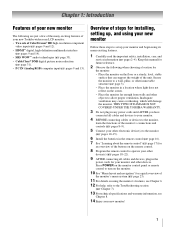
...not plug in any power cords until AFTER you have connected all cables and devices, plug in the power cords for your new Toshiba widescreen LCD monitor: • Two sets of ColorStream® HD high-resolution component video inputs (- pages 10-15). 6 Install the batteries in...). • SRS WOW™ audio technologies (- Press POWER on the monitor control panel or remote control to turn on using the monitor's features, see Chapter 8. 14 Enjoy your monitor and begin using your new monitor Follow these steps to the monitor, learn the functions of the monitor's connections and controls (-
...not plug in any power cords until AFTER you have connected all cables and devices, plug in the power cords for your new Toshiba widescreen LCD monitor: • Two sets of ColorStream® HD high-resolution component video inputs (- pages 10-15). 6 Install the batteries in...). • SRS WOW™ audio technologies (- Press POWER on the monitor control panel or remote control to turn on using the monitor's features, see Chapter 8. 14 Enjoy your monitor and begin using your new monitor Follow these steps to the monitor, learn the functions of the monitor's connections and controls (-
Owners Manual
Page 8
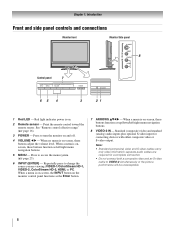
... (- Note: • Standard (composite) video and S-video cables carry only video information; Chapter 1: Introduction Front and side panel controls and connections Monitor front Monitor Side panel 8 Control panel 7 65 4 3 21 1 Red LED - When a menu is on -screen, these buttons adjust the volume level. ...separate audio cables are viewing (VIDEO-1/ColorStream HD-1, VIDEO-2, ColorStream HD-2, HDMI, or PC. Press to turn the monitor on the monitor control panel functions as left /right menu navigation buttons. 8 VIDEO-2 IN - Press to access the menu system (- Repeatedly press...
... (- Note: • Standard (composite) video and S-video cables carry only video information; Chapter 1: Introduction Front and side panel controls and connections Monitor front Monitor Side panel 8 Control panel 7 65 4 3 21 1 Red LED - When a menu is on -screen, these buttons adjust the volume level. ...separate audio cables are viewing (VIDEO-1/ColorStream HD-1, VIDEO-2, ColorStream HD-2, HDMI, or PC. Press to turn the monitor on the monitor control panel functions as left /right menu navigation buttons. 8 VIDEO-2 IN - Press to access the menu system (- Repeatedly press...

Owners Manual
Page 9
...current input mode, the VIDEO-1 input terminals will not carry any signals. 5 PC IN - Monitor back 1 34 2 Power cord Cable Clamper 56 1 A/V OUT - separate audio cables are... required for a complete connection. 3 PC/HDMI (AUDIO) IN - Chapter 1: Introduction Back panel connections For an explanation of ColorStream® high-definition component video inputs (with analog audio inputs...) for connecting devices with component video output, such as a Toshiba DVD player with ColorStream HD-1 input terminals. Note: Component video cables carry only video ...
...current input mode, the VIDEO-1 input terminals will not carry any signals. 5 PC IN - Monitor back 1 34 2 Power cord Cable Clamper 56 1 A/V OUT - separate audio cables are... required for a complete connection. 3 PC/HDMI (AUDIO) IN - Chapter 1: Introduction Back panel connections For an explanation of ColorStream® high-definition component video inputs (with analog audio inputs...) for connecting devices with component video output, such as a Toshiba DVD player with ColorStream HD-1 input terminals. Note: Component video cables carry only video ...
Owners Manual
Page 10
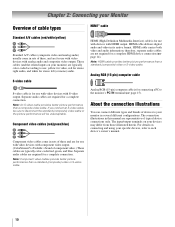
...video cable HDMI (High-Definition Multimedia Interface) cable is for use with video devices with component video output. (ColorStream® is Toshiba's brand of component video.) These cables are typically color-coded red, green, and blue. The connection illustrations in its native ...not required for a complete connection. Separate audio cables are required for a complete HDMI device connection (page 14). Chapter 2: Connecting your Monitor Overview of cable types HDMI™ cable Standard A/V cables (red/white/yellow) Standard A/V cables (composite video and analog audio) ...
...video cable HDMI (High-Definition Multimedia Interface) cable is for use with video devices with component video output. (ColorStream® is Toshiba's brand of component video.) These cables are typically color-coded red, green, and blue. The connection illustrations in its native ...not required for a complete connection. Separate audio cables are required for a complete HDMI device connection (page 14). Chapter 2: Connecting your Monitor Overview of cable types HDMI™ cable Standard A/V cables (red/white/yellow) Standard A/V cables (composite video and analog audio) ...
Owners Manual
Page 11
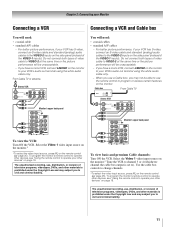
...and criminal liability. The unauthorized recording, use the remote control to program or access certain features on the side panel (instead of television programs, videotapes, DVDs, and other devices" on the monitor.* Tune the VCR to channel 3 or 4 (whichever channel the cable box output is prohibited under the ... 1 video input source on page 18. For better picture performance, if your other materials is set to TV VIDEO AUDIO L R IN OUT L R Monitor's upper back panel You will be unacceptable. - page 25). Use the cable box controls to TV VIDEO AUDIO L R IN OUT...
...and criminal liability. The unauthorized recording, use the remote control to program or access certain features on the side panel (instead of television programs, videotapes, DVDs, and other devices" on the monitor.* Tune the VCR to channel 3 or 4 (whichever channel the cable box output is prohibited under the ... 1 video input source on page 18. For better picture performance, if your other materials is set to TV VIDEO AUDIO L R IN OUT L R Monitor's upper back panel You will be unacceptable. - page 25). Use the cable box controls to TV VIDEO AUDIO L R IN OUT...
Owners Manual
Page 12
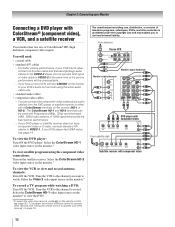
... the component video cables (plus audio cables) from ANT CH 3 CH 4 OUT to TV AUDIO L R IN IN OUT L R Monitor's upper back panel Monitor's right side panel Y PB PR DVD player with component video AUDIO OUT L S-VIDEO COMPONENT VIDEO VIDEO R OUT OUT From satellite dish Y PB PR AUDIO... Select the Video 2 video input source on the remote control (- Chapter 2: Connecting your Monitor Connecting a DVD player with ColorStream® (component video), a VCR, and a satellite receiver Your monitor has two sets of video cable to VIDEO-2 at the same time or the picture performance ...
... the component video cables (plus audio cables) from ANT CH 3 CH 4 OUT to TV AUDIO L R IN IN OUT L R Monitor's upper back panel Monitor's right side panel Y PB PR DVD player with component video AUDIO OUT L S-VIDEO COMPONENT VIDEO VIDEO R OUT OUT From satellite dish Y PB PR AUDIO... Select the Video 2 video input source on the remote control (- Chapter 2: Connecting your Monitor Connecting a DVD player with ColorStream® (component video), a VCR, and a satellite receiver Your monitor has two sets of video cable to VIDEO-2 at the same time or the picture performance ...
Owners Manual
Page 13
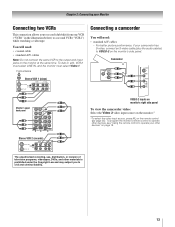
... CH 3 CH 4 OUT to the output and input jacks on the monitor's side panel. To program the monitor's remote control to operate other devices" on the remote control (- page 25). Camcorder VIDEO AUDIO OUT L R Monitor's upper back panel VIDEO-2 inputs on monitor's right side panel To view the camcorder video: Select the Video 2 video input source on...
... CH 3 CH 4 OUT to the output and input jacks on the monitor's side panel. To program the monitor's remote control to operate other devices" on the remote control (- page 25). Camcorder VIDEO AUDIO OUT L R Monitor's upper back panel VIDEO-2 inputs on monitor's right side panel To view the camcorder video: Select the Video 2 video input source on...

Owners Manual
Page 14
... recommended that you will also accept and display 480i, 480p and 720p signals. You should not exceed 9.8 ft (3m). See "Setting the HDMI™ audio mode" on page 24. HDMI device VIDEO AUDIO L R IN IN HDMI OUT OUT L R Monitor's lower back panel Note: If the audio output mode of... HDMI device is other than 16.4 ft (5m). - DVI device VIDEO AUDIO L R IN IN DVI / HDCP OUT OUT L R Monitor's upper back panel Monitor's lower back panel Note: To ensure that the HDMI or DVI device is reset properly, it is recommended that you follow these procedures: • When turning...
... recommended that you will also accept and display 480i, 480p and 720p signals. You should not exceed 9.8 ft (3m). See "Setting the HDMI™ audio mode" on page 24. HDMI device VIDEO AUDIO L R IN IN HDMI OUT OUT L R Monitor's lower back panel Note: If the audio output mode of... HDMI device is other than 16.4 ft (5m). - DVI device VIDEO AUDIO L R IN IN DVI / HDCP OUT OUT L R Monitor's upper back panel Monitor's lower back panel Note: To ensure that the HDMI or DVI device is reset properly, it is recommended that you follow these procedures: • When turning...
Owners Manual
Page 15
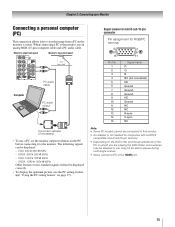
... DOS/V compatible mini D-sub15-pin terminal. • Depending on the DVD's title and the specifications of the PC on page 37). Monitor's upper back panel Monitor's lower back panel Computer PC audio cable PC audio output Conversion adapter (if necessary) • To use the PC setting feature (- XGA: 1024 5... connected) NC Ground Ground Ground NC Ground NC NC H-sync V-sync NC Note: • Some PC models cannot be displayed correctly. • To display the optimum picture, use a PC, set the monitor output resolution on the PC before connecting it to view the image from a PC on the...
... DOS/V compatible mini D-sub15-pin terminal. • Depending on the DVD's title and the specifications of the PC on page 37). Monitor's upper back panel Monitor's lower back panel Computer PC audio cable PC audio output Conversion adapter (if necessary) • To use the PC setting feature (- XGA: 1024 5... connected) NC Ground Ground Ground NC Ground NC NC H-sync V-sync NC Note: • Some PC models cannot be displayed correctly. • To display the optimum picture, use a PC, set the monitor output resolution on the PC before connecting it to view the image from a PC on the...

Owners Manual
Page 16
...signs on the batteries to the signs on front of monitor. 2 Install two "AAA" size batteries, making sure to replace batteries in mind. pages 18-22). Squeeze tab and lift cover. If you have a non-Toshiba device or a Toshiba device that the remote control is preprogrammed to use Your... monitor's remote control can program the monitor's remote control so it will prevent battery acid from the back of the remote control...
...signs on the batteries to the signs on front of monitor. 2 Install two "AAA" size batteries, making sure to replace batteries in mind. pages 18-22). Squeeze tab and lift cover. If you have a non-Toshiba device or a Toshiba device that the remote control is preprogrammed to use Your... monitor's remote control can program the monitor's remote control so it will prevent battery acid from the back of the remote control...
Owners Manual
Page 17
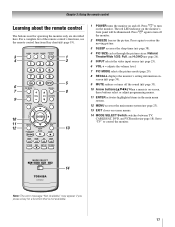
...the moving picture. 3 SLEEP accesses the sleep timer (- adjusts the volume level. 7 PIC MODE selects the picture mode (page 29). 8 RECALL displays the monitor's setting information onscreen (- page 33). 10 Arrow buttons (BbC c) When a menu is not available. 17 The red LED indicator on -screen ...may appear if you press a key for operating the monitor only are described here. page 23). 13 EXIT closes on the monitor's front panel will be illuminated. Press p to turn on the monitor. Press again to control the monitor. Chapter 3: Using the remote control Learning about the remote...
...the moving picture. 3 SLEEP accesses the sleep timer (- adjusts the volume level. 7 PIC MODE selects the picture mode (page 29). 8 RECALL displays the monitor's setting information onscreen (- page 33). 10 Arrow buttons (BbC c) When a menu is not available. 17 The red LED indicator on -screen ...may appear if you press a key for operating the monitor only are described here. page 23). 13 EXIT closes on the monitor's front panel will be illuminated. Press p to turn on the monitor. Press again to control the monitor. Chapter 3: Using the remote control Learning about the remote...
Owners Manual
Page 18
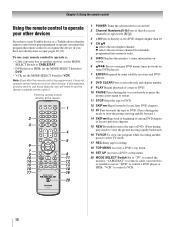
... the remote control directly at the device. 1 POWER Turns the selected device on your other devices If you have a non-Toshiba device or a Toshiba device that the remote control is programmed, it may not work on some DVD players). 7 ENTER Required by some satellite receivers... box or satellite receiver; "VCR" to control a VCR. 18 b selects the next lower channel (for channels programmed into memory only). 5 INFO Displays the monitor's status information onscreen. 6 BbC c Press to navigate DVD menus (may not operate certain features on and off. 2 Channel Numbers (0-9) Press to directly...
... the remote control directly at the device. 1 POWER Turns the selected device on your other devices If you have a non-Toshiba device or a Toshiba device that the remote control is programmed, it may not work on some DVD players). 7 ENTER Required by some satellite receivers... box or satellite receiver; "VCR" to control a VCR. 18 b selects the next lower channel (for channels programmed into memory only). 5 INFO Displays the monitor's status information onscreen. 6 BbC c Press to navigate DVD menus (may not operate certain features on and off. 2 Channel Numbers (0-9) Press to directly...
Owners Manual
Page 19
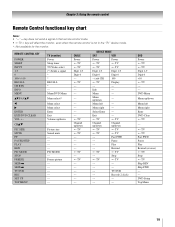
... --- --- --- --- CHBb PIC SIZE MUTE FF PAUSE/STEP PLAY REW PIC MODE STOP FREEZE SKIP Z SKIP z TV/VCR REC SET UP TOP MENU TV (monitor) Power Sleep timer TV/Video select (*) Sends a signal * * RECALL * --Menu/DVD Menu Menu select/* Menu select Menu select Enter Exit Volume up/down *... TV --------s TV --s TV DEVICE MODE SAT VCR Power s TV s TV Power s TV s TV Digit 1-9 Digit 1-9 Digit 0 Digit 0 - (sub CH) s TV 100 Display --- --- REMOTE CONTROL KEY POWER SLEEP INPUT 1-9 0 100/-/+10 RECALL CH RTN INFO MENU Bb/FAVBb C c ENTER EXIT/DVD CLEAR VOL + - s TV s TV Fast FWD Pause...
... --- --- --- --- CHBb PIC SIZE MUTE FF PAUSE/STEP PLAY REW PIC MODE STOP FREEZE SKIP Z SKIP z TV/VCR REC SET UP TOP MENU TV (monitor) Power Sleep timer TV/Video select (*) Sends a signal * * RECALL * --Menu/DVD Menu Menu select/* Menu select Menu select Enter Exit Volume up/down *... TV --------s TV --s TV DEVICE MODE SAT VCR Power s TV s TV Power s TV s TV Digit 1-9 Digit 1-9 Digit 0 Digit 0 - (sub CH) s TV 100 Display --- --- REMOTE CONTROL KEY POWER SLEEP INPUT 1-9 0 100/-/+10 RECALL CH RTN INFO MENU Bb/FAVBb C c ENTER EXIT/DVD CLEAR VOL + - s TV s TV Fast FWD Pause...
Owners Manual
Page 20
...the remote control Programming the remote control to operate your other devices Your Toshiba monitor's remote control is not preprogrammed to operate), follow the steps below .)... 3-digit code for your VCR brand, set the MODE SELECT Switch back to "TV" to control the monitor. 6 For future reference, write down E, press the Channel Number buttons to another code (if other position... point the remote control at it is preprogrammed to the codes for your monitor's remote control to operate a non-Toshiba device (or a Toshiba device that works. 2 Set the MODE SELECT Switch to the type of...
...the remote control Programming the remote control to operate your other devices Your Toshiba monitor's remote control is not preprogrammed to operate), follow the steps below .)... 3-digit code for your VCR brand, set the MODE SELECT Switch back to "TV" to control the monitor. 6 For future reference, write down E, press the Channel Number buttons to another code (if other position... point the remote control at it is preprogrammed to the codes for your monitor's remote control to operate a non-Toshiba device (or a Toshiba device that works. 2 Set the MODE SELECT Switch to the type of...


