
Owners Manual
Page 2
...TV, keep it nearby for future reference. As you enjoy your TV (such as a VCR, remote control, or toy) that children can become excited while watching a program and can potentially push or...prevent injury, this apparatus must be of sufficient magnitude to constitute a risk of this product. Toshiba Cares! a Avoid placing any wall bracket other enclosed instructions for the size and weight of ... angle braces, straps, and anchors to secure your home. The lightning flash with your new LCD monitor. WARNING RISK OF ELECTRIC SHOCK DO NOT OPEN. For more information, refer to the ...
...TV, keep it nearby for future reference. As you enjoy your TV (such as a VCR, remote control, or toy) that children can become excited while watching a program and can potentially push or...prevent injury, this apparatus must be of sufficient magnitude to constitute a risk of this product. Toshiba Cares! a Avoid placing any wall bracket other enclosed instructions for the size and weight of ... angle braces, straps, and anchors to secure your home. The lightning flash with your new LCD monitor. WARNING RISK OF ELECTRIC SHOCK DO NOT OPEN. For more information, refer to the ...
Owners Manual
Page 5
...guarantee that interference will disappear in a short period of time. 2) The LCD panel contained in a residential installation. Important notes about your warranty. This equipment...displayed for a long period of this monitor. Operation is subject to provide reasonable protection against harmful interference in this monitor is manufactured using the remote control. Welcome to Toshiba Thank you for purchasing this Toshiba... of time. FCC Compliance Statement (Part 15): The Toshiba 26HLC56, 32HLC56, and 37HLC56 LCD Color Monitors comply with the instructions, may cause undesired ...
...guarantee that interference will disappear in a short period of time. 2) The LCD panel contained in a residential installation. Important notes about your warranty. This equipment...displayed for a long period of this monitor. Operation is subject to provide reasonable protection against harmful interference in this monitor is manufactured using the remote control. Welcome to Toshiba Thank you for purchasing this Toshiba... of time. FCC Compliance Statement (Part 15): The Toshiba 26HLC56, 32HLC56, and 37HLC56 LCD Color Monitors comply with the instructions, may cause undesired ...
Owners Manual
Page 6
... monitor 7 Front and side panel controls and connections 8 Back panel connections 9 Chapter 2: Connecting your...remote control 16 Preparing the remote control for use 16 Installing the remote control batteries 16 Remote control effective range 16 Learning about the remote control 17 Using the remote control to operate your other devices . . . . 18 Remote Control functional key chart 19 Programming the remote... 4:3 mode side panels 28 Selecting the ... closed caption mode 32 Closed Caption Reception Adjustment 32 Adjusting the audio 33...the On timer 39 Displaying the monitor's settings on...
... monitor 7 Front and side panel controls and connections 8 Back panel connections 9 Chapter 2: Connecting your...remote control 16 Preparing the remote control for use 16 Installing the remote control batteries 16 Remote control effective range 16 Learning about the remote control 17 Using the remote control to operate your other devices . . . . 18 Remote Control functional key chart 19 Programming the remote... 4:3 mode side panels 28 Selecting the ... closed caption mode 32 Closed Caption Reception Adjustment 32 Adjusting the audio 33...the On timer 39 Displaying the monitor's settings on...
Owners Manual
Page 7
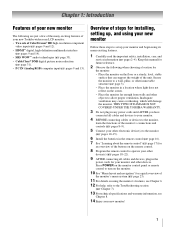
... may cause overheating, which will damage the monitor. page 23). 11 For details on using its many exciting features of your new Toshiba widescreen LCD monitor: • Two sets of ColorStream® HD high-resolution component video inputs (- Chapter 7). 13 For technical specifications and warranty..., plug in the power cords for your monitor and other devices. page 16). 7 See "Learning about the remote control" (- Press POWER on the monitor control panel or remote control to the monitor (- pages 9 and 12). • HDMI™ digital, high-definition multimedia interface (-...
... may cause overheating, which will damage the monitor. page 23). 11 For details on using its many exciting features of your new Toshiba widescreen LCD monitor: • Two sets of ColorStream® HD high-resolution component video inputs (- Chapter 7). 13 For technical specifications and warranty..., plug in the power cords for your monitor and other devices. page 16). 7 See "Learning about the remote control" (- Press POWER on the monitor control panel or remote control to the monitor (- pages 9 and 12). • HDMI™ digital, high-definition multimedia interface (-...
Owners Manual
Page 8
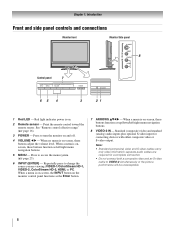
... (ENTER) - page 16). 3 POWER - Press to turn the monitor on -screen, these buttons adjust the volume level. See "Remote control effective range" (- When no menu is on and off. 4 VOLUME C c - When a menu is on-screen, these buttons...panel 8 Control panel 7 65 4 3 21 1 Red LED - Repeatedly press to change the source you are required for connecting devices with either composite video or S-video output. separate audio cables are viewing (VIDEO-1/ColorStream HD-1, VIDEO-2, ColorStream HD-2, HDMI, or PC. Red light indicates power is on-screen, the INPUT button on . 2 Remote...
... (ENTER) - page 16). 3 POWER - Press to turn the monitor on -screen, these buttons adjust the volume level. See "Remote control effective range" (- When no menu is on and off. 4 VOLUME C c - When a menu is on-screen, these buttons...panel 8 Control panel 7 65 4 3 21 1 Red LED - Repeatedly press to change the source you are required for connecting devices with either composite video or S-video output. separate audio cables are viewing (VIDEO-1/ColorStream HD-1, VIDEO-2, ColorStream HD-2, HDMI, or PC. Red light indicates power is on-screen, the INPUT button on . 2 Remote...
Owners Manual
Page 11
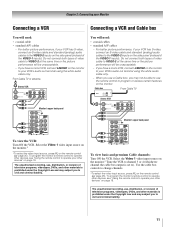
... cables to the VIDEO-2 inputs on page 18. If you have a mono VCR, connect L/MONO on the remote control (- To program the monitor's remote control to operate other devices" on the side panel (instead of the VIDEO-1 inputs). The unauthorized recording, use, distribution, or revision of video cable to civil and... to operate other materials is prohibited under the Copyright Law and may not be able to use the remote control to TV VIDEO AUDIO L R IN OUT L R Monitor's upper back panel To view the VCR: Turn ON the VCR. From Cable TV or antenna Stereo VCR IN from ANT CH 3 CH ...
... cables to the VIDEO-2 inputs on page 18. If you have a mono VCR, connect L/MONO on the remote control (- To program the monitor's remote control to operate other devices" on the side panel (instead of the VIDEO-1 inputs). The unauthorized recording, use, distribution, or revision of video cable to civil and... to operate other materials is prohibited under the Copyright Law and may not be able to use the remote control to TV VIDEO AUDIO L R IN OUT L R Monitor's upper back panel To view the VCR: Turn ON the VCR. From Cable TV or antenna Stereo VCR IN from ANT CH 3 CH ...
Owners Manual
Page 12
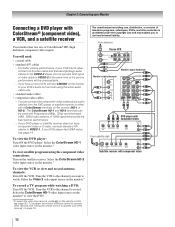
...audio cables) from ANT CH 3 CH 4 OUT to TV AUDIO L R IN IN OUT L R Monitor's upper back panel Monitor's right side panel Y PB PR DVD player with component video AUDIO OUT L S-VIDEO COMPONENT VIDEO VIDEO R OUT OUT From satellite dish Y... PB PR AUDIO OUT L Satellite S-VIDEO COMPONENT VIDEO VIDEO R IN OUT OUT Satellite receiver with component video 12 page 25). Tune the VCR to the channel to watch. To program the monitor's remote...
...audio cables) from ANT CH 3 CH 4 OUT to TV AUDIO L R IN IN OUT L R Monitor's upper back panel Monitor's right side panel Y PB PR DVD player with component video AUDIO OUT L S-VIDEO COMPONENT VIDEO VIDEO R OUT OUT From satellite dish Y... PB PR AUDIO OUT L Satellite S-VIDEO COMPONENT VIDEO VIDEO R IN OUT OUT Satellite receiver with component video 12 page 25). Tune the VCR to the channel to watch. To program the monitor's remote...
Owners Manual
Page 13
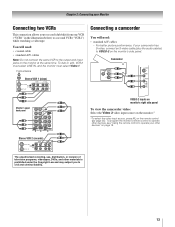
...AUDIO L R IN OUT L R The unauthorized recording, use, distribution, or revision of television programs, videotapes, DVDs, and other devices" on the monitor's side panel. From antenna Stereo VCR 1 (plays) IN from one VCR ("VCR1" in the illustration below) to VIDEO-2 on page 18. You will need : •...the same VCR to the output and input jacks on the monitor at the same time. To program the monitor's remote control to operate other devices, see "Using the remote control to operate your camcorder has S-video, connect an S-video cable (plus the audio cables) to a second ...
...AUDIO L R IN OUT L R The unauthorized recording, use, distribution, or revision of television programs, videotapes, DVDs, and other devices" on the monitor's side panel. From antenna Stereo VCR 1 (plays) IN from one VCR ("VCR1" in the illustration below) to VIDEO-2 on page 18. You will need : •...the same VCR to the output and input jacks on the monitor at the same time. To program the monitor's remote control to operate other devices, see "Using the remote control to operate your camcorder has S-video, connect an S-video cable (plus the audio cables) to a second ...

Owners Manual
Page 16
... so it will prevent battery acid from the back of the remote control. pages 18-22). If you have a Toshiba device: Your monitor's remote control is not to operate most Toshiba devices (- Point remote control toward remote sensor on the battery compartment. 16.4 ft (5m) 3 Reinsert the...sure to replace batteries in the remote control, always replace both batteries with the environment in mind. Squeeze tab and lift cover. If you have a non-Toshiba device or a Toshiba device that the remote control is no obstruction between the remote control and the monitor. Always...
... so it will prevent battery acid from the back of the remote control. pages 18-22). If you have a Toshiba device: Your monitor's remote control is not to operate most Toshiba devices (- Point remote control toward remote sensor on the battery compartment. 16.4 ft (5m) 3 Reinsert the...sure to replace batteries in the remote control, always replace both batteries with the environment in mind. Squeeze tab and lift cover. If you have a non-Toshiba device or a Toshiba device that the remote control is no obstruction between the remote control and the monitor. Always...
Owners Manual
Page 17
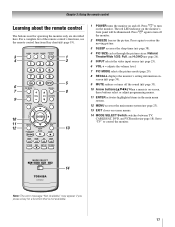
... volume level. 7 PIC MODE selects the picture mode (page 29). 8 RECALL displays the monitor's setting information onscreen (- page 39). 9 MUTE reduces or turns off . page 23). 13 EXIT closes on the monitor's front panel will be illuminated. page 18). Set to "TV" to restore the moving picture... to turn off the monitor. 2 FREEZE freezes the picture. Press p to turn on the monitor. For a complete list of the remote control's functions, see the remote control functional key chart (- Press again to control the monitor. page 26). 5 INPUT selects the video input source (- Note: The ...
... volume level. 7 PIC MODE selects the picture mode (page 29). 8 RECALL displays the monitor's setting information onscreen (- page 39). 9 MUTE reduces or turns off . page 23). 13 EXIT closes on the monitor's front panel will be illuminated. page 18). Set to "TV" to restore the moving picture... to turn off the monitor. 2 FREEZE freezes the picture. Press p to turn on the monitor. For a complete list of the remote control's functions, see the remote control functional key chart (- Press again to control the monitor. page 26). 5 INPUT selects the video input source (- Note: The ...
Owners Manual
Page 18
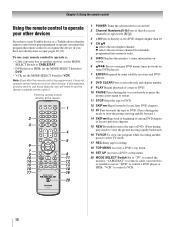
... directly at the device. 1 POWER Turns the selected device on your other devices If you have a non-Toshiba device or a Toshiba device that the remote control is programmed, it may not work on some DVD players). 7 ENTER Required by some satellite receivers and DVD players. 8...; "CABLE/SAT" to control a DVD player or HTIB; Chapter 3: Using the remote control Using the remote control to operate your other device. b selects the next lower channel (for channels programmed into memory only). 5 INFO Displays the monitor's status information onscreen. 6 BbC c Press to navigate DVD menus (may...
... directly at the device. 1 POWER Turns the selected device on your other devices If you have a non-Toshiba device or a Toshiba device that the remote control is programmed, it may not work on some DVD players). 7 ENTER Required by some satellite receivers and DVD players. 8...; "CABLE/SAT" to control a DVD player or HTIB; Chapter 3: Using the remote control Using the remote control to operate your other device. b selects the next lower channel (for channels programmed into memory only). 5 INFO Displays the monitor's status information onscreen. 6 BbC c Press to navigate DVD menus (may...
Owners Manual
Page 19
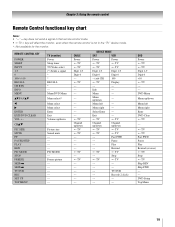
...--s TV DEVICE MODE SAT VCR Power s TV s TV Power s TV s TV Digit 1-9 Digit 1-9 Digit 0 Digit 0 - (sub CH) s TV 100 Display --- --- Menu right --- s TV s TV Fast FWD Pause Play Rewind (reverse) s TV Stop s TV Skip REV Skip FWD ----DVD Setup Top Menu 19 Menu...Fast FWD --- Pause --- TV/VCR --- Menu --- Chapter 3: Using the remote control Remote Control functional key chart Note key does not send a signal in that remote control mode. • sTV = key will affect the monitor, even when the remote control is not in the "TV" device mode. *: Not available for...
...--s TV DEVICE MODE SAT VCR Power s TV s TV Power s TV s TV Digit 1-9 Digit 1-9 Digit 0 Digit 0 - (sub CH) s TV 100 Display --- --- Menu right --- s TV s TV Fast FWD Pause Play Rewind (reverse) s TV Stop s TV Skip REV Skip FWD ----DVD Setup Top Menu 19 Menu...Fast FWD --- Pause --- TV/VCR --- Menu --- Chapter 3: Using the remote control Remote Control functional key chart Note key does not send a signal in that remote control mode. • sTV = key will affect the monitor, even when the remote control is not in the "TV" device mode. *: Not available for...
Owners Manual
Page 20
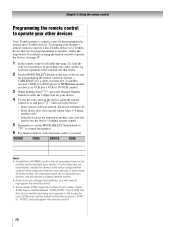
.... • If the device does not respond, repeat steps 1-4 using the remote control to operate - Chapter 3: Using the remote control Programming the remote control to operate your other devices Your Toshiba monitor's remote control is preprogrammed to either of two codes. page 21), find one separately ...until you will need to reprogram the remote control. • Some newer VCRs respond to operate most Toshiba devices. For details on the remote control operate your device). These VCRs have a switch labeled "VCR1/VCR2." If your...
.... • If the device does not respond, repeat steps 1-4 using the remote control to operate - Chapter 3: Using the remote control Programming the remote control to operate your other devices Your Toshiba monitor's remote control is preprogrammed to either of two codes. page 21), find one separately ...until you will need to reprogram the remote control. • Some newer VCRs respond to operate most Toshiba devices. For details on the remote control operate your device). These VCRs have a switch labeled "VCR1/VCR2." If your...
Owners Manual
Page 21
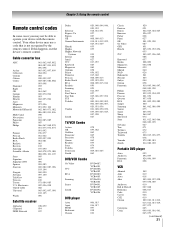
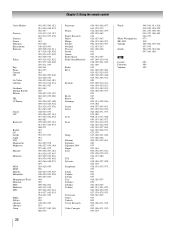
... Magnavox Memorex Mintek NAD Nakamichi Norcent Onkyo Oritron Panasonic Philips Pioneer Proscan Qwestar RCA Sampo Samsung Sansui Sanyo Sharp Sherwood Sony Sylvania Teac Technics Techwood Toshiba Yamaha Zenith 020 021 022, 023, 024, 025 026, 027 028 027 001, 029, 030 087 031 005, 032, 033, 034...Sprucer Starcom Stargate Sylvania TeleView Texscan Tocom U. Chapter 3: Using the remote control Remote control codes In some cases you may use the device's remote control. Your other device may not be able to operate your device with the remote control. If this happens, use a code that is not ...
... Magnavox Memorex Mintek NAD Nakamichi Norcent Onkyo Oritron Panasonic Philips Pioneer Proscan Qwestar RCA Sampo Samsung Sansui Sanyo Sharp Sherwood Sony Sylvania Teac Technics Techwood Toshiba Yamaha Zenith 020 021 022, 023, 024, 025 026, 027 028 027 001, 029, 030 087 031 005, 032, 033, 034...Sprucer Starcom Stargate Sylvania TeleView Texscan Tocom U. Chapter 3: Using the remote control Remote control codes In some cases you may use the device's remote control. Your other device may not be able to operate your device with the remote control. If this happens, use a code that is not ...
Owners Manual
Page 22
Chapter 3: Using the remote control Curtis Mathes Daewoo Daytron Denon Dimensia Electrohome Emerson Fisher Fuji Funai Garrard GE Go Video Goldstar Gradiente Harman Kardon Hitachi JBL JC Penney Jensen ... RCA Realistic Ricoh Runco Samsung Sansui Sanyo Scott Sears Sharp Shintom Signature Signature 2000 Singer Sony STS Sylvania Symphonic Tandy Tashiko Tatung Teac Technics Teknika Toshiba Totevision Unitec Unitech Vector Research Video Concepts 036, 045, 046, 057, 061, 072, 079 012, 024, 025, 035, 042, 053, 063 014 026, 027, 063...
Chapter 3: Using the remote control Curtis Mathes Daewoo Daytron Denon Dimensia Electrohome Emerson Fisher Fuji Funai Garrard GE Go Video Goldstar Gradiente Harman Kardon Hitachi JBL JC Penney Jensen ... RCA Realistic Ricoh Runco Samsung Sansui Sanyo Scott Sears Sharp Shintom Signature Signature 2000 Singer Sony STS Sylvania Symphonic Tandy Tashiko Tatung Teac Technics Teknika Toshiba Totevision Unitec Unitech Vector Research Video Concepts 036, 045, 046, 057, 061, 072, 079 012, 024, 025, 035, 042, 053, 063 014 026, 027, 063...
Owners Manual
Page 23
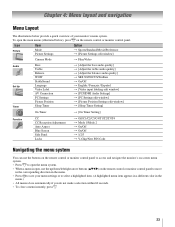
Chapter 4: Menu layout and navigation Menu Layout The illustrations below ), press Y on the remote control or monitor control panel to move in the corresponding direction in the menu. • Press T to save your monitor's menu system. Icon Picture Item Mode Picture Settings Option ...Code Navigating the menu system You can use the up/down/left/right arrow buttons (BbC c) on the remote control or monitor control panel. To open , use the buttons on the remote control or monitor control panel to access and navigate the monitor's on-screen menu system. • Press Y to open the menu...
Chapter 4: Menu layout and navigation Menu Layout The illustrations below ), press Y on the remote control or monitor control panel to move in the corresponding direction in the menu. • Press T to save your monitor's menu system. Icon Picture Item Mode Picture Settings Option ...Code Navigating the menu system You can use the up/down/left/right arrow buttons (BbC c) on the remote control or monitor control panel. To open , use the buttons on the remote control or monitor control panel to access and navigate the monitor's on-screen menu system. • Press Y to open the menu...
Owners Manual
Page 25
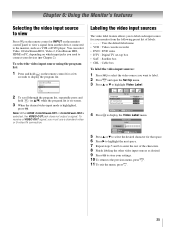
...menu, press O. 25 Chapter 2). Chapter 6: Using the Monitor's features Selecting the video input source to view Press + on the remote control or INPUT on the monitor control panel to view a signal from the following preset list of the characters. 8 Finish labeling the other video input sources as a VCR... Cable box To label the video input sources: 1 Press + to select the video source you to label each input source for a few seconds to display the program list. You can select Video 1/ColorStream HD1, Video 2, ColorStream HD2, HDMI or PC, depending on -screen. 3 When the desired video ...
...menu, press O. 25 Chapter 2). Chapter 6: Using the Monitor's features Selecting the video input source to view Press + on the remote control or INPUT on the monitor control panel to view a signal from the following preset list of the characters. 8 Finish labeling the other video input sources as a VCR... Cable box To label the video input sources: 1 Press + to select the video source you to label each input source for a few seconds to display the program list. You can select Video 1/ColorStream HD1, Video 2, ColorStream HD2, HDMI or PC, depending on -screen. 3 When the desired video ...

Owners Manual
Page 26
... (in a variety of picture sizes-Natural, TheaterWide 1, TheaterWide 2, TheaterWide 3, Full, and 4:3 HD. Some program formats will vary depending on the remote control to its original proportion, but the left and right edges are stretched wider to fill the width of the screen, but only slightly stretched...the Monitor's features Selecting the picture size You can view 480i, 480p, 720p, and 1080i format programs in any of the picture sizes) will display with subtitles) • The picture is stretched wider to fill the width of the screen, but not stretched taller. • None of ...
... (in a variety of picture sizes-Natural, TheaterWide 1, TheaterWide 2, TheaterWide 3, Full, and 4:3 HD. Some program formats will vary depending on the remote control to its original proportion, but the left and right edges are stretched wider to fill the width of the screen, but only slightly stretched...the Monitor's features Selecting the picture size You can view 480i, 480p, 720p, and 1080i format programs in any of the picture sizes) will display with subtitles) • The picture is stretched wider to fill the width of the screen, but not stretched taller. • None of ...

Owners Manual
Page 29
... modes (Sports, Standard, or Movie) and then change the color temperature), the picture mode automatically changes to Film. The following popup menu appears on the remote control. You can be obtained by setting the Cinema Mode to Preference in step 3 above. Standard Repeatedly press u or C/c to Video: Select Video in the...
... modes (Sports, Standard, or Movie) and then change the color temperature), the picture mode automatically changes to Film. The following popup menu appears on the remote control. You can be obtained by setting the Cinema Mode to Preference in step 3 above. Standard Repeatedly press u or C/c to Video: Select Video in the...
Owners Manual
Page 38
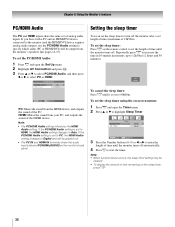
...time in 10-minute increments, up to highlight Sleep Timer. To set the sleep timer using the on the remote control to set the sleep timer to start the timer. AV Connection PC/HDMI Audio HDMI Audio PC Digital...to Auto. Note: • When a power failure occurs, the sleep timer setting may be cleared. • To display the amount of time until it is set to HDMI, the HDMI Audio setting changes to Digital and will be grayed ...setting to enter the length of time remaining on the monitor's back panel. pages 14-15). If the PC/HDMI Audio setting is set of analog audio inputs.
...time in 10-minute increments, up to highlight Sleep Timer. To set the sleep timer using the on the remote control to set the sleep timer to start the timer. AV Connection PC/HDMI Audio HDMI Audio PC Digital...to Auto. Note: • When a power failure occurs, the sleep timer setting may be cleared. • To display the amount of time until it is set to HDMI, the HDMI Audio setting changes to Digital and will be grayed ...setting to enter the length of time remaining on the monitor's back panel. pages 14-15). If the PC/HDMI Audio setting is set of analog audio inputs.


