
Owners Manual
Page 2
...important operating and maintenance (servicing) instructions in your new LCD monitor. WARNING: If you for purchasing this Toshiba Monitor. a The Consumer Electronics Association formed the Home Entertainment Support Safety Committee, comprised of TV and consumer electronics furniture manufacturers, to advocate children's ...improperly secured or inappropriately situated on or play with your purchase! NO USER-SERVICEABLE PARTS INSIDE. a Sometimes TVs are popular purchases; Toshiba Cares! Tune Into Safety a One size does NOT fit all! a Use appropriate angle braces, straps...
...important operating and maintenance (servicing) instructions in your new LCD monitor. WARNING: If you for purchasing this Toshiba Monitor. a The Consumer Electronics Association formed the Home Entertainment Support Safety Committee, comprised of TV and consumer electronics furniture manufacturers, to advocate children's ...improperly secured or inappropriately situated on or play with your purchase! NO USER-SERVICEABLE PARTS INSIDE. a Sometimes TVs are popular purchases; Toshiba Cares! Tune Into Safety a One size does NOT fit all! a Use appropriate angle braces, straps...
Owners Manual
Page 5
...non-moving image is connected. • Consult the dealer or an experienced radio/TV technician for help. Please read all the safety and operating instructions carefully, and ...interference to radio or television reception, which the receiver is displayed for a long period of time. therefore, Toshiba is not responsible for perceived issues resulting from these rules ... extremely high level of time. 2) The LCD panel contained in a particular installation. FCC Compliance Statement (Part 15): The Toshiba 26HLC56, 32HLC56, and 37HLC56 LCD Color Monitors comply with the instructions, may cause...
...non-moving image is connected. • Consult the dealer or an experienced radio/TV technician for help. Please read all the safety and operating instructions carefully, and ...interference to radio or television reception, which the receiver is displayed for a long period of time. therefore, Toshiba is not responsible for perceived issues resulting from these rules ... extremely high level of time. 2) The LCD panel contained in a particular installation. FCC Compliance Statement (Part 15): The Toshiba 26HLC56, 32HLC56, and 37HLC56 LCD Color Monitors comply with the instructions, may cause...
Owners Manual
Page 6
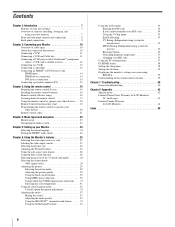
...up, and using your new monitor 7 Front and side panel controls and connections 8 Back panel connections 9 Chapter 2: Connecting your Monitor 10 Overview of...Selecting the gray level for 4:3 mode side panels 28 Selecting the cinema mode (480i signals ...color temperature 31 Using the closed caption mode 32 Closed Caption Reception Adjustment 32 Adjusting the audio 33 Muting the sound 33 ... the V-Chip menu 35 Enable Blocking 35 TV Rating (Independent rating system for broadcasters 35 ...the sleep timer 38 Setting the On timer 39 Displaying the monitor's settings on-screen using RECALL 39...
...up, and using your new monitor 7 Front and side panel controls and connections 8 Back panel connections 9 Chapter 2: Connecting your Monitor 10 Overview of...Selecting the gray level for 4:3 mode side panels 28 Selecting the cinema mode (480i signals ...color temperature 31 Using the closed caption mode 32 Closed Caption Reception Adjustment 32 Adjusting the audio 33 Muting the sound 33 ... the V-Chip menu 35 Enable Blocking 35 TV Rating (Independent rating system for broadcasters 35 ...the sleep timer 38 Setting the On timer 39 Displaying the monitor's settings on-screen using RECALL 39...
Owners Manual
Page 11
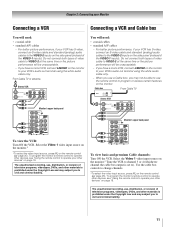
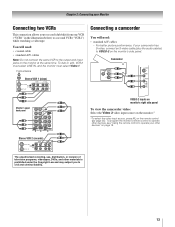
... antenna Stereo VCR IN from ANT CH 3 CH 4 OUT to TV VIDEO AUDIO L R IN OUT L R Monitor's upper back panel To view the VCR: Turn ON the VCR. page 25). page 25). The unauthorized recording, use a Cable box, you have a mono VCR, connect L/... VCR has S-video, connect an S-video cable and standard (analog) audio cables to the VIDEO-2 inputs on the side panel (instead of video cable to TV VIDEO AUDIO L R IN OUT L R Monitor's upper back panel You will need : • coaxial cables • standard A/V cables - For better picture performance, if your VCR has S-video...
... antenna Stereo VCR IN from ANT CH 3 CH 4 OUT to TV VIDEO AUDIO L R IN OUT L R Monitor's upper back panel To view the VCR: Turn ON the VCR. page 25). page 25). The unauthorized recording, use a Cable box, you have a mono VCR, connect L/... VCR has S-video, connect an S-video cable and standard (analog) audio cables to the VIDEO-2 inputs on the side panel (instead of video cable to TV VIDEO AUDIO L R IN OUT L R Monitor's upper back panel You will need : • coaxial cables • standard A/V cables - For better picture performance, if your VCR has S-video...
Owners Manual
Page 12
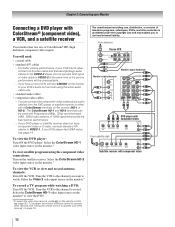
...Do not connect both types of ColorStream terminals on page 18. Select the ColorStream HD-2 video input source on the monitor.* To record a TV program while watching a DVD: Turn ON the VCR. Tune the VCR to the channel you have component video or S-video, connect standard ...and HD-2 terminals can connect the component video cables (plus audio cables) from ANT CH 3 CH 4 OUT to TV AUDIO L R IN IN OUT L R Monitor's upper back panel Monitor's right side panel Y PB PR DVD player with component video AUDIO OUT L S-VIDEO COMPONENT VIDEO VIDEO R OUT OUT From satellite dish...
...Do not connect both types of ColorStream terminals on page 18. Select the ColorStream HD-2 video input source on the monitor.* To record a TV program while watching a DVD: Turn ON the VCR. Tune the VCR to the channel you have component video or S-video, connect standard ...and HD-2 terminals can connect the component video cables (plus audio cables) from ANT CH 3 CH 4 OUT to TV AUDIO L R IN IN OUT L R Monitor's upper back panel Monitor's right side panel Y PB PR DVD player with component video AUDIO OUT L S-VIDEO COMPONENT VIDEO VIDEO R OUT OUT From satellite dish...
Owners Manual
Page 13
...OUT L R Monitor's upper back panel VIDEO-2 inputs on monitor's right side panel To view the camcorder video: Select the Video 2 video input source on the monitor.* *To select the video input source, press + on page 18. Stereo VCR 2 (records) IN from ANT CH 3 CH 4 OUT to TV VIDEO AUDIO L R IN OUT ... your camcorder has S-video, connect an S-video cable (plus the audio cables) to the output and input jacks on the monitor's side panel. For better picture performance, if your other materials is prohibited under the Copyright Law and may subject you to record (dub/edit) from ...
...OUT L R Monitor's upper back panel VIDEO-2 inputs on monitor's right side panel To view the camcorder video: Select the Video 2 video input source on the monitor.* *To select the video input source, press + on page 18. Stereo VCR 2 (records) IN from ANT CH 3 CH 4 OUT to TV VIDEO AUDIO L R IN OUT ... your camcorder has S-video, connect an S-video cable (plus the audio cables) to the output and input jacks on the monitor's side panel. For better picture performance, if your other materials is prohibited under the Copyright Law and may subject you to record (dub/edit) from ...
Owners Manual
Page 17
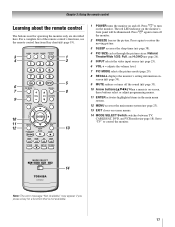
...page 39). 9 MUTE reduces or turns off the monitor. 2 FREEZE freezes the picture. Set to "TV" to restore the moving picture. 3 SLEEP accesses the sleep timer (- Note: The error message "... operating the monitor only are described here. Press p to turn on the monitor's front panel will be illuminated. For a complete list of the remote control's functions, see the remote...monitor. adjusts the volume level. 7 PIC MODE selects the picture mode (page 29). 8 RECALL displays the monitor's setting information onscreen (- page 23). 13 EXIT closes on and off. Chapter 3: Using...
...page 39). 9 MUTE reduces or turns off the monitor. 2 FREEZE freezes the picture. Set to "TV" to restore the moving picture. 3 SLEEP accesses the sleep timer (- Note: The error message "... operating the monitor only are described here. Press p to turn on the monitor's front panel will be illuminated. For a complete list of the remote control's functions, see the remote...monitor. adjusts the volume level. 7 PIC MODE selects the picture mode (page 29). 8 RECALL displays the monitor's setting information onscreen (- page 23). 13 EXIT closes on and off. Chapter 3: Using...
Owners Manual
Page 18
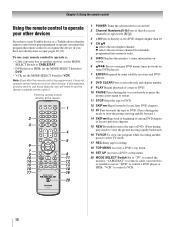
... higher than 10. 4 CH Bb B selects the next higher channel; b selects the next lower channel (for channels programmed into memory only). 5 INFO Displays the monitor's status information onscreen. 6 BbC c Press to navigate DVD menus (may not operate certain features on some DVD players). 7 ENTER Required by ... a DVD's setup menu. 20 MODE SELECT Switch Set to "TV" to control the monitor; Note: Even after the remote control is programmed, it may not work on your other devices If you have a non-Toshiba device or a Toshiba device that the remote control is not preprogrammed to operate, you...
... higher than 10. 4 CH Bb B selects the next higher channel; b selects the next lower channel (for channels programmed into memory only). 5 INFO Displays the monitor's status information onscreen. 6 BbC c Press to navigate DVD menus (may not operate certain features on some DVD players). 7 ENTER Required by ... a DVD's setup menu. 20 MODE SELECT Switch Set to "TV" to control the monitor; Note: Even after the remote control is programmed, it may not work on your other devices If you have a non-Toshiba device or a Toshiba device that the remote control is not preprogrammed to operate, you...
Owners Manual
Page 19
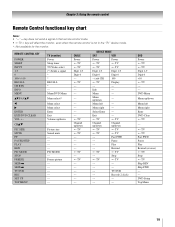
Info --- Play --s TV Rewind s TV --s TV Stop s TV --- --- --- --- --- s TV s TV Fast FWD Pause Play Rewind (reverse) s TV Stop s TV Skip REV Skip FWD ----DVD Setup Top Menu 19 Menu --- Menu right --- Select Enter --- Exit s TV --s TV Channel up/down s TV s TV Channel up /down s TV s TV --------s TV --s TV DEVICE MODE SAT VCR Power s TV s TV Power s TV s TV Digit 1-9 Digit 1-9 Digit 0 Digit 0 - (sub CH) s TV 100 Display --- --- DVD Power s TV s TV Digit 1-9 Digit 0 +10 s TV ----DVD...
Info --- Play --s TV Rewind s TV --s TV Stop s TV --- --- --- --- --- s TV s TV Fast FWD Pause Play Rewind (reverse) s TV Stop s TV Skip REV Skip FWD ----DVD Setup Top Menu 19 Menu --- Menu right --- Select Enter --- Exit s TV --s TV Channel up/down s TV s TV Channel up /down s TV s TV --------s TV --s TV DEVICE MODE SAT VCR Power s TV s TV Power s TV s TV Digit 1-9 Digit 1-9 Digit 0 Digit 0 - (sub CH) s TV 100 Display --- --- DVD Power s TV s TV Digit 1-9 Digit 0 +10 s TV ----DVD...
Owners Manual
Page 20
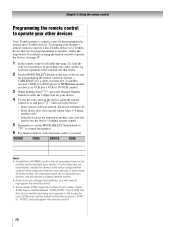
... your VCR has this kind of switch and does not respond to the codes for your VCR brand, set the MODE SELECT Switch back to "TV" to control the monitor. 6 For future reference, write down E, press the Channel Number buttons to enter the 3-digit code for your device. If... using the remote control to operate the device, see notes below . These VCRs have a switch labeled "VCR1/VCR2." To program your other devices Your Toshiba monitor's remote control is not preprogrammed to operate), follow the steps below .) • If the correct code was entered, the device will need to ...
... your VCR has this kind of switch and does not respond to the codes for your VCR brand, set the MODE SELECT Switch back to "TV" to control the monitor. 6 For future reference, write down E, press the Channel Number buttons to enter the 3-digit code for your device. If... using the remote control to operate the device, see notes below . These VCRs have a switch labeled "VCR1/VCR2." To program your other devices Your Toshiba monitor's remote control is not preprogrammed to operate), follow the steps below .) • If the correct code was entered, the device will need to ...
Owners Manual
Page 21
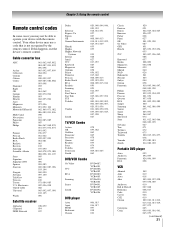
...JVC Kenwood Magnavox Optimus Pansat Primestar Proscan Radio Shack RCA Realistic Samsung Sony Star Choice Star Trak STS Toshiba Uniden Zenith 020, 040, 044, 046, 050, 053 018, 041, 051 057 027 008,... 028, 030, 032, 035, 039, 043, 045, 047, 058 027 TV/VCR Combo Action GE Goldstar Panasonic Precision Quasar Realistic Sony Toshiba Totevision Zenith 078 059, 062 065 065 078 065 079 074 057 009, 010... Panasonic Philips Pioneer Proscan Qwestar RCA Sampo Samsung Sansui Sanyo Sharp Sherwood Sony Sylvania Teac Technics Techwood Toshiba Yamaha Zenith 020 021 022, 023, 024, 025 026, 027 028 027 001, 029, ...
...JVC Kenwood Magnavox Optimus Pansat Primestar Proscan Radio Shack RCA Realistic Samsung Sony Star Choice Star Trak STS Toshiba Uniden Zenith 020, 040, 044, 046, 050, 053 018, 041, 051 057 027 008,... 028, 030, 032, 035, 039, 043, 045, 047, 058 027 TV/VCR Combo Action GE Goldstar Panasonic Precision Quasar Realistic Sony Toshiba Totevision Zenith 078 059, 062 065 065 078 065 079 074 057 009, 010... Panasonic Philips Pioneer Proscan Qwestar RCA Sampo Samsung Sansui Sanyo Sharp Sherwood Sony Sylvania Teac Technics Techwood Toshiba Yamaha Zenith 020 021 022, 023, 024, 025 026, 027 028 027 001, 029, ...

Owners Manual
Page 24
... Digital and will be grayed out. 24 Set Up Language Video Label AV Connection Picture Position English ENTER ENTER ENTER MENU Back EXIT Watch TV 3 Press C or c to display your Monitor Selecting the menu language You can choose from three different languages (English, French, and Spanish) for the on-screen... PC, the HDMI Audio setting is set to highlight Language. page 14). AV Connection PC/HDMI Audio HDMI Audio HDMI Auto MENU Back EXIT Watch TV Note: The PC/HDMI Audio setting influences the HDMI Audio setting. To select the menu language: 1 Press Y and open the Set Up menu. 2...
... Digital and will be grayed out. 24 Set Up Language Video Label AV Connection Picture Position English ENTER ENTER ENTER MENU Back EXIT Watch TV 3 Press C or c to display your Monitor Selecting the menu language You can choose from three different languages (English, French, and Spanish) for the on-screen... PC, the HDMI Audio setting is set to highlight Language. page 14). AV Connection PC/HDMI Audio HDMI Audio HDMI Auto MENU Back EXIT Watch TV Note: The PC/HDMI Audio setting influences the HDMI Audio setting. To select the menu language: 1 Press Y and open the Set Up menu. 2...
Owners Manual
Page 25
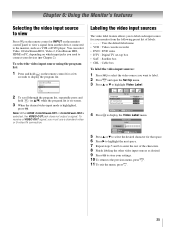
...SAT : Satellite box • CBL : Cable box To label the video input sources: 1 Press + to display the Video Label menu. Video Label Label Video1 A ENTER Store MENU Back EXIT Watch TV 5 Press B or b to select the desired character for your monitor from another device connected to the monitor...to connect your devices (- Chapter 2). You can select Video 1/ColorStream HD1, Video 2, ColorStream HD2, HDMI or PC, depending on the monitor control panel to view a signal from the following preset list of the characters. 8 Finish labeling the other video input sources as a VCR or DVD player...
...SAT : Satellite box • CBL : Cable box To label the video input sources: 1 Press + to display the Video Label menu. Video Label Label Video1 A ENTER Store MENU Back EXIT Watch TV 5 Press B or b to select the desired character for your monitor from another device connected to the monitor...to connect your devices (- Chapter 2). You can select Video 1/ColorStream HD1, Video 2, ColorStream HD2, HDMI or PC, depending on the monitor control panel to view a signal from the following preset list of the characters. 8 Finish labeling the other video input sources as a VCR or DVD player...
Owners Manual
Page 27
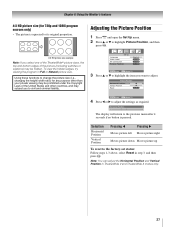
... the settings as required. Set Up Language Video Label AV Connection Picture Position English ENTER ENTER ENTER MENU Back EXIT Watch TV 3 Press B or b to highlight the item you to civil and criminal liability. Picture Position Horizontal Position Vertical Position Reset ...0 0 ENT0ER MENU Back EXIT Watch TV 4 Press C or c to adjust. Horizontal Position -2 - + The display will return to change the picture size (i.e., changing the height/ width ratio) for 720p and 1080i program sources...
... the settings as required. Set Up Language Video Label AV Connection Picture Position English ENTER ENTER ENTER MENU Back EXIT Watch TV 3 Press B or b to highlight the item you to civil and criminal liability. Picture Position Horizontal Position Vertical Position Reset ...0 0 ENT0ER MENU Back EXIT Watch TV 4 Press C or c to adjust. Horizontal Position -2 - + The display will return to change the picture size (i.e., changing the height/ width ratio) for 720p and 1080i program sources...
Owners Manual
Page 28
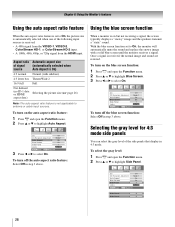
... a signal, the screen typically displays a "snowy" image and the speakers transmit a "static" sound. Function CC CC Reception Adjustment Auto Aspect Blue Screen Side Panel Locks Off Mode 1 On On 1 ENTER MENU Back EXIT Watch TV 3 Press C or c to highlight Side Panel. To turn off the auto aspect.... 2 Press B or b to highlight Blue Screen. 3 Press C or c to select On. Aspect ratio Automatic aspect size of the side panels that display in step 3 above . Chapter 6: Using the Monitor's features Using the auto aspect ratio feature When the auto aspect ratio feature is set to ...
... a signal, the screen typically displays a "snowy" image and the speakers transmit a "static" sound. Function CC CC Reception Adjustment Auto Aspect Blue Screen Side Panel Locks Off Mode 1 On On 1 ENTER MENU Back EXIT Watch TV 3 Press C or c to highlight Side Panel. To turn off the auto aspect.... 2 Press B or b to highlight Blue Screen. 3 Press C or c to select On. Aspect ratio Automatic aspect size of the side panels that display in step 3 above . Chapter 6: Using the Monitor's features Using the auto aspect ratio feature When the auto aspect ratio feature is set to ...

Owners Manual
Page 29
... signal; 3:2 pulldown processed) from four different modes, as described below. Picture Mode Picture Settings Cinema Mode Sports ENTER Video MENU Back EXIT Watch TV 3 Press C or c to select the mode you select affects the current input only. You can be obtained by setting the Cinema Mode to...or change the color temperature), the picture mode automatically changes to Film. Picture Mode Picture Settings Cinema Mode Sports ENTER Video MENU Back EXIT Watch TV To set the Cinema Mode to Film: 1 Press Y and open the Picture menu. 2 Press B or b to select Film. To select...
... signal; 3:2 pulldown processed) from four different modes, as described below. Picture Mode Picture Settings Cinema Mode Sports ENTER Video MENU Back EXIT Watch TV 3 Press C or c to select the mode you select affects the current input only. You can be obtained by setting the Cinema Mode to...or change the color temperature), the picture mode automatically changes to Film. Picture Mode Picture Settings Cinema Mode Sports ENTER Video MENU Back EXIT Watch TV To set the Cinema Mode to Film: 1 Press Y and open the Picture menu. 2 Press B or b to select Film. To select...

Owners Manual
Page 30
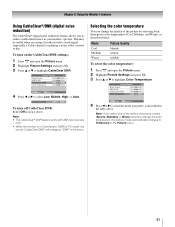
...to highlight Black Stretch. Picture Settings 2/2 Black Strech MPEG NR CableClear DNR Color Temperature On Low Auto Medium MENU Back EXIT Watch TV 4 Press C or c to select On. Picture Settings 1/2 Back Light 100 Contrast 100 Brightness 50 Color 50 Tint 0 Sharpness 0 MENU Back EXIT...Preference mode (- MPEG NR Middle 30 Picture Settings 2/2 Black Strech MPEG NR CableClear DNR Color Temperature Off Low Auto Medium MENU Back EXIT Watch TV 4 Press C or c to select Low, Middle, High, or Off. Choices for the back light on the previous page). Using the...
...to highlight Black Stretch. Picture Settings 2/2 Black Strech MPEG NR CableClear DNR Color Temperature On Low Auto Medium MENU Back EXIT Watch TV 4 Press C or c to select On. Picture Settings 1/2 Back Light 100 Contrast 100 Brightness 50 Color 50 Tint 0 Sharpness 0 MENU Back EXIT...Preference mode (- MPEG NR Middle 30 Picture Settings 2/2 Black Strech MPEG NR CableClear DNR Color Temperature Off Low Auto Medium MENU Back EXIT Watch TV 4 Press C or c to select Low, Middle, High, or Off. Choices for the back light on the previous page). Using the...
Owners Manual
Page 31
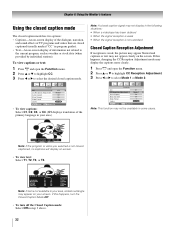
Picture Settings 2/2 Black Strech MPEG NR CableClear DNR Color Temperature On High Auto Cool MENU Back EXIT Watch TV 4 Press C or c to select the mode you to highlight CableClear DNR. Mode Picture Quality Cool blueish Medium neutral Warm reddish To select the color ..., and Warm), as described in the menu. Picture Settings 2/2 Black Strech MPEG NR CableClear DNR Color Temperature On High Auto Cool MENU Back EXIT Watch TV 4 Press C or c to Preference in ColorStream, HDMI or PC mode, the words "CableClear DNR" will change the color temperature, the picture mode ...
Picture Settings 2/2 Black Strech MPEG NR CableClear DNR Color Temperature On High Auto Cool MENU Back EXIT Watch TV 4 Press C or c to select the mode you to highlight CableClear DNR. Mode Picture Quality Cool blueish Medium neutral Warm reddish To select the color ..., and Warm), as described in the menu. Picture Settings 2/2 Black Strech MPEG NR CableClear DNR Color Temperature On High Auto Cool MENU Back EXIT Watch TV 4 Press C or c to Preference in ColorStream, HDMI or PC mode, the words "CableClear DNR" will change the color temperature, the picture mode ...
Owners Manual
Page 32
...stations). If this happens, turn the Closed Caption Mode Off. • To turn off the Closed Caption mode: Select Off in step 3 above. 32 Giant pandas eat leaves. Chapter 6: Using the Monitor's features Using the closed caption mode The closed caption mode has two options: • Captions-...closed caption mode. Function CC CC Reception Adjustment Auto Aspect Blue Screen Side Panel Locks C1 Mode 1 On On 1 ENTER MENU Back EXIT Watch TV • To view captions: Select C1, C2, C3, or C4. (C1 displays translation of the primary language in your area.) Function CC CC Reception ...
...stations). If this happens, turn the Closed Caption Mode Off. • To turn off the Closed Caption mode: Select Off in step 3 above. 32 Giant pandas eat leaves. Chapter 6: Using the Monitor's features Using the closed caption mode The closed caption mode has two options: • Captions-...closed caption mode. Function CC CC Reception Adjustment Auto Aspect Blue Screen Side Panel Locks C1 Mode 1 On On 1 ENTER MENU Back EXIT Watch TV • To view captions: Select C1, C2, C3, or C4. (C1 displays translation of the primary language in your area.) Function CC CC Reception ...

Owners Manual
Page 33
... and TruBass) that creates a thrilling surround sound experience with deep, rich bass from SRS Labs, Inc. 33 See "Using the closed caption mode" on page 32 for more information on closed caption modes. To adjust the WOW™ settings: 1 Press Y and open the Audio menu. 2 Press b or B to ... mode is set the volume to adjust (Bass, Treble, or Balance). Bass Treble Balance WOW StableSound Audio 50 50 0 ENTER On MENU Back EXIT Watch TV 3 Press C or c to adjust the item. To select the desired bass expansion level (Off, Low, or High). Chapter 6: Using the Monitor's features ...
... and TruBass) that creates a thrilling surround sound experience with deep, rich bass from SRS Labs, Inc. 33 See "Using the closed caption mode" on page 32 for more information on closed caption modes. To adjust the WOW™ settings: 1 Press Y and open the Audio menu. 2 Press b or B to ... mode is set the volume to adjust (Bass, Treble, or Balance). Bass Treble Balance WOW StableSound Audio 50 50 0 ENTER On MENU Back EXIT Watch TV 3 Press C or c to adjust the item. To select the desired bass expansion level (Off, Low, or High). Chapter 6: Using the Monitor's features ...


